|
Listen to this blog
|
AirTest is a user-friendly UI Automation framework that is used to test Mobile Games and Apps. So if you are a newcomer to automated testing or mobile game testing, AirTest will be a quick and easy UI automation testing framework that you could use. As one of the leading mobile app testing services provider, we have found AirTest to be a valuable tool in many cases as it works on a write once, run anywhere strategy. Meaning, AirTest provides cross-platform APIs that enable you to execute your code on multiple platforms like Windows, Android, and iOS. AirTest works based on image recognition technology to locate UI elements so that you can automate games and apps without injecting any code. AirTestIDE helps to create and execute the code in a user-friendly way, and it supports a complete automation workflow so that we can easily create -> run -> report.
Now that you have been introduced to the unique features of AirTest, let’s explore more about AirTest and find out how you can start using it.
Scripting Language:
NetEase is the creator of AirTest, and the core aspects of the AirTest project are two frameworks, namely AirTest and Poco. These are third-party libraries of Python, so the scripts written using these tools are essentially normal Python scripts. So you may need to learn some Python grammar in advance.
What about Selenium?
AirTest Supports automated script recording, one-click playback, and good reporting, which makes testing so much easier. In addition to having such stand-out features, AirTest also has a plugin for Selenium that gives you the ability to record and edit the tests for a browser application.
Once you set up the path to the Chrome driver, you can record or directly write the code for the selenium test automation script .
Pre-requisites:
- Have some basic understanding of automation testing.
- Python2.7 & above Python3.3+
- Prepare an integrated development environment, which can be our AirtestIDE, or any code editor like, Pycharm, etc. In this blog, we have used AirtestIDE and Pycharm for explanation purposes.
- Game or app that you want to test.
Installation Process of AirTest:
If you need to use the GUI tool, you can download AirTestIDE from the official Airtest page.
Installing as python package:
If you use a code editor like Pycharm, you can download python packages from the python interpreter.
Use pip to manage the installation of all python dependencies and the package itself.
pip install -U airtest (windows) For Mac and Linux Platforms you would need to grant the adb execute permission.
#For Mac
cd {your_python_path}/site-packages/airtest/core/android/static/adb/mac
# For Linux
# cd {your_python_path}/site-packages/airtest/core/android/static/adb/linuxchmod +x adb
Connecting a mobile device:
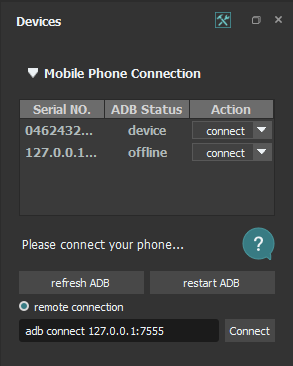
Mobile devices can be connected using a USB cable or by providing the device’s IP address and port number. AirtestIDE supports both methods.

Connecting via USB:
- Connect the phone to your system.
- Click the refresh ADB button to display the connected devices.
- When the device becomes ready to connect, the ADB status is turned to “Device”. Now you can click on the ‘Connect’ button for the device screen to appear.
Connecting via Remote:
- Get the details of the device (IP address and Port Number).
- Enter the details in the remote device field and click on the ‘Connect’ button in the remote connection area, the device screen will appear.
How to launch the application using AIRTEST in Pycharm:
- As you have already installed the Airtest package, you have to import airtest.core.api
- Using the connect_device API, you can connect to any android/iOS device or windows application.
- Then perform the simulated input to automate the game or the app.
- DO NOT forget to make assertions of the expected result.
Example Code:
from airtest.core.api import *

from poco.drivers.unity3d import UnityPoco

poco = UnityPoco()

# connect an android phone with adb
init_device("Android")
# or use connect_device api
# connect_device("Android:///")

start_app("com.demoapp.panel2")
Code Explanation
A simple explanation of the above code is as follows,
- init_device: Initializes device if not yet initialized and sets as the current device. (It returns the device instance).
Example: init_device(“Android”)
- start_app: Start the target application on device
Parameters:
Package – the name of the package to be started, e.g. “com.demoapp.panel2”
Performing Action Statements in AIRTEST:
Just by using a set of commands, we can easily perform various actions on the device. Let’s take a look at these statements one by one.
1. touch(v, times=1)
This statement can be used to perform the touch action on the device screen.
Parameters:
v – the target that has to be touched, either a Template instance or the absolute coordinates (x, y)
times – the number of touch actions that should be performed.
2. Swipe(v1, v2)
The swipe action is used to slide from one location to another location, and the above statement can be used to perform the swipe action when needed.
Parameters:
v1 – the start point of the swipe, either a Template instance or absolute coordinates (x, y)
v2 – the endpoint of swipe, either a Template instance or absolute coordinates (x, y).
3. Wait(v)
Wait to match the Template on the device screen.
Parameters:
v – the target object to wait for, Template instance
4. Exists(v)
This statement can be used to check whether the given target exists on the device screen. If the statement returns to be ‘False’, then it implies that the target was not found. If the target was found, then it returns the coordinates of it.
Parameters:
v – the target to be checked.
5. text(text, enter=True)
The above statement is used to input text on the target device. It is crucial to verify if the text input widget is active in the first place.
Parameters:
text – input text
enter – Enter key event after text input, default is True. If it is false, then it is doesn’t move to the next input field.
6. AirTest provides a dedicated assertion statement for us to verify the test script:
1. assert_exists(v, msg=”)
Assert target exists on the device screen.
Parameters:
v – target to be checked.
msg – short description of assertion, it will be recorded in the report.
2. assert_not_exists(v, msg=”)
Assert target does not exist on the device screen.
Parameters:
v – target to be checked
msg – short description of assertion, it will be recorded in the report.
Capture Screenshot with AIRTEST:
1. snapshot(filename=None, msg=”, quality=None, max_size=None)
This is a very useful feature that takes a screenshot of the target device and saves it to the file.
Parameters:
filename – the name of the file where to save the screenshot.
msg – a short description for the screenshot that will be recorded in the report.
quality – the image quality, should be an integer in the range of 1 to 99, the default value is 10.
max_size – the maximum size of the picture, e.g 120
A complete Test Case:
Now that you know about the common statements used in AirTest, you will be able to implement them in a simple test case with a small piece of code. Here’s the test case,
- Open the Application to be tested.
- Log in to the application.
- Verify the Home screen of the application.
Sample Code:
from airtest.core.api import *
from poco.drivers.unity3d import UnityPoco
poco = UnityPoco()
# connect an android phone with adb
init_device("Android")
# or use connect_device api
# connect_device("Android:///")
start_app("com.DemoApp.panel2")  # launch the application
wait("LoginScreen.png")  # waiting for the login screen
exists(Template("LoginScreen.png"))  # Verifying the login screen exists
touch(Template("DBToken.png"))
text("Demo.test.com", enter=True)
touch(Template("UserName.png"))
text("Codoid2", enter=False)
touch(Template("Password.png"))
text("C0doid", enter=False)
touch(Template("Btn_Connect.png"))
assert_exists(Template("HomeScreen.png"), "Verified Home Page")
Code Explanation:
Let’s break down the above code so that you will have a clear understanding.
- start_app(“com.DemoApp.panel2”) – It will start the provided application.
- wait(“LoginScreen.png”) – This line will wait until the provided image becomes visible.
- exists(Template(“LoginScreen.png”)) # Verifying the login screen exists – This line will verify if the provided image is present on the screen.
- touch(Template(“DBToken.png”)) – It will click the DBToken Input field so that we can enter our input values.
- text(“Demo.test.com”, enter=True) – It will enter the input values into the field.
- touch(Template(“UserName.png”)) – It will clicking the UserName Input field.
- text(“Codoid2”, enter=False) – This line will enter the input values into the field. If the key event is “enter = False”, it implies that it should not focus on the next input field. If it is “True”, then it implies that the focus should move to the next input field. This makes it unnecessary to check if the input field is active enabling us to directly enter the values.
- touch(Template(“Password.png”)) – In the above code the key event I entered is “False”. So it doesn’t focus on the next input field as explained above and so I have clicked on the input field.
- text(“C0doid”, enter=False) – This line will enter the input values into the field
- touch(Template(“Btn_Connect.png”)) – Here I am clicking the ‘Login’ button to log in to the application.
- assert_exists(Template(“HomeScreen.png”), “Verified Home Page”) – This line is used to verify if the Home screen is present or not.
Conclusion
We hope this blog article has fulfilled its purpose of introducing you to AirTest in an enjoyable manner. It doesn’t matter if you are just starting out with automation testing or if you are an expert at it, AirTest will always be a valuable asset to have in your career. As one of the best game testing companies, we will be sharing more of such resourceful blogs in the future. So make sure to subscribe to our blog. Got thoughts to share about AirTest or this blog? Head over to the comments section and share your thoughts.


Comments(0)