by admin | Oct 26, 2021 | Automation Testing, Blog, Latest Post |
Releasing software multiple times into production in a day to deploy the new features/fixes with high quality will need an automation testing setup in all the stages of your delivery pipeline. In DevOps, you have to automate as much as possible to enable continuous testing. So when a product is getting deployed into production more frequently, you have to test the product continuously. For you to proactively search for quality issues, continuous testing has to be enabled across all stages of your delivery pipeline. Since software Test Automation is the key enabler of Continuous Testing, we will be taking a look at the 6 steps that can help you achieve Continuous Testing.
Treating Test Code as Production Code
Whenever a change happens in the product, you have to update your test code to accommodate the change. Let’s say you have to make a change on a common page/screen, your test automation framework should enable you to update the change in that one place instead of updating all the scripts.
Implementing the best practices and design patterns in test automation ease script maintenance. So you have to design your framework in such a way that any script change can be added to the test suite quickly without any hassle.
Kick-off Test Execution for Every Code Commit
Every code commit to version control should kick off automated unit & acceptance tests. When you deliver fast, you will also be in need of quick feedback for the changes or fixes that you have made. Lack of code commit validations will lead to eventual quality issues and regression defects.
Test Automation Framework
You can’t just build the entire framework and immediately start the script creation for Continuous Testing. We have to use the Acceptance Test-Driven Automation (ATDA) approach to develop an automation testing framework. ATDA enables you to write automated test scripts from the very first day instead of waiting for the framework development phase to be completed.
In the past, automation testers used to spend at least two weeks, or even a month in certain cases to develop the test automation framework. The script development itself would begin only after that. So in order to achieve Continuous Testing, you have to start the script development from day one, and then go forward with the product development.
How can we develop scripts without a framework?
Let’s say your team is comfortable with Java. You can use JVM-Cucumber, Selenium, Maven, Appium, and IntelliJ Community edition to start writing automated test scripts from day one. If a script needs a new framework feature, you first have to develop the feature and complete the script. That is how you can evolve the framework and not hold up the script development during the framework development.
Avoid & remove Flaky Tests from CI
If an issue messes with the DevOps pipeline, the entire team should focus on the issue and fix it immediately. Similarly, if a script is flaky, it will make the pipeline unstable. Automation Testing Services is our core service, and we know for a fact that you’ll need a highly skilled team that follows the best practices and uses proper object locators to avoid flaky tests and achieve Continuous Testing.
So if some of your tests are flaky, you must quarantine, schedule, and run them separately, and bring them into the delivery pipeline only when it is fixed and stable.
Test Data Generation
Test data plays an important role in UI, Functional, Non-functional, and Integration Testing. So you have to park adequate test data for test execution. Make sure to avoid failures that can be caused by invalid or missing test data. You should also have an automated system that allocates the required test data and cleans up the consumed data during execution.
Setup the Tests for all the phases
Continuous Testing should be set up in all phases of your delivery pipeline starting from development to production. For example, if a feature is being actively used by the end-users on a daily basis for a particular period of time. You can write an automated test script to check the feature’s usage from the production monitoring data to proactively check for any quality issues. So make sure you don’t just focus on smoke and regression testing as you have to set up tests for different stages in the pipeline.
Conclusion
Being one of the best automation testing service providers, we, at Codoid, follow strict scripting practices and design patterns to avoid flaky tests and have helped many clients to enable Continuous Testing in their DevOps pipeline. Fast feedback is critical for DevOps. You also shouldn’t delay test code development. You have to add the test code as and when new features are deployed into the pipeline.

by admin | Oct 25, 2021 | Exploratory Testing, Blog, Latest Post |
Exploratory testing is one of the types of testing that will highly benefit from the QA’s or tester’s experience, expertise, instinct, and intuition. Unlike many other types of testing, there will be no scripted and defined steps one would have to follow. The implication here is that the person performing the tests will either make or break the results as they will be flying blind without any guidelines to adhere to. So if you are a QA professional looking to make a mark, then we recommend you to master these exploratory testing techniques we have listed in this blog. It will help you become better equipped to perform effective exploratory testing. We will start out with the basic techniques and then explore the more high-level techniques as well.
To be clear, exploratory testing may not need a prescribed method, but it definitely will require a goal or objective based on which we can use our own skills to get the job done. We will not be creating a fully defined script, but we should create charters. Charters are guiding statements that will help us avoid any kind of confusion. For example, the charters will be used to define aspects like what function has to be tested, who it has to be tested by, and what type of approach has to be used. If you are fairly new to exploratory testing, you could read our quick guide about it.
User Stories
User stories also known as user scenarios can be termed as a description of a user’s workflow when using one of the application’s functions. To put it in simple words, it’s putting yourself in the shoes of the end-user to think of the possible steps the user would have to go through to use the intended feature. The more and more you familiarize yourself with creating such user stories, the better your critical thinking will become and help you in assessing the diverse workflows of various users.
You also have to make sure not to mix app functionalities with the user’s needs. For example, if you are testing an app that can be used to sell used products, you should test it from the perspective of a person listing the product and from the perspective of a person trying to buy that product. Make sure you don’t mix both perspectives just because the app’s features allow you to. Stay focused on each user’s story and not deviate away.
Test New Waters
Testing with the same type of approach you would use doing regression testing will not help you perform good exploratory testing. You would have already tested if the expected results are achieved in a logical way. So make sure you explore new unorthodox ways of doing the same process. By doing so, you will go beyond just confirming the functions. For example, let’s assume yourself to be a user who is trying to book a flight ticket in a hurry. In the heat of the moment, such a user could make a lot of mistakes a regular user may not. So those possibilities could be explored to unearth new bugs.
But it is also crucial to not indulge in highly unlikely scenarios and waste your time. This is where your experience and expertise will come into play. You should be able to assess where possible flaws could be when testing the application. But how can you do that? Let’s find out in our next Exploratory Testing Technique
Mind Maps
Visually represented data will always help you analyze your options better to take better decisions, or even understand the process more easily. So when you use mind maps during exploratory testing, you will be able to identify functionality gaps. Though you will not be able to reap the full benefits overnight, you will be on the right path towards growth. Once you become well worse at using mind maps to find functionality gaps, you would have the potential of identifying issues even before they become bugs. As a leading manual QA testing services provider, we always try to incorporate mind maps and visual aids wherever possible to make our testing more organized and effective.
Improve Your Integration Testing Skills
One skill that will come in very handy when you expand your coverage with exploratory testing is your integration testing skill. Let’s say you are testing an application that maintains inventory and you have used your mind map to find out that there might be an error with the price adjustment in existing stock. So you would have to see if that impacts your billing or just the valuation of the stock. Since you would have to test both the inventory functionality and billing functionality, it can be understood that integration testing is very important.
An End-to-End Approach
You should go beyond just the front-end and bring the back-end processes into the picture as well. There might be third-party integrations that are key to certain functionalities. In that case, check how and where the application saves the data to its database and calls it whenever necessary. APIs are widely used for data feed purposes and since data feeds happen at fixed intervals, target those times and check them for failures. Though this approach requires a lot of knowledge, it is something that you can’t simply afford to miss. So you should enhance your understanding of how an application works by making analyzing it from its core.
Conclusion
Exploratory testing without any doubt does require time for one to master. As one of the best manual testing companies, we believe that these exploratory testing techniques can boost the rate of growth. You shouldn’t just be focused on obtaining experience, you should be focused on learning as much as possible during that time to get a deeper understanding of the entire process. So you have to be on top of your game to prevail as an exploratory tester over time.

by admin | Oct 21, 2021 | Software Testing, Blog, Latest Post |
User Acceptance Testing is one of the last phases of testing in the software development lifecycle that involves the product being used by the end-user to see if it meets the business requirements and if it can handle real-world scenarios. So it goes without saying that intricate planning and disciplined execution are required as it assures the stakeholders that the software is ready for rollout. As one of the best software testing companies in India, we have vast experience when it comes to performing user acceptance testing. So in this User Acceptance Testing Tutorial, we will be explaining the important factors to consider when performing User Acceptance Tests.
Prerequisites
There are various reasons why user acceptance testing happens at the very end. For starters, we can start only when the application code has been fully developed without any major errors. To ensure that there are no major errors, we should have completed unit testing, system testing, integrated testing, and regression testing as well. The only acceptable errors are cosmetic errors as they don’t affect further processing of the application. The business requirements should also be available to design the test cases accurately. Apart from that, the environment for performing UAT should also be ready. Now that we have covered all the prerequisites, let’s explore how to get the job done.
The Stages of User Acceptance Testing
For an easier understanding of how to efficiently execute UAT, we have split the main process into different stages to indicate the purpose.
Strategic Planning
As in every process, we should start by coming up with a plan to perform UAT. To develop the most effective plan for your project, you should analyze the business requirements and define the main objectives of UAT. This is when you will also be defining the exit criteria for UAT. An exit criterion is nothing but the minimum goals that should be achieved when performing the planned User Acceptance Tests. Exit criteria can be defined by combining the system requirements along with user stories.
Designing effective Test Cases
Once the plan is ready, you will have a clear vision as to what has to be achieved for the business. So we will be using that to design test cases that cover all the functions that needed to be tested in real-world scenarios. You also have to be crystal clear about the expected result of each test and define the steps that have to be followed to get that result. This step doesn’t end here as you will also be needed to prepare the required test data required to perform such tests.
Choosing the right team
There are primarily two ways to go about UAT. Either you can have end-users sign up to beta test your application by making it available to them or you can create your own team. You can either execute it using an in-house team or you can also employ outsourcing software testing options. Irrespective of which way you choose, you have to make sure the right people are on the task. If you are choosing people for your beta program, then make sure they are people from the same demographic as the targeted users of the application. Make sure to check their knowledge of the business and ability to detect bugs as well.
User Acceptance Testing
All the groundwork has been laid for you to start with the tests. So in this part of the User Acceptance Testing Tutorial, we will be focusing on how to perform UAT. Make sure to follow all the steps from your test cases without any deviation. If you wish to test something else in a random manner, do it separately and not while performing a particular test case. Once you start, you will also have to create meticulous records of the results, remarks, and so on from each test. Then only it will be possible for the development team to fix all the bugs and issues that were discovered during the process. Once the bugs are fixed, you can rerun those tests to see if the changes have been made without any issues.
Sign-Off
This step is the final step and the name makes it self-explanatory as well. So once you have verified that the application meets all the business requirements, you can indicate to the team that the software is ready for rollout by sending a sign-off email.
General Tip: Using the right pools is also pivotal in yielding the best results. As a leading software testing services company, we use the best tools to make the process more efficient. Test data management can become a nightmare if you don’t monitor and feed the test data in a frequent manner. We use data management tools to feed all the required test data and remove the hassle from this process. Similarly, we also use bug reporting systems to keep track of all the bugs that were discovered and make sure everything is resolved in the most efficient manner.
Conclusion
We hope that our User Acceptance Testing Tutorial has helped you get a clear picture of the UAT process. Based on your specific project demands, you could make some tweaks to this process. Also, make sure to choose the appropriate tools to get the best results.

by admin | Oct 20, 2021 | Game Testing, Blog, Latest Post |
Preparing a checklist is always a great way to make sure you get maximum coverage in any process, even for testing. As one of the leading game QA companies, we always make sure to prepare well-thought-out checklists that will help us avoid any oversight errors along the way. So we have prepared this comprehensive checklist for mobile game testing that will make sure you don’t let any bug go untraced. We have split this Mobile Game Testing Checklist into various categories like UI, Gameplay, Functionality, and so on. So let’s get started.
Downloading and Installation
Downloading the application to install it on their phone is the very first action the user will do. So let’s start our list with that as well.
- Downloading the application from the store should be supported on both Wi-Fi and mobile networks (3G, 4G, or 5G).
- If at all the downloading process is interrupted, the user should be able to re-download it again without any issues.
- Once the download has been completed, the .apk file must get installed on the device seamlessly without any errors.
- The size of the apk file usually multiplies 3 or 4 times, so make sure it does not occupy too much space or exceed the internal memory of the device.
- Uninstallation is also as important as installation, it must remove the entire game and its data from the device successfully.
- Progress must be kept after reinstalling or updating by making it possible to save the game progress online or offline.
- Reinstalling the game (For example; after the deletion or when overwriting the previous installation) must not trigger any game data files issues.
- Check if the installation path is decided by the OS and if the app is installed in the right location.
User Interface
A clean UI is always mandatory for any application as it is in most cases responsible for giving the user the first impression of the application itself. So everything ranging from the language to the animations and design should be spot on.
- The AUT (Application Under Test) must install in the correct language, (i.e.) the current device language.
- Even if the game language and device language are different, there should not be any issues.
- Apart from that, the user must also be able to change the language from within the Options section.
- The grammar & orthographic rules specific to a language have to be respected.
- You have to make sure that the font is legible even for new users as it has to be easy to read and understand.
- Ensure that the text doesn’t spill out of the screen.
- Since it is a product for the global market, you have to ensure that the appropriate date & time formats are displayed based on the country it is used in.
- It’s not just the date & time, even the number format should be displayed correctly as per that country.
- If the game’s language is set to Arabic, the buttons must be displayed in the opposite part of the screen.
- UI must not depend on factors like the device’s theme or font.
- Not all users will be having the same screen resolutions. So the game should be tested on all the supported resolutions to ensure that the graphics do not get altered.
- Also, many users might connect to larger screens using the HDMI option, so you would have to test that as well.
- There should also not be any scaling issues when the game is launched in landscape or portrait mode.
- The game loading indicator and animations should be smooth.
- You need to test for clipping to ensure that two or more polygons do not overlap and cancel each other out and test that all required overlaps (semi-transparent objects placed over solid color objects/ backgrounds) are appropriate in size, placement, and purpose.
- Once the game launches successfully, we will not directly enter the gameplay. Rather, we would first come to the menu. So make sure it is easy to navigate and fully functional.
Gameplay & Functionalities
Next up in our Mobile Game Testing Checklist, we will be exploring the focus points when testing the core of the game, its gameplay.
- You have to test the different game modes and the various locations or levels in the game.
- You should check the game flow and see if it is progressive and if it correctly unlocks the elements as the levels increase.
- Check the gameplay rules as they should not be too difficult or too simple.
- Collectibles – There should be enough collectibles in the game and there should also be a good variety of collectibles.
- The Scoring mechanism – It should be accurate and simple.
- If there are any cheat codes, then you should get them from the development team and check if they are functional.
- Sound Effects – Check if all the sound effects play correctly at the right moment without any distortion.
- Check the single function mute button for all sounds in-game.
- There should also be two mute buttons that allow separate muting of game music or sound.
- You should also check whether the game is playable without music and sound effects (except for rhythm games).
- Pay close attention to all the collisions in the game and check if there are any incorrect or inappropriate collisions, so the gameplay looks realistic. For this, you will need to move the character through all objects to observe the consequences (collisions, event triggers, or object triggers).
- The high scores of the instant game with no progression should not be saved in the cache so that the high scores are reset to 0 upon the user refreshing the page or reloading the game.
- Test if the auto-save functions work and if the manual save happens correctly as well.
- It is also important to check what happens when multiple control inputs are given at the same time to see how well the game handles it. A perfect example here would be for a racing game where both acceleration and directional control are needed.
Multitasking
As we all know that mobile phones are capable of doing more actions than playing games and that many of us use them mainly for those purposes as well. So the user must be able to seamlessly switch between the game and some other app or functionality of the phone.
- Verify if the volume gets muted when the user switches to any other app.
- The Gameplay should pause when the user switches to another app as well.
- You must also check if the Gameplay resumed from where the user left off before switching away from the game.
- Make sure the Gameplay gets paused when the user receives a phone call.
- Check if the Gameplay resumes once the user ends the call or if the user rejects the call.
- Verify if the user is able to switch to the messaging app using the notification when the user receives a message.
Multiplayer game
Multiplayer games have always been a favorite for many gamers and with mobile gaming, people just took it to the next level. Here you would have to verify the different types of multiplayer games or rounds. For example, you could play as a team against the computer or play against each other as well.
- So start by checking out if the login and logout functionalities are working well. Login also includes the new user sign-up process.
- Verifying the account using a verification email is also important to ensure that there is no foul play.
- You should also check the player profile’s image, the naming capabilities, and so on.
- It doesn’t matter if you are up against the machine or man, you should be able to challenge, decline, and receive challenges.
- Check if the user statistics like winning, losing, or even draws are being recorded correctly. We should also check the score constantly.
- You should also check the performance of the multiplayer mode as lagging performance can be a big deal-breaker for many.
- Make sure to see if the time-out functionalities work and also if the forfeit or quit options work.
- With the rise of social media, social integrations should also be tested by checking the users can share results, achievements, and so on.
- The sharing feature should be checked across the major platforms.
- If at all there is a chat feature within the game, then make sure to check the vital functionalities like character type, limit, and notifications as well.
Application and Data Storage
The AUT should be tested for all such features listed in our Mobile Game Testing Checklist. But more importantly, we should also make sure that the game is usable across a wide range of mobiles. Here are a few key pointers to focus on.
- Power consumption is a big area of concern and we have to check how efficient the game is when it comes to power management.
- During the course of continuous gameplay, there could be high usage of memory and the game must notify the user when the memory goes dangerously low.
- Test the performance of the game across different mobile configurations like the RAM, processor, and so on.
- Safety is also a concern, so all games must encrypt their saved files.
- The AUT must not be present in Running Services once the device has been restarted.
- Make sure the AUT launches without much delay in the correct orientation for gameplay.
- Make sure it is not possible to transfer the offline saved files from one device to another.
Conclusion:
The checklist is the first step towards providing unparalleled game testing services, and we hope this Mobile Game Testing Checklist of ours has been informative. Getting a good checklist ready implies that you start your journey on the right track with the correct intent. But that alone is never enough. So make sure to employ the best professionals and use the top-of-the-line methods to test a game thoroughly without facing any hiccups.

by admin | Oct 19, 2021 | Automation Testing, Blog, Latest Post |
Automation testing is not your departmental goal. Period. So when software testers or automation testers create automated test scripts, they should focus on how the tests will add value to the business or product instead of focusing on increasing the script count. Since analyzing the goals and objectives of automation testing before starting any project is very important, let’s learn about it in this blog.
A Confidence Booster
Automation test executions boost the confidence of your team to release a product. Testing a system manually on multiple browsers & devices is a tiring effort for a tester. Moreover, it is very much prone to errors. Whereas, if rightly done, automation scripts can execute your tests without any deviation. So this ultimately frees up the testers and lets them focus on the problem-solving activities.
In DevOps, there is always a need to automate as much as possible so that the testers can concentrate on Exploratory Testing to unearth bugs, identify new features, and capture edge cases for automation testing. So if there are no application issues, robust and reliable automated tests will run without any hassle, and the passing automated tests will boost the confidence of your team.
Avoid False Positives & Negatives
An automation test script should fail only when there is an application issue. But if your scripts are flaky, you will not be able to reap the benefits of automation testing, and your team will eventually lose confidence in the automated test scripts. That is why we have it in our top 3 objectives of the automation testing list. As a leading automated software testing company, we have seen success in our test automation by following the points.
How to avoid false positives & negatives:
- Recruit talented test automation engineers.
- Train your team to follow the best practices and coding patterns.
- Strictly avoid boilerplate codes.
- Enable the peer-review process.
- Quarantine flaky tests and bring them back to the execution pipeline only if & when they are stable & robust.
- Park the adequate test data required for automated test execution to avoid failures due to invalid data.
You need a highly skilled team to develop robust automated test scripts. We have been providing automation testing services to many of our clients over the years. During this period, we have revived many of the projects that had failed to reap the benefits of effective automation testing. We achieved it by trying to reuse the existing scripts and libraries. But at times, we have thrown away the poorly written automation test scripts into bins. So it is important to keep in mind that if the best practices and coding designs patterns are not followed when creating automation test scripts, you will have to suffer from such scripts forever.
Scripts fail due to invalid test data as well. But feeding the test data before starting the execution is a cumbersome task. In DevOps, automated test executions are kicked off as soon as product changes are pushed into master. So you cannot hold the execution for feeding the test data. Moreover, you will not be able to feed the data a day before the execution if your team is part of the continuous delivery pipeline as they will deliver changes into production multiple times a day.
So make sure to use a test data management tool to upload adequate test data for script executions. Your test automation scripts should be able to pick up the required data from the test data management tool.
Maintenance
When there is a change in the application, you have to accommodate the change in your script as well. If an automated test suite is not changed for a longer period, then it is going to perform the same testing again and again. You should have a process to obtain the below details constantly to keep your scripts up-to-date.
- You should know when a change is introduced in existing functionality.
- Note when a new feature is getting adding to the product.
- Note when an existing feature is removed from the system.
Conclusion
Adding more automated tests to improve coverage is a primary goal of an automation tester. However, if you do it without thinking about the system, goals, and objectives of automation testing, you will be missing out on the many benefits. Automation testing is not an isolated activity and it is pivotal for you to know how your scripting efforts are adding value to the system.
Frequently Asked Questions
-
What are the objectives of Test Automation?
Test automation aims to optimize testing by increasing efficiency, speed, and accuracy, improving test coverage, and enhancing software quality. It achieves this by automating repetitive and time-consuming tasks, reducing time and effort, and ensuring comprehensive test coverage.
-
What are the major benefits of Test Automation?
Test automation allows you to run a vast number of complex and lengthy test cases and brings in the necessary agility to testing which helps it to respond faster and more effectively to changes that would be impractical to run manually. It can enhance software quality by increasing the thoroughness of testing and reducing the likelihood of errors, without manual intervention.
-
What are the Challenges in Automation Testing?
Some of the challenges faced in automation testing are
1. Finding the right tools and frameworks that fit the project's requirements and technology stack.
2. Creating and maintaining reliable and efficient test scripts that can keep up with the constantly evolving application can also be difficult.
3. Ensuring that automated tests are accurately mimicking user behavior and covering all edge cases can be a time-consuming and complex task.
-
What is the future of Automation Testing?
Automation testing is evolving rapidly and is expected to become more sophisticated and intelligent with the integration of artificial intelligence and machine learning. This can help create self-healing test scripts, improve test coverage, and increase the accuracy and reliability of test results. As companies increasingly adopt agile methodologies, cloud-based testing solutions, and continuous delivery, automation testing will remain a critical component of software development processes, ensuring high-quality releases and faster time-to-market.

by admin | Oct 18, 2021 | Selenium Testing, Blog, Latest Post |
Selenium Grid is a concept that was introduced by the Selenium team to run Tests in remote machines by executing the tests across different Operating Systems, browsers, machines. As one of the best software QA companies, we always focus on ways to make our testing process more efficient. Selenium Grid is a great option to do just that as it helps to reduce the test execution time. So in this blog article, you will be learning about the Selenium Grid setup and tell you how you can use it.
Selenium Grid is an enhancement to the Selenium Web driver. The grid uses the Web driver’s code for executing the test scripts. The Grid contains a single Hub and one or more nodes.
We use Selenium Grid to run all the test scripts, present in the framework on a remote computer. In Selenium Grid, there are two types of systems, the first is HUB, and the other is a NODE.
Firstly, we will look into what a HUB is, and a few important points you should know.
Hub:
- It is a centralized place to which all the other nodes are connected.
- There will be only one Hub.
- Tests will be loaded and executed in the Hub.
Now, let’s take a few important points about NODE.
NODE:
- A node is a device that has been connected with the Hub. A node may be a Mobile, Tablet, Laptop, or Computer with different Operating Systems and browsers.
- The number of nodes will vary depending upon the testing requirements.
- Execution of tests will be displayed in the nodes.
Now that we have seen the basics, let’s explore the 3 main steps to use Selenium Grid, provided you have Selenium in your system. If you don’t, you can visit their official website to download the .jar file and place it in your desired drive before you proceed.
1) Start the Hub
2) Start the Node
3) Execute our Framework using remote WebDriver
1. Start the HUB
Open the command prompt on the exact location where you have kept the selenium-server jar file and type the following command:-
java -jar ./selenium-server-standalone-3.141.59.jar -role hub
It should show the following message-
Nodes should register to http://192.168.1.2:4444/grid/register/
Clients should connect to http://192.168.1.2:4444/wd/hub
Selenium Grid hub is up and running
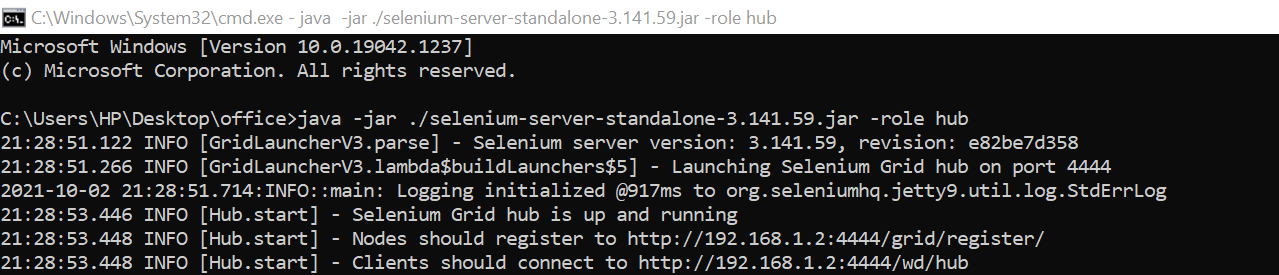
The default port number for the HUB is 4444.
2. Start the NODE
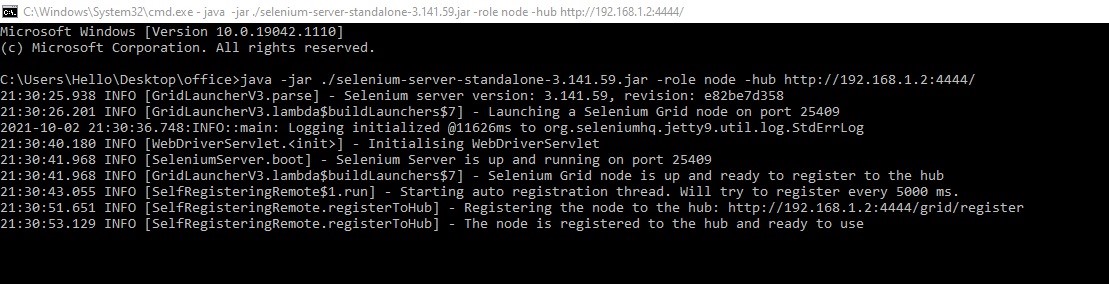
Since the hub is up and running now, copy the Selenium-server jar file and paste it into the desired drive of the remote computer where you want to run the test script. Once again open the command prompt on the exact location where you have that selenium-server jar file and type the following command.
java -jar ./selenium-server-standalone-3.141.59.jar -role node –hub
http://192.168.1.2:4444/
Note: Copy the hub URL from your HUB system.

It should show the following message-
Registering the node to the hub: http://192.168.1.2:4444/grid/register
Now the node is registered to the hub and ready to use.
Also, you will get the following message on your HUB system.
Registered a node http://192.168.1.5:25409
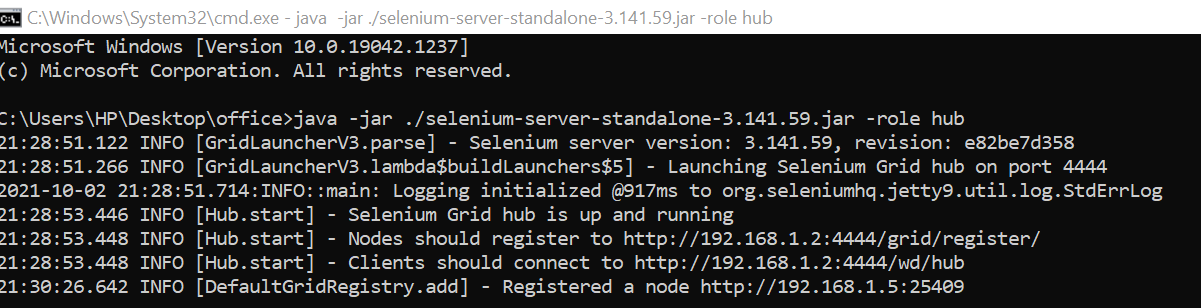
The default port no for a node is 25409.
3. Execute the Framework using the remote WebDriver
Now that both the main components of the Selenium Grid Setup are ready, it is time to execute the test scripts on a remote computer. We have to use the remote web driver class in order to specify which browser should be opened on the remote computer. We should use the desired capability class.
package Blog;
 import org.openqa.selenium.WebDriver;
 import org.openqa.selenium.remote.DesiredCapabilities;
 import org.openqa.selenium.remote.RemoteWebDriver;
 import org.testng.annotations.*;
 public class Blog_Demo
 {
     WebDriver driver;
     @BeforeMethod
     @Parameters("browser")
     public void Beforemethod(@Optional("chrome") String browserName)
     {

if(browserName.equalsIgnoreCase("firefox")) {
             System.setProperty("webdriver.gecko.driver","C:\\Users\\HP\\Desktop\\office\\geckodriver.exe");
             driver= new RemoteWebDriver(DesiredCapabilities.firefox()); }
         else if(browserName.equalsIgnoreCase("chrome")) {
             System.setProperty("webdriver.chrome.driver","C:\\Users\\HP\\Desktop\\office\\chromedriver.exe");
             driver= new RemoteWebDriver(DesiredCapabilities.chrome()); }

driver.manage().window().maximize();

driver.get("https://codoid.com/"); }
     @Test
     public void Sample1()
     {
         System.out.println(driver.getTitle());
     }
     @AfterMethod
     public void Aftermethod()
     {
         driver.close();
     }
 }
For executing test scripts in the NODE system, simply execute the test script from the HUB system.
Once you run the script in the Hub System, you will get the following message in the hub system.

You will get the following message in the node.

If at all you want to check whether the server is running or not, you can type the following command in the browser.
http://localhost:4444/grid/console
Conclusion
We hope you have found this Selenium Grid Setup blog of ours informative. Selenium Grid is a very resourceful tool that every tester has to know about. This is a very basic blog that introduces you to Selenium Grid. Explore our other blogs to learn more about it as it can be instrumental in reducing a lot of batch execution time. Its cross-platform capabilities have always come in handy to deliver the best agile test automation services.