by admin | Dec 22, 2021 | Accessibility Testing, Blog, Latest Post |
Performing comprehensive web accessibility testing for any website is no easy task. There are so many guidelines to be followed to become compliant with standards like WCAG. But at the same time, you have to at least make sure to make your website is accessible on a basic level. So we have created this basic Website Accessibility Testing Checklist with reference to the easy checks issued by W3C. Though they are not definitive methods, it’s definitely a great place to start and evolve from that point onwards.
A Basic Website Accessibility Testing Checklist
- Page Title and Content Headings
- Alt Text and Multimedia Alternatives
- Moving and Flashing Content
- Text Size and Contrast ratio
- Keyboard access
Page Title and Content Headings
Since Page Titles appear in search results, browser tabs, bookmarks, and so on, make sure to make it clear and unique. See if the main content is properly visible in all these places and use a screen reader to see if it read properly. Unclear page titles will make it very hard to navigate across different pages.
Using headings in a random order will make it hard for the user to understand the structure of your content. So in addition to confusing regular readers, it will also confuse the screen readers and cause them not to function properly.
Alt Text and Multimedia Alternatives
Alt Text and Multimedia Alternatives are key points in our Website Accessibility Testing Checklist as websites are now filled with a lot of visual content. Visually impaired users won’t be able to see any graphical content that you use on your webpage. So if you are adding an image, make sure to add appropriate alt text to the images as that will help the user understand the purpose of the image using words. Similarly, make sure to add closed captions and transcripts for videos based on the type. The media shouldn’t always start to play as soon as the page opens. Even if it does, then make sure to make it easy to pause it by adding keyboard controls for the playback.
Moving and Flashing Content
Carousel posts on websites have become a very commonly used feature. Flashing contents are instrumental in helping certain content stand out from the rest. But you have to make sure that the content doesn’t flash more than 3 times every second as it might cause seizures. Moving content and carousel content shouldn’t be too rapid that it becomes incomprehensible for your users. Similar to the media controls, the user must also be able to control the moving content to prevent the features from becoming a distraction.
Text Size and Contrast ratio

It is always a good idea to keep your text size fairly big as content with small text sizes rarely works. Even if you keep the text size big enough and fail to use proper text and background colors, the text will become hard to read. You should also test it from the perspective of a person with color blindness to see there are no contrast issues. There is even a tool called the Color Contrast Analyzer that you could use to check if the contrast ratio will pass the required standards. Few people will be able to read the content only when the text is enlarged beyond the regular size. So make sure there is enough spacing in places you add the text and not cram in too much content. Keep it simple, yet catchy.
Keyboard access
We have added this factor to our Website Accessibility Testing Checklist as it is one of the most overlooked aspects. Not everybody will be able to navigate through your website using a mouse. So make sure it is possible to navigate to the different elements like drop-down lists, text fields, menus, and so on. The labels used for text boxes should convey the requirement and be on the left side of the box for left-to-right languages. Make sure to highlight mandatory fields with the asterisks (*) sign and not just color to differentiate it.
Why is Accessibility Testing Mandatory?
So this is a basic Website Accessibility Testing Checklist that you can concentrate on, to begin with. But they are in no way sufficient to get a proper standardization as your website might pass all these checks and still have major accessibility issues. If your website isn’t accessible, there are possibilities of getting sued based on the part of the world you are in. Why go through all the hassle and be at risk when you can simply outsource the web accessibility testing to one of the best web accessibility testing service providers like us? Making your product accessible is no longer a choice you can ignore as it is an important part of making your product available to a wider audience and enhancing the product’s overall usability.
by admin | Dec 21, 2021 | Automation Testing, Blog, Latest Post |
In today’s world, success is heavily dependent on the pace at which we work. So automating repetitive work is one of the quickest ways to attain functional performance. But if you find automation to be daunting, you might have a negative approach of just manually doing the tasks over and over again to enter an endless loop of wasting time. So if you are someone who uses Google Sheets regularly to create and maintain data, this blog will be a lifesaver for you. As a leading automation testing services company, we are focused on dedicating our time to our core service by automating repetitive tasks. So in this blog, we will be exploring how to achieve Google Sheet Automation and get the job done in no time. Without any further ado, let’s get started.
The pace isn’t the only advantage that comes with automation. Since repetitive tasks are prone to oversight and manual errors, we will be able to avoid such issues by implementing automation. Now that we have established what we are targeting to achieve, let’s first see how to do it. We will be making use of the available Google APIs to examine and add data in Google Sheets using Python. So you wouldn’t have to spend hours of your time extracting data and then replica-pasting it to other spreadsheets.
Prerequisites:
In order to achieve Google Sheet Automation, you’ll be needing a few prerequisites such as
- A Google account.
- A Google Cloud Platform project with the API enabled.
- The pip package management tool
- Python 2.6 or greater
How to Achieve Google Sheet Automation using Google API Services?
Here are the few steps that need to be followed to start using the Google sheets API.
i. Create a project on Google Cloud console
ii. Activate the Google Drive API
iii. Create credentials for the Google Drive API
iv. Activate the Google Sheets API
v. Install a few modules with pip
vi. Open the downloaded JSON file and get the client email
vii. Share the desired sheet with that email
viii. Connect to Google Sheet using the Python code
Create a project on Google cloud console
In order to read and update the data from Google Sheets in Python, we will have to create a Service Account. The reason behind this need is that it is a special form of account that can be used to make authorized API calls to Google Cloud Services. Almost everybody has a Google account today. In case you don’t, make sure to create one and then follow all the steps and comply with the requirements to create a Google Services account.
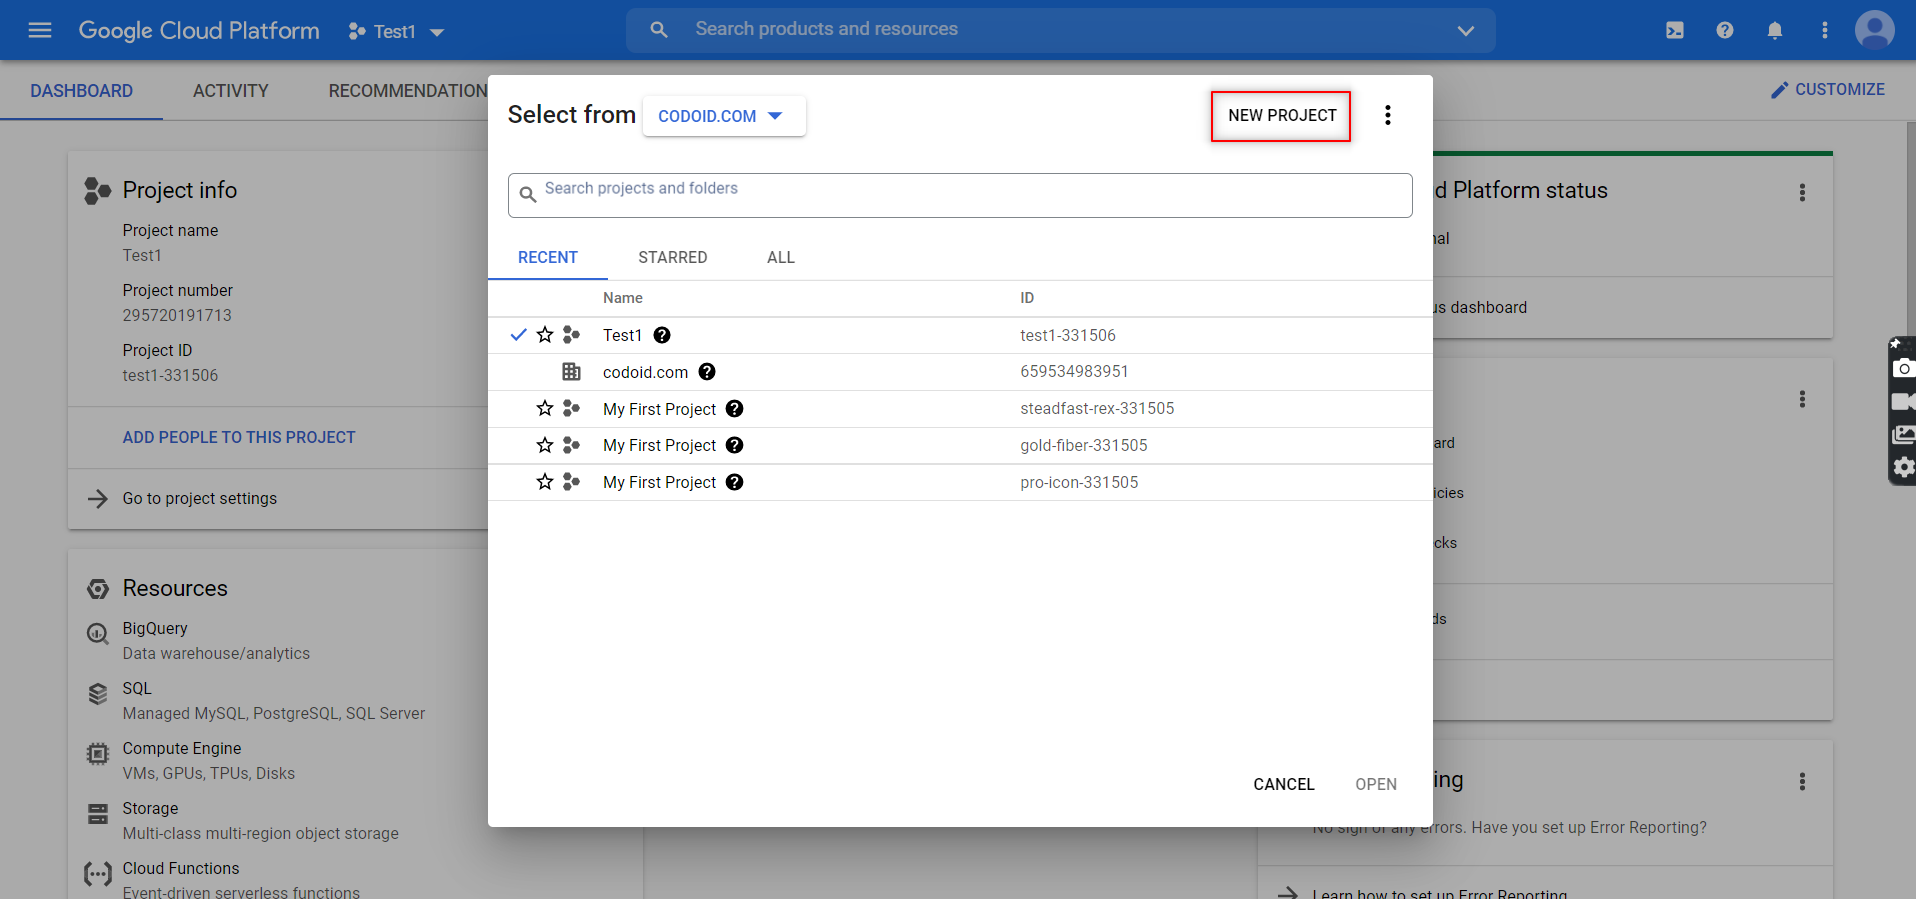
1. You will be able to create a new project by going to the developer’s console and clicking on the ‘New Project’ button.
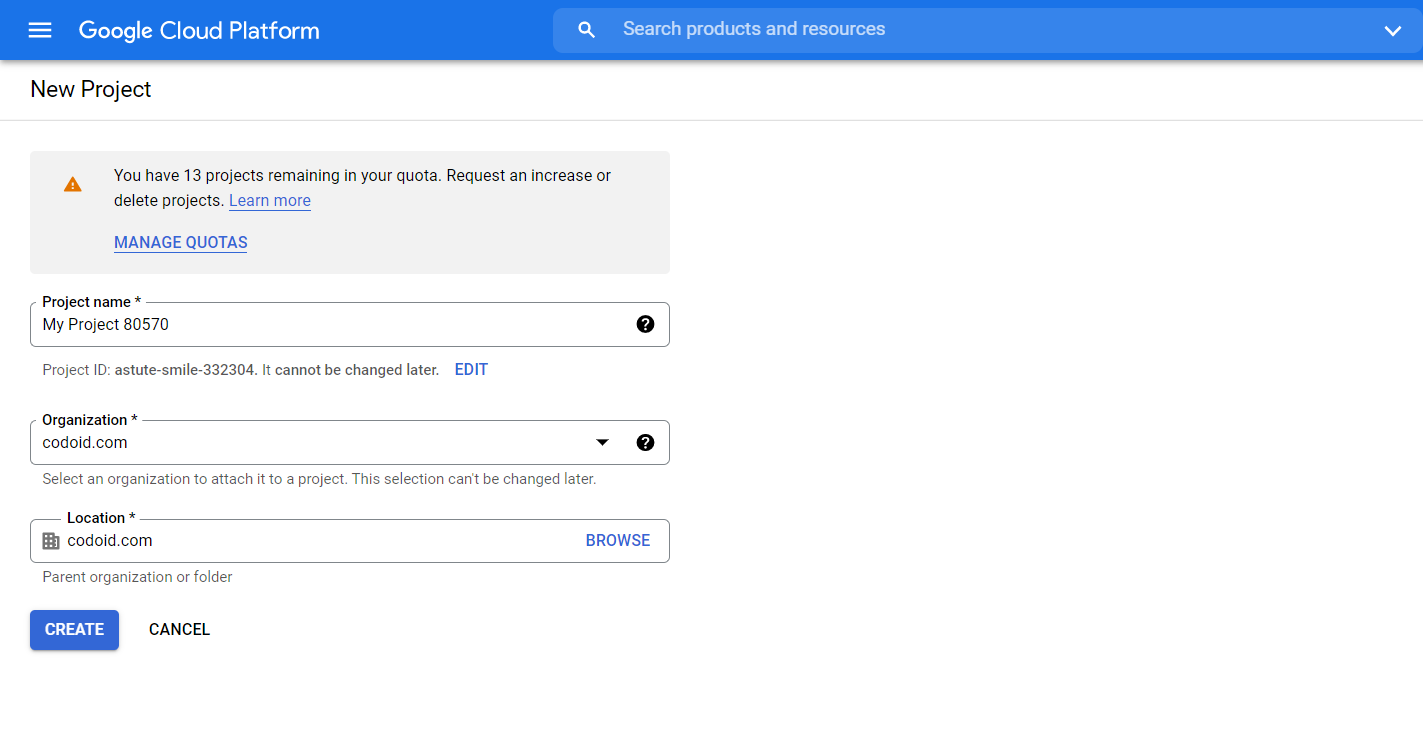
2. You can then assign the project name and even enter the organization name if you prefer to. Once you are done, click on the ‘Create’ button.
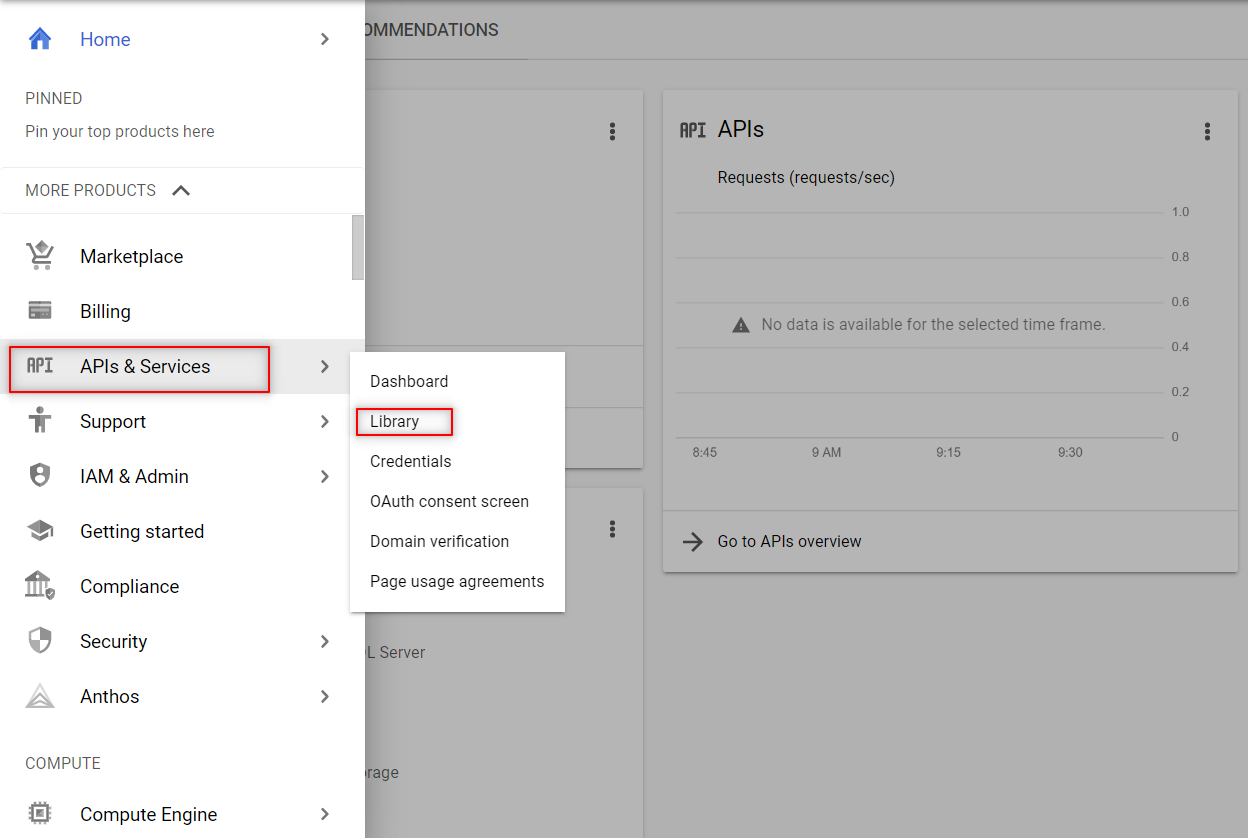
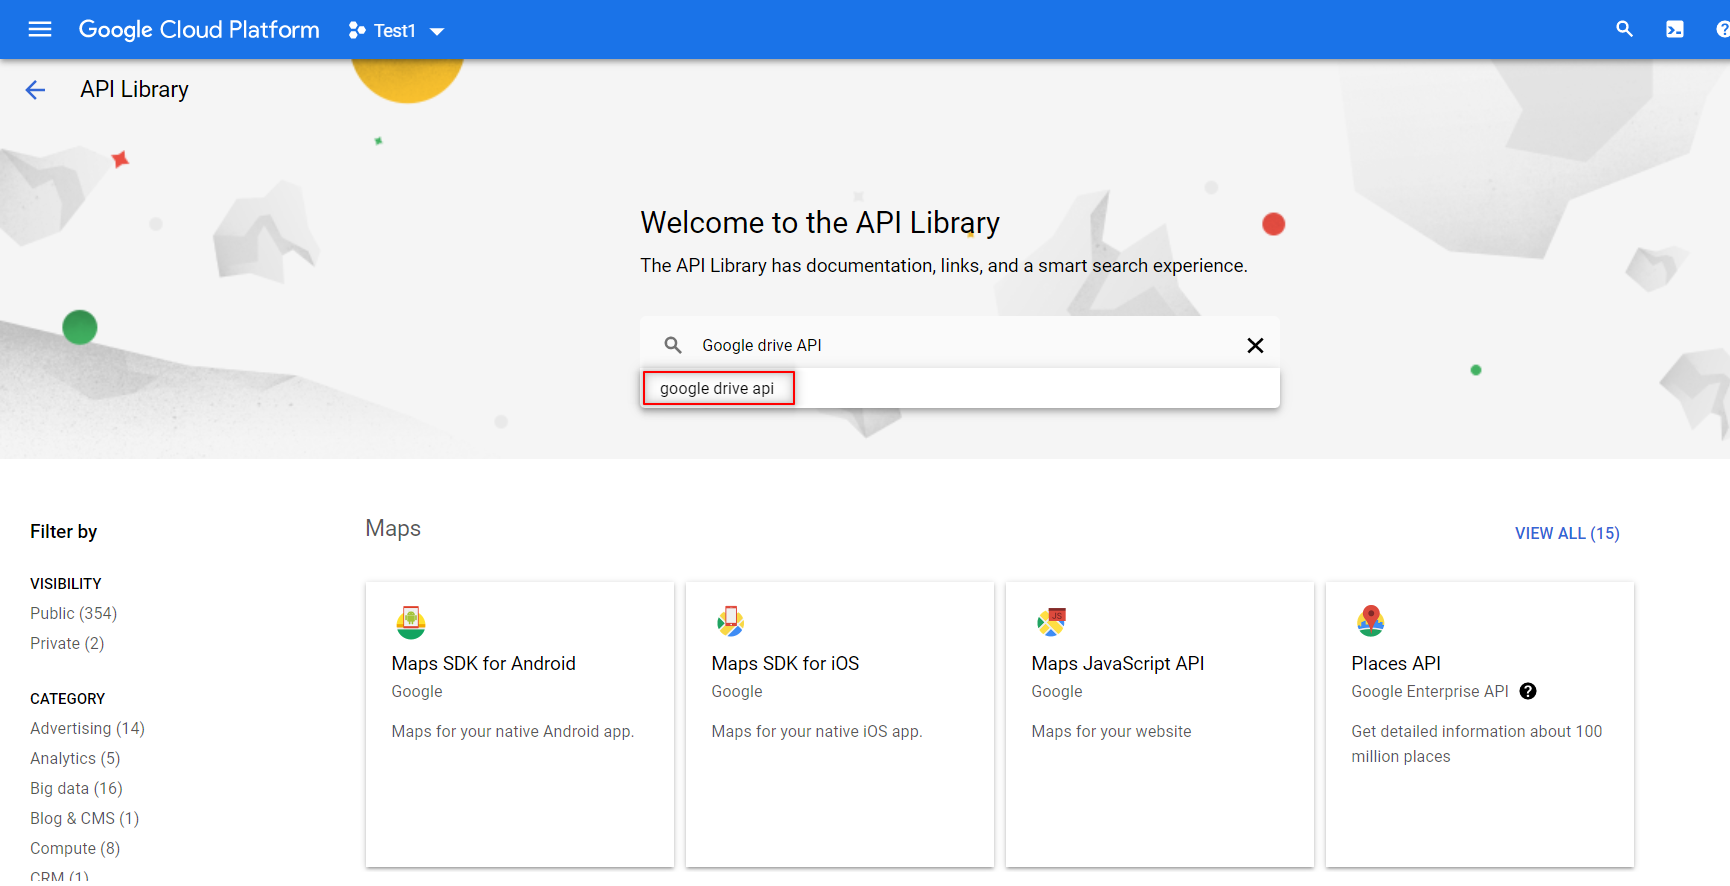
3. The next step after creating the project would be to enable the APIs that we require in this it. To access the different API options provided by Google, you have to click on Menu -> APIs & Services -> Library.
4. You have to search and enable the following two APIs from the library as shown below. You can enable them by just clicking on the enable button that appears.
- Google Sheets API
-
- Google Drive API
The Google Sheets API is the important one that will enable you to read and regulate the data in Google Sheets.
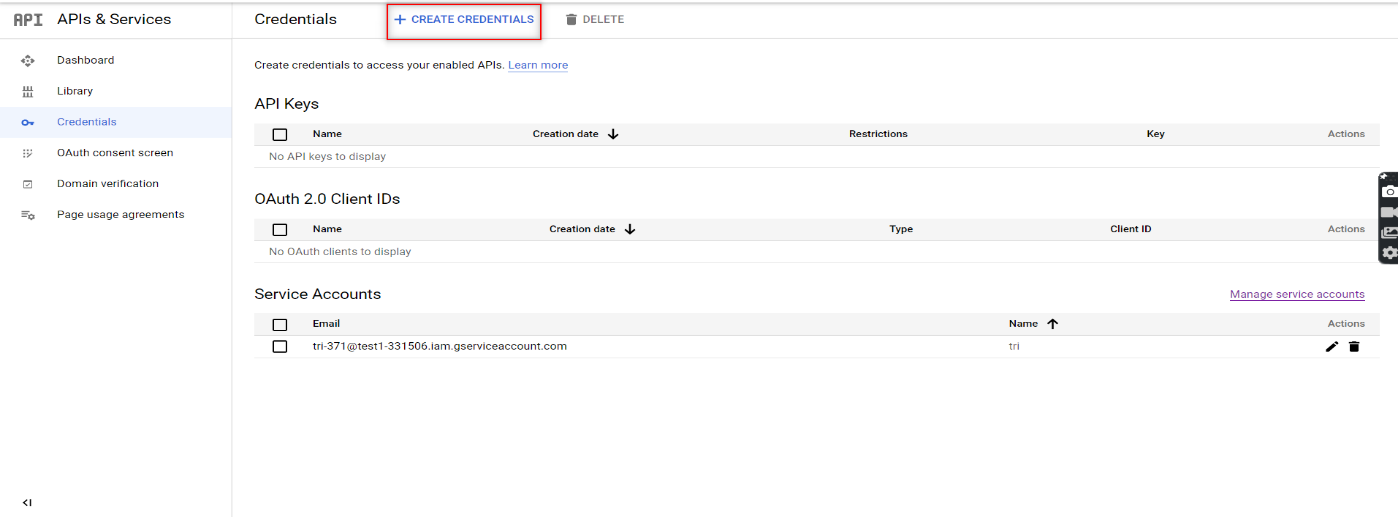
5. Now that you have enabled the required APIs to beat your automation challenge, it’s time to create the credentials for the services account. You can do that by clicking the ‘Create Credentials’ button that can be found in the Credentials menu as shown in the image.
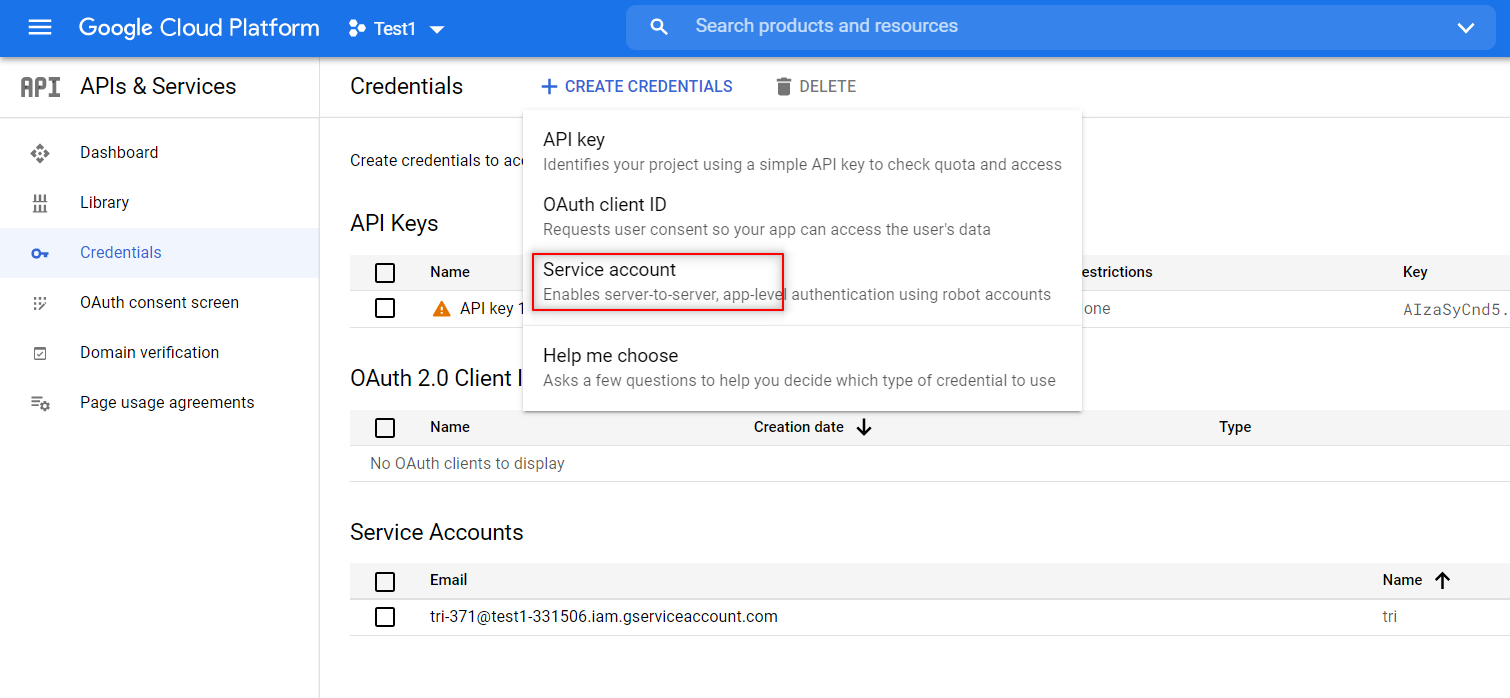
6. Once you click on that, a drop-down list will appear. Choose the ‘Service Account’ option from the list.
7. You would have to provide the Service Account details here in order to continue. That is why we had mentioned that you would have to create one prior to starting this process. Once you have provided the info, you can create the credentials by clicking on the ‘Create and Continue’ option.
8. Similar to how we share the Google spreadsheets with other collaborators by providing them various access permissions like edit or view only, we will have to provide access to our service account as well. Since we have to both read and write in the spreadsheets, you would have to give editing access or not the view-only option.
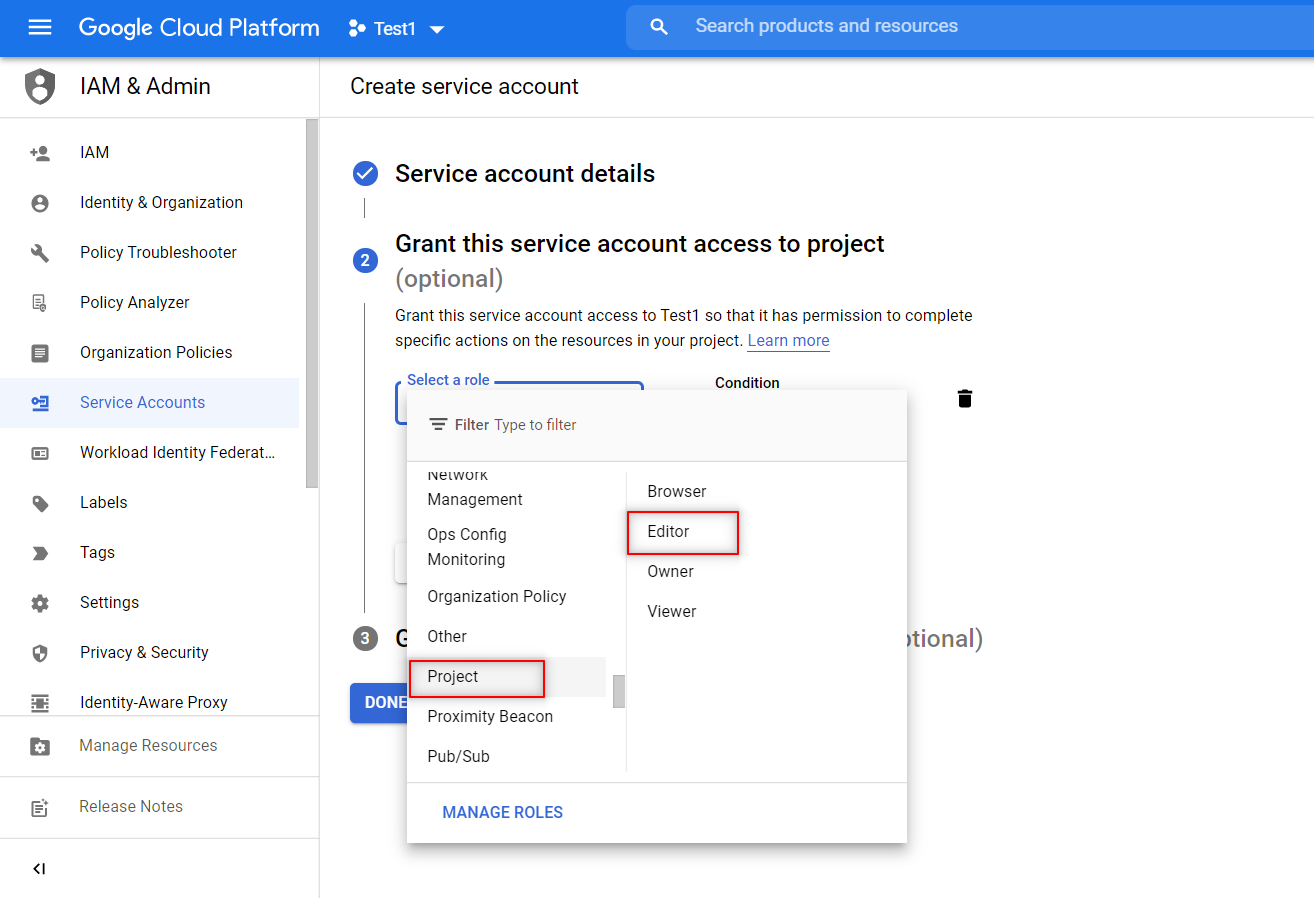
9. Once the credentials have been created, download the JSON file for the credentials. The JSON file will contain the keys that you will need to access the API. So our Google Service account is now ready to use.
Share the desired sheet with that email
Now that the Services account credentials have been created, you have to provide the email using which you will access the spreadsheet.
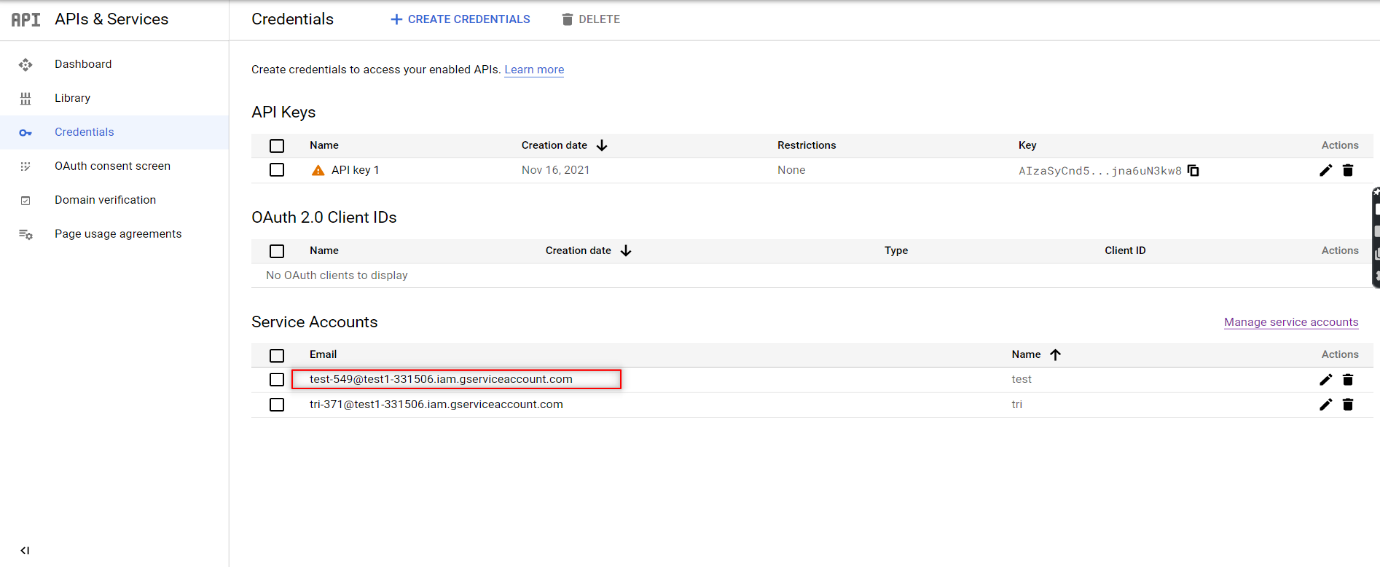
Open the Google Sheet that you want to automate and click on the Share button to provide access to this client email. Now, you are all set to code and access the sheet using Python.
Connect to Google Sheet using Python Code
First up, you have to open the downloaded JSON file in PyCharm. You can then create a Python file in the same project folder and start writing your script.
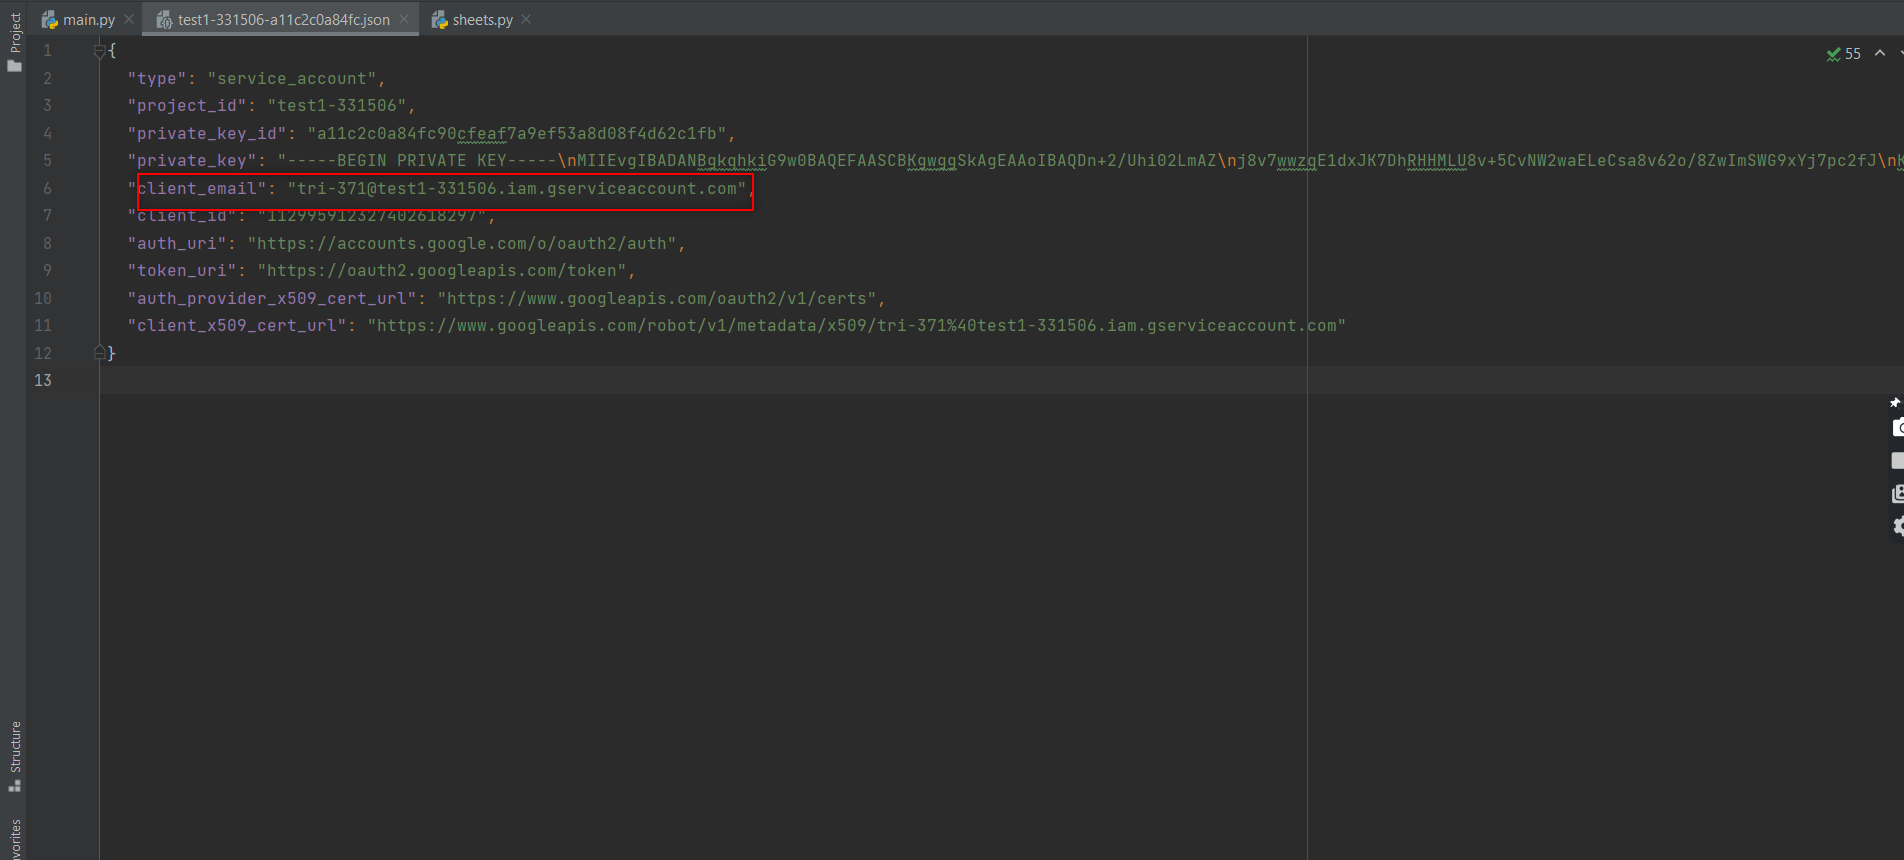
We then have to install two packages (gspread and oauth2client) from PIP. To do that in PyCharm, we have to open command prompt and use the below command
pip install gspread oauth2client
Now let’s take a look at the different segments of the python code one by one to understand it easily and successfully implement it to achieve Google Sheet Automation.
1. Importing the Libraries
We will need both the gspread and oauth2client services to authorize and make API calls to Google Cloud Services.
import gspread
from oauth2client.service_account import ServiceAccountCredentials
from pprint import print
2. Define the scope of the application
Then, we will define the scope of the application and add the JSON file that has the credentials to access the API.
scope = ["https://spreadsheets.google.com/feeds",'https://www.googleapis.com/auth/spreadsheets',"https://www.googleapis.com/auth/drive.file",
         "https://www.googleapis.com/auth/drive"]
3. Add credentials to the account
Once the scope has been defined, you have to add the credentials to the account.
creds = ServiceAccountCredentials.from_json_keyfile_name("test1-331506-a11c2c0a84fc.json", scope)
4. Authorize the client sheet
The next stage is authorizing the client sheet.
client = gspread.authorize(creds)
5. To open a Google Sheet
There is nothing that can be done without opening the Google Sheet in the first place.
sheet = client.open("Automation").sheet1
6. Get all records
Once the sheet is open, you can get all the data present in the sheet using the get_all_records function. It will return a JSON string that contains the data.
data = sheet.get_all_records()
pprint(data)
7. To get a specific row
Though reading all the data is a great feature, that wouldn’t be needed every single. So this is the code that you can use to get data from a specific row.
row = sheet.row_values(3)  # Get a specific row
pprint(row)
8. To get a specific Column
Similarly, we will also be able to access data from a specific column.
col = sheet.col_values(2)  # Get a specific column

pprint(col)
9. To Get the value of a specific cell
We can even be very precise and access data from a specific cell too.
cell = sheet.cell(1,2).value  # Get the value of a specific cell

pprint(cell)
10. To insert the data into a sheet
We have seen how to read the data, now let’s see how we can insert data.
insertRow = [ 15, "Logesh"]

sheet.insert_row(insertRow, 15)
11. To delete certain row
Not all data in a sheet will be needed forever and so you can even delete a row of data from your sheet.
12. To update one cell
If at all you want to change the data in an existing cell, you wouldn’t have to delete the content and then add the new one again. Instead, you can just update the content in the cell.
sheet.update_cell(2,4, "CHANGED") # Update one cell
13. To Get the number of rows in the sheet
Beyond reading and editing the content in the sheet, you can even get to know the number of rows in a sheet as it might be needed for your automation process.
numRows = sheet.row_count  # Get the number of rows in the s

pprint(numRows)
14. To get the length of the data
Likewise, we can even get the length of the data in the sheet if you want to use that in your automation as well.
Source Code:
Since we have explained everything part by part, now it’ll be much easier for you to go through the source code and understand it clearly.
import gspread
from oauth2client.service_account import ServiceAccountCredentials
from pprint import pprint

scope = ["https://spreadsheets.google.com/feeds",'https://www.googleapis.com/auth/spreadsheets',"https://www.googleapis.com/auth/drive.file",
         "https://www.googleapis.com/auth/drive"]

creds = ServiceAccountCredentials.from_json_keyfile_name("test1-331506-a11c2c0a84fc.json", scope)

client = gspread.authorize(creds)

sheet = client.open("Automation").sheet1

data = sheet.get_all_records()

pprint(data)

row = sheet.row_values(3)  # Get a specific row

pprint(row)

col = sheet.col_values(2)  # Get a specific column

pprint(col)

cell = sheet.cell(1,2).value  # Get the value of a specific cell

pprint(cell)

insertRow = [ 15, "Logesh"]

sheet.insert_row(insertRow, 15)  # Insert the list as a row at index 4 its will over write

sheet.delete_rows(14)

sheet.update_cell(2,4, "CHANGED")  # Update one cell

numRows = sheet.row_count  # Get the number of rows in the sheet

pprint(numRows)

pprint(len(data))
Conclusion:
We hope you now have a clear idea of how to achieve google sheet automation as per your needs and make the most out of the tool to save your valuable time. As a test automation services provider, we understand that not everything can be automated, but if you approach any automation task with a negative mindset, you’ll never be able to unravel the solutions to overcome your obstacles. So follow and implement these methods with a positive mindset and you will definitely witness performance improvement at your end.

by admin | Dec 21, 2021 | Performance Testing, Blog, Latest Post |
Load testing is a form of software testing that enables teams to test software performance under varying user loads. Load testing aims to emulate real-world scenarios by putting a strain on the application and examining how it responds.
Many teams perform load testing near the end of the project after developers have finished their work. However, this is not the only time to check for performance issues. You can run various forms of load tests throughout the development process to ensure your product will perform well in the real world.
Here are the benefits of load testing in software:
1. Speed Up Software Deployment
Load tests offer valuable information on how your app will perform in the real world. The earlier you test, the easier it is to adjust to the application. Once you have made adjustments, it will be easier to predict when your application is ready to go live.
Software is only as valuable as the speed at which it can be deployed. With load testing, you can deploy your product faster and more confidently.
2. Get Better Insight into Software Performance
Load testing helps you understand how various elements of your app work together. This enables you to determine how well your software and the supporting infrastructure support the demands of the end-user.
For example, your software may crash under load if you have an extensive database and high-volume transactions. With load testing, you can isolate the errors and fix them.
3. Avoid Costly Software Errors
When developers perform load testing, it is easier to anticipate and prevent software errors. This makes it easier to avoid expensive software errors that can cost you and your company valuable resources.
4. Minimize Software Bugs
Software bugs can cause various issues, from frustrating user experiences to data corruption. Load tests help you identify the bugs and fix them before they become a problem.
5. Identify Useful Software Features
A load test can show you how your application works under various parameters. This can give you insight into how users will respond to your app. That insight can help you identify valuable features.
6. Create a Better User Experience
Load tests help you identify and fix issues with your software that could impact the user experience. If you are trying to increase conversions and every shopper has to wait, your conversion rates will suffer. You can fix the problem before you launch.
7. Explore Real-World Scenarios
Load tests help you prepare for real-world scenarios. You can simulate a busy online store, a website experiencing a spike in traffic, or a chat application processing heavy traffic.
Load testing allows you to find and fix potential problems before they happen. It also allows you to identify valuable features and create an enjoyable user experience.
Conclusion
Load testing is critical for any software project. Load testing can identify software problems, help improve the performance of your software and create a better user experience. Load testing is often done near the end of the project after core development work is complete. However, this is not the only time to perform load tests. It is much easier to adjust to the software earlier in the development process.
Codoid is an industry leader in QA with a passion for guiding and leading the Quality Assurance community. Our brilliant team of engineers loves to attend and speak at software testing meetup groups, forums, software quality assurance events, and automation testing conferences. If you need load testing services in the United States, get in touch with us! Let us know how we can help.

by admin | Dec 10, 2021 | Web Service Testing, Blog, Latest Post |
Considering that traditional front and back-office applications are slowly being phased out for web-based applications, testing the functionality of web applications becomes infinitely more important. This is why you’ll want to do all you can to ensure that your web app testing is efficient and effective. The best way to go about doing this is through automation. Manual testing can be quite taxing as it requires an investment of time and manpower. This is why you’ll want to learn as much as you can about what web application test automation is and how it works. If this is something that you want to know more about, read on for our beginner’s guide to web app testing automation.
What is Web App Testing?
Before we discuss anything, it’s important that we define what web app testing is. Web testing is a software practice that is used to ensure the quality of a given web application by testing that the functions of the application are working as intended. Web testing can be used to find bugs at any time before a release or on a day-to-day basis. Testing is an essential part of app development. This is especially true when the app is changed in any way. Whenever there’s a change in the code, no matter how small, bugs and errors can manifest. It’s important to implement an effective testing strategy so that you can deal with these potential issues swiftly.
What Are the Benefits of Automated Web App Testing?
While testing is important, you can’t ignore how labor-intensive it is. Automation addresses this problem, as it helps you test efficiently without sacrificing quality. Automated tests eliminate the need for testers to perform routine and repetitive tests. Automated tests help find bugs in specific operations and simple-use cases (e.g. logging in, creating a new account, or resetting passwords.) By eliminating these tasks, testers can focus on exploratory testing or other tests that require a human perspective.
What Can Be Automated?
Now, it’s important to note that not all web app tests can be automated. Some tests simply require a human touch. Here are a few types of tests that you can automate for your web applications:
- Functional Testing: Functional testing is used to ensure that an app works as intended from the end-user’s perspective. While this process can be automated, it’s important that you supplement the automated tests with manual tests in order to find bugs.
- Regression Testing: Regression testing describes “repeated functional testing”. It is used to make sure that a software’s functionality continues to work after parts of it have been modified with new code. Regression testing is basically functional testing that is repeated once a new software code or configuration is added.
- Cross-browser Testing: Cross-browser testing ensures that your web application performs well in different browsers both on desktop and mobile devices.
- Performance Testing: Performance testing, or stress and load testing, ensures that a web application can endure extended periods of activity or peak user loads. While it is possible to do this manually, it would be extremely impractical.
Conclusion
We hope this article proves to be useful when it comes to helping you further your understanding of web application test automation. Now that you understand this process better, you’ll be able to maximize automation in a way that helps you optimize your web applications.
If you’re in need of an automation testing company with a spotless track record in web app testing, Codoid is your best choice. Every new software product deserves high-quality automation testing, and our team of highly skilled QA professionals can handle any job. When it comes to web application test automation, there’s no better choice than Codoid. For more information on what we can do for you, visit our website today!

by admin | Dec 20, 2021 | Accessibility Testing, Blog, Latest Post |
It is not a simple yes or no question as it depends on a lot of factors like the core purpose of the website, who runs it, and the country it is used in. Though the Web Content Accessibility Guidelines (WCAG) are the universally accepted standards to be followed on the web, it is not a global law followed in every country. Countries like the United States of America do have accessibility-related laws, but there are no dedicated laws when it comes to the web. So in this blog, we will explore the various Web Accessibility Laws around the world to see how WCAG non-compliance can end up becoming a punishable offense.
The Web Accessibility Laws in Different Regions
So if you are located in the U.S and if the website belongs to a federal agency or their contractors, those websites must comply with WCAG 2.0. But if the website belongs to a private business, the website definitely has to be accessible as per the ADA. The Americans with Disabilities Act (ADA) requires every place of public accommodation to be accessible in terms of infrastructure (Wheel Chair accessible Entry elevators, and so on). Though websites do come under this category as a place of public accommodation as the users do visit the website to obtain information, make a purchase, and perform such activities, there are no defined guidelines or standards that the websites have to adhere to.
Likewise, if you are in countries like Canada, New Zealand, or Australia, only government sites have to meet the WCAG guidelines. There are no defined standards for public sites with a few exceptions in certain areas. Argentina requires their public sites to be compliant with WCAG 1.0 and Ecuador’s public sites have to comply with WCAG 2.0. The European Union is where we can find the best Accessibility standards. They have created the Web Accessibility Directive which is in many ways similar to WCAG 2.0. It even has a few additional requirements where users should be able to report such issues, and so on. Though it was initially launched with only government sites to be compliant in 2016, by 2018 even public websites have been instructed to meet the standards.
There are also numerous countries that do not have any prominent Web Accessibility Laws. But if you are running a business website, it is always better to have a site that is accessible as there is always a possibility of getting sued by the consumer.
The Case against Dominos
Companies have been sued in the past for having inaccessible websites and apps. For example, Domino’s was sued by a visually impaired man when he was unable to order pizza from their website despite using a Screen Reader. Despite the case being very strong on the plaintiff’s side, it took more than 3 years for the judgment to come through. The court ruled Dominos’ website to be inaccessible and ordered them to meet the compliance. But the real question here is why would Dominos fight the case instead of just making their website accessible.
The Business Angle
Any company that doesn’t consider people with disabilities as viable customers are missing out on a lot of business. According to a report by Forbes, 1 in every 4 Americans have some form of disability, and about 57 million Americans have a disability that hinders their ability to view and use online services. In the digital age we live in, it wouldn’t be wise to leave out such a huge part of the population assuming it is not essential. But beyond the business aspect
Global Scale
So it is evident that the Web Accessibility Laws are different in different areas of the world. But what if you have a website that functions on a global scale? The only solution here would be to have your website meet the highest standards of accessibility so that you wouldn’t have to worry about any disputes. You could achieve this goal by outsourcing the task to one of the best web accessibility testing service providers like us. If we do take a look at it beyond the business aspect, fulfilling the rights of people with disabilities should be a moral responsibility that shouldn’t be overlooked.

by admin | Dec 14, 2021 | Web Service Testing, Blog, Latest Post |
Lighthouse is a great open-source and automated web page quality improvement tool. It is primarily used to perform audits for performance, accessibility, progressive web apps, SEO, and other factors. Its functionality doesn’t end there as the audits will provide you with very useful suggestions and act as a guide to improving the page you audited. Be it a public page or a page that requires authentication, you will have no trouble using it. As a leading performance testing company, we have found Lighthouse to be an instrumental tool in ensuring the sites we test are optimized. So in this Lighthouse Tutorial, we will be seeing how it can be run it using Chrome DevTools, the command line, and as a Node module. We will also be taking a deep dive into the reports and seeing how to share them. So let’s get started.
The List of Lighthouse Processes:
- Using the Chrome DevTools, you’ll be able to audit authentication-required pages and read reports without having to put in too much effort.
- You can use shell scripts to automate your Lighthouse runs by using Command Prompt.
- Lighthouse can be integrated into your continuous integration system in the form of a node module with ease.
- You can also use a web interface to run Lighthouse and link to reports without having to install anything at all.
Lighthouse Tutorial to Run it in Chrome DevTools
Since Google Chrome is the most popular browser, you might already have it installed in your system. But if you don’t, make sure to install it. As any URL on the web can be audited, let’s take a look at the steps to generate a report.
1. First up, open Google Chrome and navigate to the URL you’d like to audit.
2. Once the page has been loaded, open Chrome DevTools.
3. Click on the ‘Lighthouse’ tab.
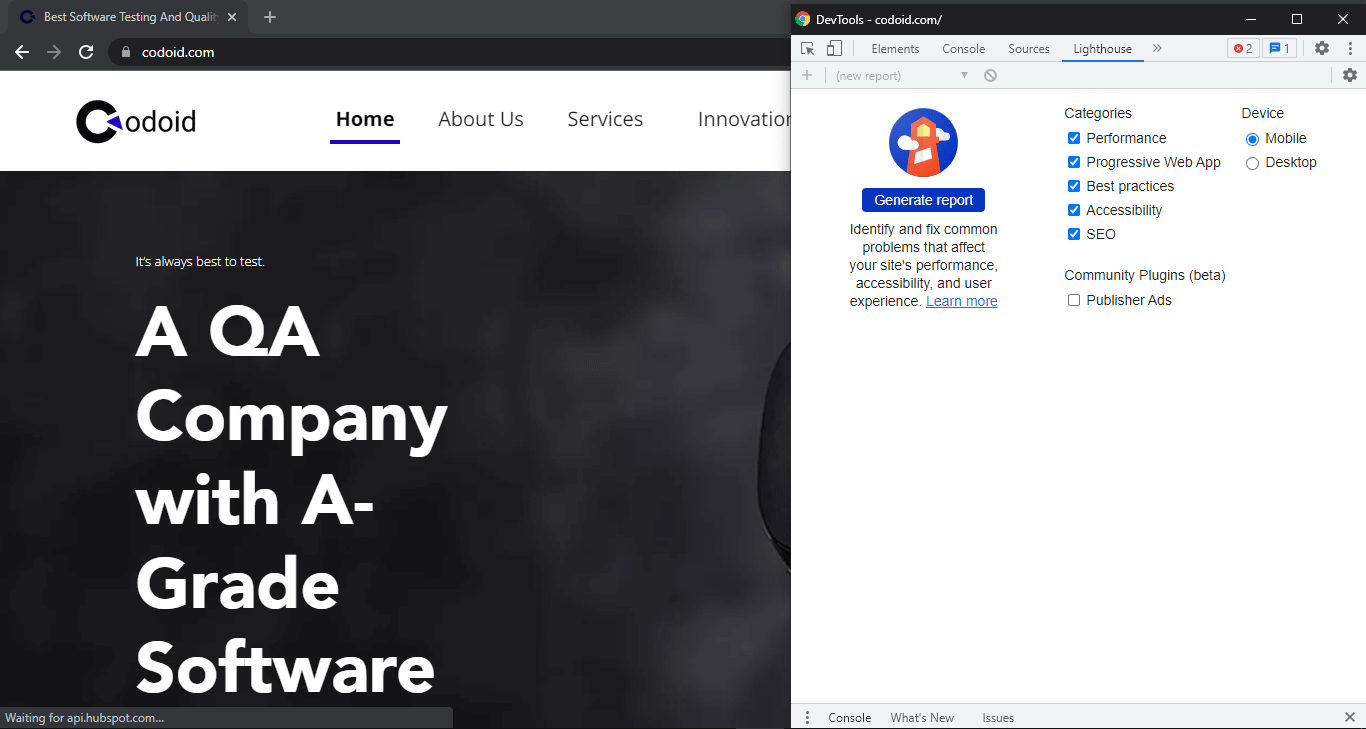
You will get a view of the page you’re looking to audit on the left and the Lighthouse-powered Chrome DevTools panel on the right.
4. You’ll see a list of audit categories as shown in the image. Check and make sure all the categories are enabled.
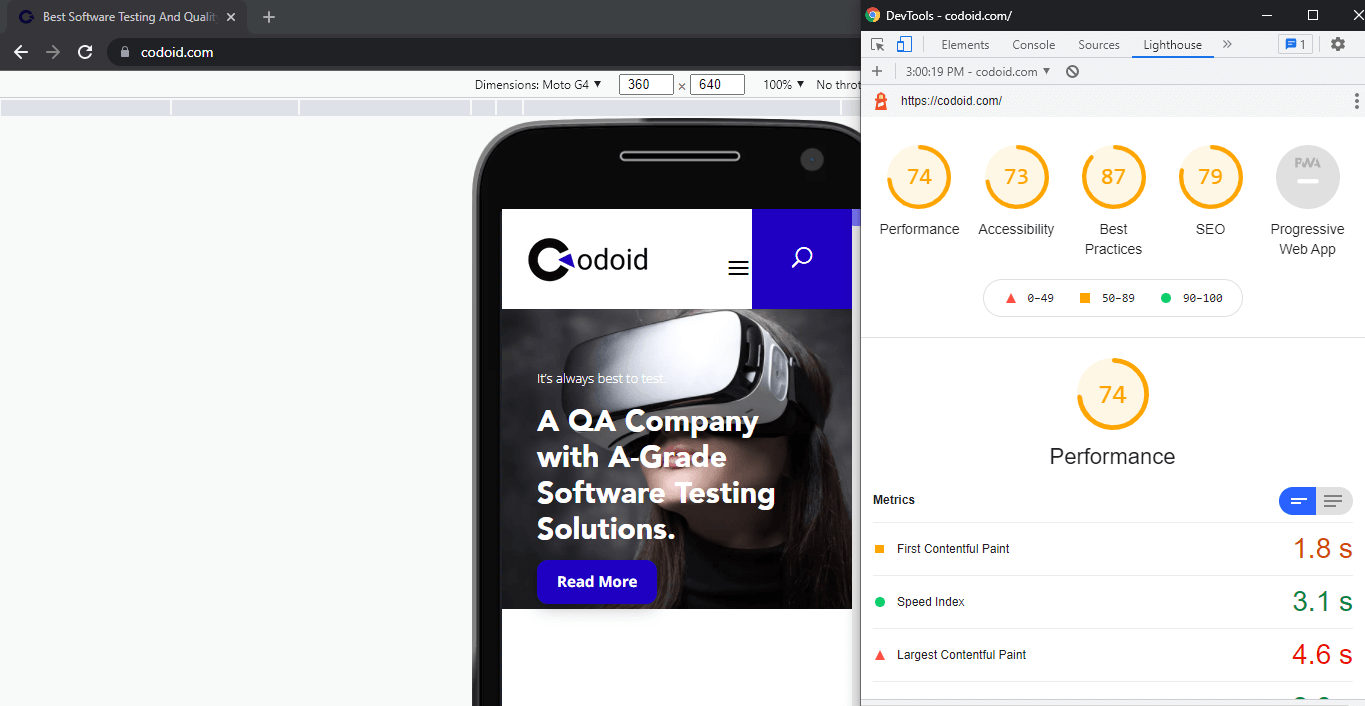
5. You can create a report in under a minute by just clicking on the ‘Generate report’ option. Once you do that, you’ll see a report as shown in the below image.
Lighthouse Tutorial to Run it using the Node command-line tool
Download & install the latest Node version that has Long-Term Support and then install Lighthouse using the following command.
npm install -g lighthouse
The -g flag here installs it as a global module.
You can use the following two commands to run an audit and to see all the options,
To run an audit:
To see all the options:
Lighthouse Tutorial to Run it with a Chrome Extension
Download the Lighthouse Chrome Extension from the Chrome Webstore, and go to the page you want to audit in Chrome.
1. If you see the Lighthouse icon beside the Chrome address bar, you can click on it to enable the extension.
2. If you don’t, you can click on the extensions button to find the Lighthouse extension. So, the Lighthouse menu expands once you click on it.
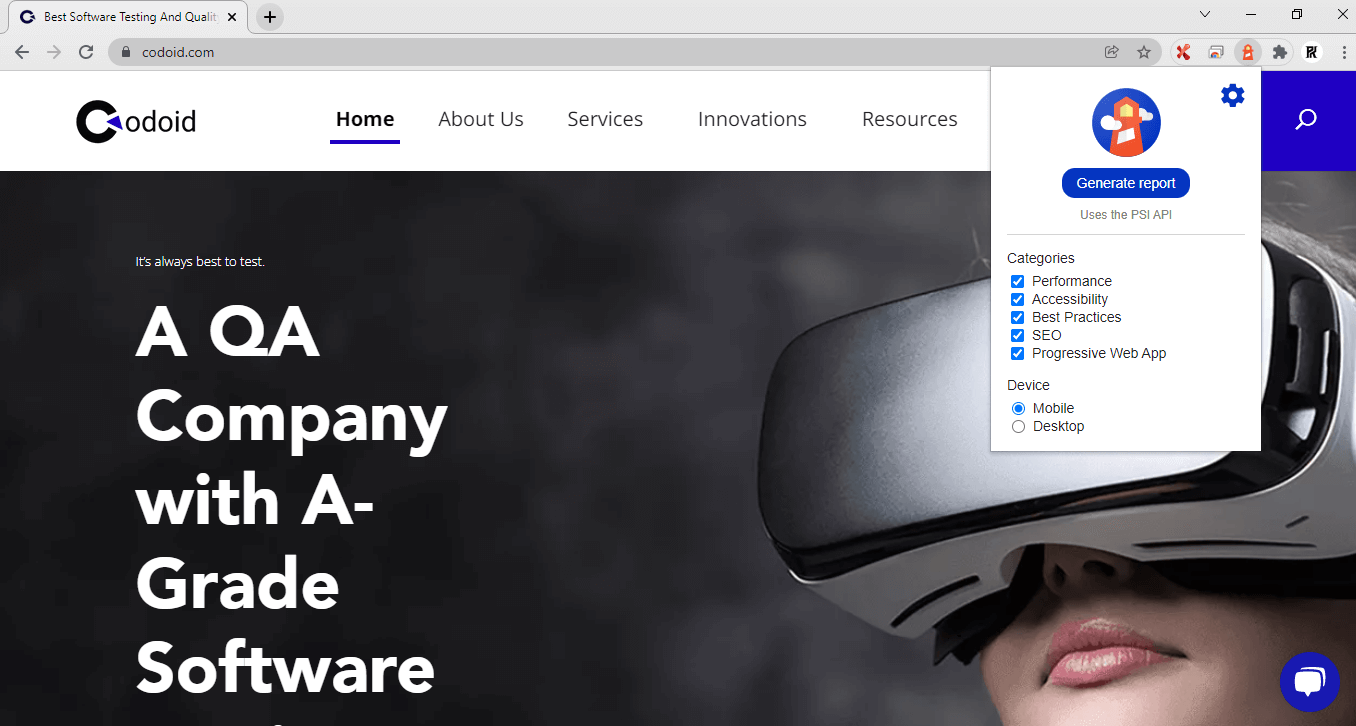
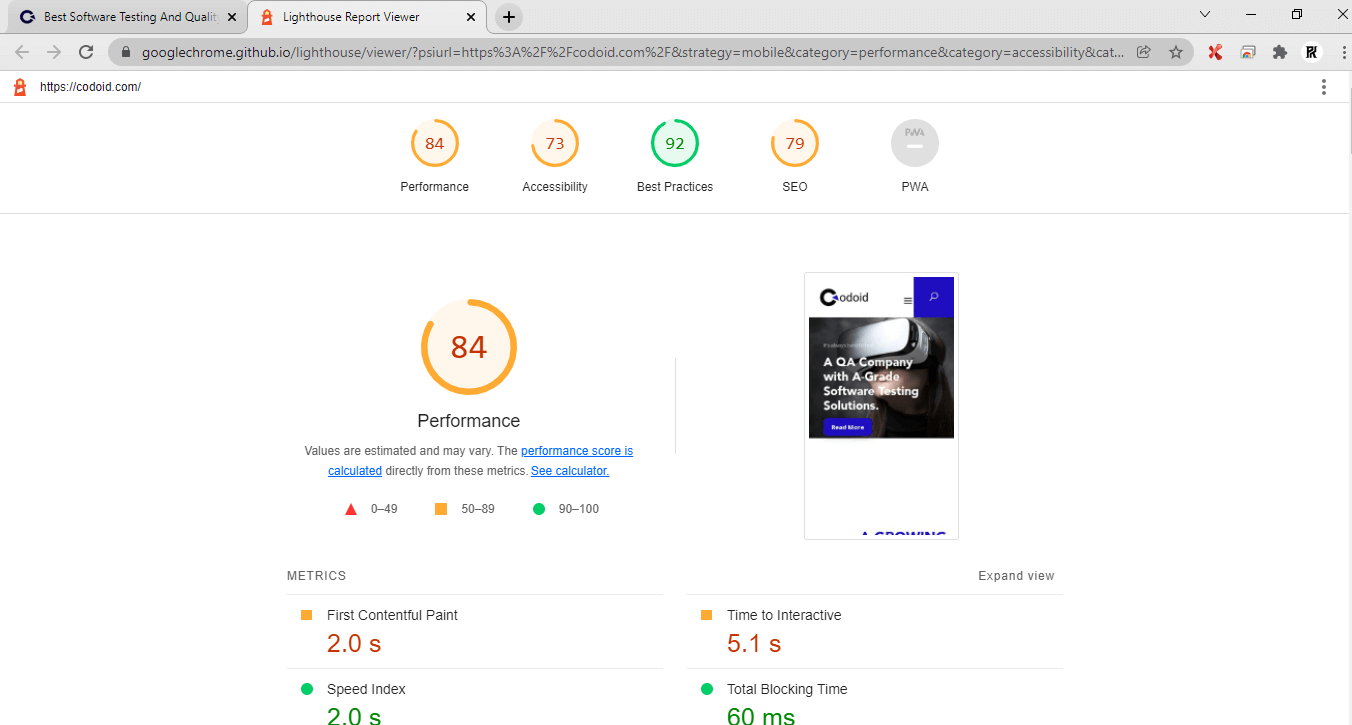
3. Once you click on the ‘Generate report’ option, Lighthouse will perform the audit on the page that is currently open and then shows the report in a new tab.
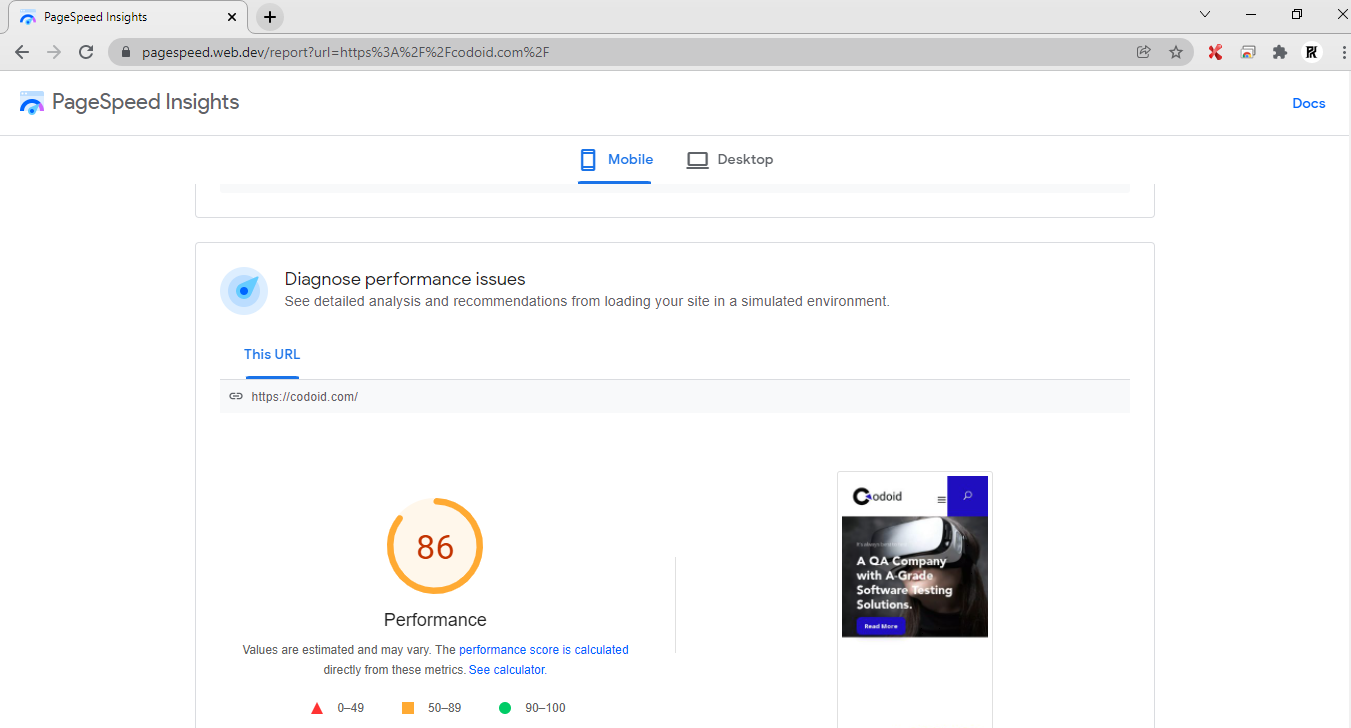
How to Run PageSpeed Insights?
Using PageSpeed Insights with Lighthouse is quite simple. You just have to follow these steps:
- Navigate to PageSpeed Insights.
- Enter a web page URL.
- Click Analyze.
The Lighthouse Report
Now that we have seen how to generate the Lighthouse report in 3 different ways and seen how to obtain the PageSpeed Insights in this Lighthouse Tutorial, it’s time to explore the various aspects of the report one would have to know about. Then only the user will be able to comprehend the report and take the required action.
Visiting a slow-loading website is definitely an excruciating task that no one will enjoy. So, using the performance score, we will be able to identify how quickly a website or app loads and how quickly the users will be able to access or view the content on the page. There are six-speed metrics that will be used to calculate this score.
First Contentful Paint
Imagine yourself opening a webpage. As soon as you click on the button, you would expect the page to navigate to the page you want to go to and start showing the content. So, this metric indicates the time it takes for the first text or image to become visible for the users.
First Meaningful Paint
Likewise, a barely loaded page that takes a lot of time to load the important contents of the page is also not a good sign. Hence as the name suggests, this metric indicates the time taken for the meaningful part of a page to be loaded.
Speed Index
So the speed index is a uniform metric that establishes how quickly the content of a page loads.
Time to Interactive
Just because the user is able to see the content, doesn’t mean the site is ready to be used. As soon as the users see the content, they will assume the page is ready and try to interact with it. But if the page takes a long time for it to be interactive, then the user will definitely get annoyed. So this metric reveals how much time is taken by the webpage and its content to become fully interactive for the user.
First CPU Idle
This metric is also very similar to the previous metric we saw. It differs majorly by what we mean when saying the site has to become interactive in the previous metric. For a page to be considered fully reactive, it has to respond to user interactions within 50 milliseconds. First CPU Idle differs as it reveals the time it has taken for the majority of the UI elements to work and not the time it takes for all UI elements to work. There is a reason why it is seen as a different metric as well. Ultimately, this metric returns the time it takes for the page’s main thread activity to become low enough to accept the inputs that have to be processed.
The latency approximates how long an app or webpage takes to react to user inputs during the 5-second window that has the maximum computational page load. The fact to keep in mind here is that if the latency is over 50ms, users might perceive the app or website to be very slow.
Make sure to review the suggestions shown in Lighthouse as it will be helpful in reducing load times easily.
Accessibility Score
The Accessibility score helps us understand how accessible the website is to people with disabilities such as vision impairment, hearing disabilities, and other physical or cognitive conditions. If we were to take the example of a visually impaired user, then the user would use a screen reader to access the content. But for the screen reader to work properly, proper heading tags are a must in the content. The alt text for visuals and proper texts explaining the buttons and hyperlinks are also important. So such will be reviewed for this score.
Best Practices Score
The Best Practices aspect primarily revolves around the security levels of the webpage. Lighthouse tests a total of 16 practices and all of them are focused on safety and modern web development standards. You can get a good score here if there are no issues in JavaScript libraries, establish secure database connections, check insecure commands, and so on.
SEO Score
So we’ve seen how fast the page loads, how inclusive it is by checking accessibility, and see if it is secure enough to provide the best user experience. But SEO is also one important action that we have to look into. The reason is that without proper SEO, the webpage itself will not be able to reach your intended audience. So though the above enhancements are important, it is very important for us to make the site appear in the search results.
Lighthouse Tutorial to Share & View reports online
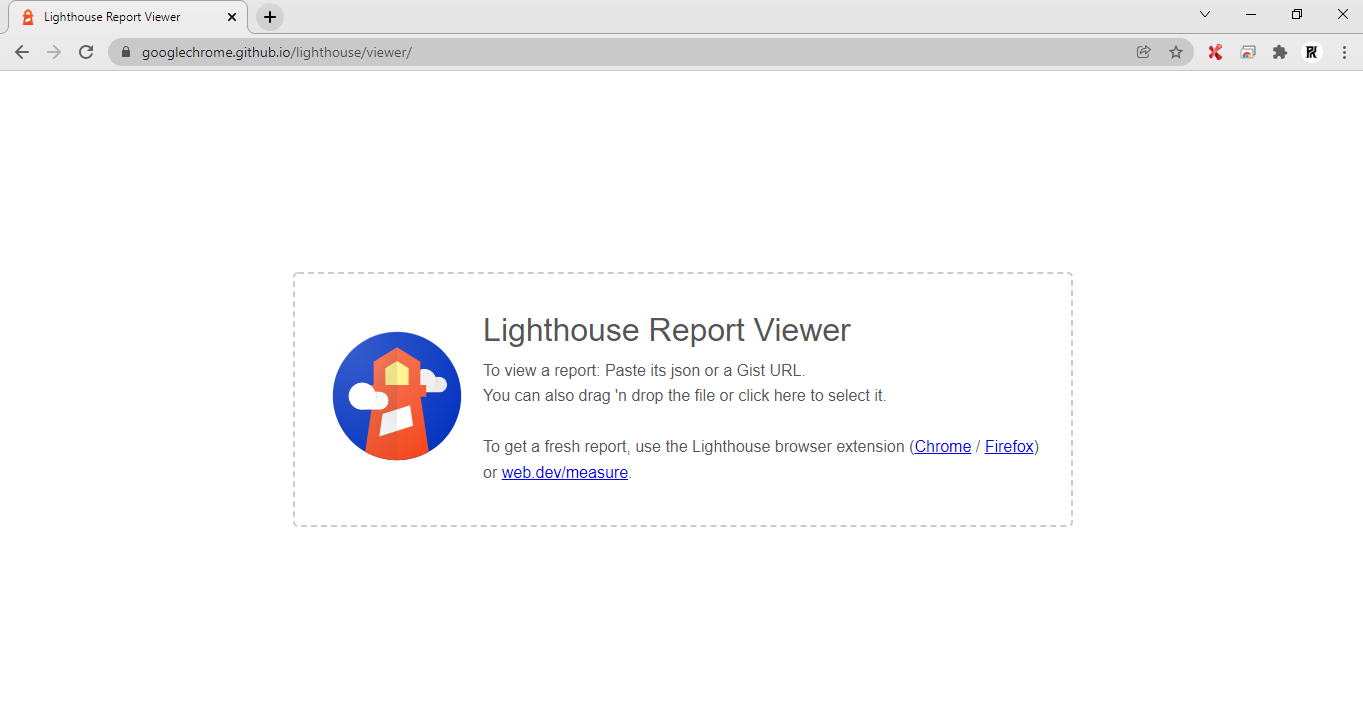
Once the reports have been generated, it is also possible to view and share the reports using the Lighthouse viewer. The report’s JSON is actually needed to use Lighthouse viewer. So let’s see what has to be done to get the report as a JSON file.
Share reports as JSON
Depending on the Lighthouse workflow you’re using, the below steps describe how to get the JSON output.
1. Click on the ‘Tool’ menu once the report has been generated.
2. Choose Save as JSON or HTML.
To view the report data:
1. Open the Lighthouse Viewer in Google Chrome.
2. You can click anywhere on the Viewer to open the file navigator using which you can select the JSON file. You can even drag the JSON file onto the viewer.
Lighthouse Features
There is a lot for web developers to benefit from following Lighthouse’s advice. Here are a couple of Lighthouse features that can enhance that experience with customization options.
Stack Packs
Today’s developers have the option to use various technologies like CMS, JavaScript frameworks, and so on while developing web pages. The best part of Lighthouse is that it can now provide more relevant and actionable advice suggestions based on the tools used. So this makes the first customization option as you’ll receive suggestions that go beyond the general recommendations.
Lighthouse Plugins
Lighthouse Plugins are the second customizability option that enables community domain experts to cater to their specific needs. For example, Lighthouse can create new audits by using the data it collects. Here, a Lighthouse plugin will act as a node module that implements a set of checks that Lighthouse will run and then add as a new category to the report.
So as a leading test automation companies, we find these 2 features to be the highlights of Lighthouse.
CONCLUSION
We hope you have a clear picture of what Lighthouse is and what it is capable of as well after reading this Lighthouse Tutorial. Since Lighthouse is an open-source project that welcomes contributions, you could look into the issue tracker and find possible bugs or even analyze audits to see how it can be improved. So make sure to keep an eye on the issues tracker as it is a great place to discuss audit metrics, new audit ideas, and so on.