|
Listen to this blog
|
Despite the rise of people using mobile applications, desktop applications are still being used on a daily basis by many. Though you can test a desktop application manually, it is still important for a tester to know how to automate desktop applications in Windows. There are a few ways to go about it, and in this blog, we will be focusing on how to automate a desktop application using C#. In order to achieve that, we’ll be sharing the tried and tested frameworks, tools, strategies, and approaches we have been using over the years to deliver exceptional automated desktop application testing services to our clients. We’ve also provided an example to help you understand everything clearly. So let’s get started.
.NET Framework
.NET Framework is a software development platform developed by Microsoft to build and run windows applications. .NET is used to automate applications in different operating systems such as Linux, macOS, and Windows. Whereas, .NET framework was developed specifically for Windows. So it can be used to run applications in windows environments that were created using the .NET framework.
WinAppDriver (Windows Application Driver)
WinAppDriver is also a test automation framework developed by Microsoft. It is an open-source option that feels like a combination of a WebDriver and Appium. We say this as WinAppDriver is a set of libraries that can be integrated into a test runner that supports Appium. For those who don’t know, Web drivers are used for desktop application automation and Appium is used for mobile app automation. Before we proceed to see how to automate a Desktop application using C#, let’s take a look at the prerequisites for WinAppDriver
- Windows 10 OS
- Visual Studio 2013+
- WinAppDriver.exe
- Turn ON Developer mode on the PC
BDD Approach
We have used the BDD approach in numerous automation testing projects and have always been satisfied with the results. That is why we have decided to focus on it while explaining how to automate a desktop application using C#. BDD is expanded as Behavior Driven Development, it is an Agile software development process that allows the design, creation, and product testing, using the product’s behavior.
But the major advantage is that it makes it very easy for even non-technical users to understand the purpose of every test without having to know technical terms like classes, methods, and variables. All the important aspects will be explained using Gherkin language that is in the Given, When, and Then format.
Since we will be automating Notepad in our example, we’ve created a feature file in the Gherkin language for easier understanding.
@Demo
Scenario: Notepad Demo
	Given Launch Notepad
	When Enter Specified Text
	Then Verify the Entered Text
Specflow
Now that we have discussed the approach we’ll be using, let’s focus on the Specflow, the solution that can be used to implement BDD in our framework. We can use the Gherkin language as mentioned above and bind the steps definitions for desktop applications. If you haven’t yet installed Specflow, you can easily do so by using the NuGet manager in any Visual Studio project.
@Demo
Scenario: Notepad Demo
	Given Launch Notepad
	When Enter Specified Text
	Then Verify the Entered Text
Inspectors
When it comes to web automation, we can find different locators by inspecting the webpage. But that will not be possible when it comes to desktop app automation. That is why knowing how to use a UI Inspector is a crucial part of learning how to automate a desktop application using C#.
Inspectors used for Desktop Applications:
- FlaUInspect
- UIspy
- Inspect
- VisualUIAVerify
Related Blogs
Using either one of these UI inspectors, you’ll be able to see the DOM of the desktop application and get the locators of elements such as ID, Name, ClassName, XPath, and so on.
How to Automate a Desktop Application using C#?
First up, we’ll need to create a new project in Visual Studio using the Console App (.NET Framework)
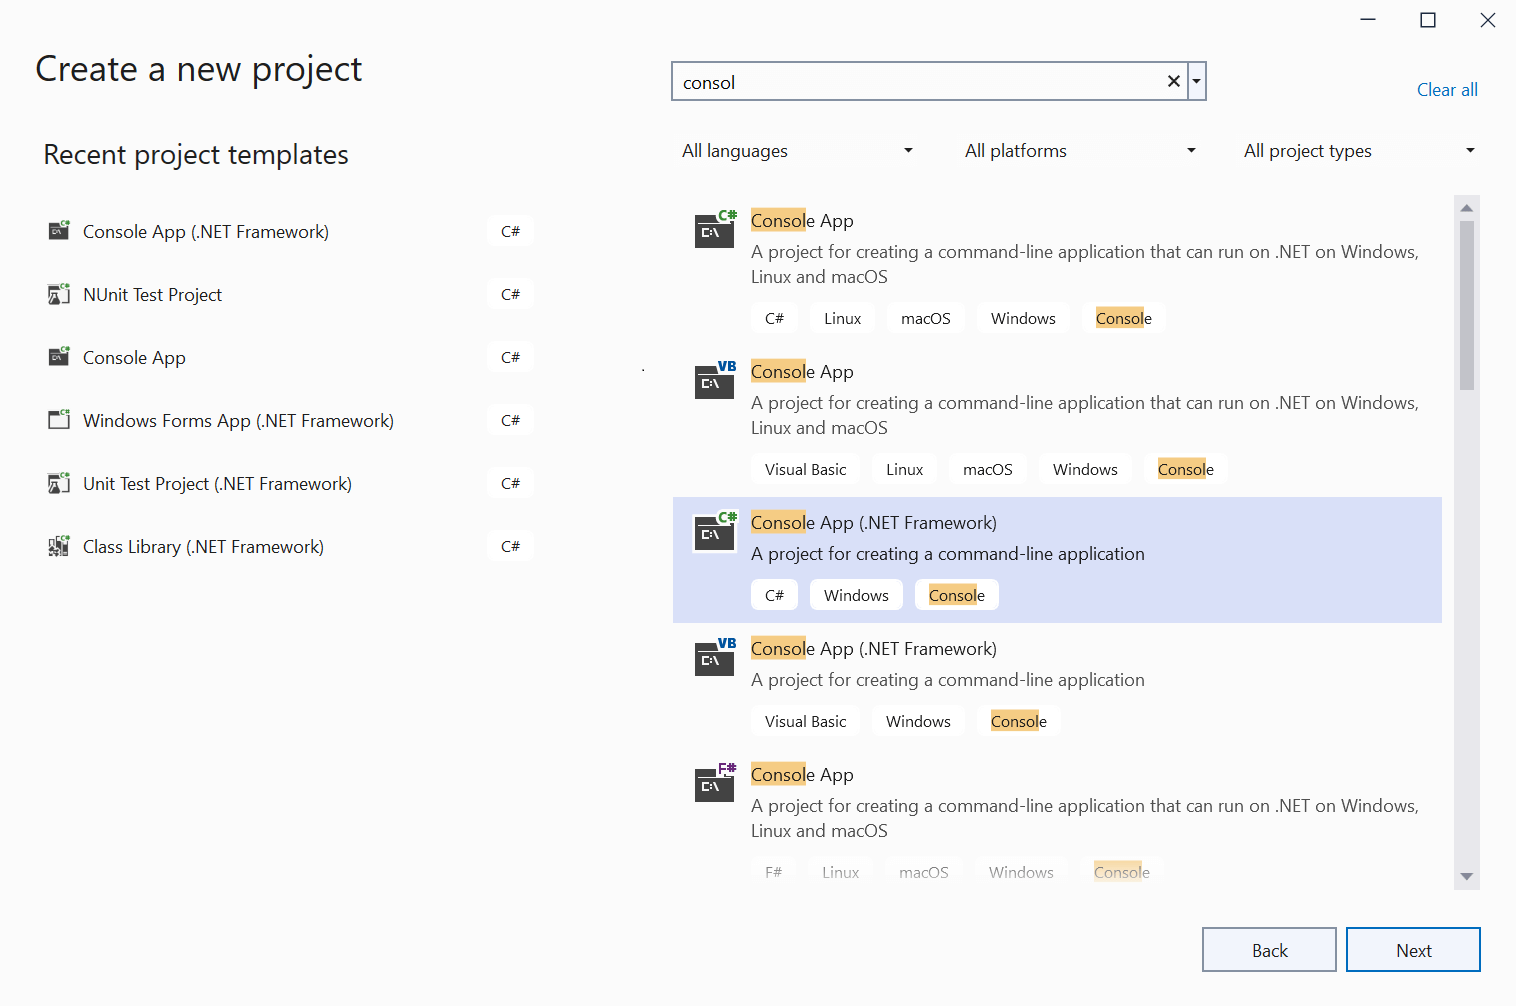
Install Specflow
We have to then install and set Specflow up by
- Navigating to Project > Manage NuGet Packages
- Search for Specflow and click on Specflow to install it
- We have to then add Specflow.NUnit and Specflow.Tools.MsBuild.Generation from the same NuGet packages
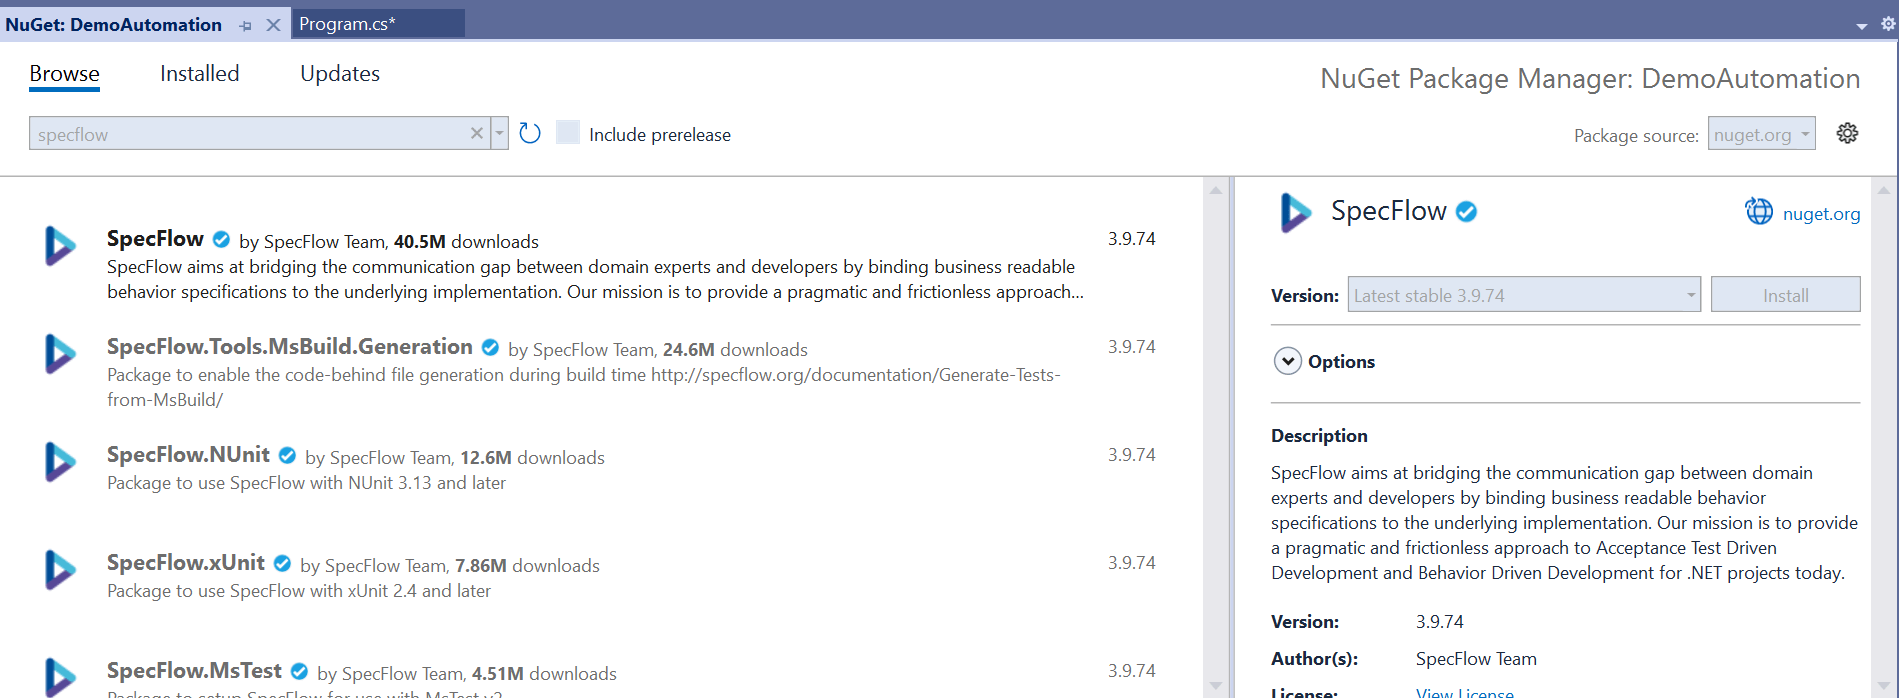
Installing WinAppDriver
We need to install WinAppDriver from GitHub to launch and access the desktop application we wish to automate. WinAppDriver will create a bridge for the application and our tests. You’ll have to enable the developer mode in Windows to run WinAppDriver.
To access the WinAppDriver classes and methods, we need to add Appium.Webdriver to our project from NuGet packages
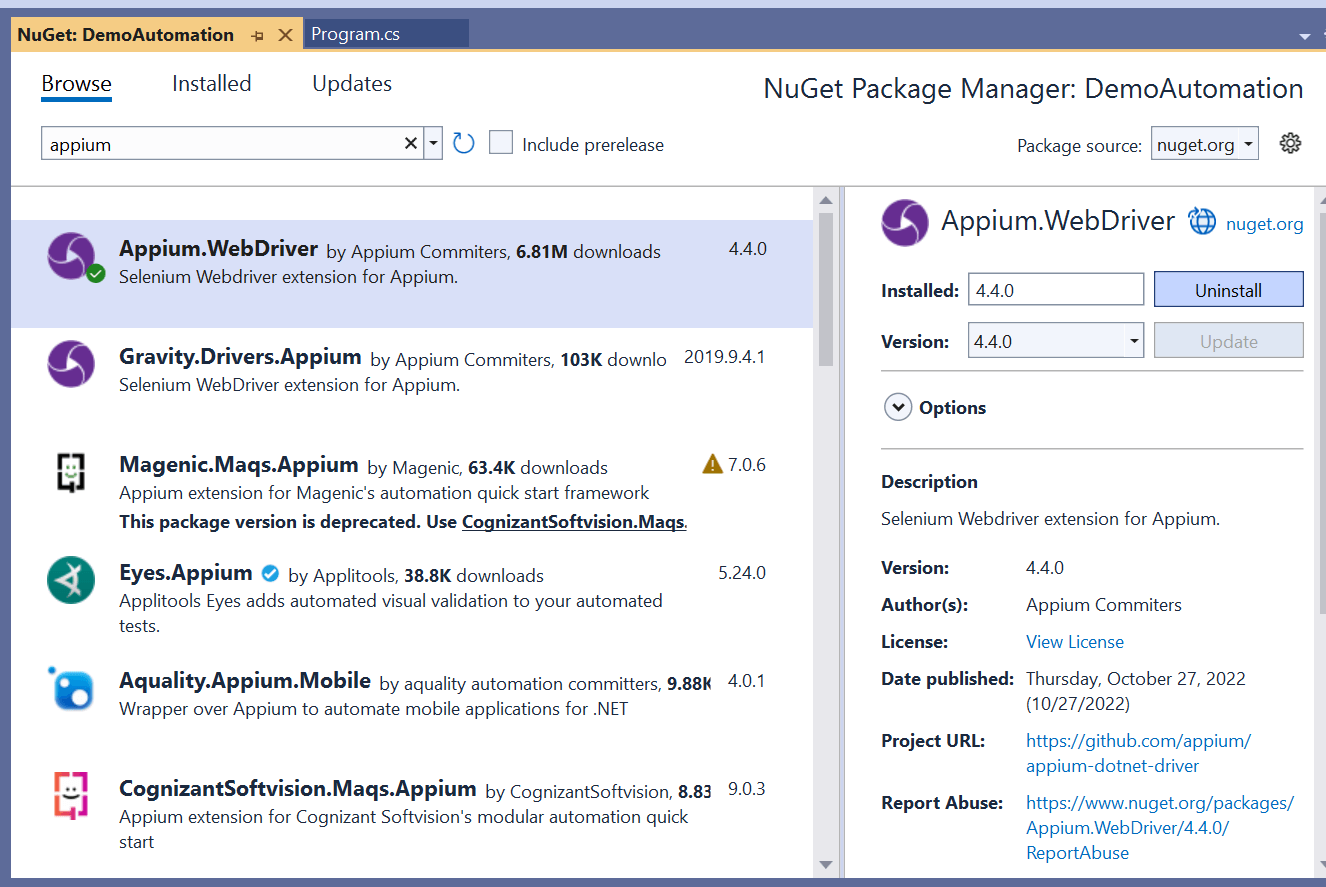
The next step would be to Create a Feature file. You can do so by right-clicking on the Feature folder > Add > New item > Search for Feature File for Specflow as shown in the below image.
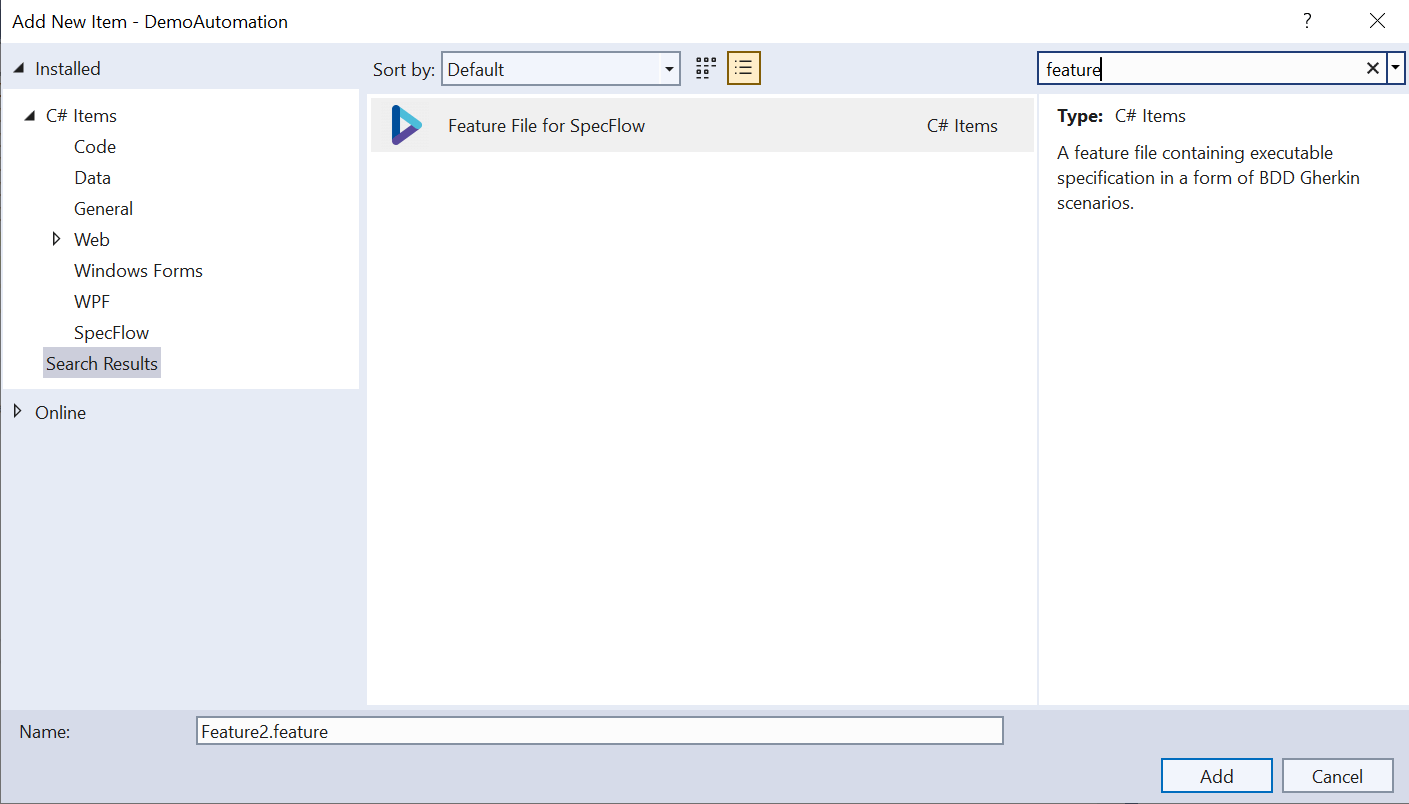
Framework Setup
Now that everything is installed and ready, we’ll be seeing how to set up the framework in our How to automate a desktop application using C# blog. You’ll have to,
- Create a windowsUtils Class file
- Create a class file for the Base window
- Create a class for the methods
- Run the test
Create a windowsUtils Class file
Taking screenshots during test execution and generating reports is an integral part of knowing how to automate a desktop application using C#. And you’ll need the windowsUtils class file to achieve that.
public class windowsUtils
    {
        static WindowsDriver<WindowsElement> window;
        static windowsUtils()
        {
         window = LaunchApp("C:\\ProgramData\\Microsoft\\Windows\\Start        Menu\\Programs\\Accessories\\Notepad.lnk");
        }
        public static WindowsDriver<WindowsElement> getWindowInstance()
        {
            return window;
        }
        public static WindowsDriver<WindowsElement> LaunchApp(String _ApplicationLocation)
        {
            try
            {
                AppiumOptions options = new AppiumOptions();
                options.AddAdditionalCapability("app", _ApplicationLocation);
                options.AddAdditionalCapability("deviceName", "WindowsPc");
                window = new WindowsDriver<WindowsElement>(new    Uri("http://127.0.0.1:4723/"), options);

            }
            catch (Exception ex)
            return window;
        }
Create a class file for the Base window
We’ll next have to use WinAppDriver to perform Desktop App Automation testing. So we have mentioned the code you’ll need to use to create the class file for the Base window.
public class baseWindow
    {
        public WindowsDriver<WindowsElement> window;
        public baseWindow(WindowsDriver<WindowsElement> window)
        {
            this.window = window;
        }
        public WindowsDriver<WindowsElement> getWindowInstance(String _ApplicationLocation)
        {
            try
            {
                AppiumOptions options = new AppiumOptions();
                options.AddAdditionalCapability("app", "C:\\ProgramData\\Microsoft\\Windows\\Start Menu\\Programs\\Accessories\\Notepad.lnk");
                options.AddAdditionalCapability("deviceName", "WindowsPc");
                window = new WindowsDriver<WindowsElement>(new Uri("http://127.0.0.1:4723/"), options);
            }
            catch (Exception ex)
            return window;
        }
Create a class file for the Methods
We then create a class for the methods to perform the required action in the desktop application. In our case, we have chosen Notepad. And we will be entering the word “Codoid Innovations” and validating if the specified text has been displayed.
public class Notepad : baseWindow
    {
        static WindowsDriver<WindowsElement> _window;
        public Notepad(WindowsDriver<WindowsElement> window) : base(window)
        {
            _window = this.window;
        }
        public By Text => By.Name("Text Editor");
        public By Verifyinput => By.Name("Text Editor");
        public void Maximize()
        {
          window.Manage().Window.Maximize();
        }
        public void enterText()
        {
            window.FindElement(Text).SendKeys("Codoid Innovations");
        }
        public bool VerifytheText()
        {
            bool result = window.FindElement(Verifyinput).Displayed;
            return result;
        }
}
Run the Test
Finally, we can run the test by opening the command prompt from the file location and using the following command
“nunit3-console.exe filename –where “cat==tagname from the feature file””
C: \Demo\DemoAutomation\DemoAutomation\bin\Debug>nunit3-console.exe DemoAutomation.dll --where "cat==Demo"
Note: Based on your requirements, you can either add Extent report or Allure report from the nuget packages.
Conclusion
We hope you now have a clear picture of how to automate a desktop application using C# after reading our blog. As a pioneer automation testing company, we have even developed our very own desktop app automation tool called Gyra. If you are unfamiliar with C#, give Gyra a try as it is a free tool that works with Java. We will be publishing more informative content on our website, and we recommend you subscribe to our newsletter to not miss out on any of those content.








Comments(0)