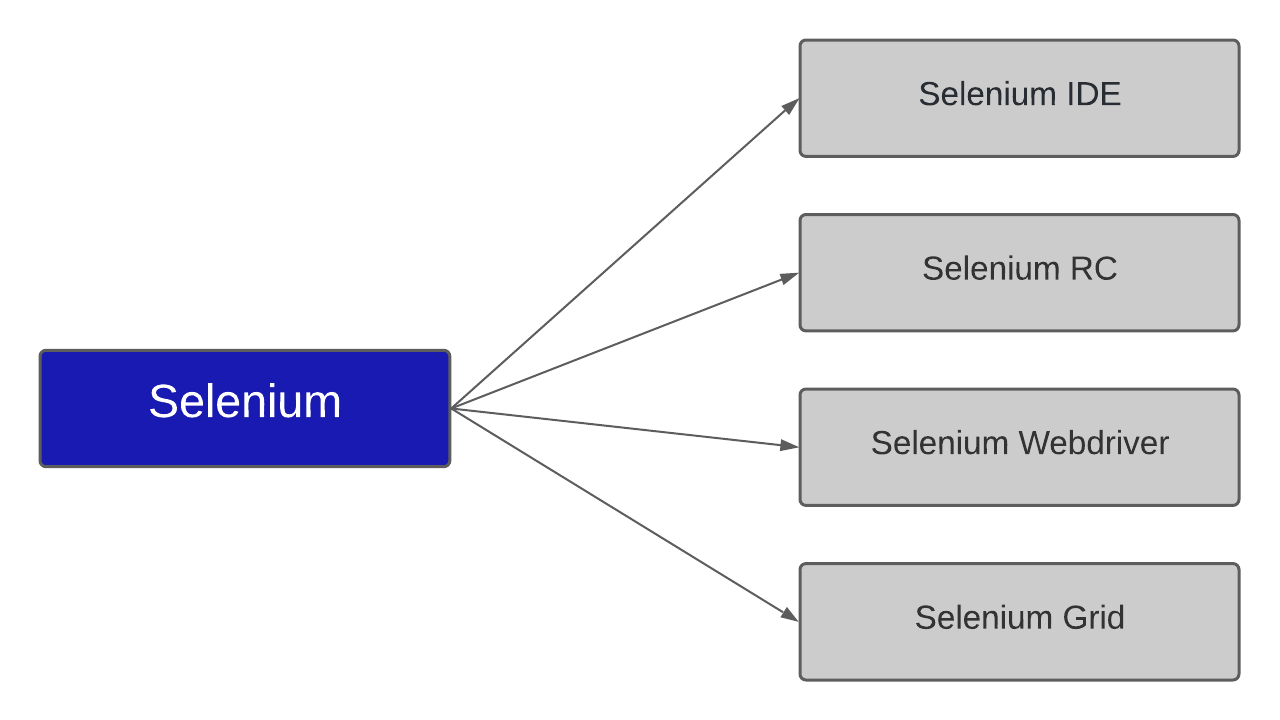
Selenium is a free and open-source testing tool that automates website testing. It is not a single tool, but rather a set of four components known as Selenium IDE, Selenium RC, Selenium WebDriver, and Selenium Grid. Selenium offers a number of features to testers as it provides support for multiple browsers, parallel testing capabilities, and execution on multiple machines. Since it is one of the best automation solutions in the market, we, as a leading QA company have created this blog by compiling the best Selenium commands (Inclusive of Selenium 4) one would have to know to achieve successful automation.

The Advantages of Selenium WebDriver
- Selenium WebDriver is compatible with prominent programming languages such as Java, C#, PHP, Ruby, Perl, Python, and.Net.
- It supports cross-browser interoperability which allows you to test on a variety of browsers including Firefox, Chrome, Edge, and Safari.
- Tests can be run on all major operating systems such as Windows, Mac, Linux, Android, and iOS.
- Selenium WebDriver overcomes Selenium v1’s limitations such as file upload, download, pop-ups, and dialogue barriers.
The Disadvantages of Selenium WebDriver
- Despite the many disadvantages, it is not possible to generate detailed test reports.
- It is also not possible to test images.
Types of Selenium WebDriver Commands
Selenium WebDriver commands are the methods used to run Selenium test automation scripts. The Selenium WebDriver commands offer different ways to interact with the WebDriver and perform various tasks. These methods are accessed by using a driver variable and calling “driver.methodName().” Let’s first list out the different categories of the Selenium WebDriver commands and then explore how to use them in the different browsers.
- Browser Initialization
- Browser Commands
- Web Elements Commands
- Text Box Commands
- Radio Button/ Check Box Commands
- Dropdown Box / Button Commands
- Windows Commands
- Frames Commands
- Actions Commands
- Synchronization Commands
- Selenium 4 Commands
Browser Initialization
So we’re starting the list of the best Selenium Commands with the one that is used to initialize a browser by helping us choose the browser we want to use for automating the script. The commonly used Selenium commands for browser initialization are,
Mozilla Firefox Syntax
System.setProperty("webdriver.gecko.driver”,”//driver-	location/geckodriver.exe");
WebDriver driver = new FirefoxDriver();
Google Chrome Syntax
System.setProperty(“webdriver.chrome.driver”,”//driver-location/chromedriver.exe”);
WebDriver driver=new ChromeDriver();
Edge Syntax
System.setProperty(“webdriver.edge.driver”,” //driver-location/edgedriver.exe”);
WebDriver driver=new EdgeDriver ();
Browser Commands
Now that the browser has been initialized, the next course of action will be to perform operations such as opening, closing, retrieving page source, and so on. So let’s take a look at the various browser commands that can be used to achieve all this.
get(String args)
The above Selenium command launches a new browser window and navigates to the specified URL. The command accepts a single string type parameter, which is usually the URL of the application under test. If you are a user of Selenium IDE, you may notice that the command is similar to the IDE open command.
Syntax:
driver.get("http://www.codoid.com");
getCurrentUrl()
As the name suggests, this Selenium command gives us the URL of the page currently loaded in the browser.
Syntax:
String url = driver.getCurrentUrl();
getTitle()
If you want to retrieve the title of the currently opened web page, you can use the above command.
Syntax:
String j = driver.getTitle();
getPageSource()
The above command will help you to get the source of the last loaded page and also to verify if a particular content is present or not by using the contains method.
Syntax:
String j=driver.getPageSource();
boolean result = driver.getPageSource().contains("String to find");
getClass()
If you’re looking to return the run time class name of the object, you can use the above command to get it done.
Syntax:
driver.getClass();
navigate().to()
It creates a new browser window with a new web page. It takes a String parameter and returns a void value.
Syntax:
driver.navigate().to(“http://google.com”);
refresh()
If you want to test by seeing how the page reacts to being refreshed, you can use the above command to refresh the current window.
Syntax:
driver.navigate().refresh();
back()
Back is a commonly used navigation action that you can achieve by using this command to go back to the previous page that you visited.
Syntax:
driver.navigate().back();
forward()
Similar to back, the forward action is also a widely used navigation action. So you can use the above command to redirect to the page you were in before clicking on the back button.
Syntax:
driver.navigate().forward ();
close()
The close() command is used to close the currently open WebDriver-controlled browser window. If the current window is the only active window in WebDriver, the browser will also be closed.
Syntax:
driver.close();
quit()
There is a minor distinction between the quit() and close() methods. The quit() method terminates all open browser instances, whereas the close() method terminates only the current browser instance.
Syntax:
driver.quit();
Web Elements Commands
So now we know how to open the browser and perform various browser actions, let’s progress to the Selenium commands that can be used to identify and perform actions on WebElements like text boxes, radio buttons, checkboxes, and so on. WebElements are integral to automating test scripts.
Text Box Commands
click()
We start the list with click() as it helps us to click the textbox initially.
Syntax:
driver.findElement(By.xpath("//div//input[@id='search']")).click();
sendKeys()
Entering text in a text box is one of the basic functionalities and you can do so by using this command.
Syntax:
driver.findElement(By.xpath("//input[@id='id_q']")).sendKeys("fresher");
clear()
If you enter text, you’ll also have to clear it at times. You can clear the value in a textbox by using the above command.
Syntax:
driver.findElement(By.xpath("//input[@id='search']")).clear();
getLocation()
You can employ the above command to determine the relative position of an element on a web page. You can either use it to get a location of a particular element or to access the textbox area using the coordinates.
(i)To get the location of a particular element
org.openqa.selenium.Point location;
location=driver.findElement(By.xpath("//input[@id='search']")).getLocation();
(ii)Through org.openqa.selenium.Point we can access the textbox area using coordinates
action.moveByOffset(location.x,location.y).click().sendKeys("romeo").perform();
getSize()
If you’re in need of retrieving the height and width (i.e) the dimensions of an object, you can use the above command.
Syntax:
Dimension dimension=driver.findElement(By.id("GmailAddress")).getSize();
System.out.println("Height of webelement--->"+dimension.height);
System.out.println("Height of webelement--->"+dimension.width);
getAttribute()
You can use the above command to view the value type in a search text box.
Syntax:
StringfieldValue=driver.findElement(By.xpath(“XPATHVALUE")).getAttribute(“Attributevalue");
getText()
If you’re looking to retrieve the inner text of a particular web element that is not hidden by CSS, this command can be used.
Syntax:
System.out.print(driver.findElement(By.xpath(“XPATHVALUE”)).getText());
Radio Button/Check Box Commands
Radio Buttons and Check Boxes are the next web elements that we are going to see the Selenium commands for.
click()
The click() command can be used to click the radio button or check box.
Syntax:
driver.findElement(By.xpath("XPATH")).click();
isSelected()
If you’re looking to verify if they have been selected or not, you can make use of this command.
Syntax:
element.isSelected();
isDisplayed()
You can even verify if these web elements are visible or not using the above command.
Syntax:
element.isDisplayed();
isEnabled()
The isEnabled() command can be used to check whether the web elements are enabled or not.
Syntax:
element.isEnabled();
getTagName()
You can use the above command to return the tag name of these web elements.
Syntax:
getText()
If you’d like to return the inner text, you can opt to use the above command.
Syntax:
String str=element.getText();
Radio Button/Check Box Commands
The Dropdown Box and Button Commands can be used to perform operations on the Dropdown so that we’ll be able to automate the process of selecting the required field from the dropdown.
Select class
The select class can be used to work with the dropdown elements as you’ll be able to choose the option using the various Selenium commands.
Syntax:
Select sel=new Select(driver.findElement(By.xpath("XPATHVALUE")));
sel.selectByIndex(INDEX_VALUE);
sel.selectByValue("VALUE");
sel.selectByVisibleText("VISIBLE_TEXT_VALUE");
getOptions()
If you would like to know the number of options in a dropdown, you can use this command.
Syntax:
int count=sel.getOptions().size();
getFirstSelectedOption()
You can return the first selected value using the above command.
Syntax:
String str=sel.getFirstSelectedOption().getText();
getAllSelectedOptions()
But, if you want to return a number of selected options, you’ll have to use this option.
Syntax:
int count=sel.getAllSelectedOptions().size();
isMultiple()
But what if the dropdown isn’t made for multiple options? So the isMultiple() command will come in handy as it returns true if the element supports multiple selecting options at the same time.
Syntax:
Boolean boolean=sel.isMultiple();
Deselect the options
You can even deselect the options you have selected using the above command.
Syntax:
sel.deselectAll();
sel.deselectByIndex(INDEX_VALUE);
sel.deselectByValue("VALUE");
sel.deselectByVisibleText("VISIBLE_TEXT_VALUE");
click()
The click() command can be used to click the element.
Syntax:
driver.findElement(By.xpath("XPATHVALUE")).click();
submit()
Finally, you should be able to automate the action of submitting the form using this command.
Syntax:
driver.findElement(By.xpath("XPATHVALUE")).submit();
Windows Commands
So the next step in attaining effective automation would be to automate the actions across different windows of the browser. So let’s find out how to switch to another window, pass the driver instance to another window.
Note: In order to switch to another window, we have to first identify the tab we want to switch to.
Syntax:
driver.switchTo().window(driver.getWindowHandles().toArray()[].toString();
getWindowHandle()
You can obtain the name of the current window by using this command as it will return the alphanumeric name of the current window.
Syntax:
String handle= driver.getWindowHandle();
getWindowHandles()
If there are multiple windows open and you want to retrieve the names of numerous window handles, you can utilize this command.
Syntax:
Set<String> handle= driver.getWindowHandles();
size()
You can even find out how many windows are currently open using this command.
Syntax:
int count=driver.getWindowHandles().size();
alert()
The above command can be used to switch to the alert window.
Syntax:
driver.switchTo().alert();
accept()
You can use this command with the previous command to switch to the alert window and accept the alert.
Syntax:
driver.switchTo().alert().accept();
sendKeys(String stringToSend)
If you’re looking to enter a specified string pattern into the alert box, you can use this command.
Syntax:
driver.switchTo().alert().sendkeys(String);
getText()
You can even retrieve the string content of the alert by using the above Selenium command.
Syntax:
String str=driver.switchTo().alert().getText();
ScreenShot
Taking a screenshot is a crucial part of the automation process and you can achieve it by using this command.
Syntax:
WebDriver driver = new FirefoxDriver();
driver.get("http://www.google.com/");
File scrFile = ((TakesScreenshot)driver).getScreenshotAs(OutputType.FILE);
FileUtils.copyFile(scrFile, new File("c:\\tmp\\screenshot.png"));
Frames Commands
Frames Commands are those that can be used to perform operations on the frames as it helps us to switch from one frame to another and also perform actions on the particular frames.
switchTo()
As the name suggests, you can use the above command to switch to another frame.
Syntax:
river.switchTo().frame(FRAME_INDEX);
driver.switchTo().frame(FRAME_NAME);
defaultContent()
If you would like to go back to the current window from any frame, you can employ this command.
Syntax:
driver.switchTo().defaultContent();
parentFrame()
When it comes to switching to the parent frame, you can use the above command.
Syntax:
driver.switchTo().parentFrame();
Iframe
The above command can be used to switch to an iframe.
Syntax:
driver.switchTo().frame(driver.findElements(By.tagName(“iframe”).get(FRAME_INDEX));
Actions Commands
In general, the methods of the actions classes are divided into two categories:
- Mouse-Controlled Actions
- Actions on the Keyboard
The Actions class has a number of methods that will return an action object unless otherwise specified. Mimicking a real user’s actions is impossible to do without automating the mouse and keyboard actions. So let’s take a look at how to do it.
build()
The build() is a very important command that can be used to generate a chain of actions that you want to perform.
Syntax:
Actions action = new Actions(driver);
WebElement  e= webdriver.findElement(By.linkText(“XPATH"));
action.moveToElement(e).moveToElement(driver.findElement(By.xpath(“XPATHVALUE"))).click().build().perform();
click()
This command is used to click at the current mouse location.
Syntax:
Actions action = new Actions(driver);
action.moveToElement(element).click().perform();
clickAndHold()
If you would like to click and hold on to it at the current mouse location, you can do so using this command.
Syntax:
<Script Code>
contextClick(WebElement onElement)
Context-click is nothing but clicking the right mouse button at the current location.
Syntax:
Actions action= new Actions(driver);
action.contextClick(productLink).build().perform();
release()
If you hold on to the click, you’d have to release it at some point and you can do so by using this command as it releases the depressed left mouse button at the current mouse location.
Syntax:
Actions builder = new Actions(driver);
WebElement canvas = driver.findElement(By.id("tutorial"));
Action dragAndDrop = builder.clickAndHold(canvas).moveByOffset(100, 150).release(canvas).build().perform();
doubleClick()
Another common mouse action is the double-clicking process and you can perform that by using this command.
Syntax:
Actions builder = new Actions(driver);
WebElement canvas = driver.findElement(By.id("tutorial"));
Action dragAndDrop = builder.clickAndHold(canvas).moveByOffset(100, 150).release(canvas).build().perform();
dragAndDrop(WebElement source, WebElement target)
Drag and drop is performed by clicking and holding the source element and then moving to the target location to release it. You can achieve this by using the above command.
Syntax:
Actions action= new Actions(driver);
WebElement Source=driver.findElement(By.id("draggable"));
WebElement Target=driver.findElement(By.id("droppable"));
act.dragAndDrop(Source, Target).build().perform();
dragAndDropBy(WebElement source, int xOffset, int yOffset)
This command is similar to the regular drag and drop, but it differs in the way that the movement happens with reference to a defined offset.
Syntax:
act.dragAndDropBy(From, 140, 18).perform();
here 140,8 are the x and y offset of target element.
moveByOffset(int xOffset, int yOffset)
You can offset the mouse’s position by either keeping the current position or (0,0) as the reference.
Syntax:
Actions builder = new Actions(driver);
WebElement canvas = driver.findElement(By.id("tutorial"));
Action dragAndDrop = builder.clickAndHold(canvas).moveByOffset(100, 150).release(canvas).build().perform();
moveToElement(WebElement toElement)
You can even move the mouse to the middle of a web element by using this command.
Syntax:
Actions action = new Actions(driver);
action.moveToElement(driver.findElement(By.xpath("XPATHVALUE").click().build().perform();
moveToElement(WebElement toElement, int xOffset, int yOffset)
You can use the above command to move the mouse to an offset from the top-left corner of the element.
Syntax:
Actions builder = new Actions(driver);
builder.moveToElement(knownElement, 10, 25).click().build().perform();
perform()
You can perform the actions without having to call the build() command first.
Syntax:
Actions action = new Actions(driver);
action.moveToElement(element).click().perform();
keyDown(),keyUp()
The above Selenium commands can be used to perform single key presses and key releases.
Syntax:
Actions action = new Actions(driver);
action.keyDown(Keys.control).sendKeys("a").keyUp(Keys.control).
sendKeys(Keys.DELETE).perform();
Synchronization Commands
We’re almost done with all the respective Selenium commands that one will need to complete their automation. Imagine an action such as a page reloads or a form was submitted, the script would have to wait for a certain amount of time to ensure the action has been completed. That is where the Selenium commands for Synchronization come into play.
Thread.sleep():
This command is used to pause for a defined time. Time is defined in milliseconds for this method.
Syntax:
Thread.sleep(5000);
implicitlyWait()
By using the above command, the script execution will wait for a specified amount of time before it moves on to the next step.
Syntax:
driver.manage().timeouts().implicitlyWait(15, TimeUnit.SECONDS);
ExplicitWait
But since setting a specified amount of time for every single command is not that efficient, you can make use of this command to be adaptable by waiting for certain conditions to be satisfied. This can be achieved by using different types of ExpectedConditions.
Syntax:
WebDriverWait wait = new WebDriverWait(driver, 10);
WebElementele=wait.until(ExpectedConditions.elementToBeClickable(By.id(“XPATH")));
Note: WebDriver Wait statements can be very useful for effective scripting as we can avoid using the Thread.sleep() Selenium commands.
Now let’s explore the various expected conditions.
visibilityOfElementLocated()
You can wait until an element to be located becomes visible using this command.
Syntax:
wait.until(ExpectedConditions.visibilityOfElementLocated(By.id(“XPATH VALUE"));
elementToBeClickable()
This command can be used to wait for an element to become visible and clickable.
Syntax:
wait.until(ExpectedConditions.elementToBeClickable(By.xpath(“/XPATH VALUE”)));
textToBePresentInElement()
By using this command, you’ll be able to make the execution wait until an element has a certain string pattern.
Syntax:
wait.until(ExpectedConditions.textToBePresentInElement(By.xpath( XPATH VALUE”), “text to be found”));
alertIsPresent()
If you want the execution to wait until an alert box appears, you can use this command.
Syntax:
wait.until(ExpectedConditions.alertIsPresent()) !=null);
titleIs()
You can even wait for a page with a specific title using this command.
Syntax:
wait.until(ExpectedConditions.titleIs(“gmail”));
frameToBeAvailableAndSwitchToIt()
The above command can be used to wait for a frame to become available and for the control to switch automatically.
Syntax:
wait.until(ExpectedConditions.frameToBeAvailableAndSwitchToIt(By.id(“XPATH VALUE”)));
FluentWait()
This command allows you to control two important aspects
(i) The maximum amount of time to wait for a condition to be satisfied along with the frequency at which to check if the condition has been satisfied or not.
(ii) You can even configure the command to ignore specific types of exceptions whilst waiting.
Syntax:
Wait wait = new FluentWait(driver);
withTimeout(30, SECONDS);
pollingEvery(5, SECONDS);
ignoring(NoSuchElementException.class);
Selenium 4 Commands
So all the above Selenium commands that we saw were from Selenium 3. Now, with the launch of Selenium 4, some more commands have been added and some changes have also been implemented to the Selenium 3 commands. Since we are focused on providing the best Selenium testing services to all our clients, we are always on a path of continuous learning. So let’s take a look at all the major changes one by one.
Relative Locators
There were no techniques (or particular methods) in Selenium 3 to locate Web Elements relative to the surrounding components. But relative locators have been introduced in Selenium 4 to make it easier to locate Web Elements based on their visual placement on the UI relative to other DOM elements.
above()
This command is used to identify the required web element that is just above the specified element.
Syntax:
WebElement ele1;
ele1 = driver.findElement(By.id("123"));
driver.findElement(withTagName("ABC").above(ele1)).getText();
below()
Likewise, to identify the required web element just below the specified element, the above command can be used.
Syntax:
WebElement ele1;
ele1 = driver.findElement(By.id("123"));
String ele2 = driver.findElement(withTagName("AYZ").below(ele1)).getText();
toLeftOf()
Similarly, this command can be used to identify the required web element to the left of the specified element.
Syntax:
driver.findElement( withTagName("ABC").toLeftOf(ele1)).getText();
toRightOf()
Finally, the above command can be used to identify the required web element to the right of the specified element.
Syntax:
driver.findElement( withTagName("ABC"). toRightOf (ele1)).getText();
near()
You can even identify required web elements that are about mexa piles away from the specified element.
Syntax:
driver.findElement( withTagName("ABC"). near(ele1)).getText();
Window and Tab management
It is very common for a link to open in a new tab or window based on the link you click or how you open it. We had to use the switch operation and the windowHandle function in Selenium 3 to handle it. But Selenium 4 now includes a new API called newWindow, which allows users to create and switch between new windows/tabs without having to build a new WebDriver object.
Syntax:
driver.get("https://www.flipkart.com/");
driver.switchTo().newWindow(WindowType.WINDOW);
driver.navigate().to("https://www.codoid.com/");
driver.get("https://www.flipkart.com/");
driver.switchTo().newWindow(WindowType.TAB);
driver.navigate().to("https://www.codoid.com/");
Conclusion:
We hope you have found our comprehensive list of all the prominent Selenium Commands and their syntaxes to be useful. We have also made sure to add the commands from Selenium 4 to make this a conclusive blog that captures all the needs. These are the Selenium Commands that we use in our automaton testing scripts and hope you’ll use them in your scripts too.


Comments(0)