
by admin | Sep 30, 2021 | Automation Testing, Blog, Latest Post |
Cypress has been gaining popularity in the testing community despite Selenium still being the favorite choice. During the initial days, Cypress had features only for Unit testing, and it was also supported only by a few browsers. However, Cypress has now extended its capabilities for End-to-end Testing, Integration Testing, and Unit Testing. So choosing between these two options isn’t as easy as it once was. So in this blog article, we will be pitting Selenium vs Cypress and list out the key differences between the two to find out which will be better for your needs.
Cypress
Cypress is not an open-source tool only its test runner is open-source. Many modern test automation frameworks are built on top of Selenium. Whereas Cypress has its own architecture to interact with browsers. Selenium performs the actions on a browser through the browser API. Cypress has a node process that runs behind the scenes and controls the web application to perform the set of scenarios we have listed below.
- Stub the functions of your browser or application to force them to behave as per the requirements in your test case.
- It enables us to programmatically alter the state of your application directly from your test code by exposing data stores (Like in Redux).
- You can force your server to send empty responses and test edge cases like ‘empty views’.
- You have the option to test how your application responds to errors on your server by modifying the response status codes to be 500.
- Direct modification of DOM elements like forcing hidden elements to be shown can be done.
- It is possible to prevent Google Analytics from loading before any of your application code is executed while testing.
- Stay in the loop with the synchronous notifications you get whenever your application transitions to a new page or when it begins to unload.
- Move forward or backward to control time and allow the timers or polls to automatically fire without having to wait for the required time in your tests.
- You can also add your own event listeners for responding to your application. You could also update your application code so that it behaves differently when under tests in Cypress.
Source – Cypress Documentation
Selenium
Selenium WebDriver can be used to control your browser either locally or remotely.
Local – First up, the client binding sends the WebDriver commands to the driver. Following this, the driver sends the command to the browser. Once a command is executed on the browser, the outcome of the command execution will be sent back from the same channel.
Remote – Let’s say you have the automation codebase in Windows, but want to run your scripts on the Chrome & Linux combination. You can start the Selenium Remote WebDriver on the Linux machine. After which, the client binding from Windows will send the commands to the remote WebDriver. From there the remote WebDriver sends the commands to Chrome Driver, and finally, the commands reach the browser via the Chrome Driver.
Advantages of Selenium
As stated earlier, Selenium is the crowd favorite. So let’s take a look at the advantages that make Selenium so popular.
- Selenium WebDriver supports multiple programming languages.
- Selenium can be integrated into any test automation framework.
- It supports multiple browsers.
- In Selenium 4, you can get the DevTools instance using CDP.
- Selenium also has a strong online community.
We have seen a glimpse of both Cypress and Selenium separately. Now let’s take the Selenium vs Cypress a notch higher and compare both on a point-to-point basis to see which one will be useful for you.
Selenium vs Cypress Comparison
| S. No |
Features |
Selenium |
Cypress |
| 1 |
Programming Languages |
Selenium Has Client Bindings For Following Languages C#, Python, Ruby, Java, JavaScript And Etc. |
JavaScript |
| 2 |
Pricing |
Free |
Free For Up To 3 Users & 75 USD Per Month For 10 Users |
| 3 |
Browsers Supported |
Chrome Edge IE Firefox Safari Opera Headless |
Edge Chrome Firefox Electron |
| 4 |
Video Recording |
Selenium Is A Web Browser Automation Tool. You Can Bring Execution Recording Using Your Test Automation Framework, But Not Using Selenium. |
Cypress Has An In-Built Feature For Video Recording. |
| 5 |
Screenshots |
Page-Level And Element-Level Screenshots Can Be Captured Using The TakeScreenshot Method. |
By Default, Screenshots Are Taken For Failures And Embedded Into Test Results. If You Want To Take Inside The Script At Any Point, You Can Use Cy.Screenshot() Command. |
| 6 |
Jira & Slack Integration |
No. You Need To Write Your Own Utilities To Integrate Jira & Slack. |
Yes |
| 7 |
Testing Libraries |
You Can Use Any Testing Libraries Based On Client Bindings Support. |
Cypress Supports Only The Following JavaScript Testing Libraries – Mocha, Chai, Chai-JQuery, And Sinon-Chai. |
| 8 |
Reporting |
Selenium Does Not Have In-Built Reporting Libraries. You Need To Integrate Some External Reporting Tools Like ReportPortal Or Allure Reporting. |
Cypress Has A Comprehensive Reporting Dashboard That Can Make The Test Results Visible To The Entire Team. |
| 9 |
Open-Source/Freeware/Commerical |
Open-Source |
Cypress Dashboard Is A Commercial Tool. Test Runner Is Open-Source |
| 10 |
Load Balancing |
No |
Cypress Will Automatically Balance Your Spec Files Across The Available Machines In Your CI Provider. |
Conclusion
As a leading test automation company, we use Selenium extensively for delivering the best-in-class automation testing services. After a lot of R&D, we did try Cypress out in a couple of our projects. We found Cypress to be a good choice for web applications developed using only JavaScript technologies in both the client-side and server-side.

by admin | Sep 28, 2021 | Automation Testing, Blog, Latest Post |
If you are assuming that achieving successful test automation is a cakewalk, you can’t be more wrong. You need a highly skilled team, a proper automation framework, healthy support from the management, the right tools, and proper training. Apart from that, we should always be on the lookout for ways to improve the automation testing process & scripts. But you need not be overwhelmed by the long list of requirements as we will be exploring the fundamentals of automation testing in this blog. So let’s get started.
Automation Testing Team
You can bring a good automation testing tool to automate web applications, mobile apps, and APIs. But you can’t bring a tool to write automated test scripts by itself as you need human intelligence to create reliable test automation scripts. That is what makes your team one of the fundamentals of automation testing.
So let’s take a look at a few pointers to understand why we need automation testers to create and maintain automation test scripts.
- Only an automation tester who has good domain & system knowledge can write proper test automation workflows for the given end-to-end tests.
- No application is static in the modern world. Your application GUI will be based on the test data, geolocation, language, user roles, and color themes. The automation testing tool needs two inputs. One is the information about the element to interact, and the other is the test data to be fed. Only an automation tester can provide the necessary inputs to the tool while automating a test workflow.
- Test Automation Tools can tell you how many times a test script is failing. However, it can’t tell you why it is failing. Automation testers will troubleshoot the failures and understand the reason for the failures. So if there is any issue in the script, it will be fixed immediately.
The Required Skills
Now that we have seen why we need the team, let’s check what skills an automation testing team should possess.
1. The team should know how to make the automated test reports visible to everyone.
2. They should have a thorough knowledge of the tools they use.
3. Boilerplate codes are killers during maintenance. So your team should know how to implement the code design patterns to avoid boilerplate codes.
4. Knowledge sharing within the team and following the best practices for test automation are vital aspects.
So when you have talented people on board, you can see success in test automation from the very beginning.
System Knowledge & Thinking
As an experienced automation testing company, we have mitigated several failed automation testing projects. Our observations make it clear that System Knowledge & Thinking are also the fundamentals of automation testing as the lack of technical skills was the major concern in many projects. However, in some cases, the projects had failed due to the lack of domain knowledge. The teams had thought only about the test automation tasks and lacked the system thinking (i.e.), the type of thinking that analyses if your automated test scripts will add value to the system and not to the team or your department. Your team should in no way be working for your departmental goals. So the question has to be asked, how can we make a team focus on the system? Here are a few basics you can follow.
- Don’t isolate the automation testing team.
- Include them in all the process improvement meetings.
- Include a high-level and real-time automation testing report in the system development dashboard.
- Enable effective collaboration and knowledge sharing.
- Make sure everyone in the team is well aware of the system goals.
- Encourage them to participate in pair testing and exploratory testing sessions.
Designing automated test workflows requires in-depth knowledge in the application domain
Acceptance Test-Driven Automation (ATDA)
Times were different a decade ago, automation testing teams usually spent a lot of time developing test automation frameworks. Which meant that the script development process started only after the entire framework development process was done. But it goes without saying that automated script development should not wait for the completion of the framework development.
But you might ask how it is possible to start script development without a framework.
It is possible if you are familiar with Test Driven Development (TDD) as you can easily understand Acceptance Test-Driven Automation (ATDA) as well. ATDA allows you to develop the test automation framework while writing automated test scripts.
In TDD, the developers first write Unit tests and then develop the application features until the captured unit tests are passed. In the same way, when it comes to test automation, you start writing test scripts using Cucumber, Selenium, and Appium tools. So if a script needs the test data from an Excel or a YAML file, you must add the test data utility in the framework before moving to the next test script.
But when using ATDA, you will make the test automation framework evolve by developing the test scripts in parallel. In the traditional automation approach, you will spend a hell of lot of time developing a framework and its utilities. Moreover, it is impossible to gather all the requirements for developing the framework without commencing the script development.
Test Data Management
Automation Test Script executions need a fresh dataset. Most of the execution failures happen due to the below three reasons.
1. Missing test data or the data which are fed for execution are already consumed.
2. Application Issues
3. Script Issues (Incorrect object locator details, UI or Functionality Change)
Test data issues need to be avoided at any cost and automation testers should not spend time to feed test data in automated test suites every time before starting the execution.
Use or create a test data management tool to keep as much as the required test data ready. So make sure your test automation scripts don’t starve for test data.
Reporting & Logging
Since Reporting & Logging is one of the fundamentals of automation testing, you have to make sure that any and all automation testing frameworks you choose have the below capabilities.
- The reports should be real-time as your team should be able to view which test case is being executed now and the test step which was just executed.
- All the framework & utilities-related exceptions and log information should go in a separate log file.
- The reporting tool should track how many times a script has failed.
- It should also collect the report data for metrics.
- Reports should be accessible and understandable to everyone.
- Screenshots and Video recordings should be embedded.
There are many test automation reporting tools available in the market that can come in handy. Make sure the tool takes care of everything once you ingest the reporting data into the tool database. Never try to build a reporting tool on your own unless you have a special requirement. Maintaining a tool is an overhead, and your focus should be on the Framework & script development.
Conclusion
So these are the fundamentals of automation testing that one has to know. As one of the best companies for automation testing, we always improve our test automation process and train our teams for continuous improvement. We have seen many instances where the frameworks which were used were not updated with the latest libraries and test automation techniques. So it is evident that when you have a proper team that always focuses to improve and collaborate effectively, you will see success in test automation.

by admin | Sep 27, 2021 | Selenium Testing, Blog, Latest Post |
In Selenium 4, the WebDriver bidirectional (BiDi) protocol has been implemented. First of all, you should know why WebDriver needs the BiDi protocol. First, the Selenium WebDriver client library sends HTTP command requests to a server. The received requests are then processed by the server. Once the server is ready with the response, it will send the response to the client.
So the Selenium WebDriver Remote server does not send any HTTP response or message to the client until it receives an HTTP request.
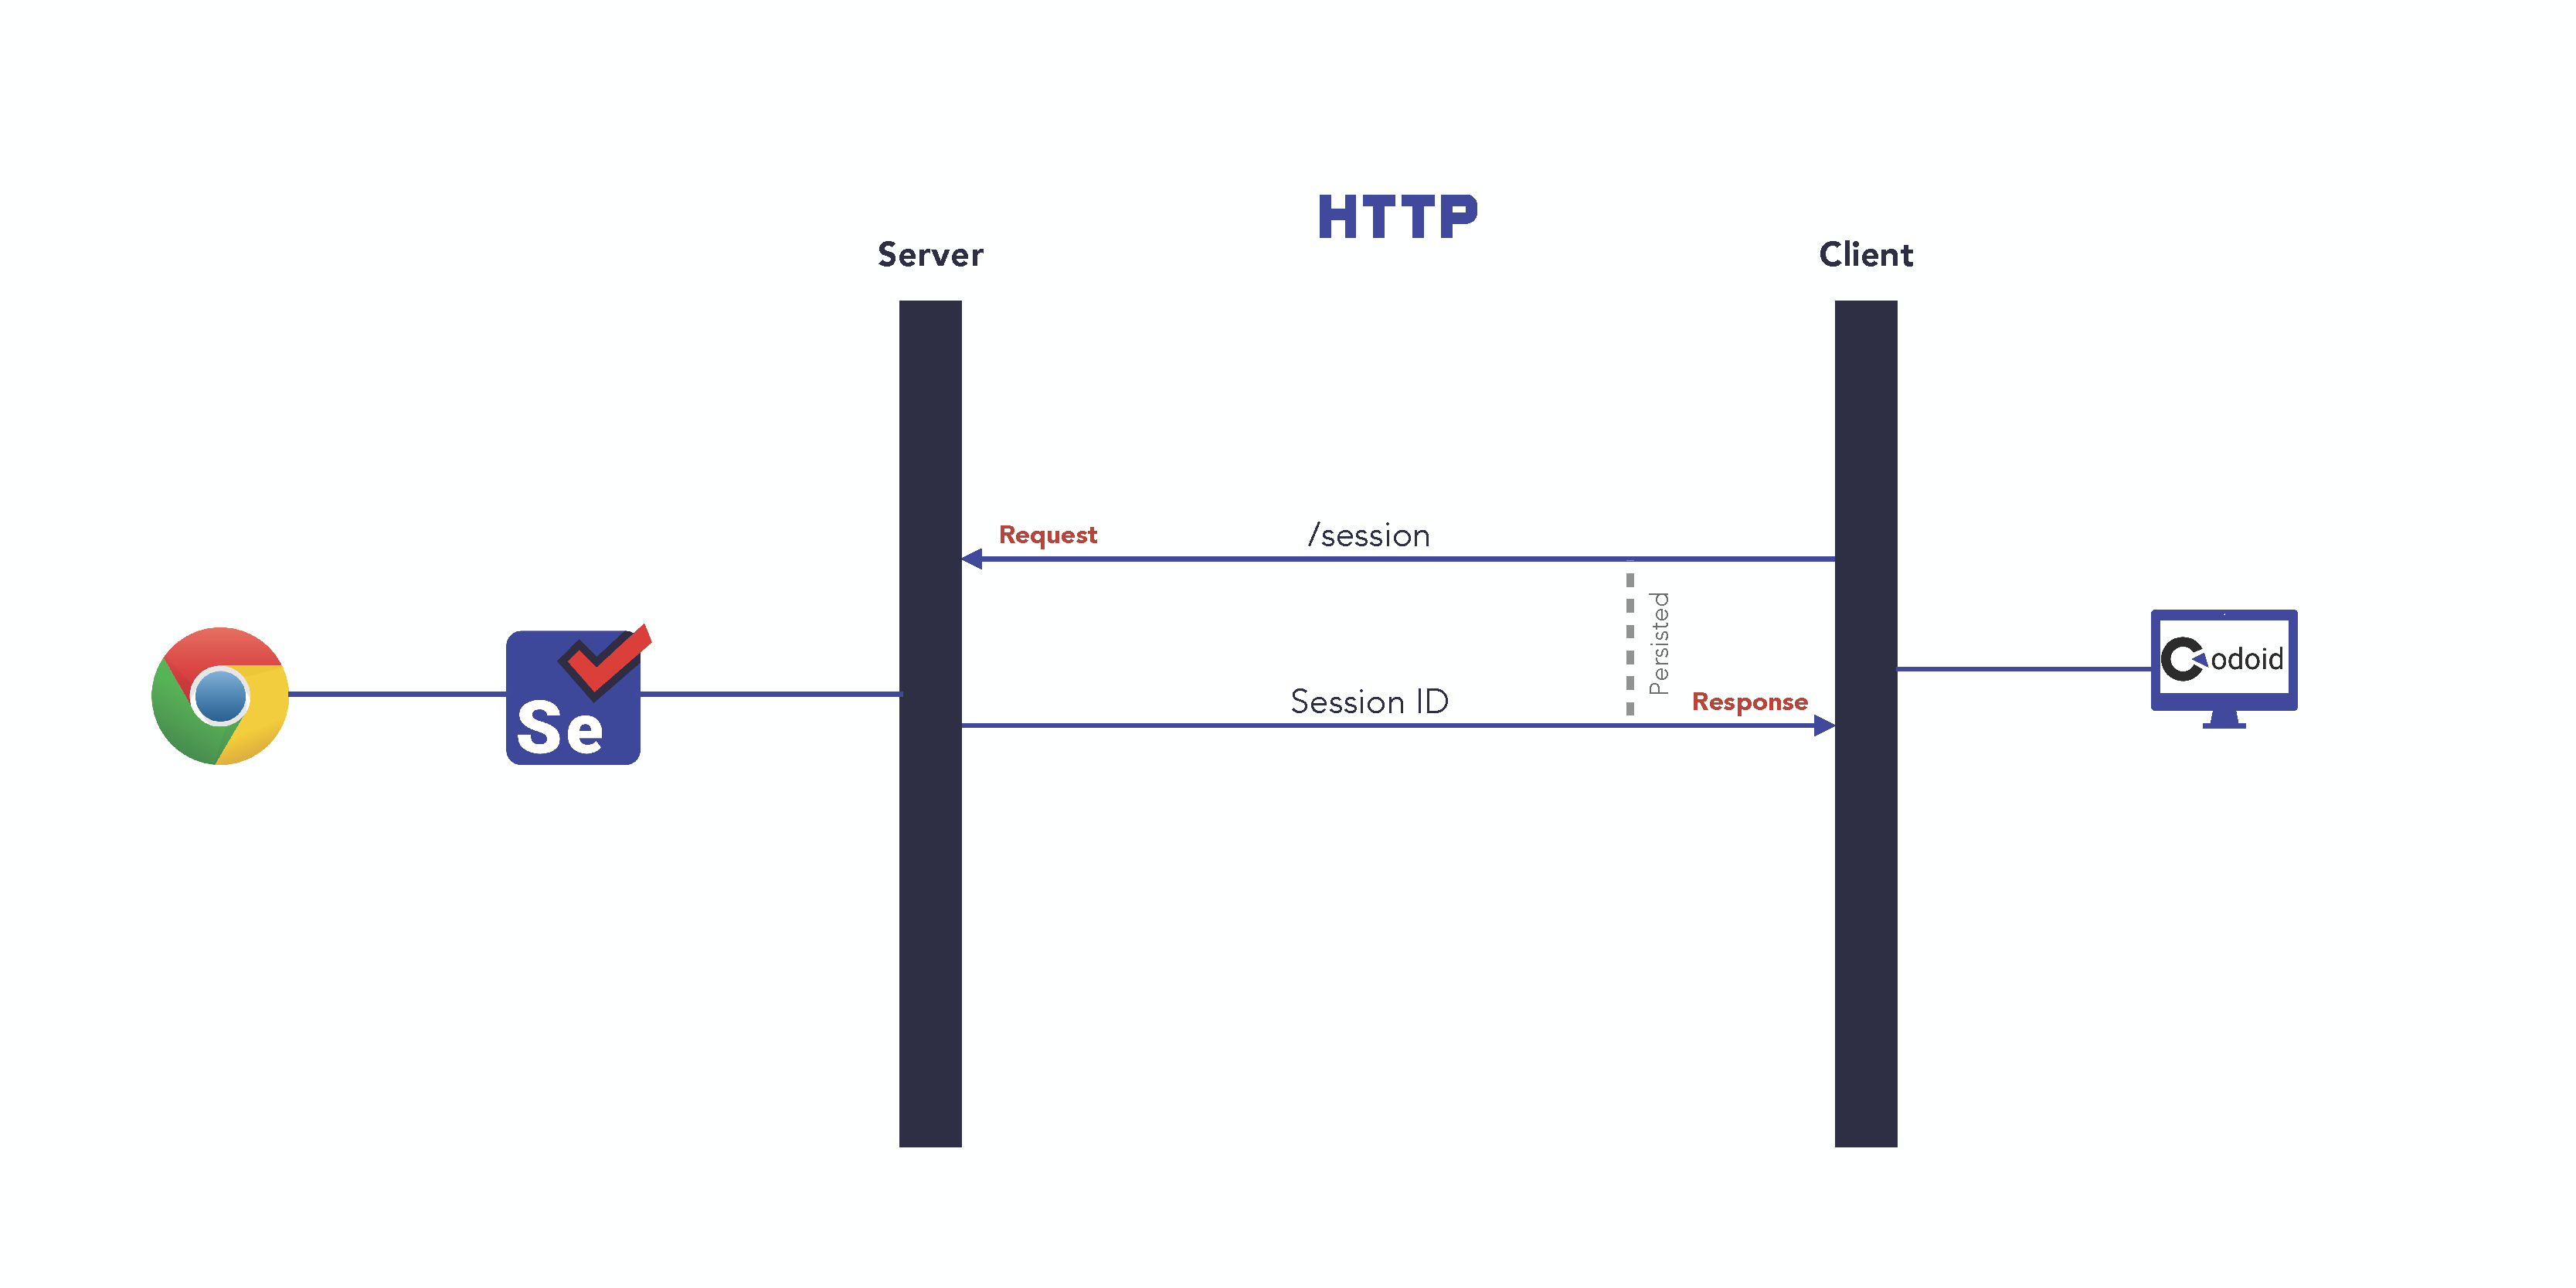
In the above diagram, the client sends a request and the server responds. The client does not kill the connection with the server until the response for a command request is received. Selenium WebDriver has more than 60 endpoints to communicate with a remote server.
Why BiDi Protocol?
The WebDriver Bi-Directional protocol allows both the client and the server to send & receive requests and responses. But we have enough HTTP commands to send requests to the server. Then why do we need the BiDi protocol? To understand this, you need to know some features which are available in Selenium 4.
- Listening DOM events
- Capture & send JS Errors and Console messages to client
- Record Traffic
- Access to native devtools protocol
Let’s take sending console messages to the client as an example. If a webpage has 100 console log messages, then the server needs to establish 100 HTTP connections and moreover, the server cannot send a response without a valid request from the client.
Even if the selenium developers tried to implement this feature with an HTTP connection, the server wouldn’t be able to handle multiple requests simultaneously. That is the reason why the BiDi protocol has come into the picture.
What is BiDi Protocol?
BiDi is a web-socket protocol. Websocket is an event-driven protocol. Let’s say the Selenium client wants JavaScript error messages from the browser. Whenever JavaScript errors are notified by the browser to the server, the error messages will be sent to the client. So the server will send the error message only when there is an error. This is called the event-driven protocol.
In the below diagram, you can see that server is sending the WebSocket URL to the client in the new session endpoint response. So any commands other than HTTP server endpoints will be communicated using the WebSocket URL.
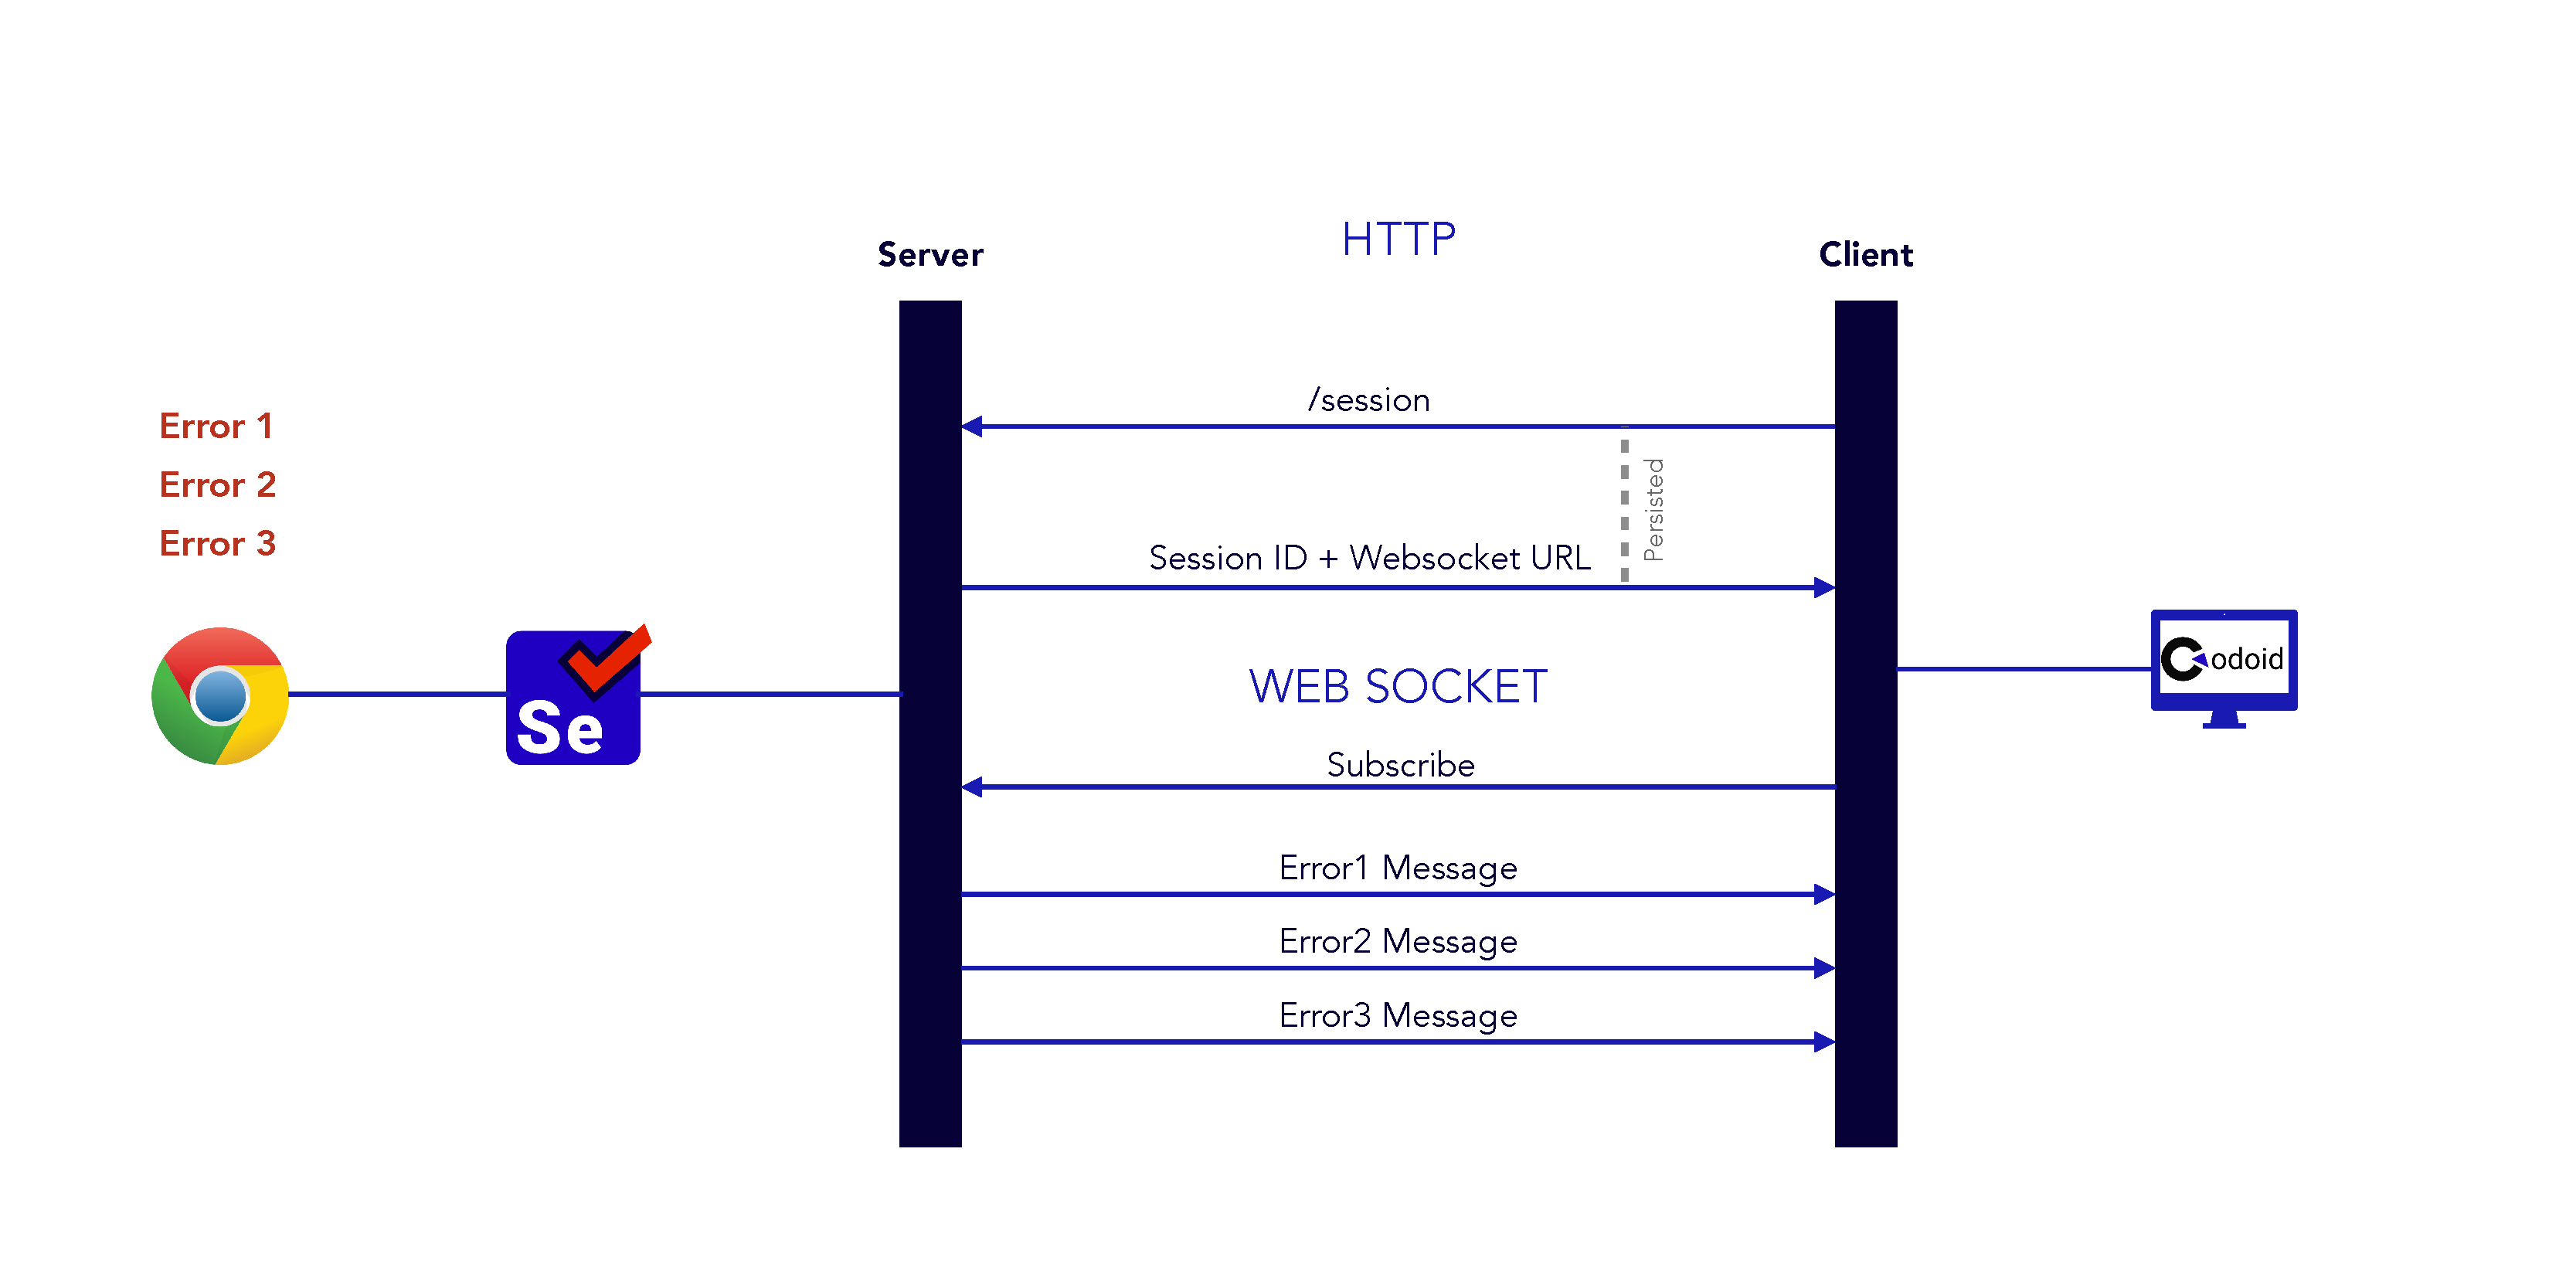
When the client needs the JavaScript console error logs, then it should subscribe to the server so that the Selenium Server will send the error messages to the client from the browser.
Refer to the below snippet. The client subscribes to the Browser Log messages. So whenever any log message is added in DevTools, the server will send the message.
import org.openqa.selenium.WebDriver;
import org.openqa.selenium.chrome.ChromeDriver;
import org.openqa.selenium.devtools.DevTools;
import org.openqa.selenium.devtools.Log;
import org.slf4j.*;

public class Selenium4Devtools {
    final static Logger logger = LoggerFactory.getLogger(Selenium4Devtools.class);

    public static void main(String args[]){
        System.setProperty("webdriver.chrome.driver", "drivers/chromedriver.exe");
        WebDriver driver = new ChromeDriver();

        try{
            DevTools devTools = ((ChromeDriver)driver).getDevTools();
            devTools.createSession();
            devTools.send(Log.enable());
            devTools.addListener(Log.entryAdded(), entry -> logger.error(entry.asSeleniumLogEntry().getMessage()));
            driver.get("https://www.codoid.com");
        }
        catch(Exception e){
            e.printStackTrace();
        }
        finally {
            driver.quit();
        }
    }
}
Conclusion
As a leading automated functional testing services company, we have explored many Selenium 4 features, and the WebDriver BiDi protocol is certainly an interesting topic. It is pivotal for every automation tester to be familiar with the internal processes of Selenium.

by admin | Sep 29, 2021 | E-Learning Testing, Blog, Latest Post |
Creating responsive content is always the recommended way irrespective of the platform you are creating it for. But when it comes to content on the LMS, the importance is a notch higher as many eLearning courses are now available on smartphones and tablets as well. The unexpected pandemic has only given more reasons for you to make your content responsive. To begin with, the number of people taking eLearning courses went up. They did so with the devices they had in hand. So the already difficult challenge of formatting the content to fit across different screen sizes and form factors got a lot harder. But even without the pandemic, testing your LMS to see if the content is responsive has always been a primary focus. So let’s take a look at a few vital tips that you can follow to make the job easier.
The LMS Choice
Choosing the right LMS provider for the job is the first step and a very important step as well. But how will you know if you have the right one? The best option here is to analyze the LMS features and verify if it will be helpful in building and delivering content that can be optimized for mobile or tablet users. We should also verify if the LMS provider will be able to provide the instructors and course designers with the required tools to create responsive content. Not all tools work in all use cases, which is why the LMS providers should have the expertise to choose the tools that will be apt for your needs. The reason we’re starting with these factors is that the content creation process itself should start with the end goal in mind.
Curating Responsive Content
So with the first step, we have made sure that the instructors and the content designers have the best tools at their disposal to get the job done. Now we have to implement the best practices to ensure that the curated content is responsive. For the content to look clean and organized across all screen sizes, we can assign a limited word count for the instructor when it comes to written content. Likewise, we can limit the image size and advise the designers to work accordingly. We will be tasked with different challenges when it comes to video content. In case the user has low internet speeds, then videos will have a tough time loading. So we have to make sure the instructor creates a transcript of the video.
Test Strategy
Creating a test strategy from the learner’s viewpoint helps us understand their expectations better. So your test strategy should align with those expectations and the initial goals defined at the start of the development process. The test strategy shouldn’t just focus on the content’s accuracy. Rather, the performance of the platform should also be tested without fail. So it is imperative to check how well the content performs in different devices under different scenarios.
Let’s say the content fits perfectly but takes a lot of time to load. That shouldn’t be a pass when testing to see if the content is responsive. Instead, we have to make sure there is no loss in usability. So before you start developing our test strategy, make sure to receive all the documentation and go through it thoroughly. It will help you get a crystal clear understanding of each module or component’s purpose.
Conclusion
Although these are valuable tips you can follow to ensure that your content is reactive, it is vital for the LMS to make it as easy as it can be for learners to submit feedback if or when they face any issues. As a leading e-learning testing company, we never overlook the fact that content will constantly be added to the LMS. So we have used the feedback and our own test reports to streamline the process and set ourselves on a path of continuous improvement.

by admin | Sep 23, 2021 | Automation Testing, Blog, Latest Post |
Going all hands on deck for every project to reach the market early is not always a great choice. We have to use the resources efficiently by using automation to eliminate the need for human intervention or supervision in as many tasks as possible. Not all project are alike and so the need for automation tools also vary on a project-to-project basis. As a leading QA Company, we focus on providing the best software test automation services using the aptest tools for the specific needs of our clients. So with that expertise to back us up, we have curated this specialized list of the top 10 automation testing tools you would need for various needs.
Selenium
When it comes to web application testing, Selenium is hands down the best option out there. There will be no Top 10 automation testing tools list without Selenium as well. But what makes Selenium so good? Selenium is so widely supported that you can use it to perform testing across numerous browsers on different platforms like Windows, Mac, and Linux as well. Selenium is also compatible with a vast number of programming languages like Java, Python, C#, Groovy, and the list keeps going. Now we know what makes Selenium good, so let’s see what makes Selenium undeniably great.
Selenium makes it possible to perform parallel test execution, which in turn will reduce the test execution times greatly. Apart from saving invaluable time, it is also helpful in creating the most complex and advanced automation scripts to meet your demand. In addition to having such benefits of its own, Selenium integrates well with other software testing tools to make the experience even smoother. We started this list with Selenium as it is also a base for many other testing tools that are available.
Appium
Like how Selenium is for web application testing, Appium is for mobile automation testing. Be it hybrid or native mobile applications developed for iOS & Android, Appium’s ease of use and high compatibility make the process automation testing a breeze. If you’re wondering how then the answer is that Appium doesn’t require SDK or recompilation of the app to test native apps. So you can use the test practices, frameworks, and tools of your choice and be in full control of the entire process.
Cypress
The primary advantage of using Cypress is that it paves the path for efficient end-to-end testing and therefore increasing its scope from being just a tool for automation. Debuggability is the standout feature of Cypress due to its many unique features like,
1. Cypress provides us with human-readable errors and makes stack traces easily accessible.
2. Cypress has the ability to take snapshots of the tests as they run. So you will be able to use the command log to see what exactly happened at every step along the way.
3. Never go out of sync as Cypress neither sleeps your tests nor adds unnecessary waits.
4. Finally, its real-time reloads enable easier implementation of changes to the tests as Cypress will reload automatically whenever any change is made.
FlaUI
FlaUI is a UI-based automation library that can help test applications that run on Windows OS. It has a large library that covers almost every single library used in the Microsoft UI Automation Test Library. FlaUI is the tool look to go with if you are looking to automate win32, WinForms, WPF, and even Windows Store apps by capitalizing on the available libraries. If you feel this tool would be useful to you and unsure of how to use it. We have a great blog that clearly explains how we can make full use of the tool.
Postman
In this Top 10 automation testing tools list, we have seen tools for specific tasks thus far. Likewise, let’s take a look at a couple of options for testing APIs which is always not an easy job to do. Postman’s API testing tool helps you set up automated tests without breaking a sweat. But the benefits don’t end there as they can also be used to aggregate the tests and requests that you have created into one automated test sequence. Postman even has common JavaScript snippets that can come in handy to test without writing any code for general use cases. By creating test suites we will be able to organize a set of our requests in Postman Collections, which in turn helps you run and automate a series of those requests. So Postman makes it very simple to run and manage your test workflow.
SoapUI
SoapUI is a headless functional testing application that is best suited for testing API and services. Even if you’re just starting out with API testing SoapUI makes it easy for you as it has a resource center to guide you. It supports various protocols and collections like REST, SOAP, GraphQL, JMS, and so on. Its drag and drop feature is a great way to accelerate script development. So with the rising need for API testing, SoapUI becomes an integral part of your CI/CD pipeline and delivers software as fast as possible.
BrowserStack
One of the primary objectives of automation testing is to reduce the effort spent on repetitive tasks. Testing across different device and software combinations is one such scenario, and this cloud-based solution is a tool we can’t afford to miss. First of all, with BrowserStack in the picture, you need not worry about having all the hardware to pull off large-scale testing. But most importantly, you can use the ‘automate’ feature in BrowserStack to run tests in parallel across so many devices with various combinations at lightning speeds. There is no room for any compromise as we can even simulate network conditions, IP geology, and GPS geolocation.
Ranorex
Ranorex Studio is a great all-in-one option as it can be used in almost all use cases as it can be used to test desktop, web, and mobile apps. It is very apt for beginners due to its codeless click-and-go interface that makes things so simple. But with a full IDE, it is powerful enough even for the experts of the trade. It has a shareable object repository, it enables highly reliable object identification even in the case of web elements with dynamic IDs. Apart from that, Ranorex also has the various features we have seen in the previous tools like recording and playing the tests, easy integration with other testing tools, code reusability, and so on.
TestComplete
Just as the name suggests, TestComplete is another all-in-one solution that offers great value by having the ability to test desktop, mobile, and web applications. Similar to Ranorex, we will be able to use it without writing even a single line of code. It can even be used to write complex automated test scripts in the same fashion. Using TestComplete we can run functional UI tests in parallel either using the cloud or your local machine. Since it can blend seamlessly with other tools you might use, TestComplete would make for a great asset to have to achieve continuous testing. That is why TestComplete makes its way to this list of the Top 10 automation testing tools.
CucumberStudio
With the primary focus on the end-user experience, Cucumber is a Behavior Driven Development (BDD) tool that has a lot of pros on its side. CucumberStudio promises a living document as your BDD documentation always stays up to date with seamless Git integration. It boosts collaboration with highly refined and readable executable specifications that everybody can understand easily. An added advantage that comes along with it is the higher visibility of the testing activities for the stakeholders. Another area where enhanced collaboration has a visible advantage is in drafting test scripts as a collective effort of testers and developers.
Conclusion
As stated earlier, the need for automation tools does vary with each project. But at the same time, these 10 automation testing tools cover some of the most common use cases as we have seen tools that have their own specialty. We hope we have covered a wide range of tools that would benefit you in the future. As a forerunner in the industry who provides test automation as a service, we will continue on a journey of continuous learning & improvement by exploring many more tools.

by admin | Sep 20, 2021 | Automation Testing, Blog, Latest Post |
The need for automation in testing has been on the rise as more and more companies adopting for it which has also increased the demand. Going from being a manual tester to an automation test engineer doesn’t just happen in a snap. It is a process that takes time and requires a lot of disciplined effort. But at the same time, it is not like you will transition yourself into doing something totally irrelevant. As a leading manual QA testing company, we firmly believe the objective of both manual testing & automation testing to be the same, and that both are quintessential. So a good understanding of manual testing can help lay the groundwork for what is to come in the future. In this blog, we will be covering the automation tester skills that you should concentrate on to make a smooth and successful transition from Manual Testing.
Understanding the need
But before we head over to see what the must-have qualities of an automation test engineer are, let’s first understand the need for automation testing. The rise of the agile software development process has radically increased the rate at which software is developed. So automation testing has become the solution to meet the ever-growing demand as it is very much efficient in performing repetitive tasks over and over again. Now that we know the purpose of automation testing, we will be able to get a better picture of the focus points needed for this transition and understand them better as well.
Coding is the Key
There is just no other way to put it. Coding is one of the must-have automation tester skills when it comes to automation testing and there is no workaround that will let you bypass it. If you are considering tools that claim to perform codeless automation, we assure you that it is not a viable option. Learning to code is the first step that you have to take and there might be difficulties here as you might feel as though you are starting everything from scratch again despite being a manual tester all this while. But the actual situation here is that you are a software tester and you are just adding a new skillset.
Coding is the key to a successful automation career and so make sure you are familiar with concepts like Object-Oriented Programming, JavaScript, HTML Basics, Coding design patterns, and so on. The lingering question in your mind would be about what programming languages you must focus on. The answer to that question is Python, Java, JavaScript, XML, CSS, (C, C++ & C#), SQL, and Perl in no particular order. Do a bit of groundwork and find out which of these languages you have easier access to learn about and start your learning journey.
Tools and Frameworks to Explore
Learning the programming languages is a good first step, but it is by no means the only step you would have to take to hone your automation tester skills and fully transition into an automation testing engineer. You can further simplify the automation process with the help of the numerous open-source tools and frameworks that are available in the market. Once you have learned the various programming languages, you will be in a position to write effective automation scripts that can be implemented in such tools to get the job done. Selenium is one of the most renowned tools that every automation tester would use to automate the web application testing with their scripts. Likewise, Appium is a great option for mobile automation testing, Postman for API testing, and the list keeps going. Read our blog that covers the top 10 automation tools to get a better idea of what these tools can do.
Take the hassle out of the development process by using effective automation frameworks like Nightwatch.JS, Cucumber, and Protractor. Such tools will be instrumental in making your test suites easy to maintain, data handling, increasing code reusability, and so on.
The Automation Testing Life Cycle
We will not be taking a step-by-step walkthrough of the Automation Testing Life Cycle (ATLC) methodology. Rather, we would be bringing to light a few things about it that you should know to begin with. Deciding which test cases should be automated is the first and foremost aspect of this methodology. Just because we can do something, doesn’t necessarily mean we have to do it. The same applies to automation testing as well. You have to make sure you’ve understood the product and the requirements well enough to run a risk analysis. Based on that analysis, you should implement automation only in places you deem to be necessary.
This decision plays a pivotal role in the test strategy that you will be implementing in the ATLC. Once you have narrowed down the test cases you should automate, you can then pick the automation tools that you will be needing to complete the task. Few tools are open-source, few are not. So you would have to also plan the predicted cost and calculate the estimated ROI to make sure your decision to automate was correct. If there is no scope of ROI, then it would be probably best to review the initial decision. After which, you would have to plan, design, and develop the tests and move forward with the regular testing process of executing the tests and reviewing the results before starting the next cycle.
The Learning Curve
Completing a degree or a course is a great value add. But that alone is never enough. “Practice Makes Perfect” is an old saying, but it still holds up when it comes to automation. The key factor to remember is not to overwhelm yourself by starting out with extremely difficult tasks. Even in case of any misstep, simple test cases will make it easier to debug, maintain, and even reuse. Start small, but make sure you do it right. The more you keep automating test cases, the more equipped you get in handling any unforeseen scenarios that might arise as challenges in the process. The objective here is to develop your automation tester skills and not just getting certified. So make sure you continue the learning process by being updated with any new tool in the market, new tips, hacks, and so on.
Conclusion
We hope you found this blog to be insightful and helpful. Finally, we would like to say that you have to be rooted in the concept of delivering better software quality. As one of the best manual software testing companies, we understand the importance of manual testing and that it can’t be completely replaced with automation. So make sure to stay updated on both fronts as both are vital aspects in delivering quality software.


