
by admin | Nov 30, 2021 | Selenium Testing, Blog, Latest Post |
Now that Selenium 4 has been officially released, we thought it’ll be a great idea to compare the architecture of both Selenium 3 & 4 and explore the Selenium 4 New Features. As one of the leading automation testing companies, we have been using Selenium for years and years over numerous projects to deliver high-quality Automation Testing Services to our clients. We feel that the upgrades in Selenium 4 are all welcome features that will be useful in helping the software testing community. Now let’s kick start this blog by comparing the two architectures.
Selenium 3 Architecture:

- The architecture for Selenium 3 includes the JSON Wire Protocol (JSON stands for JavaScript Object Notation).
- The JSON Wire Protocol operates as a mediator to transfer information from the client to the server over HTTP (HyperText Transfer Protocol).
- The Request is sent from the Selenium Client & the WebDriver Language Bindings module and received by the JSON Wire Protocol over HTTP. It is then secured by the Browser Driver module as shown in the above figure.
- Therefore the request command is delivered to a Web Browser module where the real automation takes place as shown in the above figure.
Selenium 4 Architecture:

- Selenium 3 includes the JSON Wire Protocol as discussed above, whereas Selenium 4 has introduced the W3C protocol as the communication medium of the browser between the client and server.
- Here, the client has two parts called the Selenium Client and WebDriver Language Bindings. The Browser Drivers acts as the server as shown in the above figure.
- The Selenium Client sends out a request to perform a command.
- The Browser Drivers receives that request and then returns a response after an automation test script is executed on the web browser.
Selenium 4 New Features:
Now that we understand how both versions work, let’s explore what are the new features that Selenium 4 has to offer.
1. Selenium WebDriver:
It is an open-source API that the web driver allows to interact with the browser just like a real user.
2. Selenium IDE:
It enables us to record and playback the user interactions with the browser. The new version of Selenium IDE is now available with more features.
3. Selenium Grid:
It can be used to save time by distributing and running tests on multiple browsers, operating systems, and machines.
4. Using WebDriver Manager:
Prior to the release of Selenium 4, if you wanted to run Selenium WebDriver automation scripts in Chrome, you had to first download chromedriver.exe and then use the System.setProperty as shown below to set its path.
System.setProperty("webdriver.chrome.driver","/absolute/path/to/binary/chromedriver");
After Selenium 4 release
Step 1: Add the Maven Dependency for the WebDriver Manager
https://mvnrepository.com/artifact/io.github.bonigarcia/webdrivermanager
Step 2: Add the code
Instead of the “System.setProperty()” call, the class code for WebDriverManager should be used.
WebDriverManager.chromedriver().setup();
Step 3: We can also choose a specific version of the browser as shown below.
WebDriverManager.chromedriver().driverVersion(“92.0”).setup();
5. To Capture screenshot of specific web element in selenium 4:
Users being able to take a screenshot of a specific web element is another one of the best Selenium 4 New Features that can make life easier for testers. Earlier, it was possible to take a screenshot of the entire page, but there was no provision to take the screenshot of a specific web element. Though it is a simple upgrade, it can come in very handy during real-world usage.
WebElement logo =driver.findElement(By.xpath("//div[@class='logo_container']"));
File file=logo.getScreenshotAs(OutputType.FILE);
File destFile =new File(“codoid.png”);
FileUtils.copyFile(file,destfile);
6. To open the new tab on the browser in Selenium 4:
The users can save a lot of time as it is now possible to open a URL in a new tab along with the existing tab. Let’s take a look at the sample code for opening two URLs in two different tabs.
public class SampleTab {
    public static void main(String[] args) {
          System.setProperty("webdriver.chrome.driver","src/Drivers/chromedriver.exe");
        WebDriver driver = new ChromeDriver();
        driver.get("https://www.google.com/");
        driver.switchTo().newWindow(WindowType.TAB);
        driver.navigate().to("https://codoid.com/");
    }
}
7. To Open a new window on the browser in Selenium 4:
So it doesn’t just stop with new tabs, you can also open a new window on the same browser and access two applications at the same time in Selenium 4.
public class SampleWindow {
    public static void main(String[] args) {
        System.setProperty("webdriver.chrome.driver","src/Drivers/chromedriver.exe");
        WebDriver driver = new ChromeDriver();
            driver.get("https://www.google.com/");
            driver.switchTo().newWindow(WindowType.WINDOW);
            driver.navigate().to("https://codoid.com/");
    }
}
8. Relative Locators:
Selenium 4 has even added 5 relative locators that enable testers to find web elements relative to another element in the implemented DOM.
The Five locators newly added to Selenium 4:
- toLeftOf()
- toRightOf()
- above()
- below()
- near()
The Key Differences between Selenium 3 and Selenium 4
| S. No |
Selenium 3 |
Selenium 4 |
| 1 |
The Chrome Driver Extends Directly To The Remote Web Driver. |
The Chrome Driver Class Extends To The Chromium Driver That Has A Few Predefined Ways To Access The Dev Tool. |
| 2 |
The JSON Wire Protocol Operates As A Mediator To Transfer Information From The Client To The Server Over HTTP. |
Since It Uses The W3C (World Wide Web Consortium) Standard Protocol, The Driver And Browser Communication Follows The Standard Procedure. |
| 3 |
The Testers Always Have To Start The Hub And Node Jars Every Time They Perform Automation Testing. |
Testers Needn’t Have To Start The Hub And Node Jars Every Time They Perform Automation Testing. |
Conclusion
So it is very evident that the Selenium 4 upgrade has a lot of good improvements to offer including better documentation. By seeing the architectural changes, we hope you will be in a better position to use the tool more effectively. As a leading QA company, we always make it a point to know the tool inside and out as it helps us utilize the full potential of the tool.

by admin | Oct 29, 2021 | Selenium Testing, Blog, Latest Post |
When you are testing a web-based application, it is pivotal to ensure that they work without any issues in the browsers that are predominantly used by the world. Selenium WebDriver is a great tool that allows QA professionals to automate their test cases in their desired browser by using its library and a language-specific framework. As a leading QA company, we believe the ability to run Selenium WebDriver in different browsers is a basic skill every automation tester must possess. So we have written this blog to provide a comprehensive guide to the ones looking to learn how to run Selenium WebDriver in browsers like Chrome, Firefox, Safari, Opera, and Edge. So let’s get started with a few basics of Selenium and move forward from there.
Selenium
Selenium is a popular test automation tool that was developed by Jason Huggins in 2004 at Thought Works. It is an open-source automated testing framework for web applications that works with different languages such as JavaScript (Node.js), Python, Ruby, Java, or C#.
Different Types of Selenium:
- Selenium IDE
- Selenium RC
- Selenium WebDriver
- Selenium Grid
Selenium WebDriver:
We have already established how Selenium WebDriver can be instrumental in testing a web application across different browsers. But before you can get started with your browser automation, you should make sure to download the browser-specific drivers. Also ensure that the driver is compatible with your OS (Windows, Mac, or Linux).
Though we will be guiding you to run Selenium WebDriver in Safari that runs only on macOS, we will be focusing on how you can run Selenium WebDriver in the other browsers on Windows.
Different types of WebDriver:
1. Firefox
2. Opera
3. Chrome
4. Edge
5. Safari
Both developers and QAs have the liberty to choose the programming language of their choice all thanks to the wide range of language bindings that the Selenium developers have developed.
Now, let’s see a list of software that you will have to download onto your system to successfully automate your browsers. Make sure you download the most recent and stable releases.
1. Selenium Java Stable 4.0.0
2. JDK
3. IntelliJ IDEA
Environment setup:
Setting up an environment for testing is one of the very first actions we would be doing. So let’s see how to do that in Java.
- Open ‘Edit the System Environment Variables’ options by searching for it in the Search Box.
- Click on ‘Environment Variables’ -> Click the ‘New’ Button
- Enter the variable name as ‘CLASSPATH’, and enter the following variable value ‘C:\ProgramFiles\Java\jdk-17.0.1\lib\*.jar’.
- Click the ‘New’ button again.
- Enter Variable name ‘JAVA_HOME’ and Variable value ‘C:\Program Files\Java\jdk-17.0.1’.
Once it has been downloaded, verify it in your system without fail. You can do that by opening command prompt and typing java–version and clicking Enter. If there are no issues, you will see the details of the Java & JDK versions.
IntelliJ IDEA
- Open IntelliJ. Click File -> New -> Project -> Click Java -> Select Project SDK -> Next -> Select the “Checkbox” to Create project from template, Click ‘Next’ -> Give a name for the Project, and click on Finish.
- Click on ‘File’ -> Project Structure -> Platform Settings ->SDKs to Add Classpath ‘+’.
- Open the Selenium file and navigate to the Lib folder, select ‘All Jar Files’ and click on ‘Apply’.
- Make you sure downloading Selenium Webdriver in any compatible browser on your windows . Click the URL and go to navigate the Platforms Supported by Selenium and click the browser then you can the webdriver then download the documentation.
- Must you verify the browser version of the webdriver is here , then you can download and use it .
The syntax for the WebDriver
//System.setProperty ("webdriver.chrome.driver"," Enter the driver path with driver name.exe "); //
Keywords for Selenium:
In order to understand the sample codes that we have written, you have to know a few basic keywords that are used to perform certain actions in the automation process. We have just mentioned a few basic keywords, if you are looking to get a better understanding, make sure to check out our blog that will help you with it.
Action:
We can use these keywords to open a particular website, reload it, close it, and such other actions.
driver.get ("URL");
driver.navigate ().to ("URL");
driver.navigate ().refresh ();
driver.navigate ().forward ();
driver.navigate ().back ();
driver. Close ();
Locators:
These keywords are used to locate the elements using Selenium. Each keyword uses a different method and it can be easily understood by their names.
driver.findElement(By.id(""));
driver.findElement(By.name(""));
driver.findElement(By.xpath(""));
driver.findElement(By.cssSelector(""));
driver.findElement(By.linkText(""));
driver.findElement(By.partialLinkText(""));
Code to Run Selenium WebDriver in Multiple Browsers:
We have written sample programs that will help you understand the changes you’ll have to make when using each browser. So let’s take a look at each of them one by one.
Sample Program for Chrome:
import org.openqa.selenium.By;
import org.openqa.selenium.WebDriver;
import org.openqa.selenium.WebElement;
import org.openqa.selenium.chrome.ChromeDriver;
import org.openqa.selenium.interactions.Actions;

public class Main {

   public static void main(String[] args) {
       System.setProperty("webdriver.chrome.driver","D:\\Webdriver\\chromedriver_win32 (2)\\chromedriver.exe");
       WebDriver driver=new ChromeDriver();
       driver.get("https://www.snapdeal.com/");
       driver.manage().window().maximize();
       WebElement element =driver.findElement(By.cssSelector("ul[class='nav smallNav']>li[navindex='4']"));
       Actions action  = new Actions(driver);
       action.click(element).perform();
       WebElement element2 =driver.findElement(By.xpath("//span[text()='Keyboards']"));
       Actions actions = new Actions(driver);
       actions.doubleClick(element2).perform();
       driver.findElement(By.id("searchWithinSearch")).sendKeys("logitech");
       driver.findElement(By.id("swsIco")).click();
       driver.navigate().to("https://www.snapdeal.com/product/logitech-k120-black-usb-wired/636481286288");
       driver.findElement(By.id("buy-button-id")).click();

       driver.close();
   }
}
Sample Program for Firefox:
import org.openqa.selenium.By;
import org.openqa.selenium.WebDriver;
import org.openqa.selenium.firefox.FirefoxDriver;
import org.openqa.selenium.support.ui.Select;

import java.util.concurrent.TimeUnit;

public class Main {

   public static void main(String[] args) {
       System.setProperty("webdriver.gecko.driver","D:\\Webdriver\\geckodriver-v0.29.1-win64\\geckodriver.exe");
       WebDriver driver=new FirefoxDriver();
       driver.manage().timeouts().implicitlyWait(10, TimeUnit.MICROSECONDS);
       driver.manage().window().maximize();
       driver.get("http://www.leafground.com/pages/Dropdown.html");
       Select  Select_training_program_using_Index1 = new Select( driver.findElement(By.xpath("//select[@id='dropdown1']")));
       Select_training_program_using_Index1.selectByIndex(1);

       Select  Select_training_program_using_Index2 = new Select( driver.findElement(By.xpath("//select[@name='dropdown2']")));
       Select_training_program_using_Index2.selectByValue("2");

       Select  Select_training_program_using_Index3 = new Select( driver.findElement(By.xpath("//select[@id='dropdown3']")));
       Select_training_program_using_Index3.selectByVisibleText("UFT/QTP");

       Select Get_the_number_of_dropdown_options = new Select( driver.findElement(By.xpath("//select[@class='dropdown']")));
       Get_the_number_of_dropdown_options.getWrappedElement().sendKeys("Loadrunner");

   }
}
Sample Program for Microsoft Edge:
import org.openqa.selenium.By;
import org.openqa.selenium.WebDriver;
import org.openqa.selenium.edge.EdgeDriver;

public class Main{

   public static void main(String[] args) {
       System.setProperty("webdriver.edge.driver","C:\\Users\\Admin\\Downloads\\edgedriver_win32\\msedgedriver.exe");
       WebDriver driver= new EdgeDriver();
       driver.manage ().window().maximize();
driver.manage().deleteAllCookies();
driver.get("https://facebook.com ");
driver.findElement(By.id("email")).sendKeys("7418894451");
driver.findElement(By.name("pass")).sendKeys("99664475");
driver.findElement(By.xpath("//button[@name='login']")).click();
driver.close();

   }
}
Sample Program for Opera:
import org.openqa.selenium.WebDriver;
import org.openqa.selenium.opera.OperaDriver;
import java.util.concurrent.TimeUnit;

class Main{

   public static void main(String[] args) {
       System.setProperty("webdriver.opera.driver","C:\\Users\\Admin\\Downloads\\operadriver_win64 (1)\\operadriver_win64\\operadriver.exe");
       WebDriver driver=new OperaDriver();
       driver.manage().window().maximize();
       driver.manage().deleteAllCookies();
       driver.get("https://www.google.co.in");
       driver.manage().deleteAllCookies();
       driver.navigate().to("https://codoid.com");
       driver.manage().window().fullscreen();
       driver.navigate().back();
       driver.navigate().refresh();
       driver.manage().timeouts().implicitlyWait(10, TimeUnit.MICROSECONDS);
       driver.navigate().forward();
       driver.manage().window().fullscreen();
       driver.close();
   }}
Run the WebDriver in the Safari browser
So as promised, now we are going to explore the two processes you’ll need to do to run Selenium WebDriver in Safari. Following this, we have a test script for the Safari driver to run. It is worth noting that we’d have to run an automation test in the Safari browser to enable this option.
Process 1
Step 1: Open the Safari browser and navigate to the Preferences.
Step 2: Enable the ‘Show Develop Menu’ on the Menu bar.
Step 3: Now you’ll see the new Develop option popup on your safari menu bar.
Step 4: Click on ‘Allow remote automation’.
Step 5: Once that is done, you’ll be able to run the web driver successfully.
Syntax:
Webdriver driver = new Safari Webdriver ();
//Since this Safari WebDriver there is no need to set the path of the driver for the respective browser, instead you would have to do it for the system.
For example,
System.setProperty("webdriver.safari.driver","C:\\Admin\\safaridriver(1)\\safaridriver.exe");
//Apple developed a Safari WebDriver that is compatible with all the safari browsers.
//If you can’t run a Safari WebDriver, you can activate the WebDriver by following Process 1.
Sample program for Safari:
package com.company;
import org.openqa.selenium.WebDriver;
import org.openqa.selenium.safari.SafariDriver;

public class Main{

  public static void main(String[] args) {
       WebDriver driver=new SafariDriver();

        driver.get("https://codoid.com/ ");
driver.close();
   }}
Conclusion
We hope you found this blog informative as a majority of software testers use Selenium WebDriver to automate their tests in different browsers. As one of the prominent automation testing service providers in the arena, we ourselves have been ardent users of Selenium WebDriver to automate our tests.

by admin | Oct 18, 2021 | Selenium Testing, Blog, Latest Post |
Selenium Grid is a concept that was introduced by the Selenium team to run Tests in remote machines by executing the tests across different Operating Systems, browsers, machines. As one of the best software QA companies, we always focus on ways to make our testing process more efficient. Selenium Grid is a great option to do just that as it helps to reduce the test execution time. So in this blog article, you will be learning about the Selenium Grid setup and tell you how you can use it.
Selenium Grid is an enhancement to the Selenium Web driver. The grid uses the Web driver’s code for executing the test scripts. The Grid contains a single Hub and one or more nodes.
We use Selenium Grid to run all the test scripts, present in the framework on a remote computer. In Selenium Grid, there are two types of systems, the first is HUB, and the other is a NODE.
Firstly, we will look into what a HUB is, and a few important points you should know.
Hub:
- It is a centralized place to which all the other nodes are connected.
- There will be only one Hub.
- Tests will be loaded and executed in the Hub.
Now, let’s take a few important points about NODE.
NODE:
- A node is a device that has been connected with the Hub. A node may be a Mobile, Tablet, Laptop, or Computer with different Operating Systems and browsers.
- The number of nodes will vary depending upon the testing requirements.
- Execution of tests will be displayed in the nodes.
Now that we have seen the basics, let’s explore the 3 main steps to use Selenium Grid, provided you have Selenium in your system. If you don’t, you can visit their official website to download the .jar file and place it in your desired drive before you proceed.
1) Start the Hub
2) Start the Node
3) Execute our Framework using remote WebDriver
1. Start the HUB
Open the command prompt on the exact location where you have kept the selenium-server jar file and type the following command:-
java -jar ./selenium-server-standalone-3.141.59.jar -role hub
It should show the following message-
Nodes should register to http://192.168.1.2:4444/grid/register/
Clients should connect to http://192.168.1.2:4444/wd/hub
Selenium Grid hub is up and running

The default port number for the HUB is 4444.
2. Start the NODE
Since the hub is up and running now, copy the Selenium-server jar file and paste it into the desired drive of the remote computer where you want to run the test script. Once again open the command prompt on the exact location where you have that selenium-server jar file and type the following command.
java -jar ./selenium-server-standalone-3.141.59.jar -role node –hub
http://192.168.1.2:4444/
Note: Copy the hub URL from your HUB system.

It should show the following message-
Registering the node to the hub: http://192.168.1.2:4444/grid/register
Now the node is registered to the hub and ready to use.

Also, you will get the following message on your HUB system.
Registered a node http://192.168.1.5:25409

The default port no for a node is 25409.
3. Execute the Framework using the remote WebDriver
Now that both the main components of the Selenium Grid Setup are ready, it is time to execute the test scripts on a remote computer. We have to use the remote web driver class in order to specify which browser should be opened on the remote computer. We should use the desired capability class.
package Blog;
 import org.openqa.selenium.WebDriver;
 import org.openqa.selenium.remote.DesiredCapabilities;
 import org.openqa.selenium.remote.RemoteWebDriver;
 import org.testng.annotations.*;
 public class Blog_Demo
 {
     WebDriver driver;
     @BeforeMethod
     @Parameters("browser")
     public void Beforemethod(@Optional("chrome") String browserName)
     {

if(browserName.equalsIgnoreCase("firefox")) {
             System.setProperty("webdriver.gecko.driver","C:\\Users\\HP\\Desktop\\office\\geckodriver.exe");
             driver= new RemoteWebDriver(DesiredCapabilities.firefox()); }
         else if(browserName.equalsIgnoreCase("chrome")) {
             System.setProperty("webdriver.chrome.driver","C:\\Users\\HP\\Desktop\\office\\chromedriver.exe");
             driver= new RemoteWebDriver(DesiredCapabilities.chrome()); }

driver.manage().window().maximize();

driver.get("https://codoid.com/"); }
     @Test
     public void Sample1()
     {
         System.out.println(driver.getTitle());
     }
     @AfterMethod
     public void Aftermethod()
     {
         driver.close();
     }
 }
For executing test scripts in the NODE system, simply execute the test script from the HUB system.
Once you run the script in the Hub System, you will get the following message in the hub system.

You will get the following message in the node.

If at all you want to check whether the server is running or not, you can type the following command in the browser.
http://localhost:4444/grid/console
Conclusion
We hope you have found this Selenium Grid Setup blog of ours informative. Selenium Grid is a very resourceful tool that every tester has to know about. This is a very basic blog that introduces you to Selenium Grid. Explore our other blogs to learn more about it as it can be instrumental in reducing a lot of batch execution time. Its cross-platform capabilities have always come in handy to deliver the best agile test automation services.

by admin | Oct 13, 2021 | Selenium Testing, Blog, Latest Post |
Selenium is a web browser automation testing library that has evolved to become one of the most popular automation testing tools over the years all thanks to the various tools and libraries associated with it. If you are an experienced automation tester, you will be very familiar with Selenium and you can refer to our more advanced blog articles around Selenium. On the other hand, if you are a novice automation tester who isn’t very familiar with Selenium, we highly recommend you to read this blog and get to know the basics of Selenium. It is not a how-to guide, rather, it will help you understand how Selenium works. To become a master of any tool, it is always pivotal to understand how it works first. Let’s begin from Selenium RC and move forward to where we are now and help you understand how much Selenium has evolved.
Selenium RC
Selenium remote control (RC) was the first version of Selenium that is no longer in use. It had all the features we have in Selenium WebDriver except for the way it interacts with the browser & the webpage.
How did the Selenium RC work?
- The Client code (Test Code) sends a Selenese command to the Selenium server using an HTTP request.
- The server receives and finds the suitable Selenium-Core JavaScript command for the request.
- Then the server interprets and injects a JavaScript snippet into the browser’s built-in JavaScript interpreter.

There were a few major downsides to Selenium remote control as well,
Disadvantages
- It cannot mimic how a user performs actions on a browser since the server injects JavaScripts and manipulates the DOM. Let’s take the Chrome browser as an example. Chrome browser has pointer-events to listen to the user inputs from a touch screen, pen, or mouse. Here, the pointer-events are APIs of Chrome. Selenium RC will only manipulate the DOM using JavaScript and not access the browser API to execute the commands. That’s why Selenium RC does not have the capacity to emulate user actions.
- The full strength of the Object-Oriented Programming was not adopted to Selenium RC.
Selenium WebDriver
WebDriver was developed by Simon Stewart at ThoughtWorks. WebDriver uses the Browser API instead of injecting JavaScript to perform the required actions. So Selenium and WebDriver were merged and released as Selenium 2.0. Local and Remote are two methods that are also few basics of Selenium that one must know. So let’s take a look at that now.
Local
Selenium WebDriver has drivers for each browser as every browser has its own engine. So the API implementation differs. When you want to automate a browser in the same machine where the test code is located, you wouldn’t need the Selenium Remote Server. Instead, your test code has to know where the browser driver is located. Once the driver location has been identified, it will start sending commands to the driver and the driver will begin interacting with the browser.

Remote
But at the same time, if you want to execute your test code on a Windows machine and launch Safari browser in Mac. You can start the Selenium Remote server in Mac and start the script execution from Windows. In this scenario, the test code and the browser are not in the same location. That’s why the remote server is coming into the picture.

Selenium IDE
Selenium IDE is widely used to record test scripts. The Selenium IDE Legacy version is supported only on Firefox. The newer version of Selenium IDE does have plugins for Chrome & Firefox. Now let’s take a look at a few use cases and understand where Selenium IDE can be used.
Usage
- If you are a beginner, you can use Selenium IDE to learn the Selenium commands.
- You can also use it to quickly check whether you are able to automate a webpage or not without writing any snippets.
Selenium Grid
If you have multiple machines for test execution, you would have to start the remote server on all the machines. In addition to that, your test code needs to take the overhead to orchestrate IPs and Port numbers of all remote machines. This is where Selenium Grid comes into play and becomes one of the must-know basics of Selenium as it allows you to have a hub to which the nodes can be attached. Now your test code has to just send the commands to the hub and the hub will redirect the command to the appropriate nodes.
Basically, Hub takes the overhead of managing nodes and routing the command requests. So the Selenium Grid makes it easy to achieve parallel execution.
Selenium 4
If you have been following the topic, you will know that Selenium 4 has brought some notable features to the table. Selenium WebDriver has 60 plus endpoints to send and receive commands using the HTTP Protocol. So the Selenium client and server communicate with each other using the HTTP Protocol. But in order to implement the Chrome DevTools Protocol, Selenium 4 needs the Bi-directional protocol.
We, as one of the leading software test automation services providers, have used the browser console listener for a project. We wanted to capture all the JavaScript errors which are triggered on the browser. Yes, the Selenium 3 server does have the capability to receive the requests and send the responses. But when the browser sends a series of messages to the client via the server, the HTTP protocol isn’t enough to handle it. If you’re interested in finding out how we handled the bidirectional protocol, read our blog where to explain everything step-by-step.

Conclusion
As stated earlier, this is not a how-to guide, and we hope that our approach of covering the basics of Selenium helped you get a crystal clear understanding of Selenium works. If you like what you have read, make sure to follow us on social media to get all the latest blog updates that happen over the week. QA Automation Testing Services is our core and in order to deliver the best service to our clients, we are on a path of continuous development. We have an R&D team to explore the new tool features, techniques, and so on. So it goes without saying that more informative articles are on the way.

by admin | Oct 8, 2021 | Selenium Testing, Blog, Latest Post |
Have you ever noticed the inconsistencies between different Selenium browser drivers before Selenium’s W3C recommendation? If so, you would have a clear idea of what we are going to explore in this blog. But, if you are a novice automation tester, then the chances of you experiencing that are very low. So to clear things up, before Selenium WebDriver’s W3C recommendation, it was tough to bring uniform implementation. You will get a better picture once we go through an example.
Let’s say you want to run your scripts on Chrome, IE, Safari, and Firefox. Executing the scripts on IE and Safari browsers was a challenge as the IEDriver and Safari Driver are maintained by Microsoft & Apple. This meant that if any changes were needed in these drivers, then it should be done only by the browser vendors. So the issues would be raised and fixed only after the Selenium contributors notify the browser vendors.
Most of the modern browsers are W3C compliant. This means that HTML, CSS, and JavaScript should be interpreted as recommended by W3C across all the browsers. So there should not be any case where a particular HTML tag is rendered differently in a browser for all the websites.
Selenium WebDriver is a browser controlling library that is used globally and it is also supported by the major browsers. That is why Selenium WebDriver becomes a valid candidate to become W3C compliant. So the browser vendors adhere to the WebDriver’s W3C recommendations when developing the browser drivers.
The W3C
If you are not that aware of W3C, then you need to know what W3C is and what it does before we could proceed any further. Tim Berners-Lee and Michael Dertouzos met in Zurich and discussed forming the W3C, and eventually formed the World Wide Web Consortium (W3C) in October 1994.
- W3C’s Mission – Web for all, and Web on Everything.
- W3C’s Vision – Web for Rich Interaction, Web of Data and Services, & Web of Trust
W3C Browser Testing and Tools Working Group
W3C defines the international web standards and helps to make sure that the web is accessible from any hardware, browser, and geo-location. There are 42 open working groups to get the job done, and Browser Testing and Tools Working Group is one among the 42. The mission of the group is to produce technologies that can be used in testing, debugging, and troubleshooting Web applications running in Web browsers. So naturally, this is also the group that takes care of the Selenium WebDriver’s W3C standards.
A working group is approved and formed once the recommendations, sample code, and technical reports are submitted. WebDriver’s W3C recommendation was submitted on 5th June 2018 to inform the world to follow the recommended standards when developing Selenium drivers.
There are 38 participants from 9 organizations in the Browser Testing and Tools Working Group.
| S. No |
Name |
Company |
| 1 |
David Burns |
W3C Invited Experts |
| 2 |
Michael[Tm] Smith |
W3C |
| 3 |
Patrick Angle |
Apple, Inc. |
| 4 |
Christian Bromann |
Sauce Labs |
| 5 |
Brian Burg |
Apple, Inc. |
| 6 |
Rick Byers |
Google LLC |
| 7 |
John Chen |
Google LLC |
| 8 |
Karl Dubost |
Mozilla Foundation |
| 9 |
Jim Evans |
W3C Invited Experts |
| 10 |
Jim Evans |
Salesforce |
| 11 |
Titus Fortner |
Sauce Labs |
| 12 |
Maja Frydrychowicz |
Mozilla Foundation |
| 13 |
Shuotao Gao |
Google LLC |
| 14 |
Zoher Ghadyali |
Microsoft Corporation |
| 15 |
James Graham |
James Graham |
| 16 |
Peter Hedenskog |
Wikimedia Foundation |
| 17 |
Philip Jägenstedt |
Google LLC |
| 18 |
John Jansen |
Microsoft Corporation |
| 19 |
Wilhelm Joys Andersen |
W3C Invited Experts |
| 20 |
Joon Lee |
Google LLC |
| 21 |
Jason Leyba |
Google LLC |
| 22 |
Shengfa Lin |
Google LLC |
| 23 |
Karin Lundberg |
Google LLC |
| 24 |
Clayton Martin |
Salesforce |
| 25 |
Marcus Merrell |
Sauce Labs |
| 26 |
Diego Molina |
Sauce Labs |
| 27 |
Theresa O’Connor |
Apple, Inc. |
| 28 |
Jan Odvarko |
Mozilla Foundation |
| 29 |
Michael Pennisi |
Bocoup |
| 30 |
Devin Rousso |
Apple, Inc. |
| 31 |
Maksim Sadym |
Google LLC |
| 32 |
David Singer |
Apple, Inc. |
| 33 |
Henrik Skupin |
Mozilla Foundation |
| 34 |
Sam Sneddon |
Apple, Inc. |
| 35 |
Andy Sterland |
Microsoft Corporation |
| 36 |
Simon Stewart |
Apple, Inc. |
| 37 |
Brandon Walderman |
Microsoft Corporation |
| 38 |
Luke Zielinski |
Google LLC |
Browser Drivers
The below-listed browser drivers are W3C compliant.
- Mozilla Firefox
- Microsoft Edge
- Apple Safari
-
- WebKit GTK Port
- Selenium IEDriverServer
- Chrome
If any browser produces the driver for Selenium WebDriver, it needs to follow the W3C specifications.
Conclusion
There is speculation that only Selenium 4 is W3C compliant, but that is incorrect. The older version of the drivers supports W3C, and even if any of the old drivers don’t support W3C, it will use the JSON wire protocol. We, as one of the automated software testing companies, have faced many driver-related issues before the W3C WebDriver protocol. After embracing the uniformity, the Selenium Browser Drivers have now been stabilized. So there are no longer any issues where an automated test suite runs fine on one browser and fails to do so on another.

by admin | Sep 27, 2021 | Selenium Testing, Blog, Latest Post |
In Selenium 4, the WebDriver bidirectional (BiDi) protocol has been implemented. First of all, you should know why WebDriver needs the BiDi protocol. First, the Selenium WebDriver client library sends HTTP command requests to a server. The received requests are then processed by the server. Once the server is ready with the response, it will send the response to the client.
So the Selenium WebDriver Remote server does not send any HTTP response or message to the client until it receives an HTTP request.
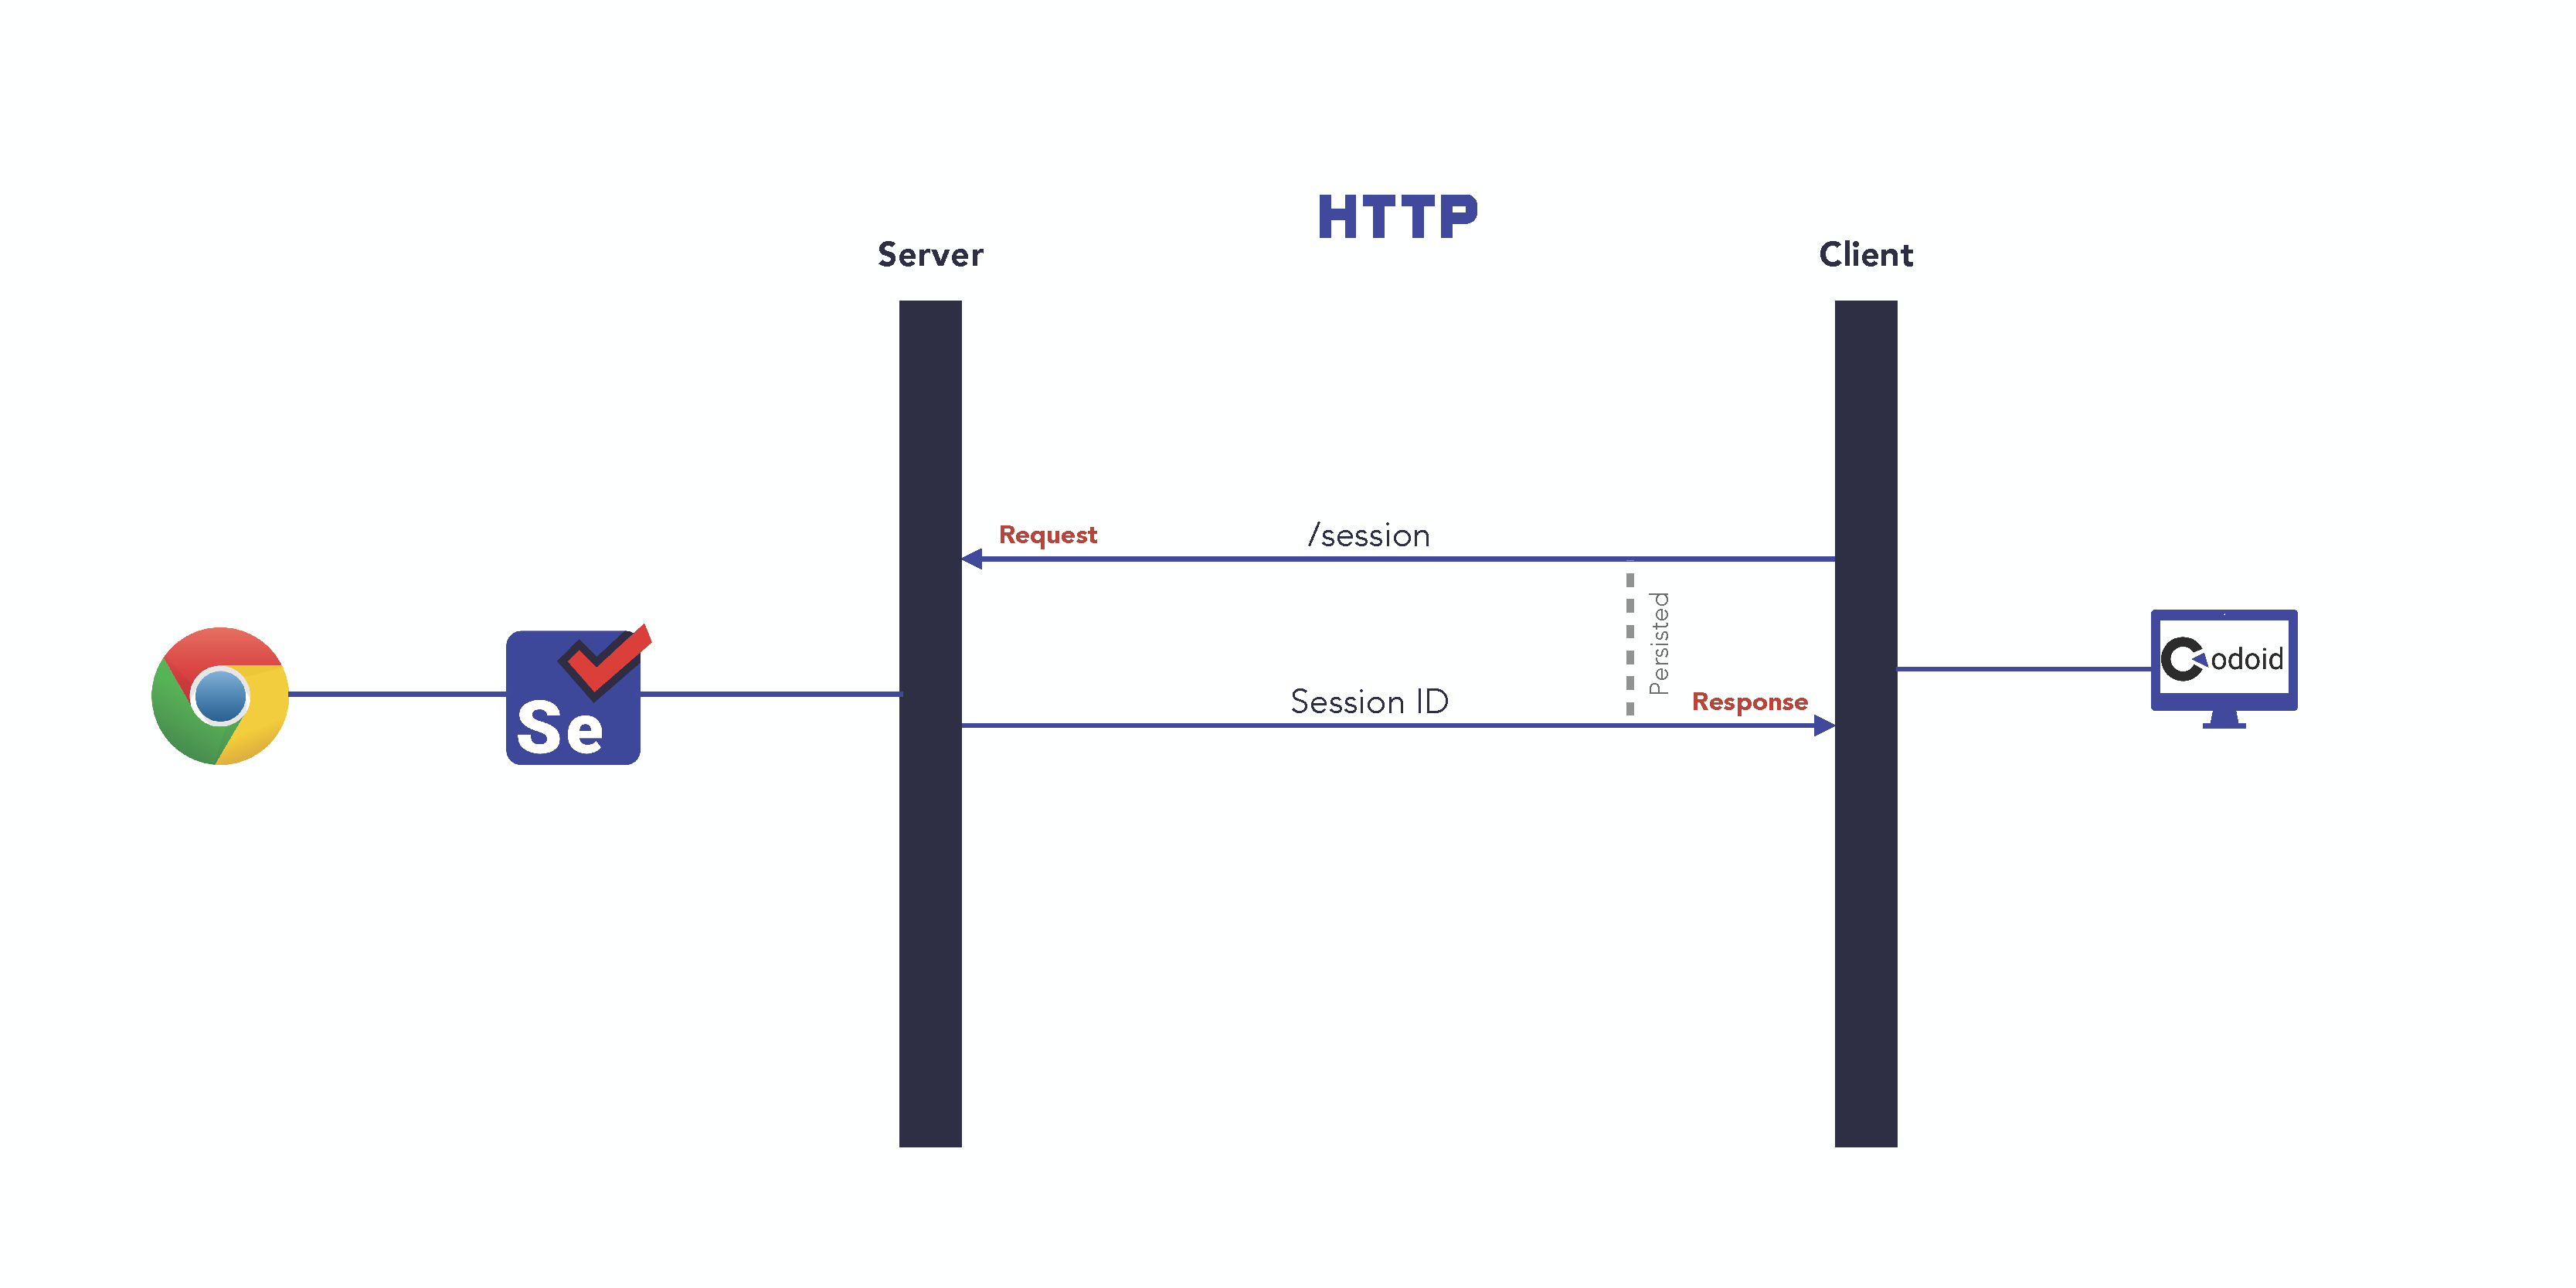
In the above diagram, the client sends a request and the server responds. The client does not kill the connection with the server until the response for a command request is received. Selenium WebDriver has more than 60 endpoints to communicate with a remote server.
Why BiDi Protocol?
The WebDriver Bi-Directional protocol allows both the client and the server to send & receive requests and responses. But we have enough HTTP commands to send requests to the server. Then why do we need the BiDi protocol? To understand this, you need to know some features which are available in Selenium 4.
- Listening DOM events
- Capture & send JS Errors and Console messages to client
- Record Traffic
- Access to native devtools protocol
Let’s take sending console messages to the client as an example. If a webpage has 100 console log messages, then the server needs to establish 100 HTTP connections and moreover, the server cannot send a response without a valid request from the client.
Even if the selenium developers tried to implement this feature with an HTTP connection, the server wouldn’t be able to handle multiple requests simultaneously. That is the reason why the BiDi protocol has come into the picture.
What is BiDi Protocol?
BiDi is a web-socket protocol. Websocket is an event-driven protocol. Let’s say the Selenium client wants JavaScript error messages from the browser. Whenever JavaScript errors are notified by the browser to the server, the error messages will be sent to the client. So the server will send the error message only when there is an error. This is called the event-driven protocol.
In the below diagram, you can see that server is sending the WebSocket URL to the client in the new session endpoint response. So any commands other than HTTP server endpoints will be communicated using the WebSocket URL.
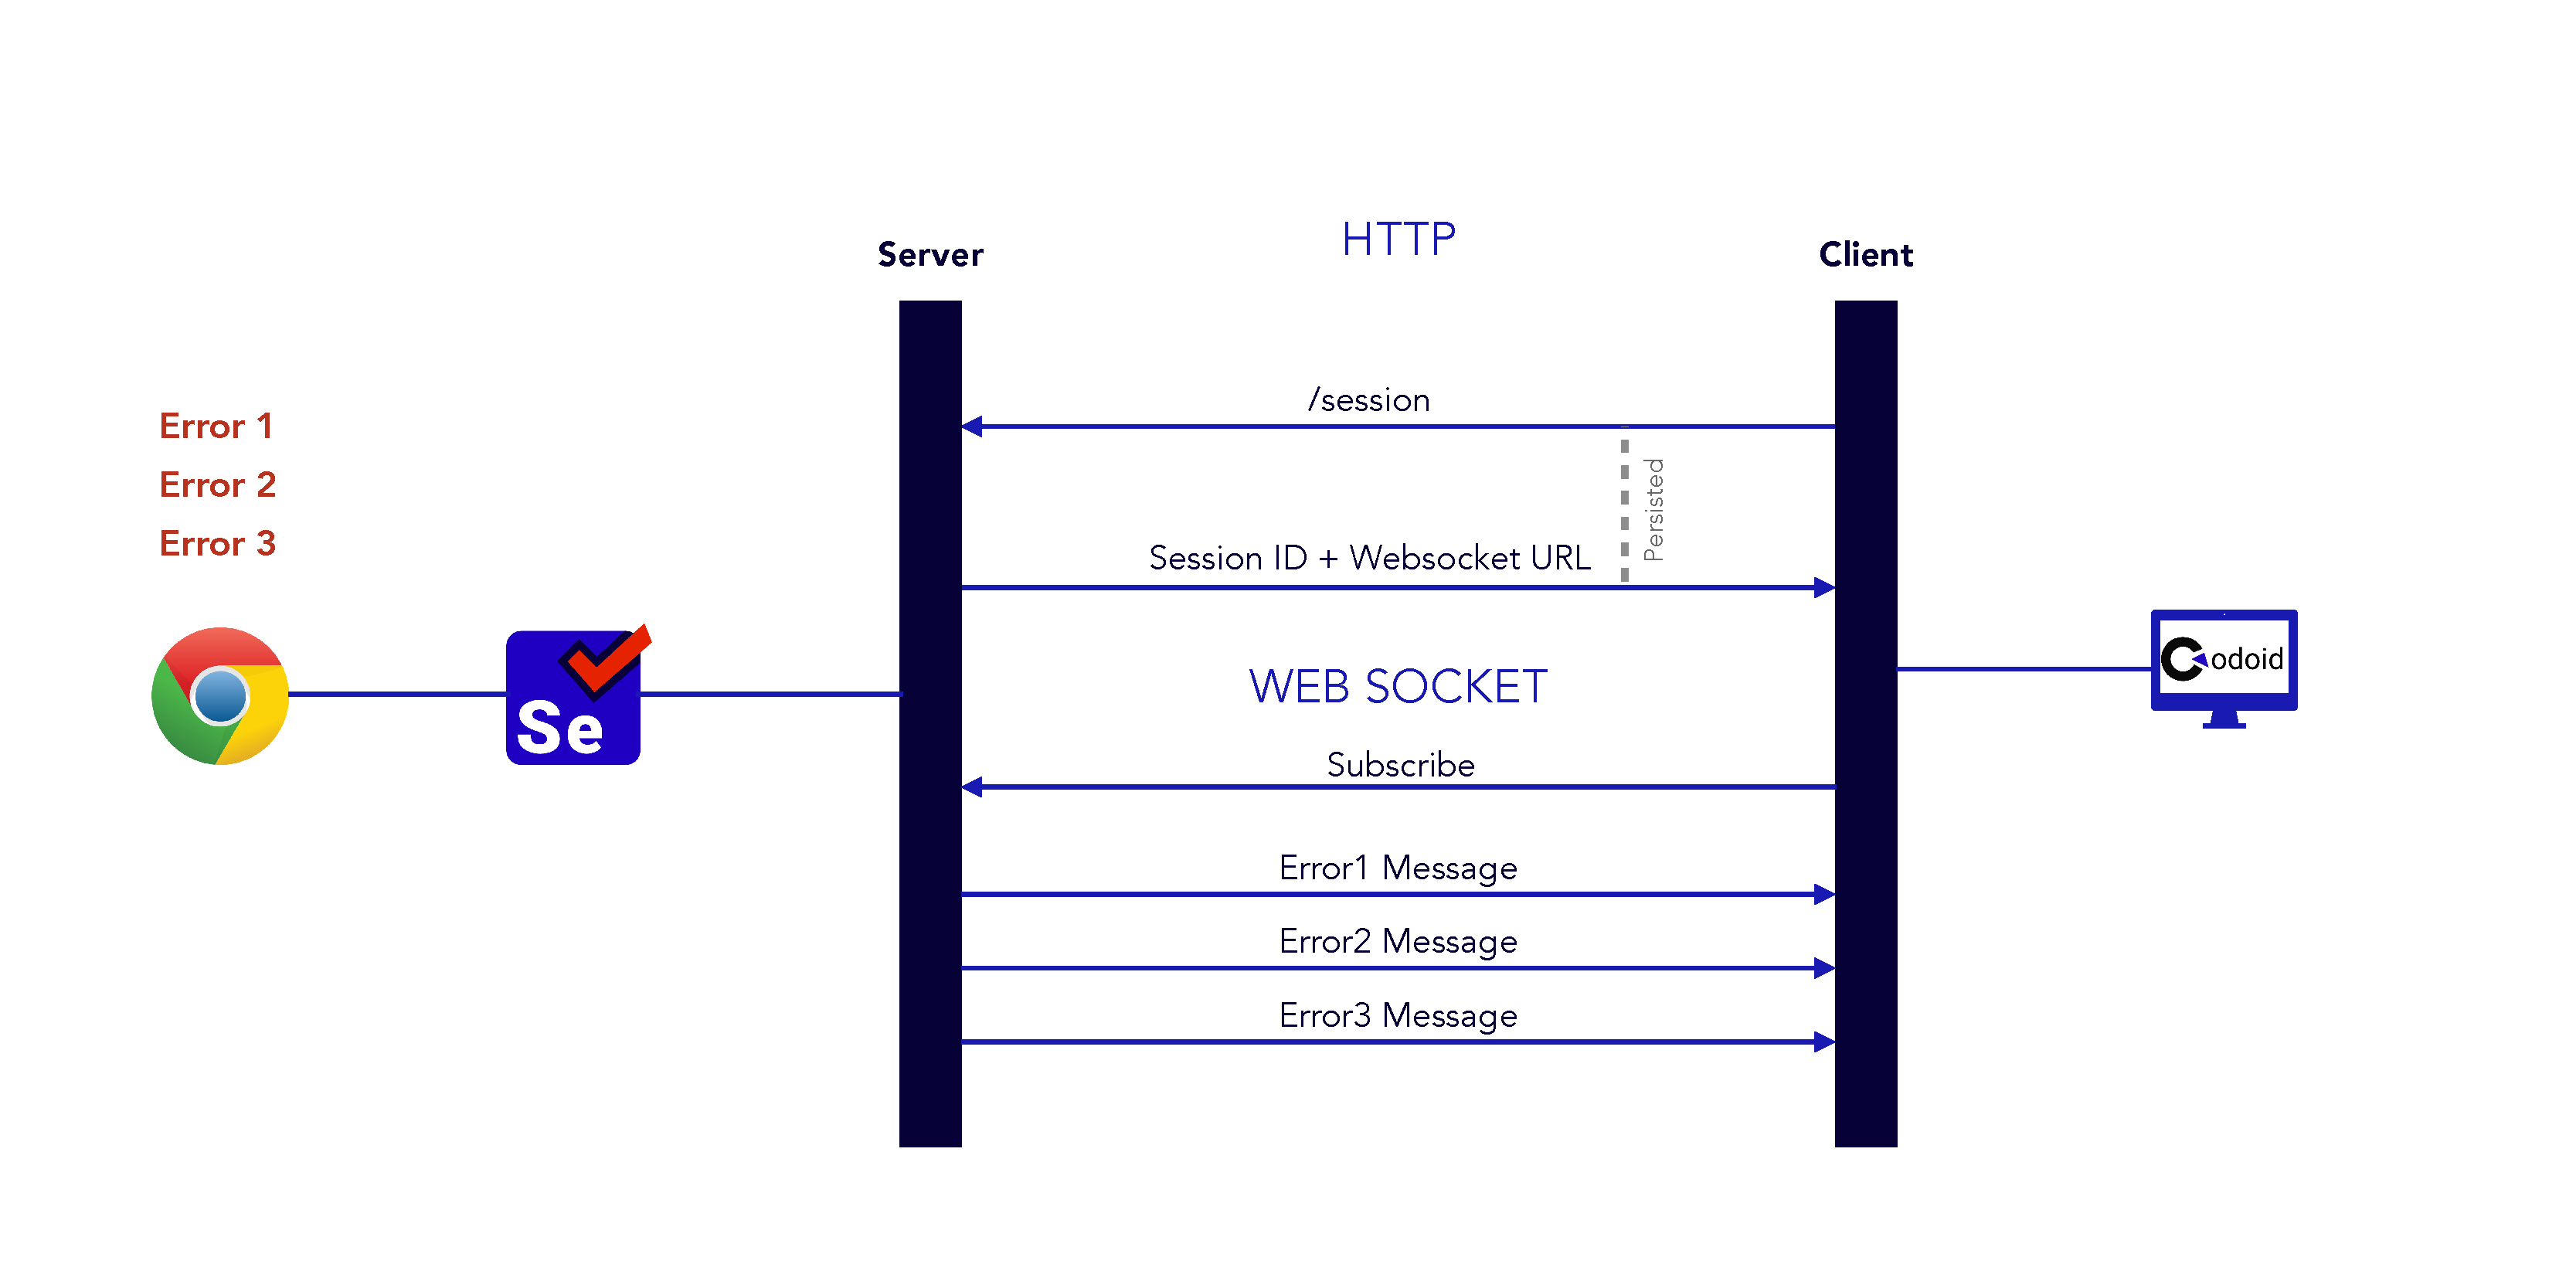
When the client needs the JavaScript console error logs, then it should subscribe to the server so that the Selenium Server will send the error messages to the client from the browser.
Refer to the below snippet. The client subscribes to the Browser Log messages. So whenever any log message is added in DevTools, the server will send the message.
import org.openqa.selenium.WebDriver;
import org.openqa.selenium.chrome.ChromeDriver;
import org.openqa.selenium.devtools.DevTools;
import org.openqa.selenium.devtools.Log;
import org.slf4j.*;

public class Selenium4Devtools {
    final static Logger logger = LoggerFactory.getLogger(Selenium4Devtools.class);

    public static void main(String args[]){
        System.setProperty("webdriver.chrome.driver", "drivers/chromedriver.exe");
        WebDriver driver = new ChromeDriver();

        try{
            DevTools devTools = ((ChromeDriver)driver).getDevTools();
            devTools.createSession();
            devTools.send(Log.enable());
            devTools.addListener(Log.entryAdded(), entry -> logger.error(entry.asSeleniumLogEntry().getMessage()));
            driver.get("https://www.codoid.com");
        }
        catch(Exception e){
            e.printStackTrace();
        }
        finally {
            driver.quit();
        }
    }
}
Conclusion
As a leading automated functional testing services company, we have explored many Selenium 4 features, and the WebDriver BiDi protocol is certainly an interesting topic. It is pivotal for every automation tester to be familiar with the internal processes of Selenium.