by Rajesh K | May 16, 2025 | API Testing, Blog, Latest Post |
GraphQL, a powerful query language for APIs, has transformed how developers interact with data by allowing clients to request precisely what they need through a single endpoint. Unlike REST APIs, which rely on multiple fixed endpoints, GraphQL uses a strongly typed schema to define available data and operations, enabling flexible queries and mutations. This flexibility reduces data over-fetching and under-fetching, making APIs more efficient. However, it also introduces unique challenges that require a specialized approach to GraphQL API testing and software testing in general to ensure reliability, performance, and security. The dynamic nature of GraphQL queries, where clients can request arbitrary combinations of fields, demands a shift from traditional REST testing approaches. QA engineers must account for nested data structures, complex query patterns, and security concerns like unauthorized access or excessive query depth. This blog explores the challenges of GraphQL API testing, outlines effective testing strategies, highlights essential tools, and shares best practices to help testers ensure robust GraphQL services. With a focus on originality and practical insights, this guide aims to equip testers with the knowledge to tackle GraphQL testing effectively.
What is GraphQL?
GraphQL is a query language for APIs and a runtime for executing those queries with existing data. Developed by Facebook in 2012 and released publicly in 2015, GraphQL provides a more efficient, powerful, and flexible alternative to REST. It allows clients to define the structure of the required data, and the server returns exactly that, nothing more, nothing less.
Why is GraphQL API Testing Important?
Given GraphQL’s dynamic nature, testing becomes crucial to ensure:
- Schema Integrity: Validating that the schema accurately represents the data models and business logic.
- Resolver Accuracy: Ensuring resolvers fetch and manipulate data correctly.
- Security: Preventing unauthorized access and safeguarding against vulnerabilities like injection attacks.
- Performance: Maintaining optimal response times, especially with complex nested queries.
Challenges in GraphQL API Testing
GraphQL’s flexibility, while a strength, creates several testing hurdles:
- Combinatorial Query Complexity: Clients can request any combination of fields defined in the schema, leading to an exponential number of possible query shapes. For instance, a query for a “User” type might request just the name or include nested fields like posts, comments, and followers. Testing all possible combinations is impractical, making it difficult to achieve comprehensive coverage.
- Nested Data and N+1 Problems: GraphQL queries often involve deeply nested data, such as fetching a user’s posts and each post’s comments. This can lead to the N+1 problem, where a single query triggers multiple database calls, impacting performance. Testers must verify that resolvers handle nested queries efficiently without excessive latency.
- Error Handling: Unlike REST, which uses HTTP status codes, GraphQL returns errors in a standardized “errors” array within the response body. Testers must ensure that invalid queries, missing arguments, or type mismatches produce clear, actionable error messages without crashing the system.
- Security and Authorization: GraphQL’s single endpoint exposes many fields, requiring fine-grained access control at the field or query level. Testers must verify that unauthorized users cannot access restricted data and that introspection (which reveals the schema) is appropriately restricted in production.
- Performance Variability: Queries can range from lightweight (e.g., fetching a single field) to resource-intensive (e.g., deeply nested or wide queries). Testers need to simulate diverse query patterns to ensure the API performs well under typical and stress conditions.
These challenges necessitate tailored testing strategies that address GraphQL’s unique characteristics while ensuring functional correctness and system reliability.
Tools for GraphQL API Testing
| S. No |
Tool |
Purpose |
Features |
| 1 |
Postman |
API testing and collaboration |
Supports GraphQL queries, environment variables, and automated tests |
| 2 |
GraphiQL |
In-browser IDE for GraphQL |
Interactive query building, schema exploration |
| 3 |
Apollo Studio |
GraphQL monitoring and analytics |
Schema registry, performance tracing, and error tracking |
| 4 |
GraphQL Inspector |
Schema validation and change detection |
Compares schema versions, detects breaking changes |
| 5 |
Jest |
JavaScript testing framework |
Supports unit and integration testing with mocking capabilities |
| 6 |
k6 |
Load testing tool |
Scripts in JavaScript, integrates with CI/CD pipelines |
Key Strategies for Effective GraphQL API Testing
To overcome these challenges, QA engineers can adopt the following strategies, each targeting specific aspects of GraphQL APIs:
1. Query and Mutation Testing
Queries (for fetching data) and mutations (for modifying data) are the core operations in GraphQL. Each must be tested thoroughly to ensure correct data retrieval and manipulation. For example, consider a GraphQL API for a library system with a query to fetch book details:
query {
   book(id: "123") {
       title
       author
       publicationYear
   }
}
Testers should verify that valid queries return the expected fields (e.g., title: “The Great Gatsby”) and that invalid inputs (e.g., missing ID or non-existent book) produce appropriate errors. Similarly, for a mutation like adding a book:
mutation {
   addBook(input: { title: "New Book", author: "Jane Doe" }) {
       id
       title
   }
}
Tests should confirm that the mutation creates the book and returns the correct data. Edge cases, such as invalid inputs or duplicate entries, should also be tested to ensure robust error handling. Tools like Jest or Mocha can automate these tests by sending queries and asserting response values.
2. Schema Validation
The GraphQL schema serves as the contract between the client and server, defining available types, fields, and operations. Schema testing ensures that updates or changes do not break existing functionality. Testers can use introspection queries to retrieve the schema and verify that all expected types (e.g., Book, Author) and fields (e.g., title: String!) are present and correctly typed.
Automated schema validation tools, such as GraphQL Inspector, can compare schema versions to detect breaking changes, like removed fields or altered types. For example, if a field changes from String to String! (non-nullable), tests should flag this as a potential breaking change. Integrating schema checks into CI pipelines ensures that changes are caught early.
3. Error Handling Tests
Robust error handling is crucial for a reliable API. Testers should craft queries that intentionally trigger errors, such as:
query {
   book(id: "123") {
       titles  # Invalid field
   }
}
This should return an error like:
{
       "errors": [
       {
       "message": "Cannot query field \"titles\" on type \"Book\"",
       "extensions": { "code": "GRAPHQL_VALIDATION_FAILED" }
       }
       ]
       }
Tests should verify that errors are descriptive, include appropriate codes, and do not expose sensitive information. Negative test cases should also cover invalid arguments, null values, or injection attempts to ensure the API handles malformed inputs gracefully.
4. Security and Permission Testing
Security testing focuses on protecting the API from unauthorized access and misuse. Key areas include:
- Introspection Control: Verify that schema introspection is disabled or restricted in production to prevent attackers from discovering internal schema details.
- Field-Level Authorization: Test that sensitive fields (e.g., user email) are only accessible to authorized users. For example, an unauthenticated query for a user’s email should return an access-denied error.
- Query Complexity Limits: Test that the API enforces limits on query depth or complexity to prevent denial-of-service attacks from overly nested queries, such as:
query {
   user(id: "1") {
       posts {
           comments {
               author {
                   posts { comments { author { ... } } }
               }
           }
       }
   }
}
5. Performance and Load Testing
Performance testing evaluates how the API handles varying query loads. Testers should benchmark lightweight queries (e.g., fetching a single book) against heavy queries (e.g., fetching all books with nested authors and reviews). Tools like JMeter or k6 can simulate concurrent users and measure latency, throughput, and resource usage.
Load tests should include stress scenarios, such as high-traffic conditions or unoptimized queries, to verify that caching, batching (e.g., using DataLoader), or rate-limiting mechanisms work effectively. Monitoring response sizes is also critical, as large JSON payloads can impact network performance.
Example: GraphQL API Testing for a Bookstore
Objective: Validate the correct functioning of a book query, including both expected behavior and handling of schema violations.
Positive Scenario: Fetch Book Details with Reviews
GraphQL Query
query {
  book(id: "1") {
    title
    author
    reviews {
      rating
      comment
    }
  }
}
Expected Response
{
  "data": {
    "book": {
      "title": "1984",
      "author": "George Orwell",
      "reviews": [
        {
          "rating": 5,
          "comment": "A dystopian masterpiece."
        },
        {
          "rating": 4,
          "comment": "Thought-provoking and intense."
        }
      ]
    }
  }
}
Test Assertions
- HTTP status is 200 OK.
- data.book.title equals “1984”.
- data.book.reviews is an array containing objects with rating and comment.
Purpose & Validation
- Confirms that the API correctly retrieves structured nested data.
- Ensures relationships (book → reviews) resolve accurately.
- Validates field names, data types, and content integrity.
Negative Scenario: Invalid Field Request
GraphQL Query
query {
  book(id: "1") {
    title
    publisher  # 'publisher' is not a valid field on Book
  }
}
Expected Error Response
{
  "errors": [
    {
      "message": "Cannot query field \"publisher\" on type \"Book\".",
      "locations": [
        {
          "line": 4,
          "column": 5
        }
      ],
      "extensions": {
        "code": "GRAPHQL_VALIDATION_FAILED"
      }
    }
  ]
}
Test Assertions
- HTTP status is 200 OK (GraphQL uses the response body for errors).
- Response includes an errors array.
- Error message includes “Cannot query field \”publisher\” on type \”Book\”.”.
- extensions.code equals “GRAPHQL_VALIDATION_FAILED”.
Purpose & Validation
- Verifies that schema validation is enforced.
- Ensures non-existent fields are properly rejected.
- Confirms descriptive error handling without exposing internal details.
Best Practices for GraphQL API Testing
To maximize testing effectiveness, QA engineers should follow these best practices:
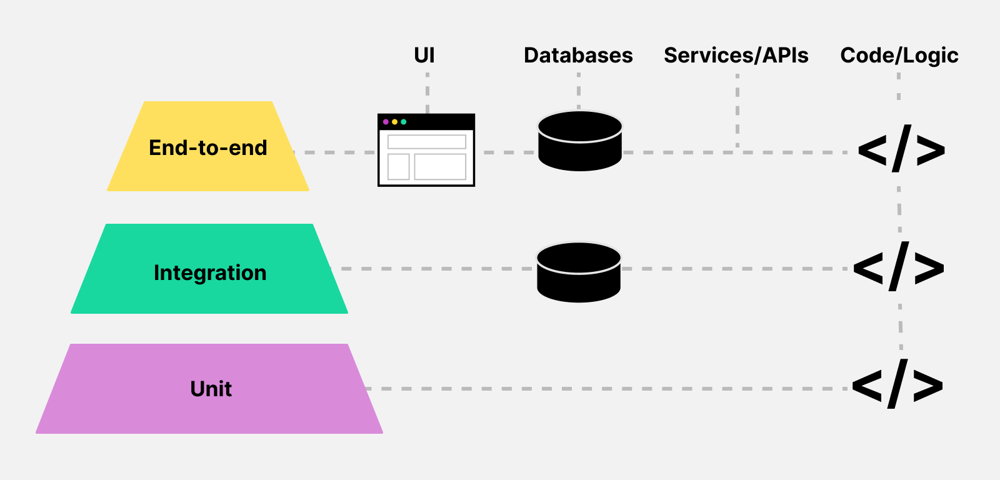
1. Adopt the Test Pyramid: Focus on numerous unit tests (e.g., schema and resolver tests), fewer integration tests (e.g., endpoint tests with a database), and minimal end-to-end tests to balance coverage and speed.
2. Prioritize Realistic Scenarios
: Test queries and mutations that reflect common client use cases first, such as retrieving user profiles or updating orders, before tackling edge cases.
3. Manage Test Data: Ensure test databases include sufficient interconnected data to support nested queries. Include edge cases like empty or null fields to test robustness.
4. Mock External Dependencies: Use stubs or mocks for external API calls to ensure repeatable, cost-effective tests. For example, mock a payment gateway response instead of hitting a live service.
5. Automate Testing: Integrate tests into CI/CD pipelines to catch issues early. Use tools like GraphQL Inspector for schema validation and Jest for query testing.
6. Monitor Performance: Regularly test and monitor API performance in staging environments, setting thresholds for acceptable latency and error rates.
7. Keep Documentation Updated: Ensure the schema and API documentation remain in sync, using introspection to verify that deprecated fields are handled correctly.
Conclusion
GraphQL’s flexibility and power make it a compelling choice for modern API development—but with that power comes a responsibility to ensure robustness, security, and performance through thorough testing. As we’ve explored, effective GraphQL API testing involves validating schema integrity, crafting diverse query and mutation tests, addressing nested data challenges, simulating real-world load, and safeguarding against security threats. The positive and negative testing scenarios detailed above highlight the importance of not only validating expected outcomes but also ensuring that your API handles errors gracefully and securely. At Codoid, we specialize in comprehensive API testing services, including GraphQL. Our expert QA engineers leverage industry-leading tools and proven strategies to deliver highly reliable, secure, and scalable APIs for our clients. Whether you’re building a new GraphQL service or enhancing an existing one, our team can ensure that your API performs flawlessly in production environments.
Frequently Asked Questions
-
What is the main advantage of using GraphQL over REST?
GraphQL allows clients to request exactly the data they need, reducing over-fetching and under-fetching issues common with REST APIs.
-
How can I prevent performance issues with deeply nested queries?
Implement query complexity analysis and depth limiting to prevent excessively nested queries that can degrade performance.
-
Are there any security concerns specific to GraphQL?
Yes, GraphQL's flexibility can expose APIs to vulnerabilities like injection attacks and unauthorized data access. Proper authentication, authorization, and query validation are essential.
-
Can I use traditional API testing tools for GraphQL?
While some traditional tools like Postman support GraphQL, specialized tools like GraphiQL and Apollo Studio offer features tailored for GraphQL's unique requirements.
-
How do I handle versioning in GraphQL APIs?
Instead of versioning the entire API, GraphQL encourages schema evolution through deprecation and addition of fields, allowing clients to migrate at their own pace.
by Rajesh K | May 9, 2025 | API Testing, Blog, Latest Post |
API testing is crucial for ensuring that your backend services work correctly and reliably. APIs often serve as the backbone of web and mobile applications, so catching bugs early through automated tests can save time and prevent costly issues in production. For Node.js developers and testers, the Supertest API library offers a powerful yet simple way to automate HTTP endpoint testing as part of your workflow. Supertest is a Node.js library (built on the Superagent HTTP client) designed specifically for testing web APIs. It allows you to simulate HTTP requests to your Node.js server and assert the responses without needing to run a browser or a separate client. This means you can test your RESTful endpoints directly in code, making it ideal for integration and end-to-end testing of your server logic. Developers and QA engineers favor Supertest because it is:
- Lightweight and code-driven – No GUI or separate app required, just JavaScript code.
- Seamlessly integrated with Node.js frameworks – Works great with Express or any Node HTTP server.
- Comprehensive – Lets you control headers, authentication, request payloads, and cookies in tests.
- CI/CD friendly – Easily runs in automated pipelines, returning standard exit codes on test pass/fail.
- Familiar to JavaScript developers – You write tests in JS/TS, using popular test frameworks like Jest or Mocha, so there’s no context-switching to a new language.
In this guide, we’ll walk through how to set up and use Supertest API for testing various HTTP methods (GET, POST, PUT, DELETE), validate responses (status codes, headers, and bodies), handle authentication, and even mock external API calls. We’ll also discuss how to integrate these tests into CI/CD pipelines and share best practices for effective API testing. By the end, you’ll be confident in writing robust API tests for your Node.js applications using Supertest.
Setting Up Supertest in Your Node.js Project
Before writing tests, you need to add Supertest to your project and set up a testing environment. Assuming you already have a Node.js application (for example, an Express app), follow these steps to get started:
- Install Supertest (and a test runner): Supertest is typically used with a testing framework like Jest or Mocha. If you don’t have a test runner set up, Jest is a popular choice for beginners due to its zero configuration. Install Supertest and Jest as development dependencies using npm:
npm install --save-dev supertest jest
This will add Supertest and Jest to your project’s node_modules. (If you prefer Mocha or another framework, you can install those instead of Jest.)
- Project Structure: Organize your tests in a dedicated directory. A common convention is to create a folder called tests or to put test files alongside your source files with a .test.js extension. For example:
my-project/
├── app.js            # Your Express app or server
└── tests/
    └── users.test.js # Your Supertest test file
In this example, app.js exports an Express application (or Node HTTP server) which the tests will import. The test file users.test.js will contain our Supertest test cases.
- Configure the Test Script: If you’re using Jest, add a test script to your package.json (if not already present):
"scripts": {
  "test": "jest"
}
This allows you to run all tests with the command npm test. (For Mocha, you might use “test”: “mocha” accordingly.)
With Supertest installed and your project structured for tests, you’re ready to write your first API test.
Writing Your First Supertest API Test
Let’s create a simple test to make sure everything is set up correctly. In your test file (e.g., users.test.js), you’ll require your app and the Supertest library, then define test cases. For example:
const request = require('supertest');    // import Supertest
const app = require('../app');           // import the Express app


describe('GET /api/users', () => {
  it('should return HTTP 200 and a list of users', async () => {
    const res = await request(app).get('/api/users');  // simulate GET request
    expect(res.statusCode).toBe(200);                  // assert status code is 200
    expect(res.body).toBeInstanceOf(Array);            // assert response body is an array
  });
});
In this test, request(app) creates a Supertest client for the Express app. We then call .get(‘/api/users’) and await the response. Finally, we use Jest’s expect to check that the status code is 200 (OK) and that the response body is an array (indicating a list of users).
Now, let’s dive deeper into testing various scenarios and features of an API using Supertest.
Testing Different HTTP Methods (GET, POST, PUT, DELETE)
Real-world APIs use multiple HTTP methods. Supertest makes it easy to test any request method by providing corresponding functions (.get(), .post(), .put(), .delete(), etc.) after calling request(app). Here’s how you can use Supertest for common HTTP methods:
// Examples of testing different HTTP methods with Supertest:

// GET request (fetch list of users)
await request(app)
  .get('/users')
  .expect(200);

// POST request (create a new user with JSON payload)
await request(app)
  .post('/users')
  .send({ name: 'John' })
  .expect(201);

// PUT request (update user with id 1)
await request(app)
  .put('/users/1')
  .send({ name: 'John Updated' })
  .expect(200);

// DELETE request (remove user with id 1)
await request(app)
  .delete('/users/1')
  .expect(204);
In the above snippet, each request is crafted for a specific endpoint and method:
- GET /users should return 200 OK (perhaps with a list of users).
- POST /users sends a JSON body ({ name: ‘John’ }) to create a new user. We expect a 201 Created status in response.
- PUT /users/1 sends an updated name for the user with ID 1 and expects a 200 OK for a successful update.
- DELETE /users/1 attempts to delete user 1 and expects a 204 No Content (a common response for successful deletions).
Notice the use of .send() for POST and PUT requests – this method attaches a request body. Supertest (via Superagent) automatically sets the Content-Type: application/json header when you pass an object to .send(). You can also chain an .expect(statusCode) to quickly assert the HTTP status.
Sending Data, Headers, and Query Parameters
When testing APIs, you often need to send data or custom headers, or verify endpoints with query parameters. Supertest provides ways to handle all of these:
- Query Parameters and URL Path Params: Include them in the URL string. For example:
// GET /users?role=admin (query string)
await request(app).get('/users?role=admin').expect(200);

// GET /users/123 (path parameter)
await request(app).get('/users/123').expect(200);
If your route uses query parameters or dynamic URL segments, constructing the URL in the request call is straightforward.
- Request Body (JSON or form data): Use .send() for JSON payloads (as shown above). If you need to send form-url-encoded data or file uploads, Supertest (through Superagent) supports methods like .field() and .attach(). However, for most API tests sending JSON via .send({…}) is sufficient. Just ensure your server is configured (e.g., with body-parsing middleware) to handle the content type you send.
- Custom Headers: Use .set() to set any HTTP header on the request. Common examples include setting an Accept header or authorization tokens. For instance:
await request(app)
  .post('/users')
  .send({ name: 'Alice' })
  .set('Accept', 'application/json')
  .expect('Content-Type', /json/)
  .expect(201);
Here we set Accept: application/json to tell the server we expect a JSON response, and then we chain an expectation that the Content-Type of the response matches json. You can use .set() for any header your API might require (such as X-API-Key or custom headers).
Setting headers is also how you handle authentication in Supertest, which we’ll cover next.
Handling Authentication and Protected Routes
APIs often have protected endpoints that require authentication, such as a JSON Web Token (JWT) or an API key. To test these, you’ll need to include the appropriate auth credentials in your Supertest requests.
For example, if your API uses a Bearer token in the Authorization header (common with JWT-based auth), you can do:
const token = 'your-jwt-token-here';  // Typically you'd generate or retrieve this in your test setup
await request(app)
  .get('/dashboard')
  .set('Authorization', `Bearer ${token}`)
  .expect(200);
In this snippet, we set the Authorization header before making a GET request to a protected /dashboard route. We then expect a 200 OK if the token is valid and the user is authorized. If the token is missing or incorrect, you could test for a 401 Unauthorized or 403 Forbidden status accordingly.
Tip: In a real test scenario, you might first call a login endpoint (using Supertest) to retrieve a token, then use that token for subsequent requests. You can utilize Jest’s beforeAll hook to obtain auth tokens or set up any required state before running the secured-route tests, and an afterAll to clean up after tests (for example, invalidating a token or closing database connections).
Validating Responses: Status Codes, Bodies, and Headers
Supertest makes it easy to assert various parts of the HTTP response. We’ve already seen using .expect(STATUS) to check status codes, but you can also verify response headers and body content.
You can chain multiple Supertest .expect calls for convenient assertions. For example:
await request(app)
  .get('/users')
  .expect(200)                              // status code is 200
  .expect('Content-Type', /json/)           // Content-Type header contains "json"
  .expect(res => {
    // Custom assertion on response body
    if (!res.body.length) {
      throw new Error('No users found');
    }
  });
Here we chain three expectations:
- The response status should be 200.
- The Content-Type header should match a regex /json/ (indicating JSON content).
- A custom function that throws an error if the res.body array is empty (which would fail the test). This demonstrates how to do more complex assertions on the response body; if the condition inside .expect(res => { … }) is not met, the test will fail with that error.
Alternatively, you can always await the request and use your test framework’s assertion library on the response object. For example, with Jest you could do:
const res = await request(app).get('/users');
expect(res.statusCode).toBe(200);
expect(res.headers['content-type']).toMatch(/json/);
expect(res.body.length).toBeGreaterThan(0);
Both approaches are valid – choose the style you find more readable. Using Supertest’s chaining is concise for simple checks, whereas using your own expect calls on the res object can be more flexible for complex verification.
Testing Error Responses (Negative Testing)
It’s important to test not only the “happy path” but also how your API handles invalid input or error conditions. Supertest can help you simulate error scenarios and ensure your API responds correctly with the right status codes and messages.
For example, if your POST /users endpoint should return a 400 Bad Request when required fields are missing, you can write a test for that case:
it('should return 400 when required fields are missing', async () => {
  const res = await request(app)
    .post('/users')
    .send({});  // sending an empty body, assuming "name" or other fields are required
  expect(res.statusCode).toBe(400);
  // Optionally, check that an error message is returned in the body
  expect(res.body.error).toBeDefined();
});
In this test, we intentionally send an incomplete payload (empty object) to trigger a validation error. We then assert that the response status is 400. You could also assert on the response body (for example, checking that res.body.error or res.body.message contains the expected error info).
Similarly, you might test a 404 Not Found for a GET with a non-existent ID, or 401 Unauthorized when hitting a protected route without credentials. Covering these negative cases ensures your API fails gracefully and returns expected error codes that clients can handle.
Mocking External API Calls in Tests
Sometimes your API endpoints call third-party services (for example, an external REST API). In your tests, you might not want to hit the real external service (to avoid dependencies, flakiness, or side effects). This is where mocking comes in.
For Node.js, a popular library for mocking HTTP requests is Nock. Nock can intercept outgoing HTTP calls and simulate responses, which pairs nicely with Supertest when your code under test makes HTTP requests itself.
To use Nock, install it first:
npm install --save-dev nock
Then, in your tests, you can set up Nock before making the request with Supertest. For example:
// Mock the external API endpoint
nock('https://api.example.com')
  .get('/data')
  .reply(200, { result: 'ok' });


// Now make a request to your app (which calls the external API internally)
const res = await request(app).get('/internal-route');
expect(res.statusCode).toBe(200);
expect(res.body.result).toBe('ok');
In this way, when your application tries to reach api.example.com/data, Nock intercepts the call and returns the fake { result: ‘ok’ }. Our Supertest test then verifies that the app responded as expected without actually calling the real external service.
Best Practices for API Testing with Supertest
To get the most out of Supertest and keep your tests maintainable, consider the following best practices:
- Separate tests from application code: Keep your test files in a dedicated folder (like tests/) or use a naming convention like *.test.js. This makes it easier to manage code and ensures you don’t accidentally include test code in production builds. It also helps testing frameworks (like Jest) find your tests automatically.
- Use test data factories or generators: Instead of hardcoding data in your tests, generate dynamic data for more robust testing. For example, use libraries like Faker.js to create random user names, emails, etc. This can reveal issues that only occur with certain inputs and prevents all tests from using the exact same data. It keeps your tests closer to real-world scenarios.
- Test both success and failure paths: For each API endpoint, write tests for expected successful outcomes (200-range responses) and also for error conditions (4xx/5xx responses). Ensuring you have coverage for edge cases, bad inputs, and unauthorized access will make your API more reliable and bug-resistant.
- Clean up after tests: Tests should not leave the system in a dirty state. If your tests create or modify data (e.g., adding a user in the database), tear down that data at the end of the test or use setup/teardown hooks (beforeEach, afterEach) to reset state. This prevents tests from interfering with each other. Many testing frameworks allow you to reset database or app state between tests; use those features to isolate test cases.
- Use environment variables for configuration: Don’t hardcode sensitive values (like API keys, tokens, or database URLs) in your tests. Instead, use environment variables and perhaps a dedicated .env file for your test configuration. By using a package like dotenv, you can load test-specific environment variables (for example, pointing to a test database instead of production). This protects sensitive information and makes it easy to configure tests in different environments (local vs CI, etc.).
By following these practices, you’ll write tests that are cleaner, more reliable, and easier to maintain as your project grows.
Supertest vs Postman vs Rest Assured: Tool Comparison
While Supertest is a great tool for Node.js API testing, you might wonder how it stacks up against other popular API testing solutions like Postman or Rest Assured. Here’s a quick comparison:
| S. No |
Feature |
Supertest (Node.js) |
Postman (GUI Tool) |
Rest Assured (Java) |
| 1 |
Language/Interface |
JavaScript (code) |
GUI + JavaScript (for tests via Newman) |
Java (code) |
| 2 |
Testing Style |
Code-driven; integrated with Jest/Mocha |
Manual + some automation (collections, Newman CLI) |
Code-driven (uses JUnit/TestNG) |
| 3 |
Speed |
Fast (no UI overhead) |
Medium (runs through an app or CLI) |
Fast (runs in JVM) |
| 4 |
CI/CD Integration |
Yes (run with npm test) |
Yes (using Newman CLI in pipelines) |
Yes (part of build process) |
| 5 |
Learning Curve |
Low (if you know JS) |
Low (easy GUI, scripting possible |
Medium (requires Java and testing frameworks) |
| 6 |
Ideal Use Case |
Node.js projects – embed tests in codebase for TDD/CI |
Exploratory testing, sharing API collections, quick manual checks |
Java projects – write integration tests in Java code |
In summary, Supertest shines for developers in the Node.js ecosystem who want to write programmatic tests alongside their application code. Postman is excellent for exploring and manually testing APIs (and it can do automation via Newman), but those tests live outside your codebase. Rest Assured is a powerful option for Java developers, but it isn’t applicable for Node.js apps. If you’re working with Node and want seamless integration with your development workflow and CI pipelines, Supertest is likely your best bet for API testing.
Conclusion
Automated API testing is a vital part of modern software development, and Supertest provides Node.js developers and testers with a robust, fast, and intuitive tool to achieve it. By integrating Supertest API tests into your development cycle, you can catch regressions early, ensure each endpoint behaves as intended, and refactor with confidence. We covered how to set up Supertest, write tests for various HTTP methods, handle things like headers, authentication, and external APIs, and even how to incorporate these tests into continuous integration pipelines.
Now it’s time to put this knowledge into practice. Set up Supertest in your Node.js project and start writing some tests for your own APIs. You’ll likely find that the effort pays off with more reliable code and faster debugging when things go wrong. Happy testing!
Frequently Asked Questions
-
What is Supertest API?
Supertest API (or simply Supertest) is a Node.js library for testing HTTP APIs. It provides a high-level way to send requests to your web server (such as an Express app) and assert the responses. With Supertest, you can simulate GET, POST, PUT, DELETE, and other requests in your test code and verify that your server returns the expected status codes, headers, and data. It's widely used for integration and end-to-end testing of RESTful APIs in Node.js.
-
Can Supertest be used with Jest?
Yes – Supertest works seamlessly with Jest. In fact, Jest is one of the most popular test runners to use with Supertest. You can write your Supertest calls inside Jest's it() blocks and use Jest’s expect function to make assertions on the response (as shown in the examples above). Jest also provides convenient hooks like beforeAll/afterAll which you can use to set up or tear down test conditions (for example, starting a test database or seeding data) before your Supertest tests run. While we've used Jest for examples here, Supertest is test-runner agnostic, so you could also use it with Mocha, Jasmine, or other frameworks in a similar way.
-
How do I mock APIs when using Supertest?
You can mock external API calls by using a library like Nock to intercept them. Set up Nock in your test to fake the external service's response, then run your Supertest request as usual. This way, when your application tries to call the external API, Nock responds instead, allowing your test to remain fast and isolated from real external dependencies.
-
How does Supertest compare with Postman for API testing?
Supertest and Postman serve different purposes. Supertest is a code-based solution — you write JavaScript tests and run them, which is perfect for integration into a development workflow and CI/CD. Postman is a GUI tool great for manually exploring endpoints, debugging, and sharing API collections, with the ability to write tests in the Postman app. You can automate Postman tests using its CLI (Newman), but those tests aren't part of your application's codebase. In contrast, Supertest tests live alongside your code, which means they can be version-controlled and run automatically on every code change. Postman is easier for quick manual checks or for teams that include non-developers, whereas Supertest is better suited for developers who want an automated testing suite integrated with their Node.js project.
by Rajesh K | Apr 5, 2025 | API Testing, Blog, Latest Post |
API testing is a crucial component of modern software development, as it ensures that backend services and integrations function correctly, reliably, and securely. With the increasing complexity of distributed systems and microservices, validating API responses, performance, and behavior has become more important than ever. The Karate framework simplifies this process by offering a powerful and user-friendly platform that brings together API testing, automation, and assertions in a single framework. In this tutorial, we’ll walk you through how to set up and use Karate for API testing step by step. From installation to writing and executing your first test case, this guide is designed to help you get started with confidence. Whether you’re a beginner exploring API automation or an experienced tester looking for a simpler and more efficient framework, Karate provides the tools you need to build robust and maintainable API test automation.
What is the Karate Framework?
Karate is an open-source testing framework designed for API testing, API automation, and even UI testing. Unlike traditional tools that require extensive coding or complex scripting, Karate simplifies test creation by using a domain-specific language (DSL) based on Cucumber’s Gherkin syntax. This makes it easy for both developers and non-technical testers to write and execute test cases effortlessly.
With Karate, you can define API tests in plain-text (.feature) files, reducing the learning curve while ensuring readability and maintainability. It offers built-in assertions, data-driven testing, and seamless integration with CI/CD pipelines, making it a powerful choice for teams looking to streamline their automation efforts with minimal setup.
Prerequisites
Before we dive in, ensure you have the following:
- Java Development Kit (JDK): Version 8 or higher installed (Karate runs on Java).
- Maven: A build tool to manage dependencies (we’ll use it in this tutorial).
- An IDE: IntelliJ IDEA, Eclipse, or VS Code.
- A sample API: We’ll use the free Reqres for testing.
Let’s get started!
Step 1: Set Up Your Project
1. Create a New Maven Project
- If you’re using an IDE like IntelliJ, select “New Project” > “Maven” and click “Next.”
- Set the GroupId (e.g., org.example) and ArtifactId (e.g., KarateTutorial).
2. Configure the pom.xml File
Open your pom.xml and add the Karate dependency. Here’s a basic setup:
<project xmlns="http://maven.apache.org/POM/4.0.0" xmlns:xsi="http://www.w3.org/2001/XMLSchema-instance"
 xsi:schemaLocation="http://maven.apache.org/POM/4.0.0 http://maven.apache.org/maven-v4_0_0.xsd">
 <modelVersion>4.0.0</modelVersion>
 <groupId>org.example</groupId>
 <artifactId>KarateTutorial</artifactId>
 <version>1.0-SNAPSHOT</version>
 <name>Archetype - KarateTutorial</name>
 <url>http://maven.apache.org</url>


<properties>
 <maven.compiler.source>1.8</maven.compiler.source>
 <maven.compiler.target>1.8</maven.compiler.target>
 <karate.version>1.4.1</karate.version>
</properties>


<dependencies>
 <dependency>
   <groupId>com.intuit.karate</groupId>
   <artifactId>karate-junit5</artifactId>
   <version>${karate.version}</version>
   <scope>test</scope>
 </dependency>
</dependencies>


<build>
 <testResources>
   <testResource>
     <directory>src/test/java</directory>
     <includes>
       <include>**/*.feature</include>
     </includes>
   </testResource>
 </testResources>
 <plugins>
   <plugin>
     <groupId>org.apache.maven.plugins</groupId>
     <artifactId>maven-surefire-plugin</artifactId>
     <version>3.0.0-M5</version>
   </plugin>
 </plugins>
</build>
</project>
- This setup includes Karate with JUnit 5 integration and ensures that .feature files are recognized as test resources.
Sync the Project
- In your IDE, click “Reload Project” (Maven) to download the dependencies. If you’re using the command line, run mvn clean install.
Step 2: Create Your First Karate Test
1. Set Up the Directory Structure
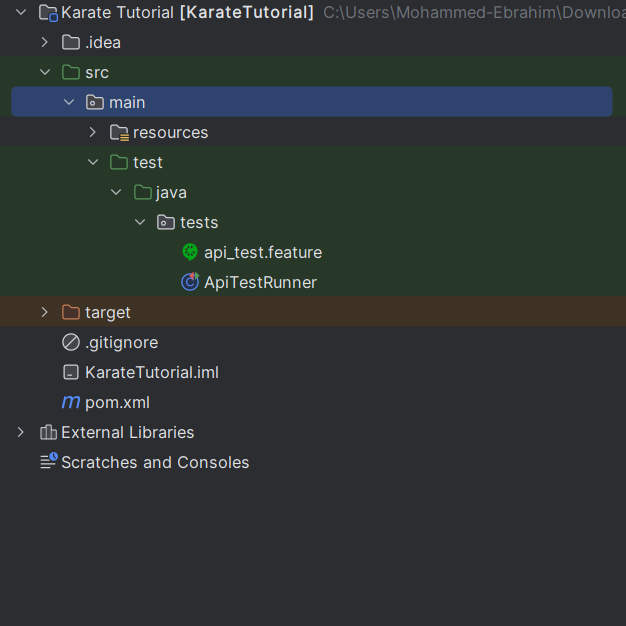
- Inside src/test/java, create a folder called tests (e.g., src/test/java/tests).
- This is where we’ll store our .feature files.
2. Write a Simple Test
- Create a file named api_test.feature inside the tests folder.
- Add the following content:
Feature: Testing Reqres API with Karate


 Background:
   * url 'https://reqres.in'


 Scenario: Get a list of users
   Given path '/api/users?page=1'
   When method GET
   Then status 200
   And match response.page == 1
   And match response.per_page == 6
   And match response.total == 12
   And match response.total_pages == 2
Explanation:
- Feature: Describes the purpose of the test file.
- Scenario: A single test case.
- Given url: Sets the API endpoint.
- When method GET: Sends a GET request.
- Then status 200: Verifies the response status is 200 (OK).
- And match response.page == 1: Checks that the page value is equal to 1.
Step 3: Run the Test
1. Create a Test Runner
- In src/test/java/tests, create a Java file named ApiTestRunner.java:
package tests;


import com.intuit.karate.junit5.Karate;


class ApiTestRunner {
   @Karate.Test
   Karate testAll() {
       return Karate.run("api_test").relativeTo(getClass());
   }
}
- This runner tells Karate to execute the api_test.feature file.
Before Execution make sure the test folder looks like this.
2. Execute the Test
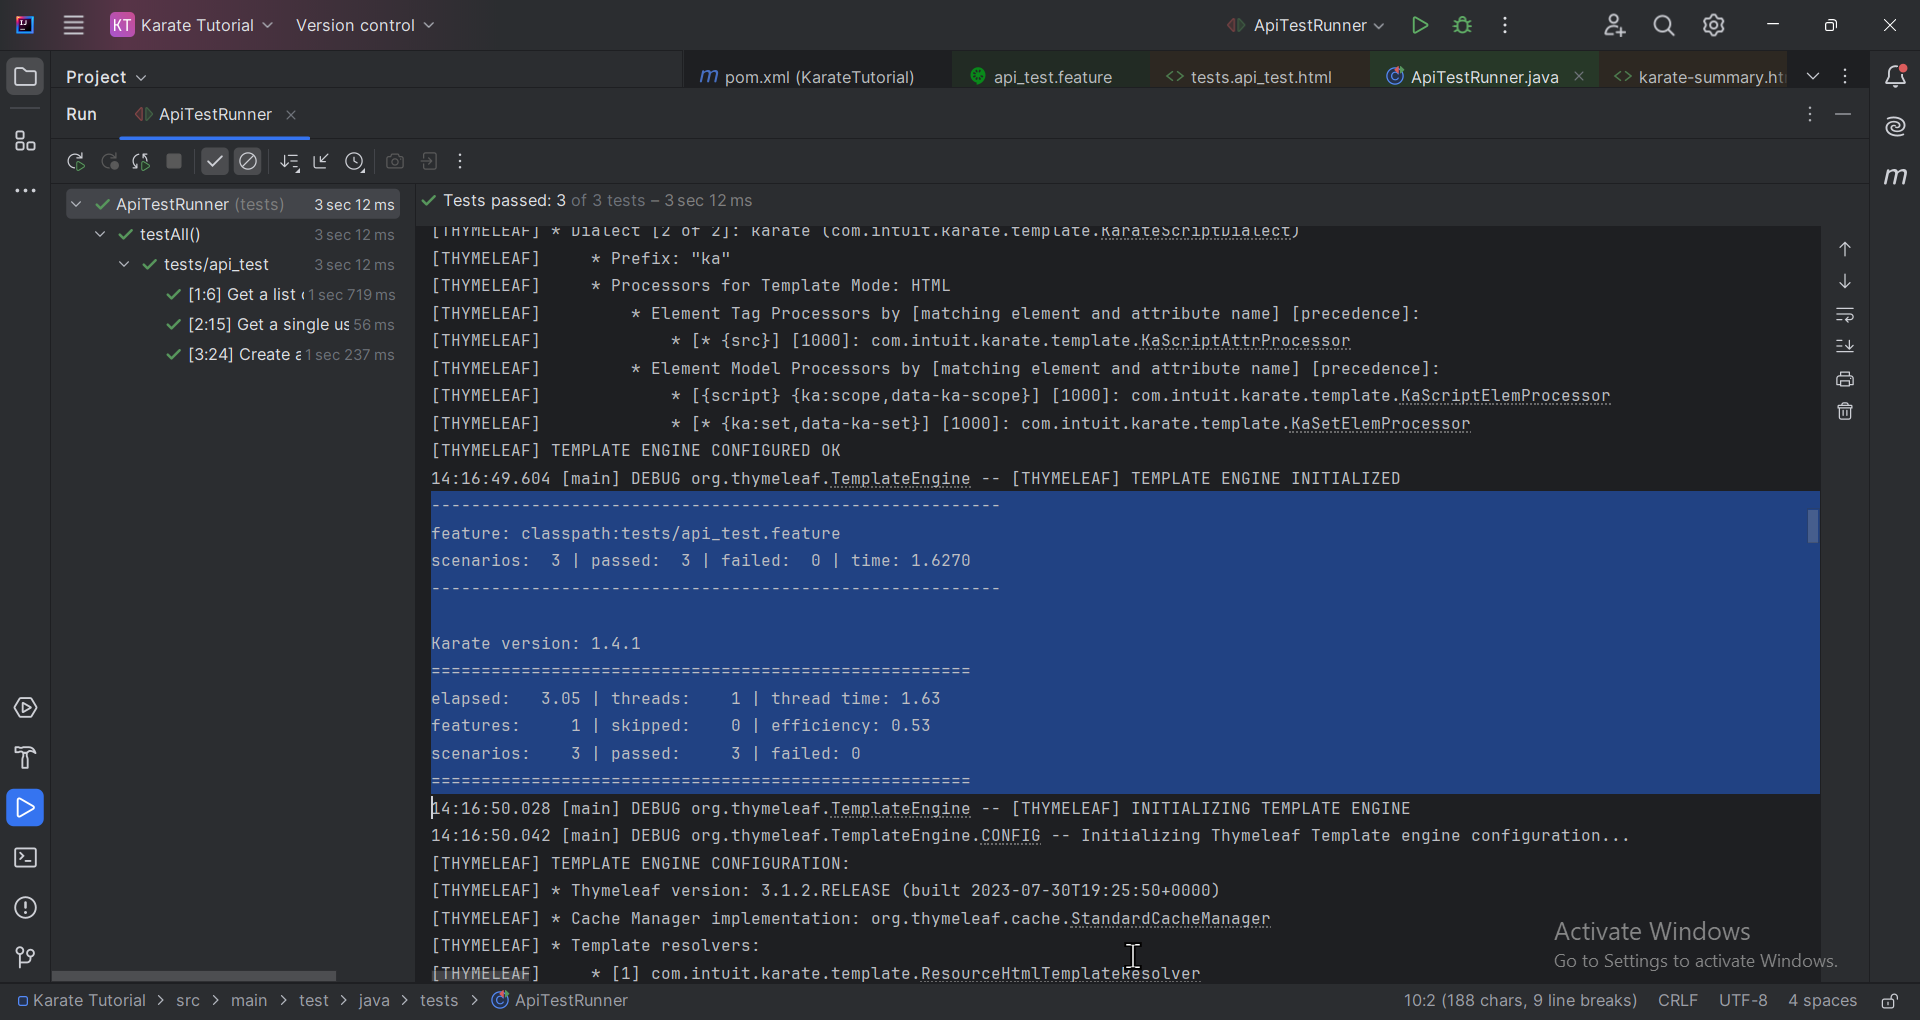
- Right-click ApiTestRunner.java and select “Run.”
You should see a report indicating the test passed, along with logs of the request and response.
Step 4: Expand Your Test Cases
Let’s add more scenarios to test different API functionalities.
1. Update api_test.feature
Replace the content with:
Feature: Testing Reqres API with Karate


 Background:

   * url 'https://reqres.in'


 Scenario: Get a list of users

   Given path '/api/users?page=1'

   When method GET

   Then status 200

   And match response.page == 1

   And match response.per_page == 6

   And match response.total == 12

   And match response.total_pages == 2


 Scenario: Get a single user by ID

   Given path '/api/users/2'

   When method GET

   Then status 200

   And match response.data.id == 2

   And match response.data.email == "[email protected]"

   And match response.data.first_name == "Janet"

   And match response.data.last_name == "Weaver"


 Scenario: Create a new post

   Given path 'api/users'

   And request {"name": "morpheus","job": "leader"}

   When method POST

   Then status 201

   And match response.name == "morpheus"

   And match response.job == "leader"
Explanation:
- Background: Defines a common setup (base URL) for all scenarios.
- First scenario: Tests GET request for a list of users.
- Second scenario: Tests GET request for a specific user.
-
- Third scenario: Tests POST request to create a resource.
Run the Updated Tests
- Use the same ApiTestRunner.java to execute the tests. You’ll see results for all three scenarios.
Step 5: Generate Reports
Karate automatically generates HTML reports.
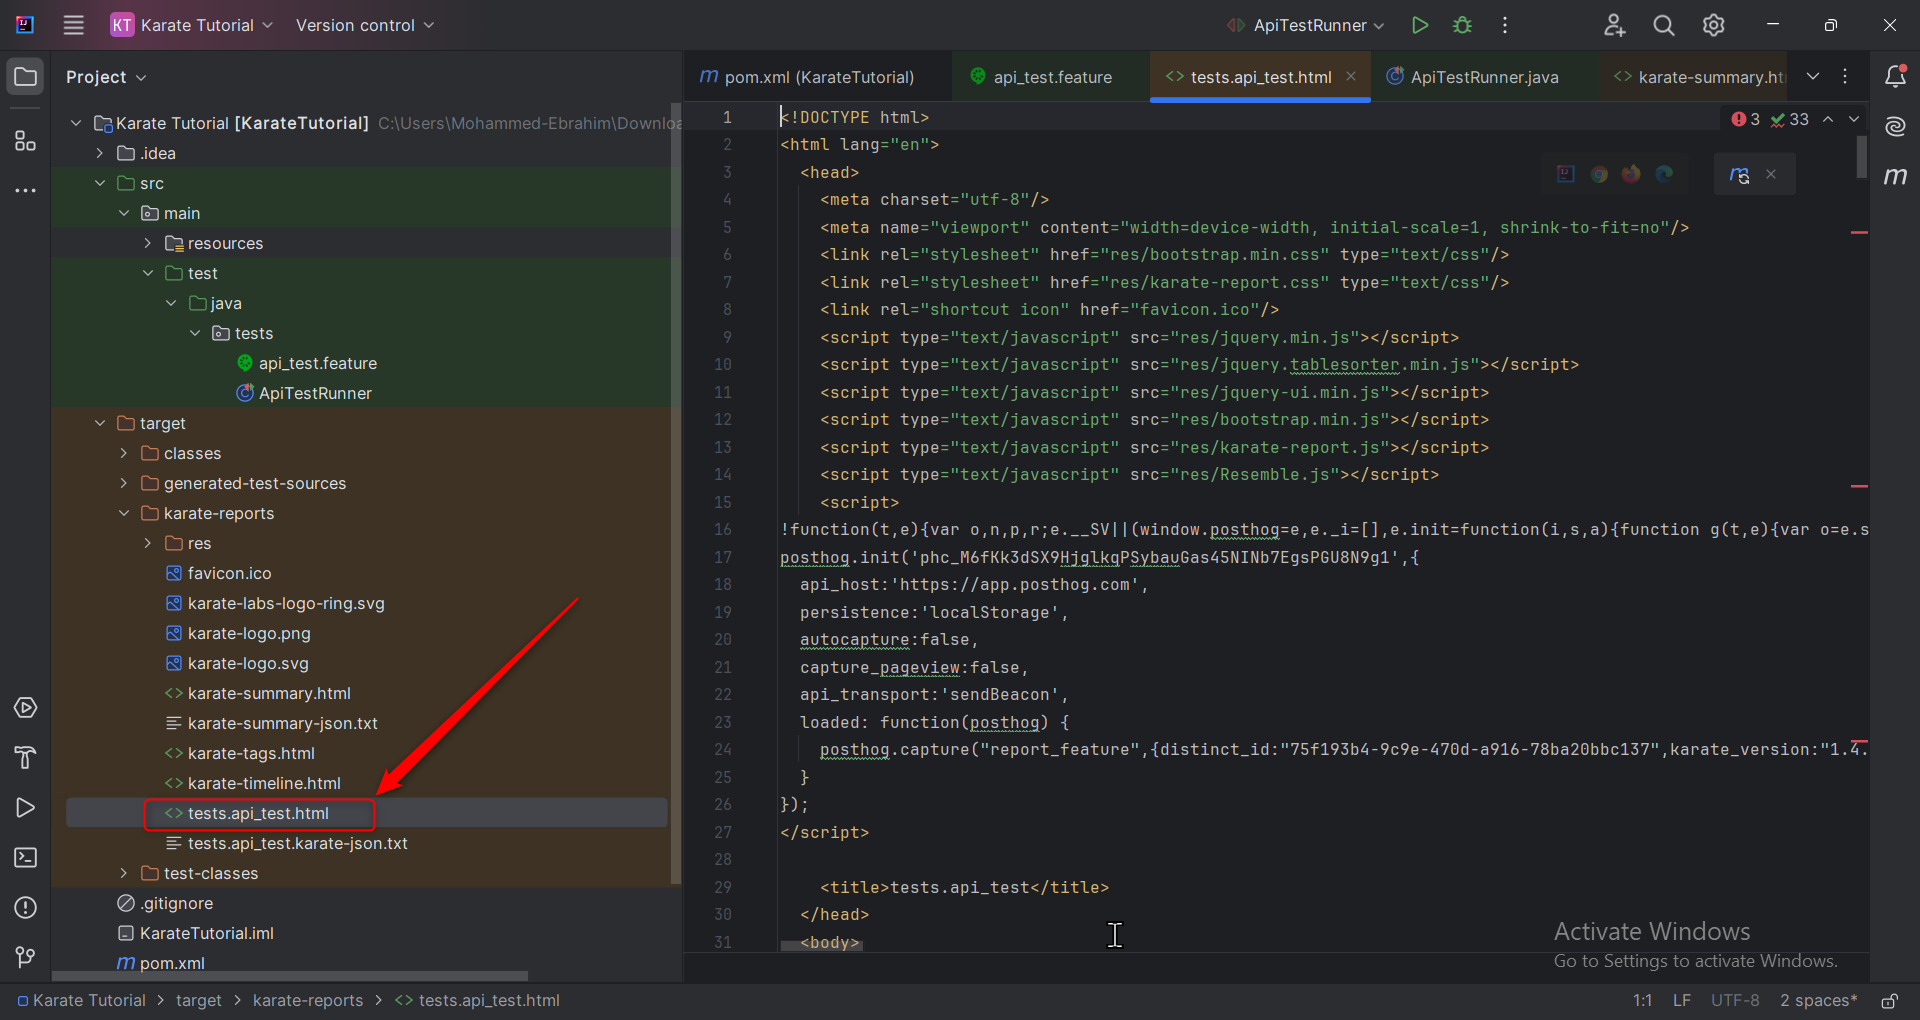
1. Find the Report
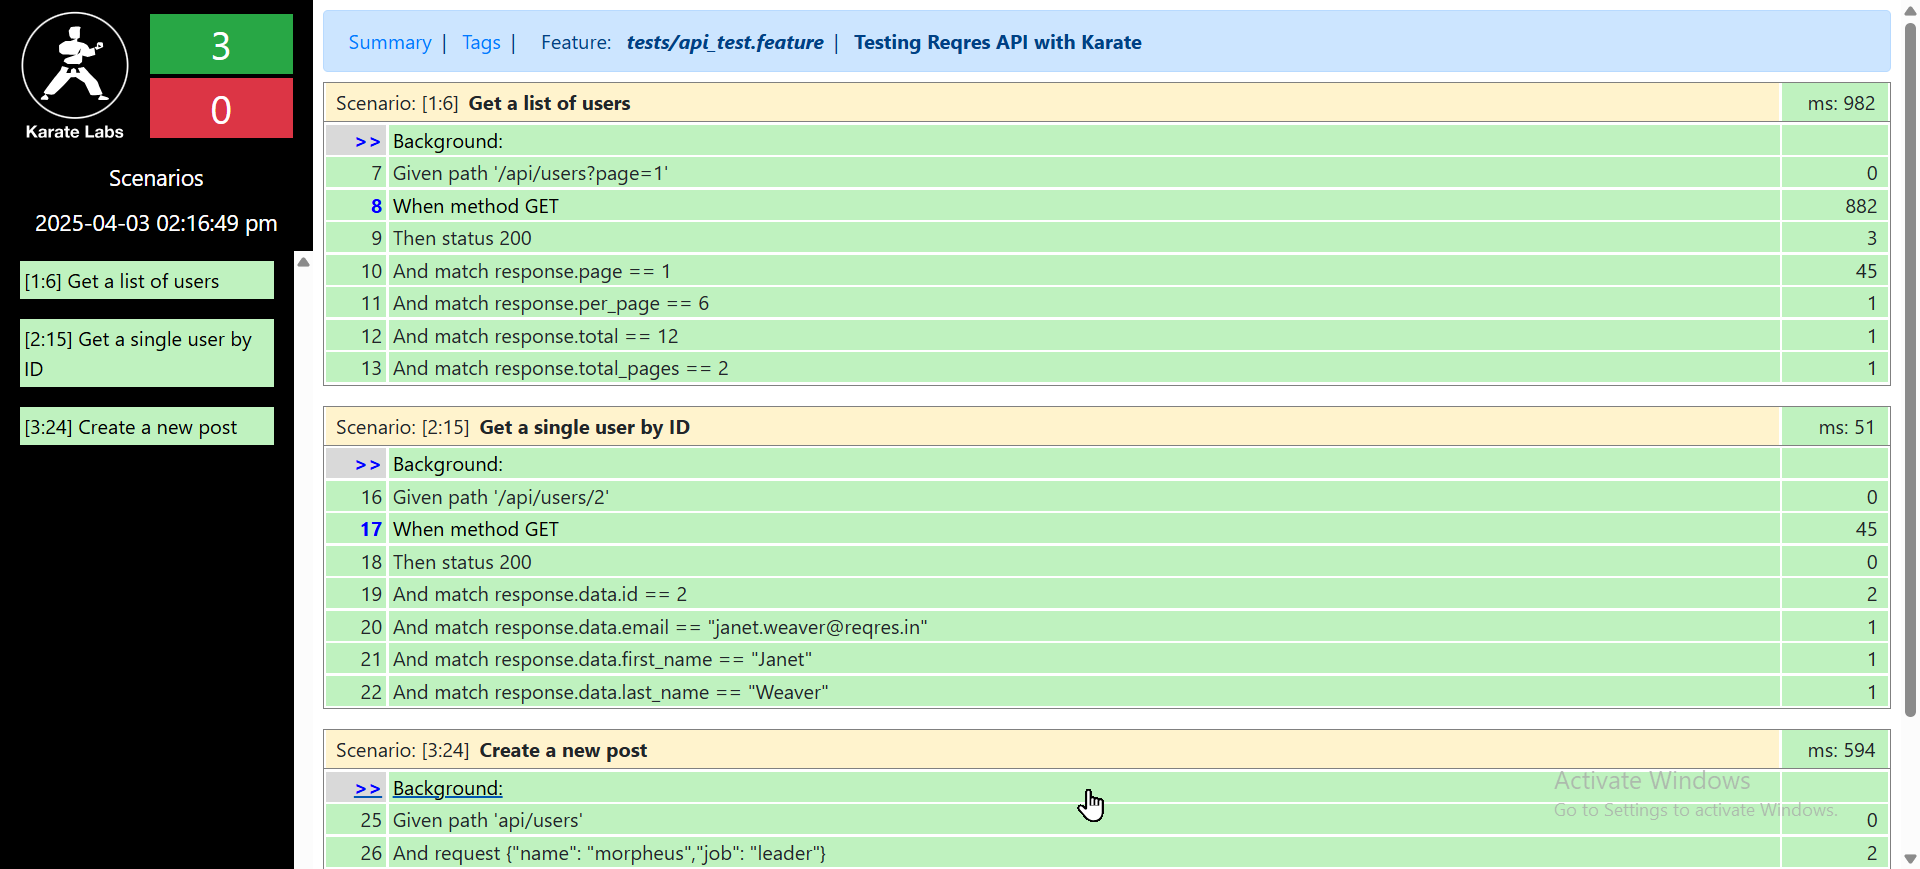
- After running tests, check target/surefire-reports/karate-summary.html in your project folder.
- Open it in a browser to see a detailed summary of your test results.
Conclusion
Karate is a powerful yet simple framework that makes API automation accessible for both beginners and experienced testers. In this tutorial, we covered the essentials of API testing with Karate, including setting up a project, writing test cases, running tests, and generating reports. Unlike traditional API testing tools, Karate’s Gherkin-based syntax, built-in assertions, parallel execution, and seamless CI/CD integration allow teams to automate tests efficiently without extensive coding. Its data-driven testing and cross-functional capabilities make it an ideal choice for modern API automation. At Codoid, we specialize in API testing, UI automation, performance testing, and test automation consulting, helping businesses streamline their testing processes using tools like Karate, Selenium, and Cypress. Looking to optimize your API automation strategy? Codoid provides expert solutions to ensure seamless software quality—reach out to us today!
Frequently Asked Questions
-
Do I need to know Java to use Karate?
No, extensive Java knowledge isn’t required. Karate uses a domain-specific language (DSL) that allows test cases to be written in plain-text .feature files using Gherkin syntax.
-
Can Karate handle POST, GET, and other HTTP methods?
Yes, Karate supports all major HTTP methods such as GET, POST, PUT, DELETE, and PATCH for comprehensive API testing.
-
Are test reports generated automatically in Karate?
Yes, Karate generates HTML reports automatically after test execution. These reports can be found in the target/surefire-reports/karate-summary.html directory.
-
Can Karate be used for UI testing too?
Yes, Karate can also handle UI testing using its karate-ui module, though it is primarily known for its robust API automation capabilities.
-
How is Karate different from Postman or RestAssured?
Unlike Postman, which is more manual, Karate enables automation and can be integrated into CI/CD. Compared to RestAssured, Karate has a simpler syntax and built-in support for features like data-driven testing and reports.
-
Does Karate support CI/CD integration?
Absolutely. Karate is designed to integrate seamlessly with CI/CD pipelines, allowing automated test execution as part of your development lifecycle.

by Hannah Rivera | Mar 17, 2025 | API Testing, Blog, Latest Post |
The demand for robust and efficient API testing tools has never been higher. Teams are constantly seeking solutions that not only streamline their testing workflows but also integrate seamlessly with their existing development pipelines. Enter Bruno, a modern, open-source API client purpose-built for API testing and automation. Bruno distinguishes itself from traditional tools like Postman by offering a lightweight, local-first approach that prioritizes speed, security, and developer-friendly workflows. Designed to suit both individual testers and collaborative teams, Bruno brings simplicity and power to API automation by combining an intuitive interface with advanced features such as version control integration, JavaScript-based scripting, and command-line execution capabilities.
Unlike cloud-dependent platforms, Bruno emphasizes local-first architecture, meaning API collections and configurations are stored directly on your machine. This approach ensures data security and faster performance, enabling developers to easily sync test cases via Git or other version control systems. Additionally, Bruno offers flexible environment management and dynamic scripting to allow teams to build complex automated API workflows with minimal overhead. Bruno stands out as a compelling solution for organizations striving to modernize their API testing process and integrate automation into CI/CD pipelines. This guide explores Bruno’s setup, test case creation, scripting capabilities, environment configuration, and how it can enhance your API automation strategy.
Before you deep dive into API automation testing, we recommend checking out our detailed blog, which will give you valuable insights into how Bruno can optimize your API testing workflow.
Setting Up Bruno for API Automation
In the following sections, we’ll walk you through everything you need to get Bruno up and running for your API automation needs — from installation to creating your first automated test cases, configuring environment variables, and executing tests via CLI.
Whether you’re automating GET or POST requests, adding custom JavaScript assertions, or managing multiple environments, this guide will show you exactly how to harness Bruno’s capabilities to build a streamlined and efficient API testing workflow.
Install Bruno
- Download Bruno from its official site (bruno.io) or GitHub repository, depending on your OS.
- Follow the installation prompts to set up the tool on your computer.
Creating a Test Case Directory
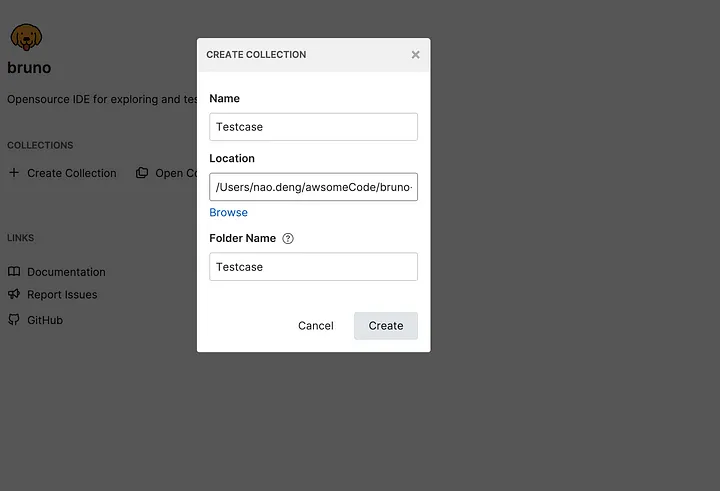
Begin by launching the Bruno application and setting up a directory for storing test cases.
- 1. Run the Bruno application.
- 2. Create a COLLECTION named Testcase.
- 3. Select the project folder you created as the directory for this COLLECTION.
Writing and Executing Test Cases in Bruno
1. Creating a GET Request Test Case
- Click the ADD REQUEST button under the Testcase COLLECTION.
- Set the request type to GET.
- Name the request GetDemo and set the URL to:
https://jsonplaceholder.typicode.com/posts/1
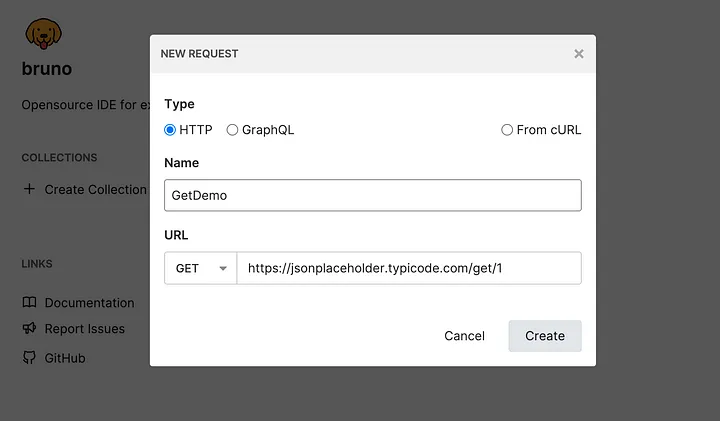
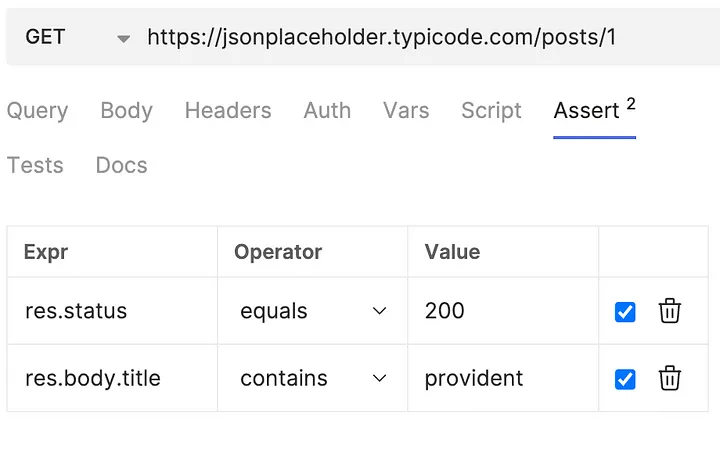
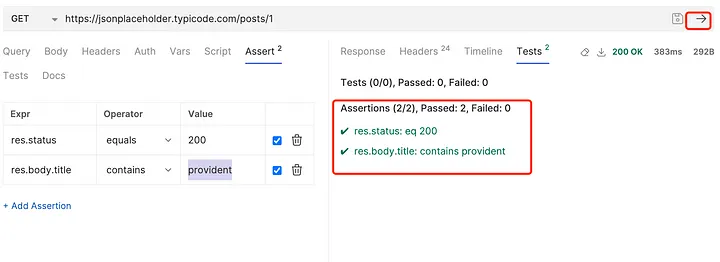
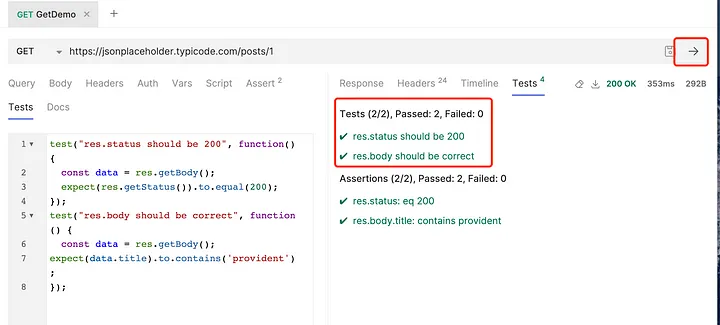
2. Adding Test Assertions Using Built-in Assert
4. Creating a POST Request Test Case
- Click ADD REQUEST under the Testcase COLLECTION.
- Set the request type to POST.
- Name the request PostDemo and set the URL to:
https://jsonplaceholder.typicode.com/posts
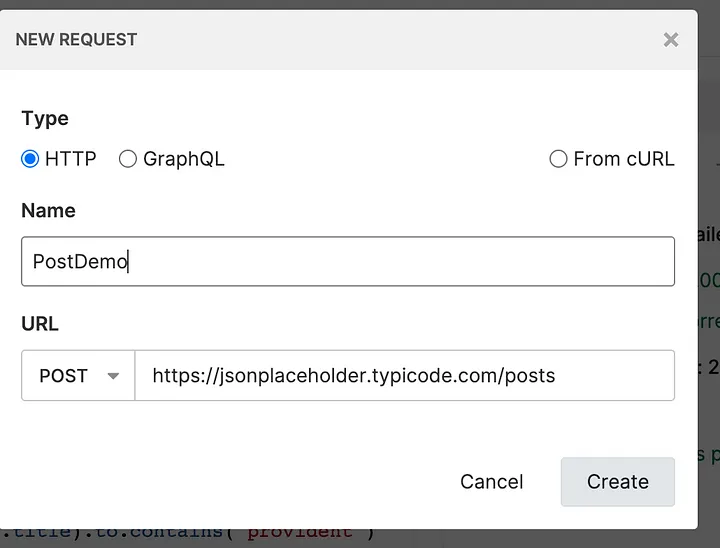
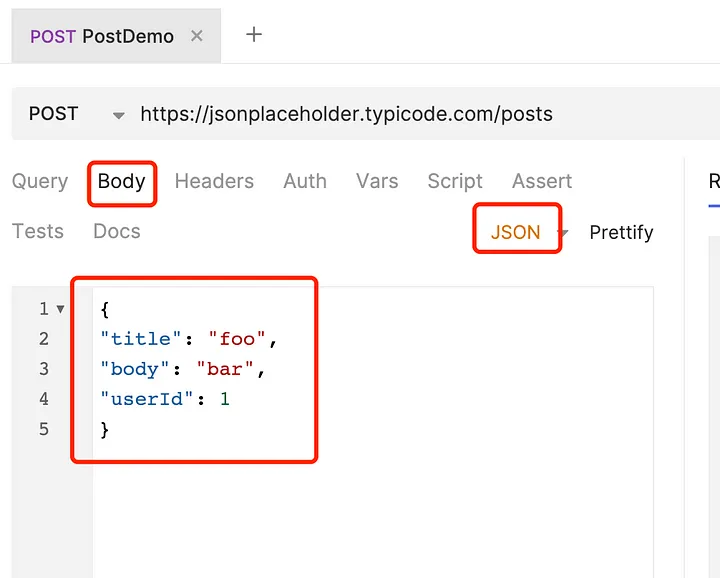
- Click Body and enter the following JSON data:
5. Adding Test Assertions Using Built-in Assert
- Click the Assert button under PostDemo.
- Add the following assertions:
- Response status code equals 201.
- The title in the response body equals “foo.”
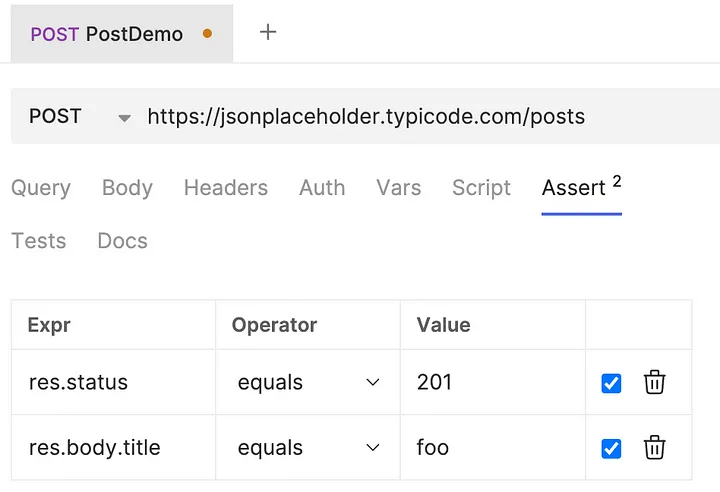
- Click Run to execute the assertions.
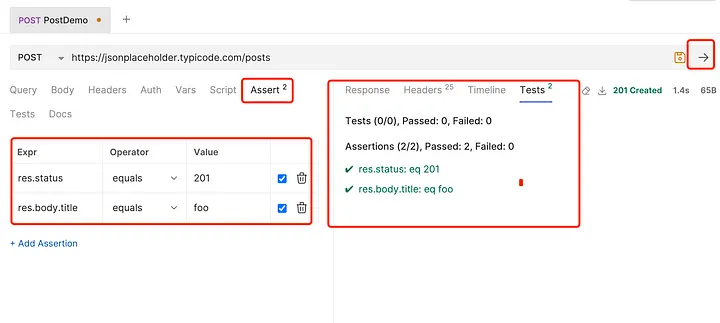
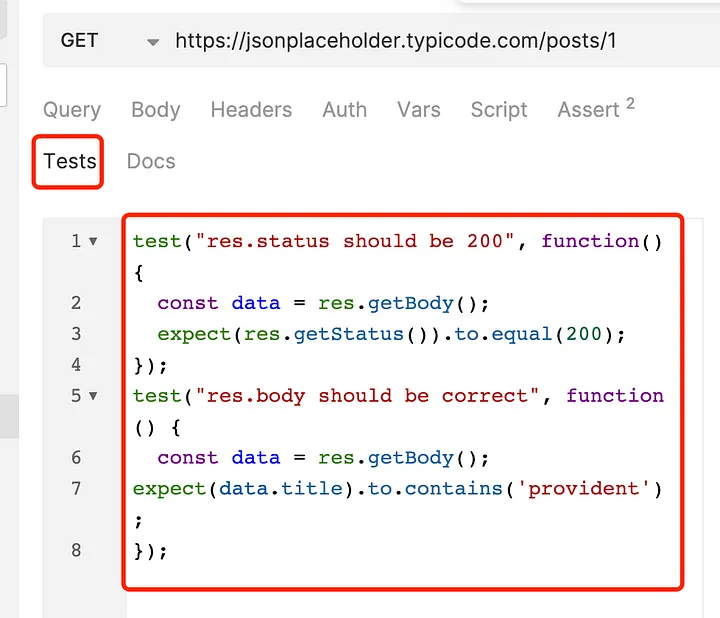
6. Writing Test Assertions Using JavaScript
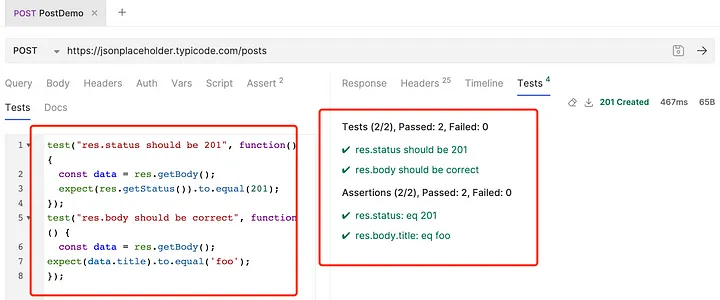
- Click Tests under PostDemo.
- Add the following script:
test("res.status should be 201", function() {
 const data = res.getBody();
 expect(res.getStatus()).to.equal(201);
});
test("res.body should be correct", function() {
 const data = res.getBody();
 expect(data.title).to.equal('foo');
});
- Click Run to validate assertions.
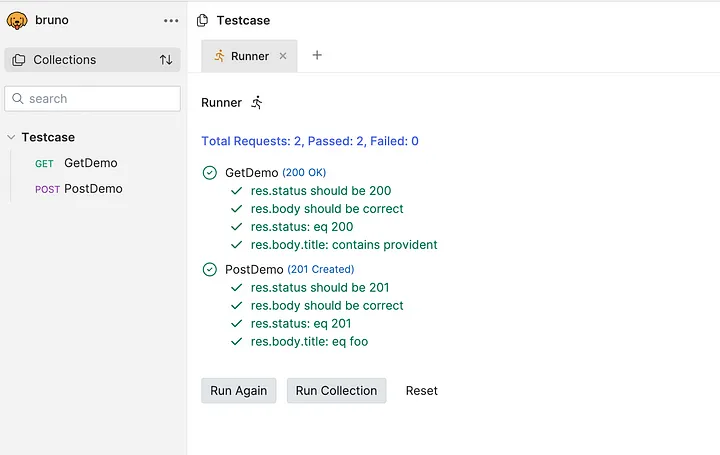
Executing Two Test Cases Locally
- Click the Run button under the Testcase COLLECTION to execute all test cases.
- Check and validate whether the results match the expected outcomes.
Configuring Environment Variables in Bruno for API Testing
When running API test cases in different environments, modifying request addresses manually for each test case can be tedious, especially when dealing with multiple test cases. Bruno, an API testing tool, simplifies this by providing environment variables, allowing us to configure request addresses dynamically. This way, instead of modifying each test case, we can simply switch environments.
Creating Environment Variable Configuration Files in Bruno
Follow these steps to set up environment variables in Bruno:
1. Open the Environment Configuration Page:
- Click the Environments button under the Testcase COLLECTION to access the environment settings.
2. Create a New Environment:
- Click ADD ENVIRONMENT in the top-right corner.
- Enter a name for the environment (e.g., dev) and click SAVE to create the configuration file.
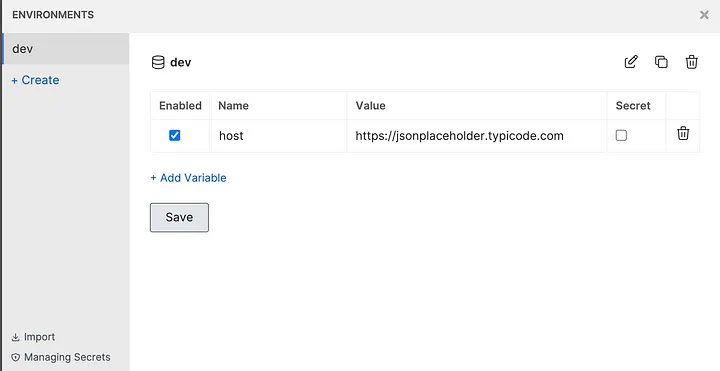
3. Add an Environment Variable:
- Select the newly created environment (dev) to open its configuration page.
- Click ADD VARIABLE in the top-right corner.
- Enter the variable name as host and set the value to https://jsonplaceholder.typicode.com.
- Click SAVE to apply the changes.
Using Environment Variables in Test Cases
Instead of hardcoding URLs in test cases, use {{host}} as a placeholder. Bruno will automatically replace it with the configured value from the selected environment, making it easy to switch between different testing environments.
By utilizing environment variables, you can streamline your API testing workflow, reducing manual effort and enhancing maintainability.
Using Environment Variables in Test Cases
Once environment variables are configured in Bruno, we can use them in test cases instead of hardcoding request addresses. This makes it easier to switch between different testing environments without modifying individual test cases.
Modifying Test Cases to Use Environment Variables
1. Update the GetDemo Request:
- Click the GetDemo request under the Testcase COLLECTION to open its editing page.
- Modify the request address to {{host}}/posts/1.
- Click SAVE to apply the changes.
2. Update the PostDemo Request:
- Click the PostDemo request under the Testcase COLLECTION to open its editing page.
- Modify the request address to {{host}}/posts.
- Click SAVE to apply the changes.
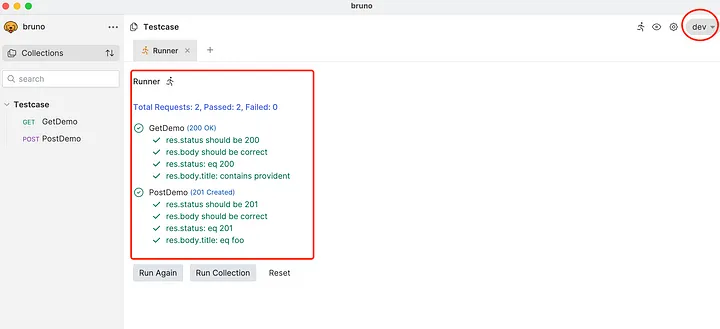
Debugging Environment Variables
- Click the Environments button under the Testcase COLLECTION and select the dev environment.
- Click the RUN button in the top-right corner to execute all test cases.
- Verify that the test results meet expectations.
Conclusion
Bruno is a lightweight and powerful tool designed for automating API testing with ease. Its local-first approach, Git-friendly structure, JavaScript-based scripting, and environment management make it ideal for building fast, secure, and reliable API tests. While Bruno streamlines automation, partnering with Codoid can help you take it further. As experts in API automation, Codoid provides end-to-end solutions to help you design, implement, and scale efficient testing frameworks integrated with your CI/CD pipelines. Reach out to Codoid today to enhance your API automation strategy and accelerate your software delivery.
Frequently Asked Questions
-
How does Bruno API Automation work?
Bruno allows you to automate the testing of APIs locally by recording, running, and validating API requests and responses. It helps streamline the testing process and ensures more efficient workflows.
-
Is Bruno API Automation suitable for large-scale projects?
Absolutely! Bruno's local-first approach and ability to scale with your testing needs make it suitable for both small and large-scale API testing projects.
-
What makes Bruno different from other API automation tools?
Bruno stands out due to its local-first design, simplicity, and ease of use, making it an excellent choice for teams looking for a straightforward and scalable API testing solution.
-
Is Bruno API Automation free to use?
Bruno offers a free version with basic features, allowing users to get started with API automation. There may also be premium features available for more advanced use cases.
-
Does Bruno provide reporting features?
Yes, Bruno includes detailed reporting features that allow you to track test results, view error logs, and analyze performance metrics, helping you optimize your API testing process.
-
Can Bruno be used for continuous integration (CI) and deployment (CD)?
Absolutely! Bruno can be integrated into CI/CD pipelines to automate the execution of API tests during different stages of development, ensuring continuous quality assurance.
-
How secure is Bruno API Automation?
Bruno ensures secure API testing by providing options for encrypted communications and secure storage of sensitive data, giving you peace of mind while automating your API tests.
by Chris Adams | Mar 10, 2025 | API Testing, Blog, Latest Post |
APIs (Application Programming Interfaces) play a crucial role in enabling seamless communication between different systems, applications, and services. From web and mobile applications to cloud-based solutions, businesses rely heavily on APIs to deliver a smooth and efficient user experience. However, with this growing dependence comes the need for continuous monitoring to ensure APIs function optimally at all times. API monitoring is the process of tracking API performance, availability, and reliability in real-time, while API testing verifies that APIs function correctly, return expected responses, and meet performance benchmarks. Together, they ensure that APIs work as expected, respond within acceptable timeframes, and do not experience unexpected downtime or failures. Without proper monitoring and testing, even minor API failures can lead to service disruptions, frustrated users, and revenue losses. By proactively keeping an eye on API performance, businesses can ensure that their applications run smoothly, enhance user satisfaction, and maintain a competitive edge.
In this blog, we will explore the key aspects of API monitoring, its benefits, and best practices for keeping APIs reliable and high-performing. Whether you’re a developer, product manager, or business owner, understanding the significance of API monitoring is essential for delivering a top-notch digital experience.
Why API Monitoring is Important
- Detects Downtime Early: Alerts teams when an API is down or experiencing issues.
- Improves Performance: Helps identify slow response times or bottlenecks.
- Ensures Reliability: Monitors API endpoints to maintain a seamless experience for users.
- Enhances Security: Detects unusual traffic patterns or unauthorized access attempts.
- Optimizes Third-Party API Usage: Ensures external APIs used in applications are functioning correctly.
Types of API Monitoring
- Availability Monitoring: Checks if the API is online and accessible.
- Performance Monitoring: Measures response times, latency, and throughput.
- Functional Monitoring: Tests API endpoints to ensure they return correct responses.
- Security Monitoring: Detects vulnerabilities, unauthorized access, and potential attacks.
- Synthetic Monitoring: Simulates user behavior to test API responses under different conditions.
- Real User Monitoring (RUM): Tracks actual user interactions with the API in real-time.
Now that we’ve covered the types of API monitoring, let’s set it up using Postman. In the next section, we’ll go through the steps to configure test scripts, automate checks, and set up alerts for smooth API monitoring.
Set Up API Monitoring in Postman – A Step-by-Step Guide
Postman provides built-in API monitoring to help developers and testers track API performance, uptime, and response times. By automating API checks at scheduled intervals, Postman ensures that APIs remain functional, fast, and reliable.
Follow this step-by-step guide to set up API monitoring in Postman.
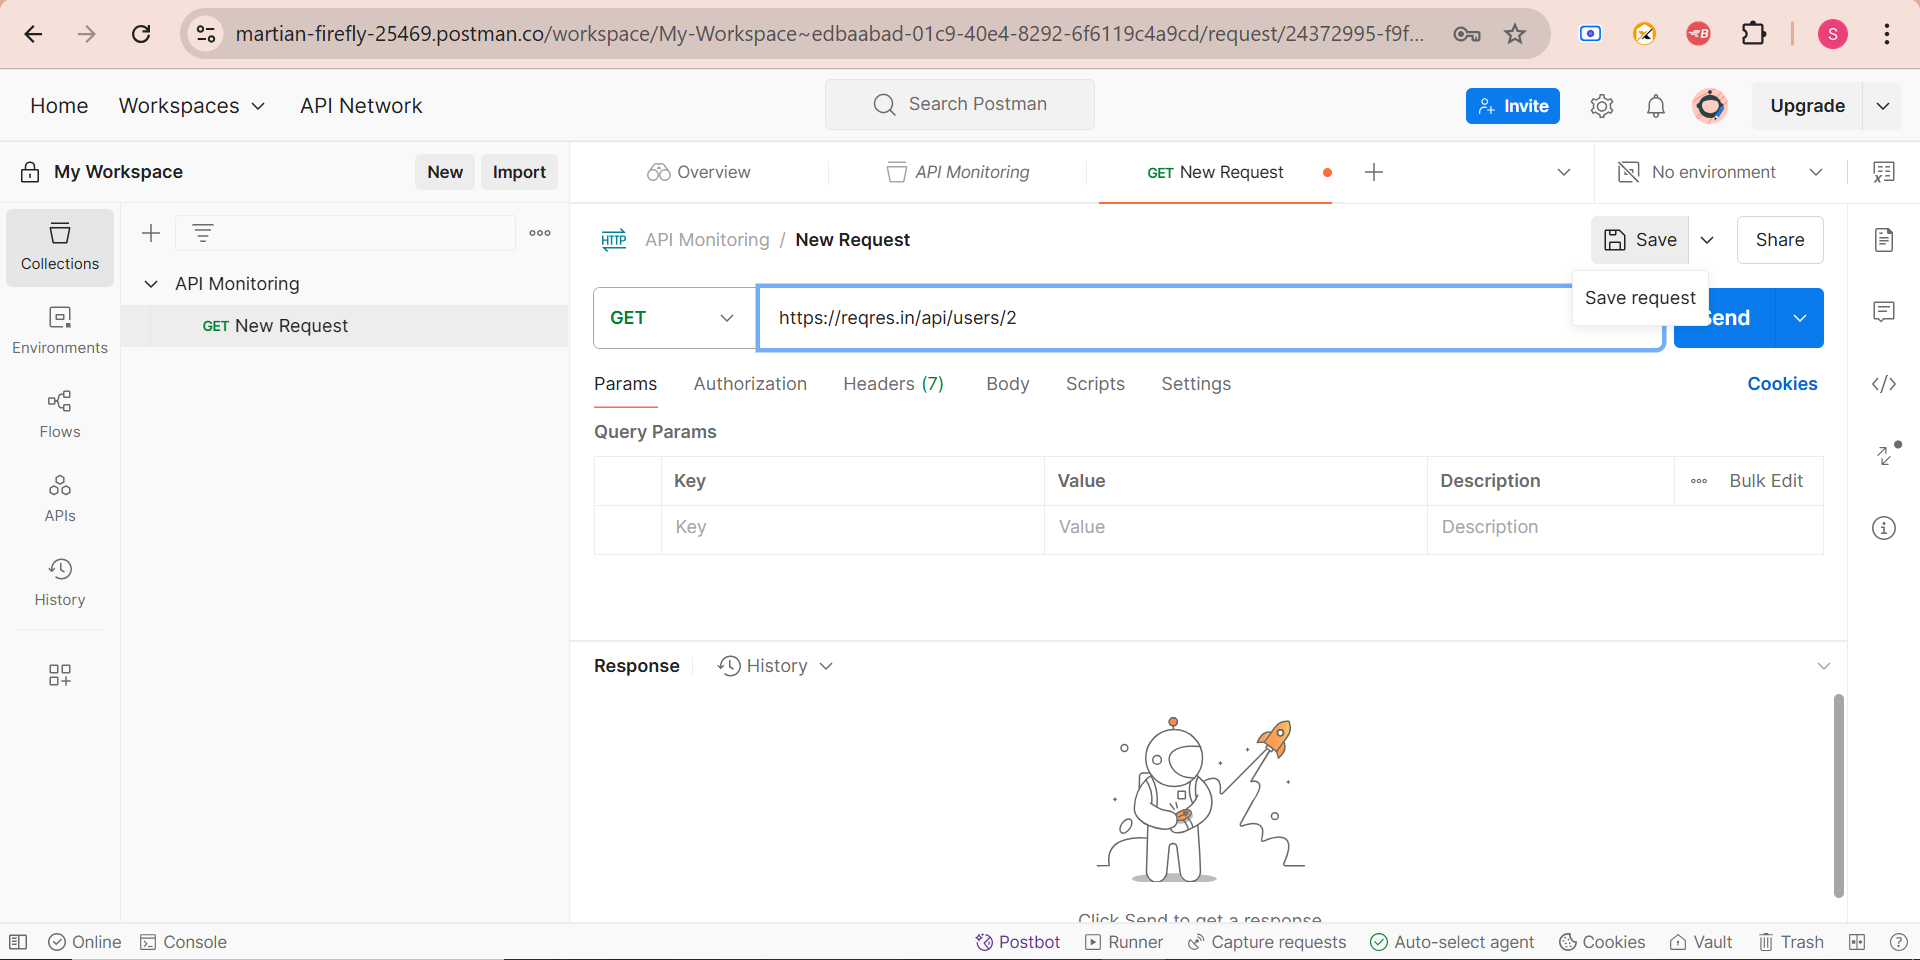
Step 1: Create a Postman Collection
A collection is a group of API requests that you want to monitor.
How to Create a Collection:
1. Open Postman and click on the “Collections” tab in the left sidebar.
2. Click “New Collection” and name it (e.g., “API Monitoring”).
3. Click “Add a request” and enter the API URL you want to monitor (e.g., https://api.example.com/users).
4. Select the request method (GET, POST, PUT, DELETE, etc.).
5. Click “Save” to store the request inside the collection.
Example:
- If you are monitoring a weather API, you might create a GET request like: https://api.weather.com/v1/location/{city}/forecas
- If you want to get single user from the list: https://reqres.in/api/users/2
Step 2: Add API Tests to Validate Responses
Postman allows you to write test scripts in JavaScript to validate API responses.
How to Add API Tests in Postman:
1. Open your saved API request from the collection.
2. Click on the “Tests” tab.
3. Enter the following test scripts to check API response time, status codes, and data validation.
Example Test Script:
// Check if API response time is under 500ms
pm.test("Response time is within limit", function () {
    pm.expect(pm.response.responseTime).to.be.below(500);
});

// Ensure the response returns HTTP 200 status
pm.test("Status code is 200", function () {
    pm.response.to.have.status(200);
});

// Validate that the response body contains specific data
pm.test("Response contains expected data", function () {
    var jsonData = pm.response.json();
    //pm.expect(jsonData.city).to.eql("New York");
     pm.expect(jsonData.data.first_name).to.eql("Janet");

});
4. Click “Save” to apply the tests to the request.
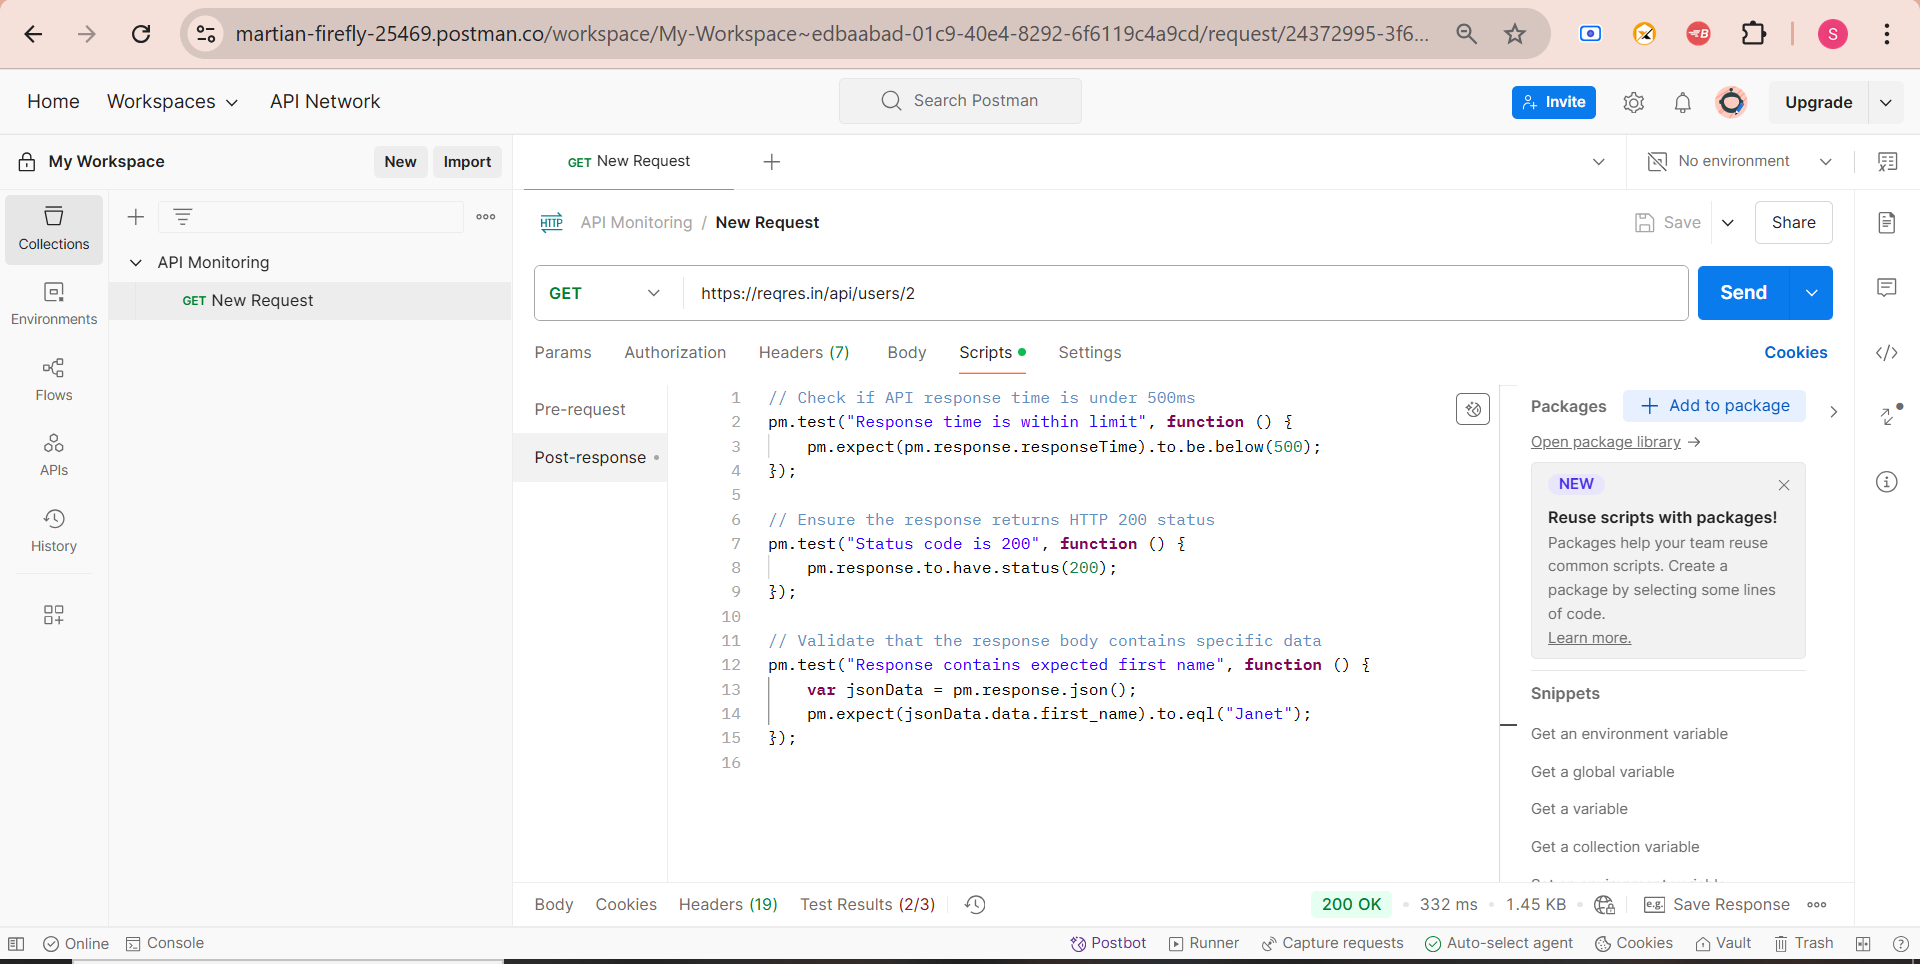
What These Tests Do:
- Response time check– Ensures API response is fast.
- Status code validation– Confirms API returns 200 OK.
- Data validation– Checks if the API response contains expected values.
Step 3: Configure Postman Monitor
Postman Monitors allow you to run API tests at scheduled intervals to check API health and performance.
How to Set Up a Monitor in Postman:
1. Click on the “Monitors” tab on the left sidebar.
2. Click “Create a Monitor” and select the collection you created earlier.
3. Set the monitoring frequency (e.g., every 5 minutes, hourly, or daily).
- Set the monitoring frequency (e.g., Every day, 12 AM , or daily).
4. Choose a region for monitoring (e.g., US East, Europe, Asia) to check API performance from different locations.
5. Click “Create Monitor” to start tracking API behavior.
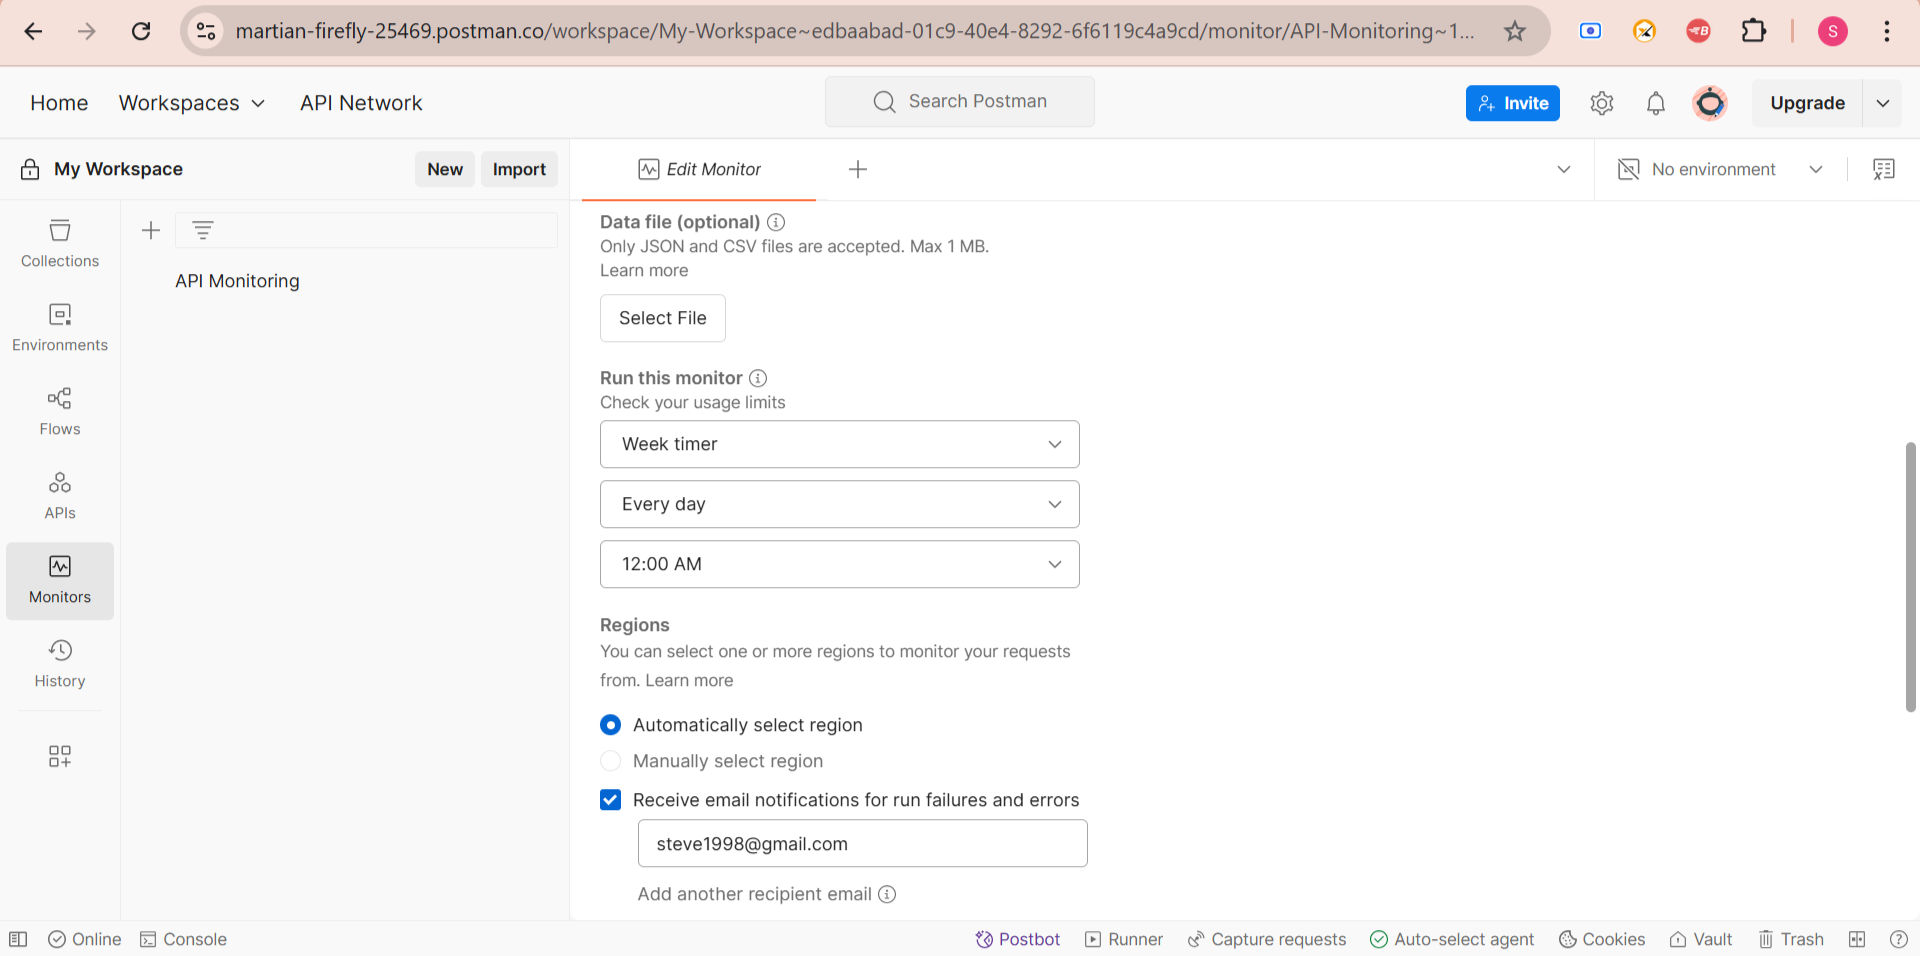
Example: A company that operates globally might set up monitors to run every 10 minutes from different locations to detect regional API performance issues.
Step 4: Set Up Alerts for API Failures
To ensure quick response to API failures, Postman allows real-time notifications via email, Slack, and other integrations.
How to Set Up Alerts:
1. Open the Monitor settings in Postman.
2. Enable email notifications for failed tests.
3. Integrate Postman with Slack, Microsoft Teams, or PagerDuty for real-time alerts.
4. Use Postman Webhooks to send alerts to other monitoring systems.
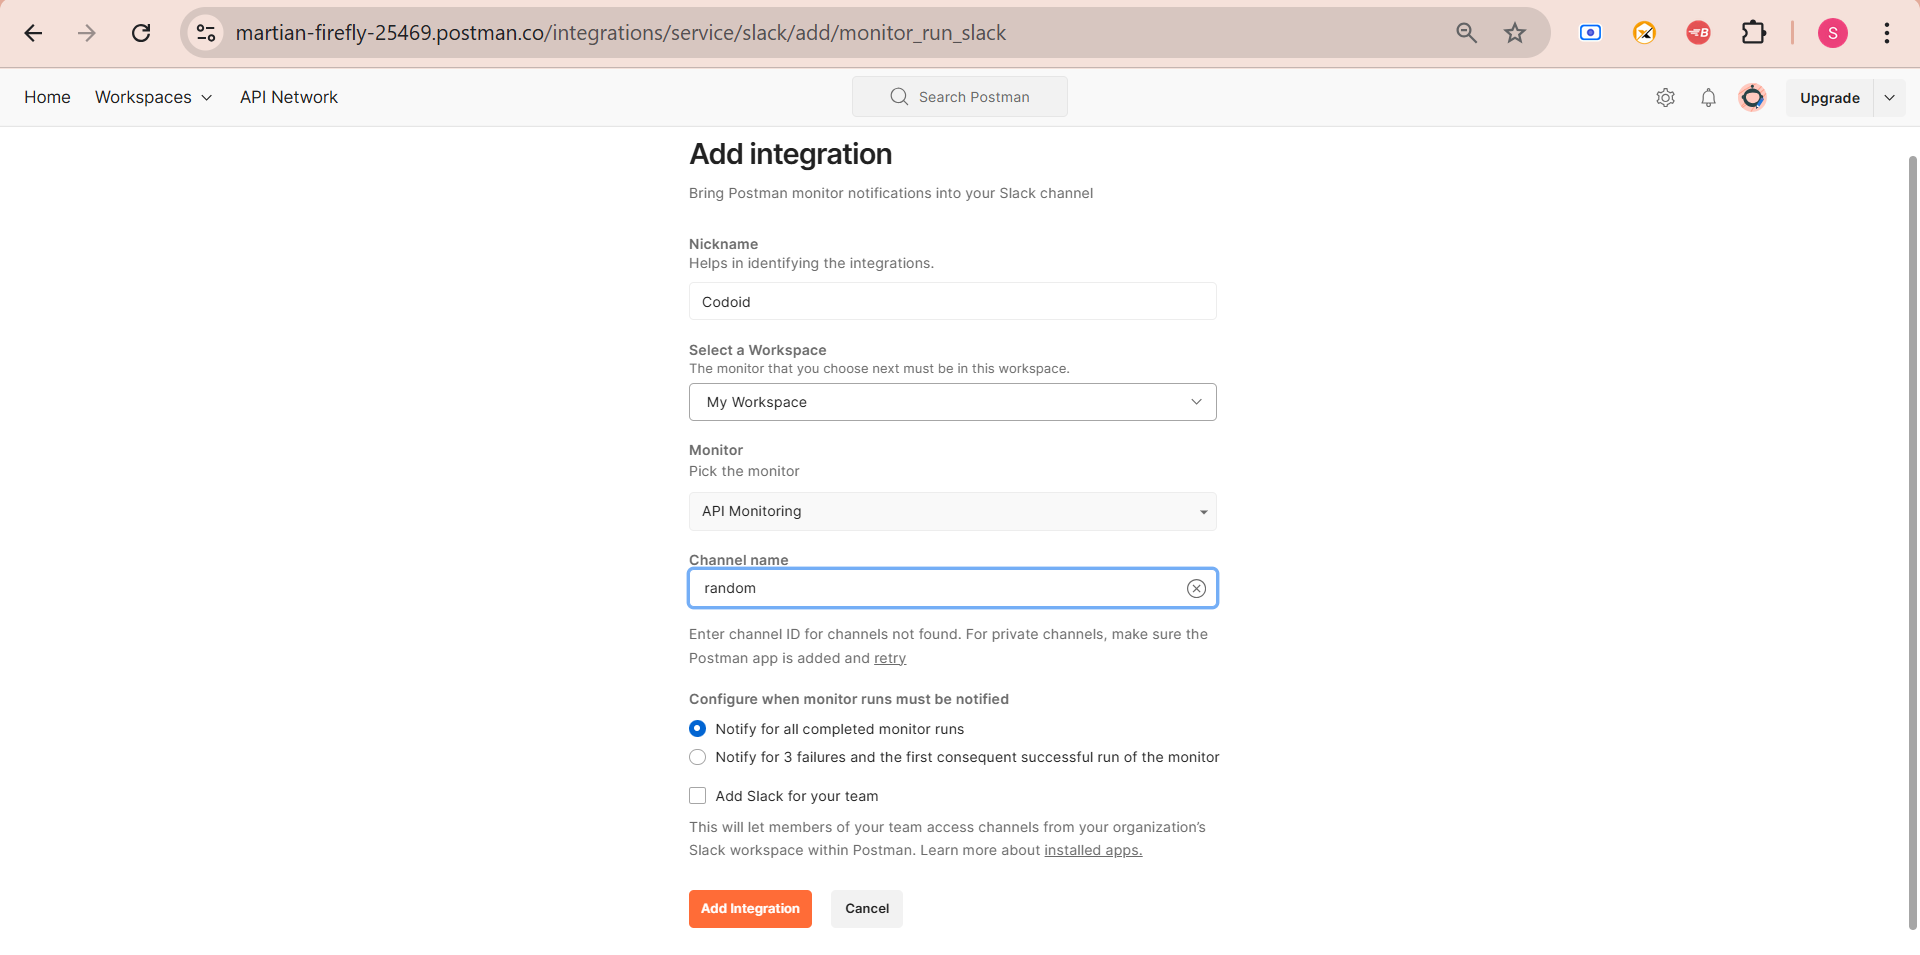
Example: A fintech company might configure Slack alerts to notify developers immediately if their payment API fails.
Step 5: View API Monitoring Reports & Logs
Postman provides detailed execution history and logs to help you analyze API performance over time.
How to View Reports in Postman:
1. Click on the “Monitors” tab.
2. Select your API monitor to view logs.
3. Analyze:
- Success vs. failure rate of API calls.
- Average response time trends over time.
- Location-based API performance (if different regions were configured).
4. Export logs for debugging or reporting.
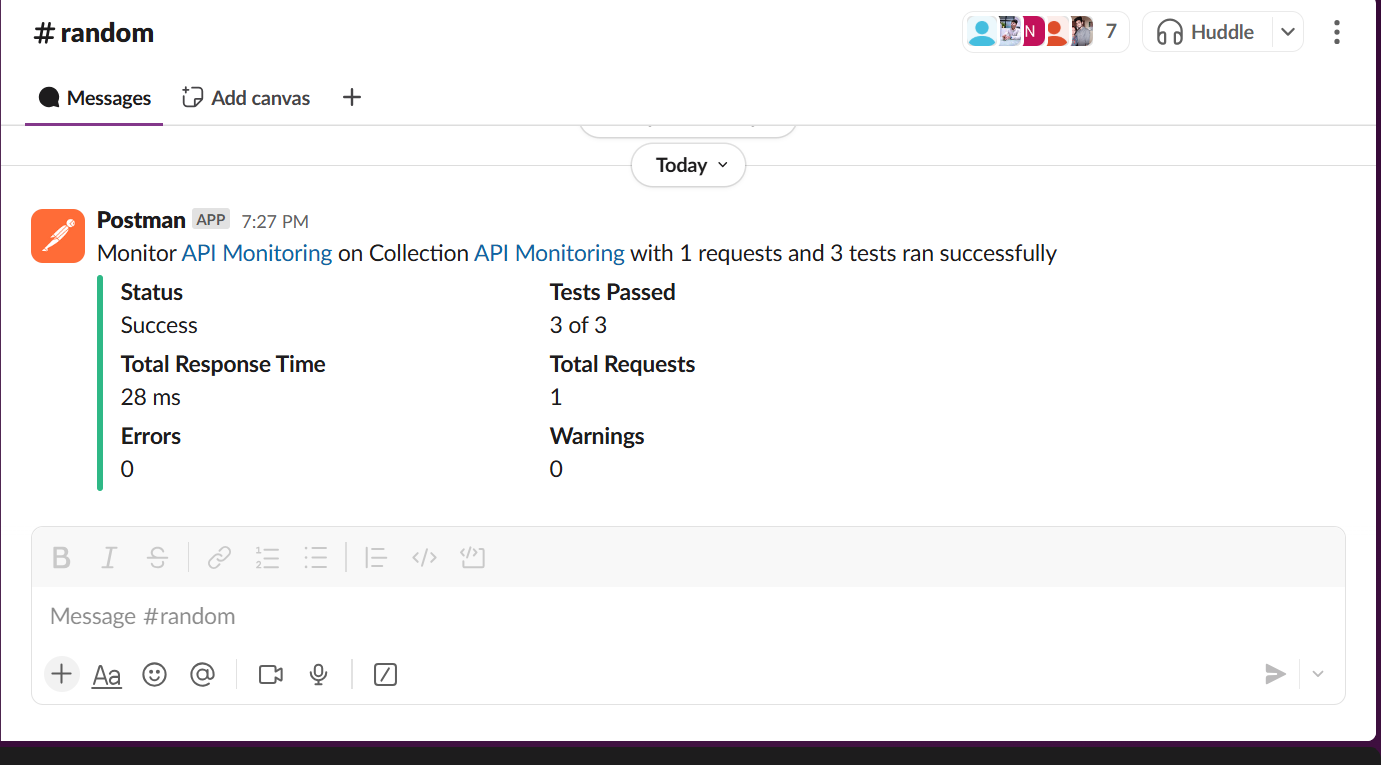
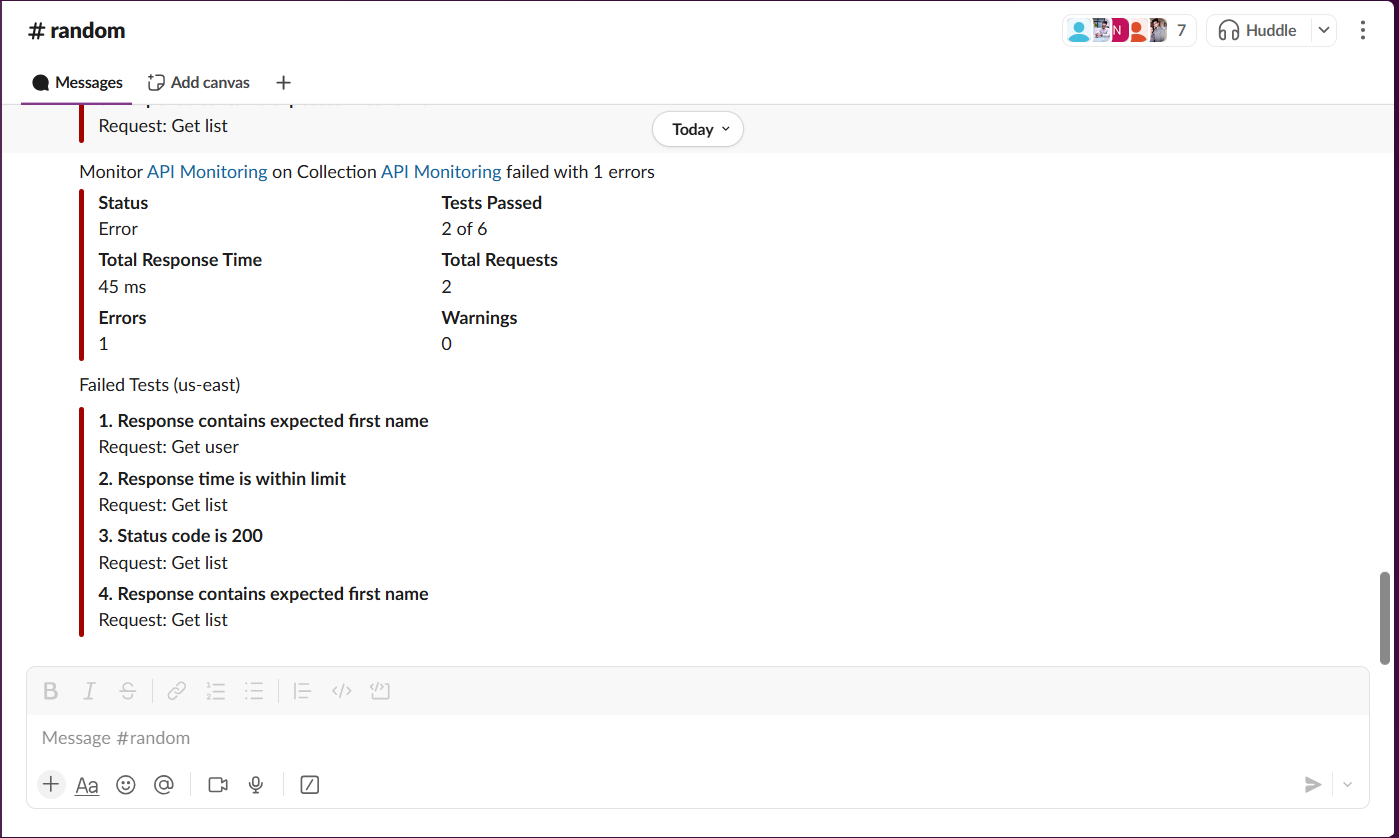
Example: A retail company might analyze logs to detect slow API response times during peak shopping hours and optimize their backend services.
Implementing API Monitoring Strategies
Implementing an effective API monitoring strategy involves setting up tools, defining key metrics, and ensuring proactive issue detection and resolution. Here’s a step-by-step approach:
1. Define API Monitoring Goals
Before implementing API monitoring, clarify the objectives:
- Ensure high availability (uptime monitoring).
- Improve performance (latency tracking).
- Validate functionality (response correctness).
- Detect security threats (unauthorized access or data leaks).
- Monitor third-party API dependencies (SLA compliance).
2. Identify Key API Metrics to Monitor
Track important API performance indicators, such as:
Availability Metrics
- Uptime/Downtime (Percentage of time API is available)
- Error Rate (5xx, 4xx errors)
Performance Metrics
- Response Time (Latency in milliseconds)
- Throughput (Requests per second)
- Rate Limiting Issues (Throttling by API providers)
Functional Metrics
- Payload Validation (Ensuring expected response structure)
- Endpoint Coverage (Monitoring all critical API endpoints)
Security Metrics
- Unauthorized Access Attempts
- Data Breach Indicators (Unusual data retrieval patterns)
3. Implement Different Types of Monitoring
A. Real-Time Monitoring
- Continuously check API health and trigger alerts if it fails.
- Use tools like Prometheus + Grafana for real-time metrics.
B. Synthetic API Testing
- Simulate real-world API calls and verify responses.
- Use Postman or Runscope to automate synthetic tests.
C. Log Analysis & Error Tracking
- Collect API logs and analyze patterns for failures.
- Use ELK Stack (Elasticsearch, Logstash, Kibana) or Datadog.
D. Load & Stress Testing
- Simulate heavy traffic to ensure APIs can handle peak loads.
- Use JMeter or k6 to test API scalability.
4. Set Up Automated Alerts & Notifications
- Use Slack, PagerDuty, or email alerts for incident notifications.
- Define thresholds (e.g., response time > 500ms, error rate > 2%).
- Use Prometheus AlertManager or Datadog Alerts for automation.
5. Integrate with CI/CD Pipelines
- Add API tests in Jenkins, GitHub Actions, or GitLab CI/CD.
- Run functional and performance tests during deployments.
- Prevent faulty API updates from going live.
6. Ensure API Security & Compliance
- Implement Rate Limiting & Authentication Checks.
- Monitor API for malicious requests (SQL injection, XSS, etc.).
- Ensure compliance with GDPR, HIPAA, or other regulations.
7. Regularly Review and Optimize Monitoring
- Conduct monthly API performance reviews.
- Adjust alert thresholds based on historical trends.
- Improve monitoring coverage for new API endpoints.
Conclusion
API monitoring helps prevent issues before they impact users. By using the right tools and strategies, businesses can minimize downtime, improve efficiency, and provide seamless digital experiences. To achieve robust API monitoring, expert guidance can make a significant difference. Codoid, a leading software testing company, provides comprehensive API testing and monitoring solutions, ensuring APIs function optimally under various conditions.
Frequently Asked Questions
-
Why is API monitoring important?
API monitoring helps detect downtime early, improves performance, ensures reliability, enhances security, and optimizes third-party API usage.
-
How can I set up API monitoring in Postman?
You can create a Postman Collection, add test scripts, configure Postman Monitor, set up alerts, and analyze reports to track API performance.
-
How does API monitoring improve security?
API monitoring detects unusual traffic patterns, unauthorized access attempts, and potential vulnerabilities, ensuring a secure API environment.
-
How do I set up alerts for API failures?
Alerts can be configured in Postman via email, Slack, Microsoft Teams, or PagerDuty to notify teams in real-time about API issues.
-
What are best practices for API monitoring?
-Define clear monitoring goals.
-Use different types of monitoring (real-time, synthetic, security).
-Set up automated alerts for quick response.
-Conduct load and stress testing.
-Regularly review and optimize monitoring settings.

by Chris Adams | Mar 2, 2025 | API Testing, Blog, Latest Post |
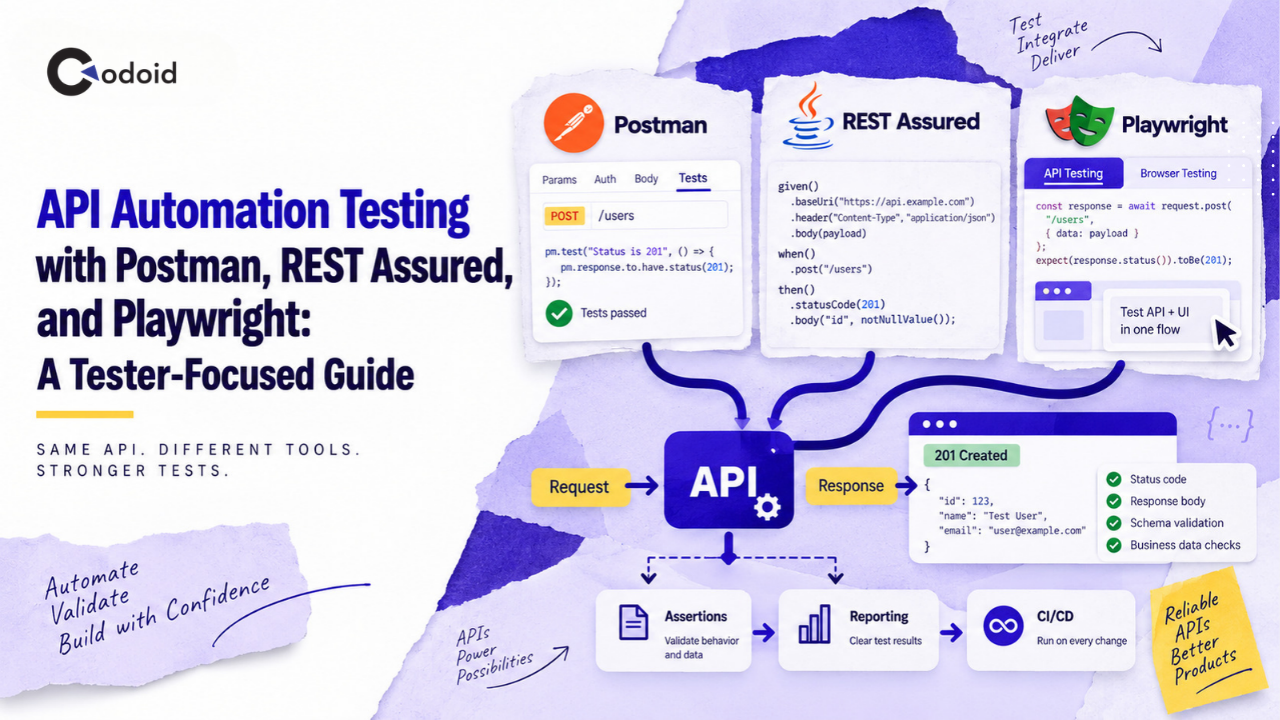
Playwright is widely known for browser automation, it also offers powerful features for API testing, making it a versatile tool for end-to-end testing. By using Playwright, testers can efficiently validate API endpoints, perform authentication checks, and seamlessly integrate API tests with UI tests to ensure consistent functionality across the entire application. API testing with Playwright allows for the testing of various HTTP methods, including GET, POST, PUT, and DELETE requests, enabling comprehensive validation of data flow and business logic. Additionally, Playwright supports handling complex authentication scenarios, such as token-based and OAuth authentication. This guide will explain why Playwright is an excellent choice for API testing, how to set it up and provide detailed examples of requests, authentication handling, and best practices for effective and efficient API testing.
Basics of API Testing
API testing checks if different software systems can communicate and exchange data correctly. It ensures functionality, security, and performance while being faster and easier to automate than UI testing. Unlike UI testing, which focuses on visual elements, API testing verifies the backend logic using requests like GET and POST. It also differs from unit testing, which tests individual functions, and integration testing, which checks how system parts work together.
Why Choose Playwright for API Testing?
API testing is a crucial aspect of software testing, ensuring that backend services function correctly before integrating them with the UI. Several tools are available for API testing, each offering unique features suited to different testing needs:
- Postman – A widely used API testing tool with a graphical interface for sending requests and validating responses.
- RestAssured – A Java-based API testing framework commonly used for automated API validation.
- SoapUI – A dedicated tool for testing SOAP and REST APIs, offering advanced features for functional and security testing.
- SuperTest – A JavaScript library designed for testing HTTP APIs, particularly useful in Node.js applications.
- Cypress – Primarily a UI testing framework that also includes basic API testing capabilities.
Then why should we use Playwright for API testing? It allows users to make API requests, validate responses, and integrate API checks within automated test scripts. It provides features like APIRequestContext for direct API interactions, built-in authentication handling, and cross-browser support, making it a versatile option for teams looking to perform both API and UI testing within the same environment. Like other tools, Playwright offers a structured approach to API testing, enabling efficient validation of backend services. Now let’s take a deeper look at all the key features.
Key Features of Playwright That Enhance API Testing
1. Built-in APIRequestContext for Simplified API Testing
Playwright provides APIRequestContext, allowing testers to make API calls directly within test scripts without needing external libraries like Axios or SuperTest.
Example: GET Request with Playwright
import { test, expect, request } from '@playwright/test';

test('Validate GET request', async ({ request }) => {
    const response = await request.get('https://jsonplaceholder.typicode.com/posts/1');
    expect(response.status()).toBe(200);

    const responseBody = await response.json();
    expect(responseBody.id).toBe(1);
});
Why Playwright? Unlike Postman (which is UI-based) and RestAssured (which requires Java), Playwright allows API requests directly within the test automation framework with minimal setup.
2. Seamless Integration of API & UI Testing
Unlike Postman, RestAssured, and SoapUI, which focus only on API testing, Playwright enables UI and API tests to run in the same framework. This is useful for:
- Setting up test data via API before UI tests.
- Validating API responses against UI elements.
- Testing UI interactions that trigger API calls.
Example: API and UI Test Together
test('Create user via API and validate on UI', async ({ page, request }) => {
    const response = await request.post('https://jsonplaceholder.typicode.com/users', {
        data: { name: 'John Doe', email: '[email protected]' }
    });

    expect(response.status()).toBe(201);
    const user = await response.json();

    await page.goto('https://example.com/users');
    const userExists = await page.locator(`text=${user.name}`).isVisible();
    expect(userExists).toBeTruthy();
});
3. JavaScript/TypeScript Support for Modern Development
Playwright is built for JavaScript and TypeScript, making it ideal for teams using modern web frameworks like React, Angular, and Vue.js.
Comparison with Other Tools:
| S. No |
Tool |
Language Support |
Best For |
| 1 |
Playwright |
JavaScript/TypeScript |
API + UI Testing |
| 2 |
Postman |
GUI-based (No coding required) |
Manual API Testing |
| 3 |
RestAssured |
Java |
Backend API Testing |
| 4 |
SoapUI |
Java & Groovy |
SOAP & REST API Testing |
| 5 |
SuperTest |
JavaScript |
Node.js API Testing |
Why Playwright? Teams using JavaScript for frontend development can now write API tests in the same language, improving efficiency and collaboration.
4. Cross-Browser & Cross-Platform API Testing
Unlike most API testing tools that only test API responses, Playwright supports cross-browser validation, ensuring that API responses work correctly with different browsers.
Example: API Test Across Browsers
import { test, expect, request } from '@playwright/test';

test('Validate API response in different browsers', async ({ browser }) => {
    const context = await browser.newContext();
    const request = context.request;
    const response = await request.get('https://jsonplaceholder.typicode.com/posts/1');
    expect(response.status()).toBe(200);
});
Why Playwright?
- Postman, RestAssured, and SoapUI cannot test how APIs behave across different browsers.
- Playwright ensures API + UI compatibility across Chromium, Firefox, and WebKit (Safari).
5. CI/CD Integration for Automated API Testing
Playwright works seamlessly with CI/CD pipelines, allowing automated API testing in:
- Jenkins
- GitHub Actions
- GitLab CI/CD
Example: Running Playwright API Tests in GitHub Actions
name: Playwright API Tests
on: push

jobs:
  test:
    runs-on: ubuntu-latest
    steps:
      - name: Checkout code
        uses: actions/checkout@v2

      - name: Install dependencies
        run: npm install

      - name: Run API Tests
        run: npx playwright test api-tests
Why Playwright? Unlike Postman, which requires Newman for automation, Playwright runs API tests directly in CI/CD pipelines without additional setup.
Guide to Writing tour First API Test with Playwright
To get started with API Testing with Playwright, install Playwright using npm:
npm init -y
npm install @playwright/test
Ensure that Playwright is installed by running:
Writing Your First API Test with Playwright
You can use APIRequestContext to interact with APIs. Below is a simple GET request example:
import { test, expect, request } from '@playwright/test';

test('Validate GET request', async ({ request }) => {
    const response = await request.get('https://jsonplaceholder.typicode.com/posts/1');
    expect(response.status()).toBe(200);

    const responseBody = await response.json();
    expect(responseBody.id).toBe(1);
});
Breaking Down the Code:
- Import Playwright functions: test, expect, and request are used for API testing.
- Make a GET request: request.get() fetches data from the API.
- Validate the response status: Ensures the request was successful (200 OK).
- Parse and validate response body: Converts the response to JSON and checks if the expected data is returned.
Making Different API Requests
1. POST Request (Creating a Resource)
test('Validate POST request', async ({ request }) => {
    const response = await request.post('https://jsonplaceholder.typicode.com/posts', {
        data: {
            title: 'Playwright API Test',
            body: 'This is a test post',
            userId: 1
        }
    });

    expect(response.status()).toBe(201);
    const responseBody = await response.json();
    expect(responseBody.title).toBe('Playwright API Test');
});
- Sends a POST request to create a new resource.
- Validates response status (201 Created) to confirm successful creation.
- Ensures response data matches the expected values.
2. PUT Request (Updating a Resource)
test('Validate PUT request', async ({ request }) => {
    const response = await request.put('https://jsonplaceholder.typicode.com/posts/1', {
        data: {
            id: 1,
            title: 'Updated Title',
            body: 'Updated content',
            userId: 1
        }
    });

    expect(response.status()).toBe(200);
    const responseBody = await response.json();
    expect(responseBody.title).toBe('Updated Title');
});
- Sends a PUT request to update an existing resource.
- Validates status code (200 OK) for successful updates.
- Confirms that the updated title matches the expected value.
3. DELETE Request (Removing a Resource)
test('Validate DELETE request', async ({ request }) => {
    const response = await request.delete('https://jsonplaceholder.typicode.com/posts/1');
    expect(response.status()).toBe(200);
});
- Sends a DELETE request to remove an existing resource.
- Checks if the API returns a successful deletion status (200 OK or 204 No Content).
Handling Authentication in API Testing
For APIs requiring authentication, Playwright supports passing headers and cookies for authorization.
test('Validate Authenticated Request', async ({ request }) => {
    const response = await request.get('https://example.com/protected', {
        headers: {
            Authorization: 'Bearer YOUR_ACCESS_TOKEN'
        }
    });

    expect(response.status()).toBe(200);
});
- Includes Authorization Header: Uses a Bearer token for authentication.
- Validates Authentication: Ensures the API allows access (200 OK).
Best Practices for API Testing with Playwright
To ensure efficient and maintainable API testing with Playwright, it is important to follow structured practices that enhance test reliability, performance, and organization. By properly structuring test suites, managing dependencies, and optimizing execution, teams can achieve faster, more scalable, and maintainable API tests. Below are some key best practices to maximize efficiency:
- Use Fixtures – Helps maintain test reusability and efficiency by providing a structured way to set up and share test data across multiple tests.
- Validate Response Schema – Use schema validation tools like Ajv to ensure API responses follow the expected structure, reducing inconsistencies.
- Use Environment Variables – Store API URLs, authentication tokens, and sensitive data securely using environment variables to enhance security and flexibility.
- Enable Logging – Capture and log API responses to debug test failures efficiently, making troubleshooting easier.
- Run Tests in Parallel – Speed up execution using Playwright’s parallel test execution feature, optimizing test suite performance.
Conclusion
As seen in our blog, Playwright is a powerful tool for both UI automation and API testing, offering seamless integration of API and UI tests within a single framework. With features like built-in request handling, authentication management, parallel execution, and cross-browser compatibility, it simplifies API testing while improving efficiency and reliability. By using Playwright, teams can reduce execution time, automate authentication, organize test suites efficiently, and improve debugging with logging and structured test cases.
For businesses looking to enhance their API testing strategy, Codoid, a leader in software testing services, provides expert API automation solutions. With extensive experience in Playwright, Selenium, and other frameworks, Codoid helps organizations optimize testing processes, improve test coverage, and ensure smooth digital experiences. By adopting Playwright and partnering with Codoid, teams can build a scalable, efficient, and future-ready test automation strategy.
Frequently Asked Questions
-
Why use Playwright for API testing instead of Postman or RestAssured?
Unlike Postman (UI-based) and RestAssured (Java-dependent), Playwright enables API and UI testing within the same framework, supports JavaScript/TypeScript, and integrates easily into CI/CD pipelines.
-
Can Playwright handle authentication in API testing?
Yes, Playwright supports authentication methods like Bearer Tokens, OAuth, and Cookies to test secured API endpoints.
-
Does Playwright support API schema validation?
While Playwright does not have built-in schema validation, you can integrate it with Ajv or Joi to validate API responses.
-
How does Playwright compare with Cypress for API testing?
- Playwright supports multi-browser testing (Chrome, Firefox, Safari), while Cypress is limited to Chromium-based browsers.
- Playwright enables parallel execution and has better API handling than Cypress.
-
What are some real-time applications of Playwright API testing?
- E-commerce: Validate product APIs and order processing.
- Banking: Test authentication and transaction APIs.
- Healthcare: Ensure secure data exchange in patient records.
- SaaS applications: Automate API requests in multi-tenant platforms.