Select Page

Category Selected: Fixed

275 results Found


People also read

Manual Testing
Accessibility Testing

European Accessibility Act : What You Need to Know

Automation Testing

Docker with Selenium: Boost Your Automation

Talk to our Experts

Amazing clients who
trust us


poloatto
ABB
polaris
ooredo
stryker
mobility
Selenium WebDriver with Python Cheat Sheet

Selenium WebDriver with Python Cheat Sheet

This blog article lists Python Selenium WebDriver commands which are helpful to automate Web Application Testing.

Selenium WebDriver Installation

pip install selenium
  

WebDriver Initialization

from selenium import webdriver

firefox = webdriver.Firefox(executable_path='driversgeckodriver.exe')
chrome = webdriver.Chrome(executable_path='driverschromedriver.exe')
edge = webdriver.Edge(executable_path='driversMicrosoftWebDriver.exe')
ie = webdriver.Ie(executable_path='driversIEDriverServer.exe')
  

Browser Details

#Get Browser Name
print(browser.name)

#Get Title
print(browser.title)

#Get Current URL
print(browser.current_url)

#Get Current Window Handle
print(browser.current_window_handle)

#Get All Window Handles
handles_list=browser.window_handles

#Get Page Source
print(browser.page_source)
  

Maximize and Minimize

browser.maximize_window()
browser.minimize_window()
  

Switch to Frame & Window

browser.switch_to.active_element

browser.switch_to.alert

browser.switch_to.default_content()

# You can pass Window Name or Handle to switch between windows
browser.switch_to.window("window_name")

#You can switch to frame using Name, ID, Index & WebElement
browser.switch_to.frame(1)

browser.switch_to.parent_frame()
  

Back, Forward & Refresh

browser.back()
browser.forward()
browser.refresh()
  

Cookies

#Get all cookies in a list
cookies_list = browser.get_cookies

#Get a Cookie value
cookie_value = browser.get_cookie("my_cookie")

#Delete a Cookie
browser.delete_cookie("my_cookie")

#Delete all Cookies
browser.delete_all_cookies()

#Add Cookie
browser.add_cookie({"name:value"})
  

Finding Elements

#Find Element(s) By ID
element = browser.find_element_by_id("txt_1")
elements = browser.find_elements_by_id("txt_1")

#Find Element By XPATH
browser.find_element_by_xpath("//input")

#Find Element By Link Text
browser.find_element_by_link_text("Products")

#Find Element By Link Text
browser.find_element_by_link_text("Products")

#Find Element By Partial Link Text
browser.find_element_by_partial_link_text('Sign')

#Find Element By Name
browser.find_elements_by_name('foo')

#Find Element By Tag Name
browser.find_elements_by_tag_name('Input')

#Find Element By Class Name
browser.find_elements_by_class_name('breadcrumb')

#Find Element By CSS Selector
browser.find_elements_by_css_selector('input[name="txt"]')
  
Data Quality Checks for Data Warehouse/ETL

Data Quality Checks for Data Warehouse/ETL

Data should be perceived as a strategic corporate tool, and data quality must be regarded as a strategic corporate responsibility. The corporate data universe is made up of a wide range of databases that are connected by infinite real-time and batch data feeds. Data is an ever-constant movement, and transition, the core of any solid and thriving business is high-quality data services which will, in turn, make for efficient and optimal business success.

However, the huge conundrum here is that data quality, solely on its own cannot improve. In truth, most IT processes have a negative impact on the quality of data. Therefore, if nothing is done, the quality of data will continue to plummet until the point that data will be considered a burden. It is also pertinent to point out that data quality is not a feat that can easily be achieved and after that, you brand the mission complete and heap praises on yourself for eternity. Rather, it must be viewed as a garden that must be continuously looked after.

Data Warehouse testing is becoming increasingly popular, and competent testers are being sought after. Data-driven decisions are termed to be accurate. A good grasp of data modelling and source to target data mappings can assist QA analysts with the relevant information to draw up an ideal testing strategy.

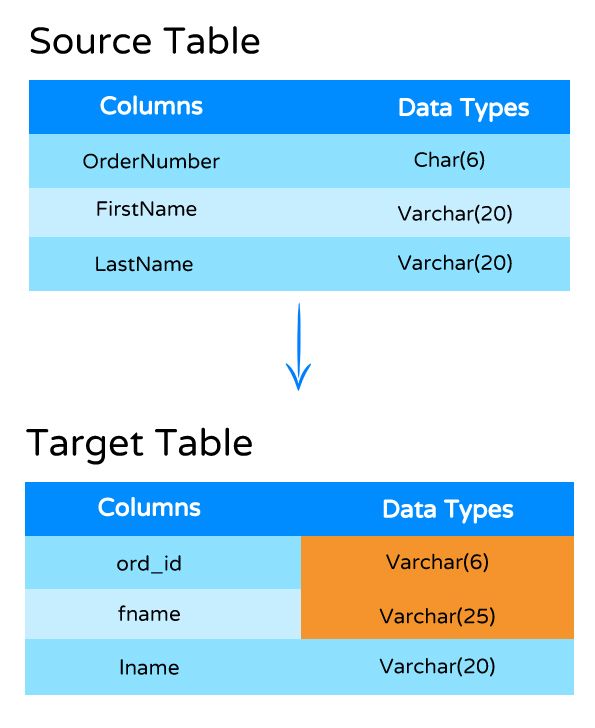
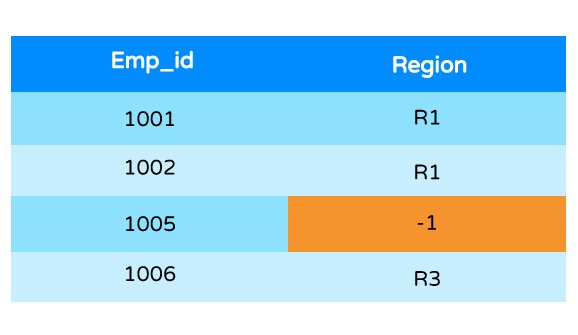
Data Quality Check-Verify Field Data Type and Length

Authenticate source and target fields data type and length.

Data Quality Check-Verify Field Data Type and Length

In the verification pictured above, we have a mismatch of the data type and length in the target table. It is a good habit to verify data type and length uniformity between the source and target tables.

Data Quality Check-Verify Not Null Fields

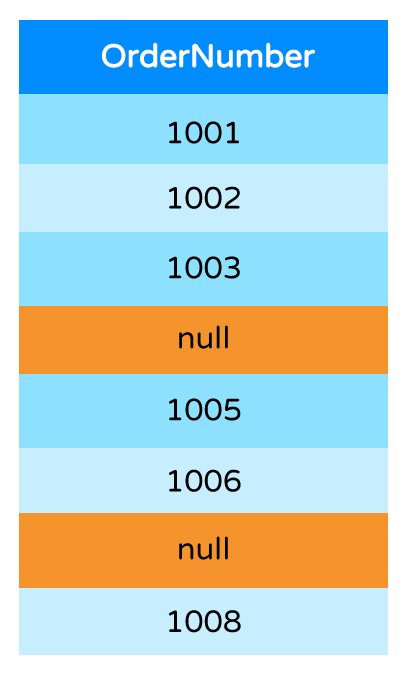
Authenticate Null Values in a column which features a NOT NULL CONSTRAINT

Data Quality Check-Verify Not Null Fields

When a source has a Not Null Constraint, it should not feature Null Values as demonstrated above.

Data Quality Check-Verify For Duplicate Records

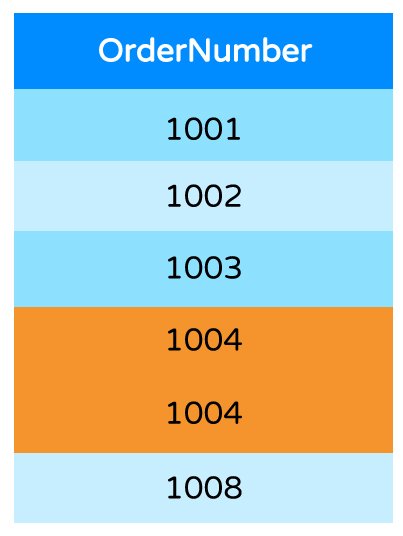
If your data warehouse features duplicated records, then your business decisions will be inaccurate and undependable. Poor data that is marred with inaccurate and duplicate data records will not enable stakeholders to properly forecast business targets.

Data Quality Check-Verify For Duplicate Records

A QA team should ensure that source data files are verified to spot duplicate records and any error in data. Similarly, you can integrate automated data testing by adopting Python to authenticate all data rather than just checking an example or subset.

Data Quality Check-Verify for Orphan Records

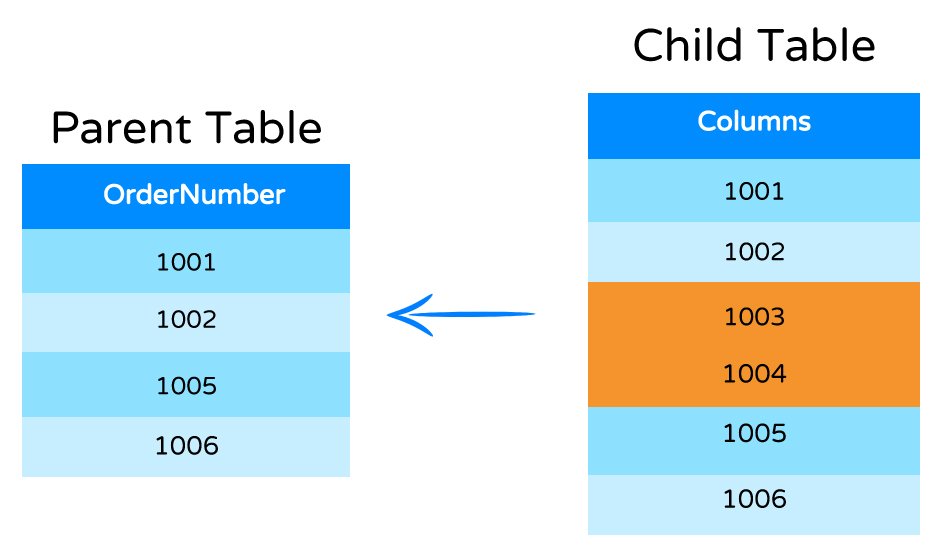
A situation where there are child records with no matching parent records, then such records are termed “Orphan Records.” The business should outline Strategic relationship rules amongst parent and child tables.

Data Quality Check-Verify for Orphan Records

Data Quality Check-Verify for Unknown Data

On some occasions, unknown data validation is necessary to ensure that the right changes happened as planned for value encoding. For instance, consider during the transformation process, if there is a logic to encode the value “Male” as “M”, subsequently, the QA team should cross-check the Gender column to ensure that it does not feature a different encoded value.

Data Quality Check-Verify for Unknown Data

Conclusion

Data quality is a broad and complicated field with many aspects. Corporate data universe is made up of different databases, linked in countless real-time and batch data interfaces. Irrespective of the industry, revenue size or its target market, virtually every organization depends on credible data to produce useful information for appropriate business decisions. Data quality can be jeopardized at any level; reception, entering, integration, maintenance, loading or processing.

Thus, efforts must be made to ensure that quality data via Data Warehouse testing/ETL testing is aimed at guaranteeing the production, availability, and use of high-quality data within an organization.

Collecting Network Events using Selenium WebDriver

Collecting Network Events using Selenium WebDriver

Collecting Network Events using Selenium WebDriver is simple, you just need to enable performance logging in Chrome Desired capabilities.

Once you enable Performance Log, Timeline, Network,
and Page events can be collected.

Enabling Logging in Desired Capabilities

DesiredCapabilities caps = DesiredCapabilities.chrome();
LoggingPreferences logPrefs = new LoggingPreferences();
logPrefs.enable(LogType.PERFORMANCE, Level.INFO);
caps.setCapability(CapabilityType.LOGGING_PREFS, logPrefs);  

Collecting Network Events

WebDriver driver=new RemoteWebDriver(new URL("http://localhost:4444/wd/hub"), caps);

driver.get("https://codoid.com/about-codoid/");

List<LogEntry> entries = driver.manage().logs().get(LogType.PERFORMANCE).getAll();
System.out.println(entries.size() + " " + LogType.PERFORMANCE + " log entries found");
for (LogEntry entry : entries) {
          System.out.println(new Date(entry.getTimestamp()) + " " + entry.getLevel() + " " + entry.getMessage());
}  

Note

If tracing is enabled, `ChromeDriver` will start a browser-wide trace when Chrome is launched, and will continue tracing until Chrome closes.

Reference

Performance Log
Demo code for the GTAC 2013 talk “Web Performance Testing with WebDriver” by Michael Klepikov

Protractor Cucumber HTML Report

Protractor Cucumber HTML Report

Behavior-Driven Development helps us to test behaviors instead of implementations. We can use any BDD framework to follow Behavior-Driven Development. Generating HTML report after BDD scenarios execution is an important feature, and it helps to publish BDD result in a readable format.

In this blog post, we will show you how to generate HTML report using Protractor and Cucumber.

Configure Cucumber JSON format in conf.js

Protractor Configuration File

exports.config = {
  getPageTimeout: 60000,
  allScriptsTimeout: 500000,
  framework: 'custom',
  frameworkPath: require.resolve('protractor-cucumber-framework'),
  capabilities: {
    'browserName': 'chrome'
  },

  specs: [
    'features/*/*/*.feature'
  ],

  baseURL: 'https://google.com',

  cucumberOpts: {
    format: ['json:reports/results.json', 'pretty'],
    require: ['features/*/*/steps.js','features/support/*.js'],
    tags: true,
    profile: false,
    'no-source': true
  }
};  

Installing grunt-protractor-cucumber-html-report plugin

Install grunt-protractor-cucumber-HTML-report plugin locally using the below command.

npm install grunt-protractor-cucumber-html-report --save-dev  

Create protractor-cucumber-html-report task in Gruntfile.js

Sample Gruntfile.js with grunt-protractor-runner and protractor-cucumber-html-report tasks

module.exports = function(grunt) {
  grunt.initConfig({
    protractor: {
      options: {
        configFile: "conf.js",
        keepAlive: true,
        noColor: false,
        args: {

        }
      },
      your_target: {
        options: {
          configFile: "conf.js",
          keepAlive: true,
          args: {
            seleniumServerJar: 'node_modules/webdriver-manager/selenium/selenium-server-standalone-2.53.1.jar',
            chromeDriver: 'node_modules/webdriver-manager/selenium/chromedriver_2.22'
          }
        }
      },
    },

  'protractor-cucumber-html-report': {
    default_options: {
      options: {
        dest: 'reports',//Where you want to generate the HTML report.
        output: 'report.html',//File Name
        testJSONDirectory: 'reports'//Mention where you have generated JSON format.
      }
    }
  },

})

grunt.loadNpmTasks('grunt-protractor-runner');
grunt.loadNpmTasks('grunt-protractor-cucumber-html-report');

grunt.registerTask('default', ['protractor:your_target','protractor-cucumber-html-report']);
};
  

Run registered Grunt tasks

This command executes the default tasks which are registered in Gruntfile.js

grunt default --cucumberOpts={"tags":"@smoke"}  

View your report

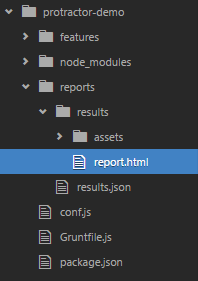
Once the Grunt tasks complete, you can see the HTML report in reports folder as mentioned in Gruntfile.js

Folder Structure
Protractorc Cucumber Project Structure

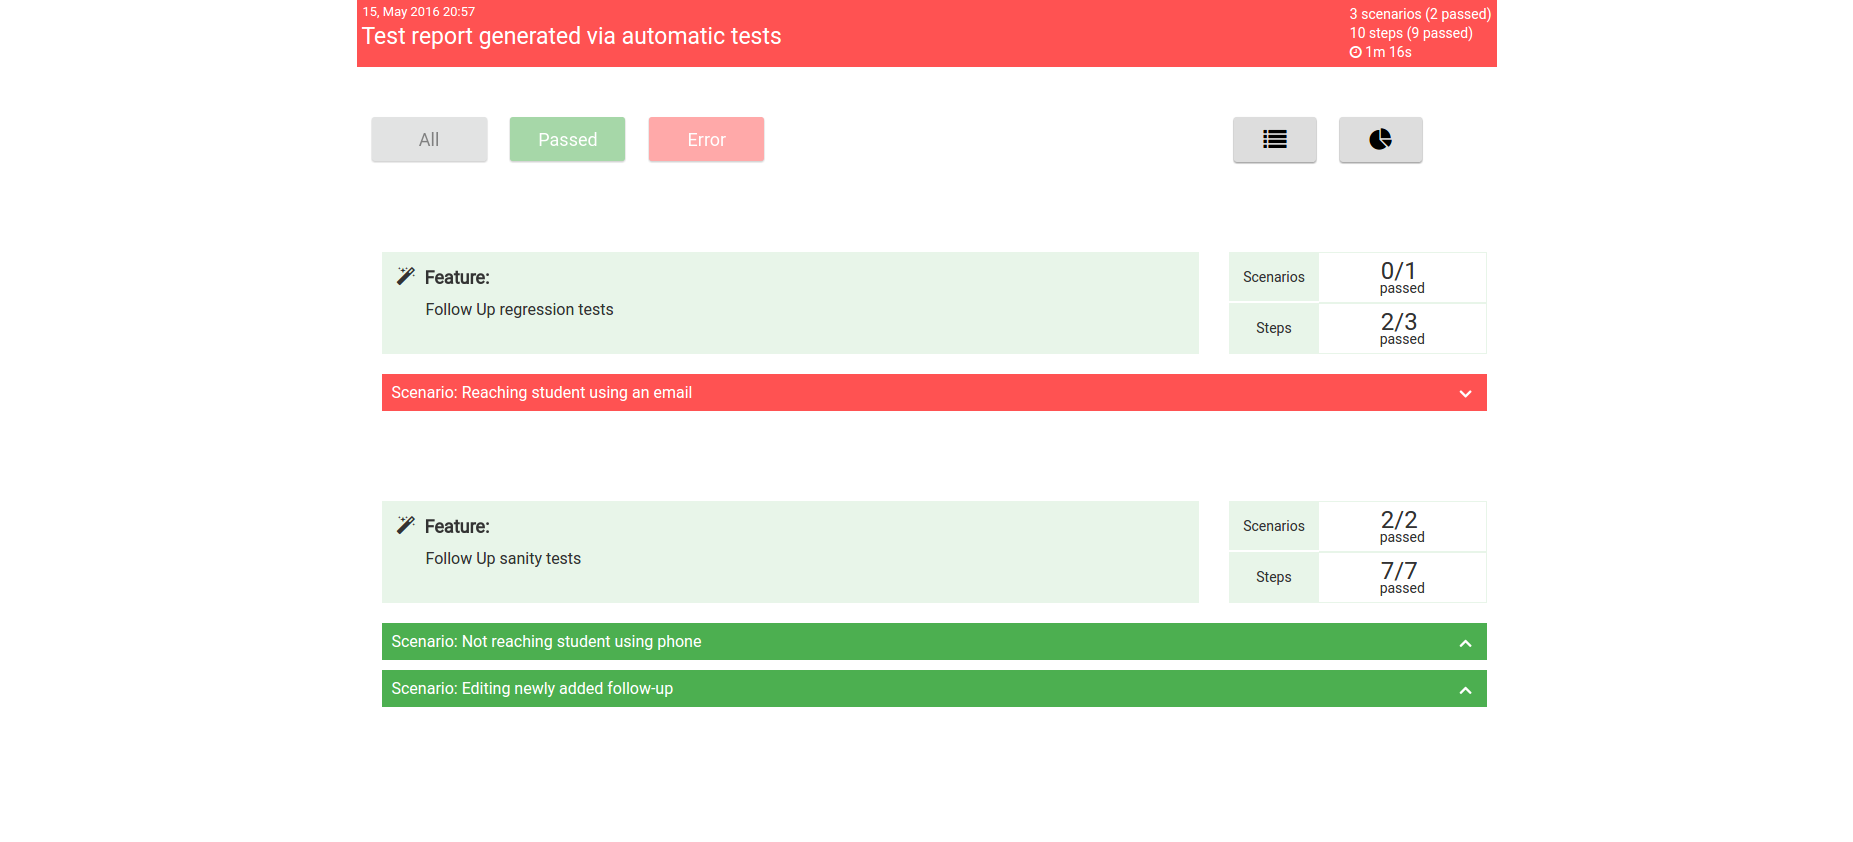
Example
Protractorc Cucumber HTML Report

CSS nth-child Selector

CSS nth-child Selector

In CSS Selector, we have a very useful structural pseudo-class selector i.e. ‘nth-child’ selector. ‘nth-child’ can be used to select ordered elements by giving the expression (an+b) or single element with positive integer as an argument. Consider if you want to get odd rows from a HTML table using Selenium WebDriver, your immediate idea will be ‘separating odd rows using FOR loop’. But we can accomplish it using nth-child (2n+1) selector.

nth-child (2n+1) expanded below.
(2*0) + 1=1=1st Row
(2*1) + 1=3=3rd Row
(2*2) + 1=5=5th Row

Selenium WebDriver-Java code below counts no. of odd rows in a table.

int inCount=driver.findElements(By.cssSelector("table[id='tbl1'] tr:nth-child(2n+1)")).size();
  

The below code gets first row from a table.

WebElement firstRow=driver.findElement(By.cssSelector("table[id='tbl1'] tr:nth-child(1)"));
  

Browser Compatibility

IE9+, FF 11.0+ on Win, FF 10.0.2+ on Mac, Safari 5.1, Chrome 18+ on Win and Chrome 17+ Mac.

White Framework Cheat Sheet

White Framework Cheat Sheet

Everyone is aware of automating rich client applications using White framework. As a software testing service provider, sharing our experience and knowledge is one of the success factors for Codoid. In this blog article, we would like to share useful White framework methods with examples.

Launch an Application
Application application = Application.Launch("C:\Windows\System32\calc.exe");
  
Attaching an existing Application
//Attach by process id
Application application=Application.Attach(10628);

//Attach by process name
 Application application = Application.Attach("calc");
  
Attach or Launch
//Attaches to the process, if it is running or launches a new process
ProcessStartInfo startInfo = new ProcessStartInfo();
startInfo.FileName = "calc.exe";
Application application = Application.AttachOrLaunch(startInfo);
  
Get Windows
//Get Window by title
 Window window =application.GetWindow("Calculator");

//Search a window with criteria
Window window = application.GetWindow(SearchCriteria.ByText("Testing services Companies"), TestStack.White.Factory.InitializeOption.NoCache);

//Returns a list of all main windows in belonging to an application. It doesn't return modal windows.
List<Window> windows = application.GetWindows(); 
  
Speed up window search performance

You can store window’s position in White-framework cache xml file by providing identification string in GetWindow method. For the very first run, it will store the window position. And for the subsequent executions, it accesses the cache xml and identifies your window quickly. For more details, refer the following link: Speed up performance by Position based search

Application application = Application.Attach("notepad");

Window window =application.GetWindow("Codoid-A Test Automation company - Notepad", TestStack.White.Factory.InitializeOption.NoCache.AndIdentifiedBy("Notepad"));

application.ApplicationSession.Save();
  
Desktop Windows
//Returns a list of all main windows on the desktop. It doesn't return modal windows.
List<Window> windows = Desktop.Instance.Windows();
  
Get Modal windows
//Get list of all the modal windows belong to the window.
List<Window> modalWindows = mainWindow.ModalWindows();

//Get modal window with title
Window childWindow = mainWindow.ModalWindow("child");
  
Get Tool tip
string message = window.ToolTip;
  
Take Screenshot
//Takes a screenshot of the entire desktop, and saves it to disk
Desktop.TakeScreenshot("C:\white-framework.png", System.Drawing.Imaging.ImageFormat.Png);

//Captures a screenshot of the entire desktop, and returns the bitmap
Bitmap bitmap = Desktop.CaptureScreenshot();
  
Button
//Find
 Button button=window.Get<Button>(SearchCriteria.ByText("Calculate"));

//Click
button.Click();

//Double Click
button.DoubleClick();

//Right Click
button.RightClick();
button.RightClickAt(new Point(5, 5));

//Is Enabled
bool isEnabledButton=button.Enabled;

//Take screenshot
Bitmap bitmap = button.VisibleImage;
bitmap.Save("C:\button.png", System.Drawing.Imaging.ImageFormat.Png);
  
ComboBox
ComboBox combobox=window.Get<ComboBox>(SearchCriteria.ByAutomationId("261"));

//Select by index
combobox.Select(1);

//Select by text
combobox.Select("Purchase price");
  
Radiobutton
RadioButton radioButton = window.Get<RadioButton>(SearchCriteria.ByAutomationId("322"));

//Select
radioButton.Select();

//Is selected
bool isSelected = radioButton.IsSelected;
  
Textbox
SearchCriteria searchCriteria = SearchCriteria.ByClassName("TextBox").AndIndex(1);

TextBox textBox = window.Get<TextBox>(searchCriteria);

//Clear and enter text. Use BulkText to set value in textbox for better performance.
textBox.BulkText = "QA Services";

//Click center of text box
textBox.ClickAtCenter();
  
Mouse
 Mouse mouse = Mouse.Instance;

//Click
mouse.Click();

//Click with Point
mouse.Click(textBox.ClickablePoint);

//Right Click
mouse.RightClick(textBox.ClickablePoint);

//Double Click
mouse.DoubleClick(textBox.ClickablePoint);

//Get cursor location
System.Windows.Point location = mouse.Location;
  
Checkbox
CheckBox checkbox = window.Get<CheckBox>(SearchCriteria.ByAutomationId("3213482"));

//Check
checkbox.Select();

//Uncheck
checkbox.UnSelect();

//Is checked
bool isChecked=checkbox.Checked;
  
Menubar
//Menu bar
MenuBar menubar = window.MenuBar;

//Selecting menu items
menubar.MenuItem("Tools", "Change language", "Polski (Polish)").Click();

//Searching and selecting menu items
menubar.MenuItemBy(SearchCriteria.ByText("Tools"), SearchCriteria.ByText("Change language")).Click();
  
Listbox
//Check an item
listBox.Check("QA Consultants");

//Uncheck an item
listBox.UnCheck("Quality Assurance");

//Get all the items
ListItems items = listBox.Items;

//Select an item
listBox.Select("Testing and QA Services");

//Get selected item
ListItem listItem = listBox.SelectedItem;
  
Tree
//Select a node
tree.Node("Codoid", "Services").Select();

//Expand a node
tree.Node("Codoid", "Products").Expand();

//Collapse node
tree.Node("Codoid", "Automation Testing").Collapse();
  
Wait Till using Delegate

Using the below technique, you can make your script to wait until a certain condition matches.


    class Program
    {
        public static TextBox textbox = null;

        static void Main(string[] args)
        {
            
            Application application = Application.Attach("calc");

            Window window = application.GetWindow("Calculator");

            textbox = window.Get<TextBox>(SearchCriteria.ByAutomationId("226"));


            //Waits until the textbox value becomes "123". isTextMatch method user defined method for this condition.
            window.WaitTill(new WaitTillDelegate(isTextMatched));

        }

        static bool isTextMatched()
        {
            bool isMatched = false;

            if (textbox.Text.Equals("123")) { isMatched = true; }

            return isMatched;
        }
    }