
Testing too much for Interaction and not BusinessTests that focus only on or primarily on interaction end up ignoring business level issues. These issues include business goals, processes and rules.
Mixing Business and Interaction TestsWhile running both tests is critical, it is important to run them separately even when the tests are run for the purpose of testing business functionalities. It is important to put in place a robust and modular test design that would ensure maintainability and be easily managed. A proper test design would also ensure that there is a clear scope, and also would obliterate the detailed steps if they are unnecessary for the understanding of the test with respect to its purpose.
Neglecting Business Objects Life Cycle StepsApplications contain data on ‘business objects’ such as customers, products, invoices, orders, and others. These elements have life cycles within the application – collectively known as CRUD (create, retrieve, update, and delete). Since tests for CRUD are usually incomplete and scattered, this paucity of testing causes gaps in the overall scope of the tests. It is important for test designers to fashion life cycle tests as business tests, since this should be their primary purpose.
Poorly designed and one dimensional testsPaucity of time, lack of experience, and other factors lead to poorly designed and shallow tests. This in turn leads to quality issues such as unresponsive applications, less than optimal working functionalities, and poor user experience. Over time, this makes test maintenance harder, which results in unnecessary costs, which could have been avoided if time and effort are expended at the start.
Deficiency in Defining ScopeWithout properly defining the scope of tests, they would be hard to retrieve and update later in the event of changes to the application. This could result in work duplication, wasting valuable time and other resources.
In Conclusion
Anti-patterns are actually warning signs and not rules for automated testing. In order to simplify automated testing, testers must look at these warning signs and spend time strategizing to create effective test designs from a business perspective. There could still be issues, but when anti-patterns and simplification are in focus, automation testing would become a lot more effortless and have better chances at being successful. Work with a top class automation testing company as a partner – experienced in simplifying this type of testing and a larger gamut of testing – connect with us.

by admin | Sep 29, 2019 | Automation Testing, Fixed, Blog |
Automated testing is established as an indispensable part of the overall software testing regime. It helps to maintain the quality of a software product right from the start and reduces the time and effort required for repetitive tasks.
Post the creation of automated frameworks, scripted tests continue to run with negligible maintenance for the entire life of the project. As experts of automation testing services, we firmly believe that this form of testing must never be avoided if you wish to present a top-quality product to your customers. As a test automation company (in addition to a gamut of other services) we guide clients and help them understand that investing in and putting aside a budget for automated testing will prove cheaper in the long run.

Keep an Upfront Investment Aside – To Save for the Future
As a business you would have put in sweat and tears, and invested a lot of time, money, and effort to get started and remain successful. It would make sense then to ensure that your automation testing efforts are headed in the right direction. We as a leading automation testing company have helped several clients put together a top-line automated testing regime, within their specified budget and timelines. It is necessary to put together a budget for automated testing since the funds would be required for the acquisition of proper testing tools and the training of the in-house staff that would be using these tools. Additionally, the investment would be used to create the infrastructure to support the testing tools and for running the tests.
It may seem arduous to convince the top brass to allocate a budget for this set of tasks. Convincing them to set aside additional monies is a problem as it is, and becomes even tougher when they may not fully understand the technical requirements, tools, and services important for this form of testing. This is where our experience and expertise can be leveraged – we give you some points that can help the management decisions in favor of allocating a budget for automated testing. The fact is that investing in this important task can have a significant and positive impact on the overall profit of an organization.
Top notch ROIDesigning a test case and creating code for the script does not take up much time. Once the test is created, running it requires minimal human interaction. The ROI from automated tests comes from the fact there is no need for human presence and costly human hours, and each test effectively makes up for some of the investment each time a test suite is run.
Test Often and Meticulously with Automated TestingWell-crafted automated tests can uniformly determine application functionality. Even additional tests added later automatically become part of the suite of tests, elevating the quality of an application even further.
Automated Tests Can Be Run Anytime without Added ExpenseIn manual testing there is a requirement for a human tester, and unless someone is available around the clock such testing cannot run. It would require a business to spend extra funds on hiring resources or paying extra to exist employees to work additional hours. With automatic suites, no human intervention is required and they can be set for execution at any time of day or night and would alert the relevant personnel of any problems or irregularities.
Enable the Use of your Valuable Human Resources for Elevated TasksWe at Codoid believe that our testing team consists of experts in their respective realms and hence we use automation test suites which allow the computer to run repetitive testing scenarios. It is important for a business to ensure that their testing engineers have the time to design additional and creative test cases, and focus on elevating the quality and functionality of an application/system.
Regression Testing Manually is ArduousRegression testing is an arduous process as is, and conducting it manually could add to the complexity and leave the system open to errors and defects. An automated regression test suits ensures stability of the application and consistent support for the required functionality. An automated testing suite validates the functionality with each successful run.
Increases Test Coverage ScopeAn automated testing suite can test cases in a speedier manner than manually by a person. Additionally, repetitive tests can be run to test the same functionality while using varying scenarios.
Get the Advantage of SpeedIrrespective of the number of tests to be run and the complexity of an application, it is a fact that automated tests are significantly faster, accurate, and better than manual tests. We as an automating testing company stand by this fact while knowing when to use manual testing. Since and uses fewer human resources, it makes up over time for the initial investment, and hence putting aside a budget for this form of testing makes business sense.
Bugs Cannot Play SpoilsportRunning detailed tests speedily enables the quicker validation of the code base of an application. This brings up bugs earlier on allowing developers to ascertain the cause and remedy immediately post app creation. As experts in the realm of software testing, we understand the high costs and time requirements if bugs are uncovered later on in the SDLC. It is our endeavor to save valuable resources for our clients and hence recommend early testing to ensure budgets remain undisturbed. This in turn leads to a consistently high quality of software in a speedy manner allowing clients to take their app to market before their competitors – which is the aim of creating apps and software.
Easily Distinguishable Testing ResultsA large number of automated test suites have the option of report generation which would contain details of a number of tests and the results of each. Users can also subscribe to system-generated automated emails to get an objective and highly detailed perspective on the quality of the application.
In Conclusion
We at Codoid stand by the reasons mentioned above, although this is not an exhaustive list of reasons why there must be a budget for automated testing within the overall testing strategy. However, these reasons provide a comprehensive understanding for a business with regard to the need and cost-effectiveness of automated testing. Connect with us to learn more and leverage our expertise in the realm of software testing.

by admin | Aug 21, 2019 | Automation Testing, Fixed, Blog |
Page objects are commonly used for testing, but should not make assertions themselves. Their responsibility is to provide access to the state of the underlying page. It’s up to test clients to carry out the assertion logic.
–Martin Fowler
In this blog article, you will learn how to implement Page Object Pattern using PyPOM package.
Installation
pip install PyPOM
[/code]
Sample Code
from pypom import Page
from selenium import webdriver
from selenium.webdriver.common.by import By

driver = webdriver.Chrome(executable_path='driverschromedriver.exe')

class Home(Page):
    _contact_us_locator = (By.ID, 'menu-item-54')

    @property
    def fill_contact_us_form(self):
        self.find_element(*self._contact_us_locator).click()

base_url = 'https://www.codoid.com'

home_page = Home(driver, base_url).open()

home_page.fill_contact_us_form

driver.quit()
In Conclusion:
We have other page object model packages in Python. We will review them in our subsequent articles. Please feel free to contact us if you face any issues with PyPOM implementation.

by admin | Aug 17, 2019 | Automation Testing, Fixed, Blog |
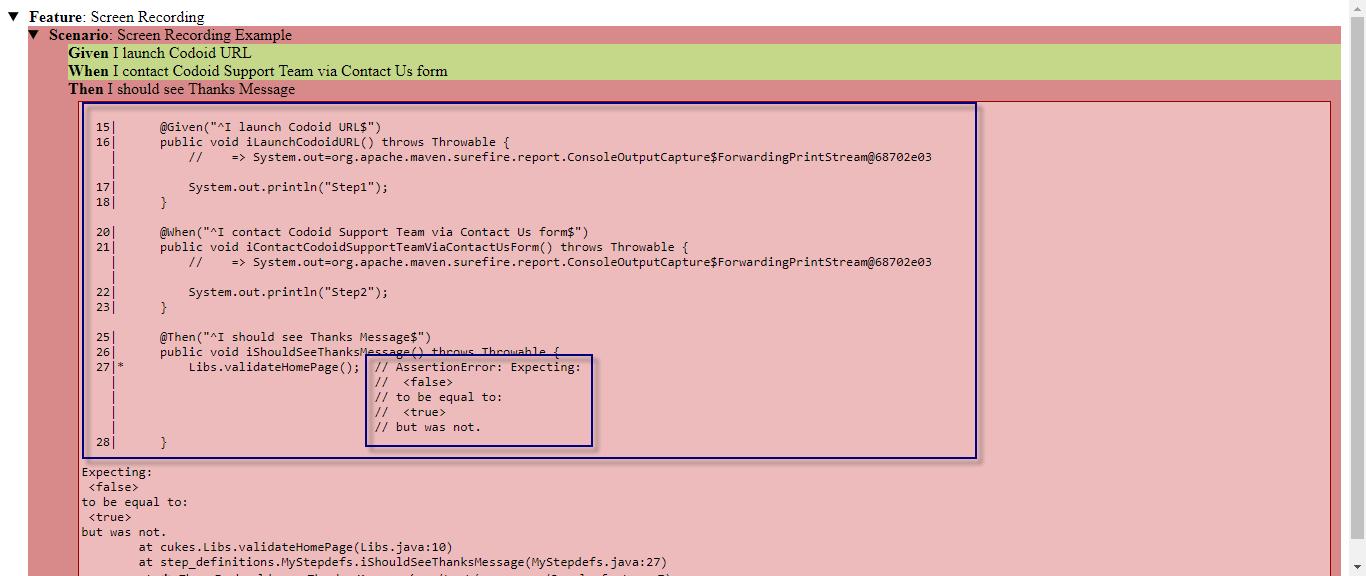
After automated regression test suite execution, troubleshooting failures is an important post execution task. However, it needs more error details to make sure whether the failure is test data issue or script issue or an actual application bug. Default Cucumber reporting does not provide step definition information. If you want to add the failed step definition information in Cucumber HTML Report, you can use Scott Test Reporter.
How to install? Add the below plugin and dependency in POM.xml
<build>
        <plugins>
            <plugin>
                <groupId>hu.advancedweb<groupId>
                <artifactId>scott-maven-plugin<artifactId>
                <version>3.5.0<version>
                <executions>
                    <execution>
                        <goals>
                            <goal>prepare-agent<goal>
                        <goals>
                    <execution>
                <executions>
            <plugin>
        <plugins>
    <build>

<dependency>
            <groupId>hu.advancedweb<groupId>
            <artifactId>scott<artifactId>
            <version>3.5.0<version>
            <scope>test<scope>
<dependency>
Cukes Test
package cukes;

import cucumber.api.CucumberOptions;
import cucumber.api.testng.AbstractTestNGCucumberTests;

@CucumberOptions(features = "src/test/resources/Sample.feature", monochrome = true, plugin = {
        "pretty", "hu.advancedweb.scott.runtime.ScottCucumberHTMLFormatter:target/cucumber",
        "hu.advancedweb.scott.runtime.ScottCucumberJSONFormatter:target/cucumber.json"},
        glue = {"step_definitions"})
public class Runner1 extends AbstractTestNGCucumberTests {

}
Report
In Conclusion:
Using this library, you can troubleshoot failures without revisiting or executing your code again. To provide quick feedback after test automation execution, you need to troubleshoot the failures quickly.

by admin | Aug 31, 2019 | Automation Testing, Fixed, Blog |
Nowadays, we have umpteen number of testing frameworks developed using Python and most of them don’t fit everyone’s requirement, through extensive research we have a found a testing framework which is comprehensive and has all the required features to maintain your automated test cases. It is Test Junkie which is still in the Alpha stage. This framework was developed by Artur Spirin . In this blog article, we will see what are all the distinct features of Test Junkie.
ListenersIn Cucumber, we use hooks like beforeScenario & afterScenario. Similarly, in Test Junkie, we have many listeners for Test and Suite.
Test Listeners: on_in_progress, on_success, on_failure, on_error, on_ignore, on_cancel, on_skip, & on_complete.
Suite Listeners: on_class_in_progress, on_before_class_failure, on_before_class_error, on_after_class_failure, on_after_class_error, on_class_skip, on_class_cancel, on_class_ignore, on_class_complete, on_before_group_failure, on_before_group_error, on_after_group_failure, & on_after_group_error.
from test_junkie.listener import Listener

class MyTestListener(Listener):
    def __init__(self, **kwargs):
        Listener.__init__(self, **kwargs)
    ...
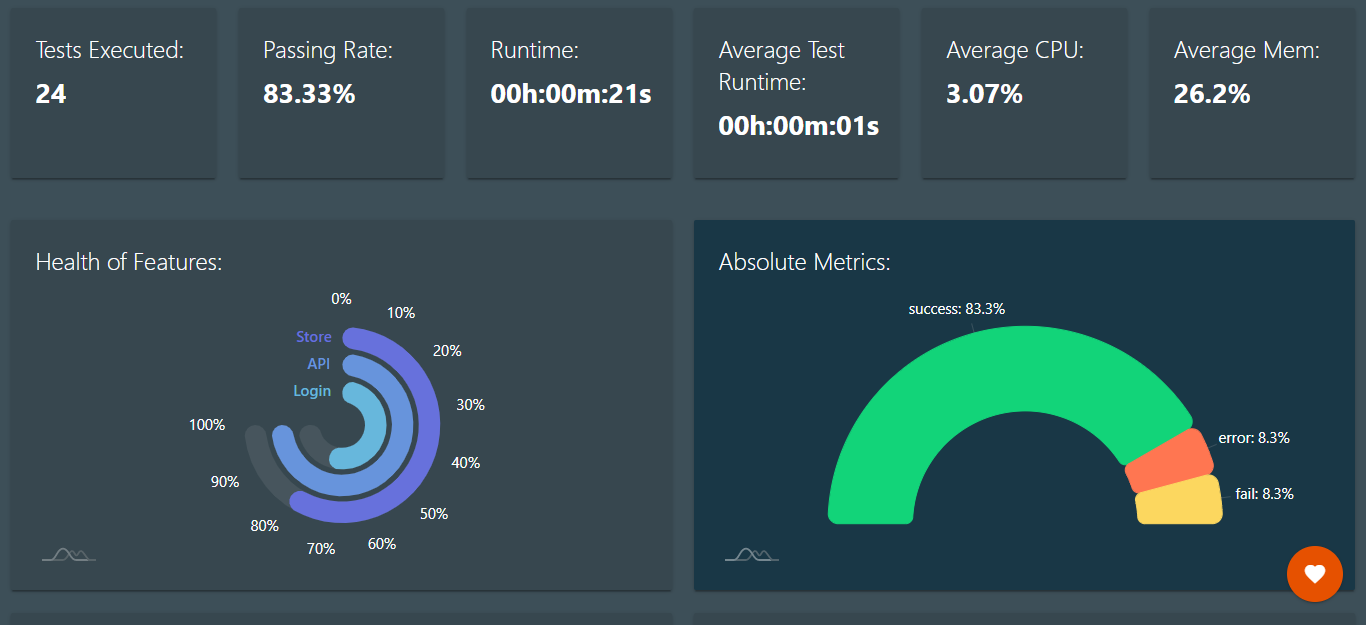
Test ReportingIn Test Junkie, you can report the test execution in HTML, XML, and JSON. Using monitor_resources parameter, you can enable monitoring of the MEM & CPU usage during test execution. Test Junkie generates a beautiful HTML report as shown below.
Advanced Test Suite Example
from test_junkie.decorators import Suite, test, afterTest, beforeTest, beforeClass, afterClass
from test_junkie.meta import meta, Meta
@Suite(parameters=[{"login": "[email protected]", "password": "example", "admin": True},
                   {"login": "[email protected]", "password": "example", "admin": False}])
class LoginSuite:
    @beforeClass()
    def before_class(self, suite_parameter):  # yes, we just parameterized this function, seen that anywhere else?
        # Lets assume we have some code here to login with
        # username . . . suite_parameter["login"]
        # password . . . suite_parameter["password"]
        # This is our, hypothetical, pre-requirement before we run the tests
        # If this step were to fail, the tests would have been ignored
        pass
    @afterClass()
    def after_class(self):
        # Here, generally, we would have clean up logic.
        # For the sake of this example, lets assume we logout
        # from the account that we logged into during @beforeClass()
        # no `suite_parameter` in method signature,
        # logout process would likely be the same irrespective of the account
        pass
    @test(parameters=["page_url_1", "page_url_2", "page_url_3"])
    def validate_user_login_in_header(self, parameter, suite_parameter):
        # Lets assume that in this test case we are going to be validating
        # the header. We need to make sure that email that user logged in with
        # is displayed on every page so we will make this test parameterized.
        # By doing so we will know exactly which pages pass/fail without
        # writing any extra logic in the test itself to log all the failures
        # and complete testing all the pages which would be required if you
        # were to use a loop inside the test case for instance.
        # Now we would use something like Webdriver to open the parameter in order to land on the page
        # and assert that suite_parameter["username"] in the expected place
        pass
    @test(parameters=["admin_page_url_1", "admin_page_url_2"])
    def validate_access_rights(self, parameter, suite_parameter):
        # Similar to the above test case, but instead we are validating
        # access right privileges for different user groups.
        # Using same principal with the parameterized test approach.
        # Now we would also use Webdriver to open the parameter in order to land on the page
        # and assert that the page is accessible if suite_parameter["admin"] is True
@Suite(pr=[LoginSuite],
       parameters=[{"login": "[email protected]", "password": "example", "user_id": 1},
                   {"login": "[email protected]", "password": "example", "user_id": 2}])
class EditAccountCredentialsSuite:
    """
    It is risky to run this suite with the LoginSuite above because if
    the suites happen to run in parallel and credentials get updated
    it can cause the LoginSuite to fail during the login process.
    Therefore, we are going to restrict this suite using the `pr` property, this will insure that
    LoginSuite and EditAccountCredentialsSuite will never run in parallel thus removing any risk
    when you run Test Junkie in multi-threaded mode.
    """
    @test(priority=1, retry=2)  # this test, in case of failure, will be retried twice
    def reset_password(self, suite_parameter):  # this test is now parameterised with parameters from the suite
        # Lets assume in this test we will be resetting password of the
        # username . . . suite_parameter["login"]
        # and then validate that the hash value gets updated in the database
        # We will need to know login when submitting the passowrd reset request, thus we need to make sure that
        # we don't run this test in parallel with edit_login() test bellow.
        # We will use decorator properties to prioritize this test over anything else in this suite
        # which means it will get kicked off first and then we will disable parallelized mode for the
        # edit_login() test so it will have to wait for this test to finish.
        pass
    @test(parallelized=False, meta=meta(expected="Able to change account login"))
    def edit_login(self, suite_parameter):
        # Lets assume in this test we will be changing login for . . . suite_parameter["login"]
        # with the current number of tests and settings, this test will run last
        Meta.update(self, suite_parameter=suite_parameter, name="Edit Login: {}".format(suite_parameter["login"]))
        # Making this call, gives you option to update meta from within the test case
        # make sure, when making this call, you did not override suite_parameter with a different value
        # or update any of its content
    @afterClass()
    def after_class(self, suite_parameter):
        # Will reset everything back to default values for the
        # user . . . suite_parameter["user_id"]
        # and we know the original value based on suite_parameter["login"]
        # This will insure other suites that are using same credentials, wont be at risk
        pass
@Suite(listener=MyTestListener,  # This will assign a dedicated listener that you created
       retry=2,  # Suite will run up to 2 times but only for tests that did not pass
       owner="Chuck Norris",  # defined the owner of this suite, has effects on the reporting
       feature="Analytics",  # defines a feature that is being tested by the tests in this suite,
                             # has effects on the reporting and can be used by the Runner
                             # to run regression only for this feature
       meta=meta(name="Example",  # sets meta, most usable for custom reporting, accessible in MyTestListener
                 known_failures_ticket_ids=[1, 2, 3]))  # can use to reference bug tickets for instance in your reporting
class ExampleTestSuite:
    @beforeTest()
    def before_test(self):
        pass
    @afterTest()
    def after_test(self):
        pass
    @test(component="Datatable",  # defines the component that this test is validating,
                                  # has effects on the reporting and can be used by the Runner
                                  # to run regression only for this component
          tags=["table", "critical", "ui"],  # defines tags that this test is validating,
                                             # has effects on the reporting and can be used by the Runner
                                             # to run regression only for specific tags
          )
    def something_to_test1(self, parameter):
        pass
    @test(skip_before_test=True,  # if you don't want to run before_test for s specific test in the suite, no problem
          skip_after_test=True)  # also no problem, you are welcome!
    def something_to_test2(self):
        pass
Command Line InterfaceTest Junkie comes with three features in Command Line execution. First one is run command which allows to execute your tests. The second one is audit command which to quickly scan existing codebase and aggregate test data based on the audit query. The last one is config command is to let you easily persist test configuration for later use with other commands like run & audit
In Conclusion:
Reviewing a testing framework helps the test automation community to understand the framework features quickly. We, at Codoid, urge our testers to explore latest tools/frameworks to improve our automation testing services. Test Junkie is still Alpha phase. Once it is released, it will be the most popular Python testing framework.

by admin | Aug 30, 2019 | Automation Testing, Fixed, Blog |
Automated software testing schedules have the ability to increase the depth and expand the scope of software testing while elevating the quality of software applications and packages. Today, test automation frameworks are deployed to execute thousands of different complex test cases during every test run, thus providing expansive testing coverage, which would be impossible with manual testing. For instance, certain automated testing tools can playback pre-recorded and predefined actions, compare the results to the expected behavior of a software package, and report the success or failure of these manual tests to the software testing experts. Automation also boosts the repeatability of tests, which can be extended to perform tasks impossible with manual testing. These facts help leading software testing companies to promote automated software testing as an essential component of successful software development projects, while also measuring its success across a range of projects.
Test Management Tools
Testing engineers offering automation testing services should identify ‘candidates’ for automation during the process of defining test cases and testing scenarios. The salient features of a test management tool are flexibility and ease of use. Further, a good quality tool should be able to help testers identify any bugs in the project. Additionally, a test management tool should have the ability to execute various automation tests and scripts in batches or position these in the testing pipeline for scheduled testing or on-demand.

What to Automate
An intelligent automated testing strategy should be able to answer the questions: ‘where to automate’ and ‘what to automate’. Testing engineers must answer these queries to denote the layer of an application that must undergo automated testing. However, testing engineers offering automation testing services must bear in mind that although automated testing requires higher initial investment, it can yield a significantly higher return on investment. Therefore, teams of software testing experts should have answers to the questions mentioned to enable a better focus on their automation efforts.
Tool Selection
The correct automation tool is critical to ensure the success of automation testing. Hence, test engineers must, for instance, work to determine which tool could enable the automated testing of a desktop application. Further, factors such as language support, tool support, the availability of newer versions of a tool, support for API automation, and more, must be considered during the tool selection process. These factors can and should influence commercial decisions to purchase tools for firms that offer test automation services. Certain complexities may arise when a company engaged in automation testing services negotiates the process of tool selection in specific circumstances.
Environment Stability
Test automation thrives in stable testing environments. Hence, test engineers performing test automation services must consider factors such as dependency, availability and the up-time of a test environment. Testers should take a special interest in managing test infrastructure – such as hardware servers, application servers, networking, firewalls, software components required for testing, build software required for testing releases and more. Further, they must manage test environments such as database clusters, UAT, Pre-production, and the data required for testing. Additionally, testers must remain aware that test environments differ from production environments in several ways – these include operating systems, configuration, software versions, patches, and others. Therefore, the wider the gap between test and production environments, the greater the probability the delivered product will feature a range of bugs and defects.
Data Usage
Data and its appropriate usage are critical to devising a correct approach to automation. The complications associated with data bring up several unexpected challenges in automation testing. Therefore, testing engineers must find the means to randomly generate or obtain varied data input combinations as part of reinforcing their efforts towards test automation. For instance, data can be sourced from tables, files or APIs. Further, engineers must make qualitative judgments such as whether sourcing a certain type of data would affect the performance of scripts, and others.
In Conclusion
A well-calibrated and prudent approach to testing automation can elevate the quality of testing in software testing scenarios. Testers with the ability to put together a unique approach to test automation would be more successful in their chosen domain of work. Companies must partner with a leading software testing company to get the best service, experts, and top testing tools. Connect with us for all these features and more.


