by admin | May 1, 2018 | Automation Testing, Fixed, Blog |
Rerunning Cucumber failed scenarios is a great value add for your automation test suites. Sometimes, your scripts may fail because of network latency and test bed slowness. Rerunning scripts will reduce the number of failures.
However, you need to monitor the scripts which are always failing in the first attempt. In this blog article, we will walk you through how to rerun jvm-Cucumber failed scenarios.
Step #1
Configure where you want to store failed scenario details in Runner class
package sample.cukes;
import cucumber.api.CucumberOptions;
import cucumber.api.testng.AbstractTestNGCucumberTests;

@CucumberOptions(
        features = "src/test/resources/features/Sample.feature", monochrome = true,
        plugin = {
        "pretty", "html:target/cucumber-report/single",
        "json:target/cucumber-report/single/cucumber.json",
        "rerun:rerun/failed_scenarios.txt"},
        glue = {"common","sample"}
        )

public class SampleCukesTest extends AbstractTestNGCucumberTests {}
Note: Use rerun variable in CucumberOptions to store the failed scenarios.
Step #2
Create a new Runner class to run the failed scenarios.
package sample.cukes;
import cucumber.api.CucumberOptions;
import cucumber.api.testng.AbstractTestNGCucumberTests;

@CucumberOptions(
        features = {"@rerun/failed_scenarios.txt"},
        monochrome = true,
        plugin = {
        "pretty", "html:target/cucumber-report/single",
        "json:target/cucumber-report/single/rerun_cucumber.json"},
        glue = {"common","sample"}
        )

public class FailureRerun extends AbstractTestNGCucumberTests {}
Note: In the ‘features’ variable, you need mention the failed_scenarios.txt file and don’t forget that you must mention ‘@’ symbol before the file path.
If you are running your automated test scripts from Jenkins, you can create and configure a downstream job to run the failed scenarios.

by admin | Oct 8, 2018 | Automation Testing, Fixed, Blog |
Cypress is a JavaScript based end-to-end testing framework that doesn’t use Selenium unlike other framework(Protractor, Jasmine, Webdriverjs) does. Cypress is built on top of Mocha, which is again a feature-rich JavaScript test framework, making asynchronous testing simple and fun. Cypress also uses a BDD/TDD assertion library. As Cypress has many handy advantages, I want to highlight only those that I found fascinating:
- Automatic waiting – Using Cypress, you do not need to specify explicitly to wait for the DOM to load, elements to become visible, the animation to be completed, the XHR and AJAX calls to be finished, and much more.
- Real-Time Reloads – Cypress triggers automatic running of your script when you save the script file you are working with (xyz_spec.js file). Usually other frameworks needs manual triggering to run the script.
- Debug ability – Cypress gives you the ability to directly debug your app under test from chrome Dev-tools, It suggests you how to approach an issue while it pops out an error message.
- Free and Open Source.
- Fast, It takes a max of 20 ms response time.
There are two ways to use this tool in your PC.
- – Desktop Application
- – Using NPM installer
Download the zip file for Desktop by hitting the download button, extract the files and install in your machine.
OS Support:
- Mac OS 10.9+ (Mavericks+), only 64bit binaries are provided for macOS.
- Windows 7+, only 32bit binaries are provided for Windows.
- Linux Ubuntu 12.04+, Fedora 21, Debian 8.
Desktop Application will be look like,
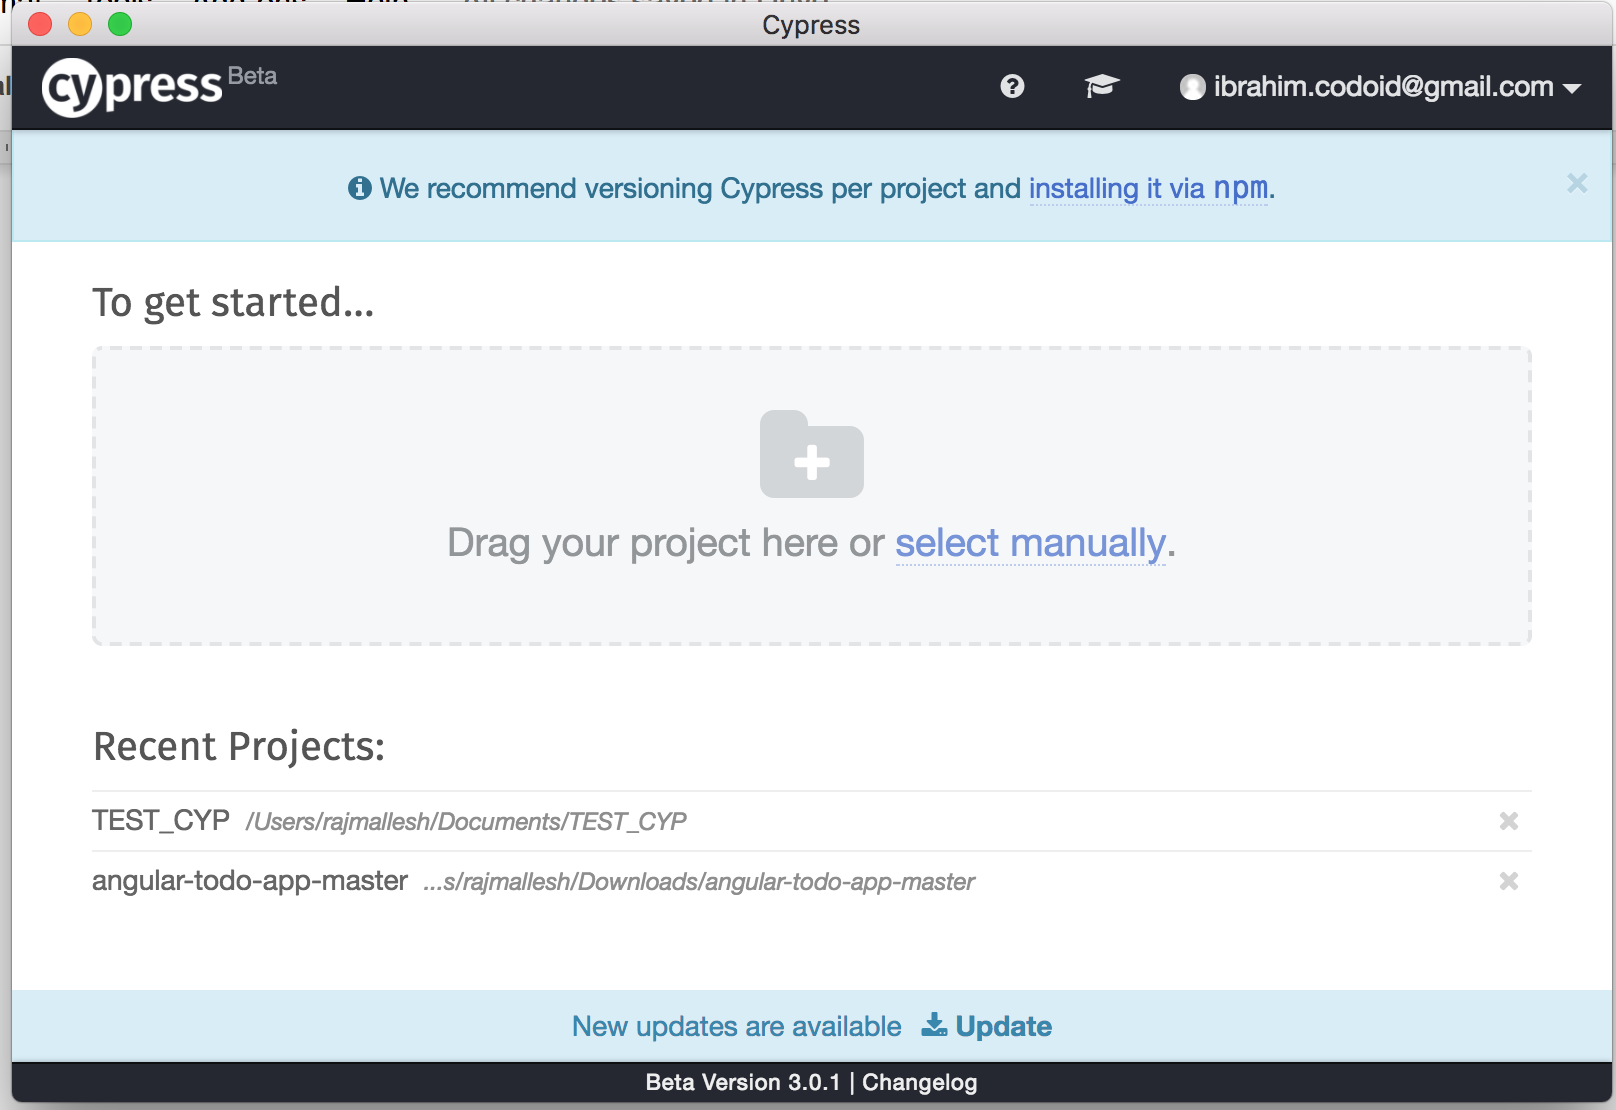
You can create a new separate cypress project and you can also add a cypress project to an existing projects, to achieve this follow the below steps.
- 1. User can drag and drop your project or empty folder.
- 2. Cypress will create an example project inside the folder, which contains a. A Cypress folder(has lot of example “.js” (like spec.js files)) b. Cypress.json file
After creating a new cypress project, it looks like the below,
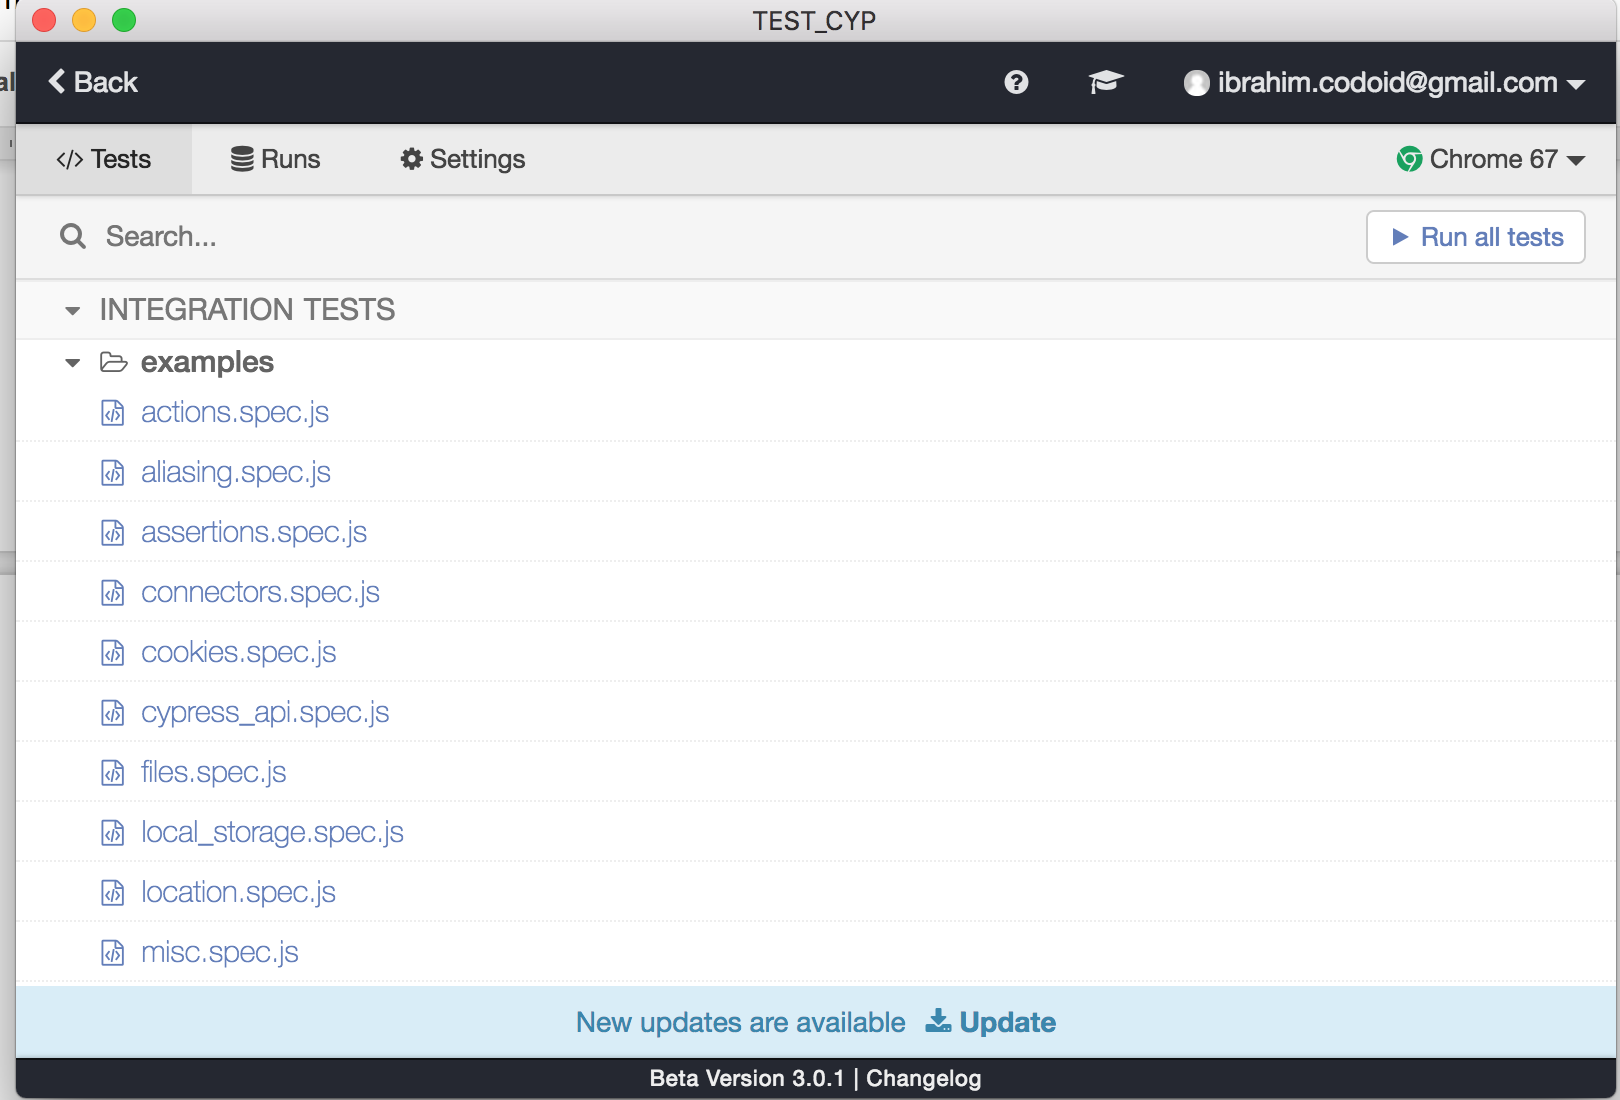
Cypress is purely a chrome dependent framework (chrome, chromium and canary). If you open anyone of the spec.js file, that spec will start executing the automation script in a Google chrome browser. Also, you can run all the test files together by clicking the button (Run all tests). Cypress has a beautiful display that splits test execution on right and individual steps of execution on left side. Refer the below screenshot,
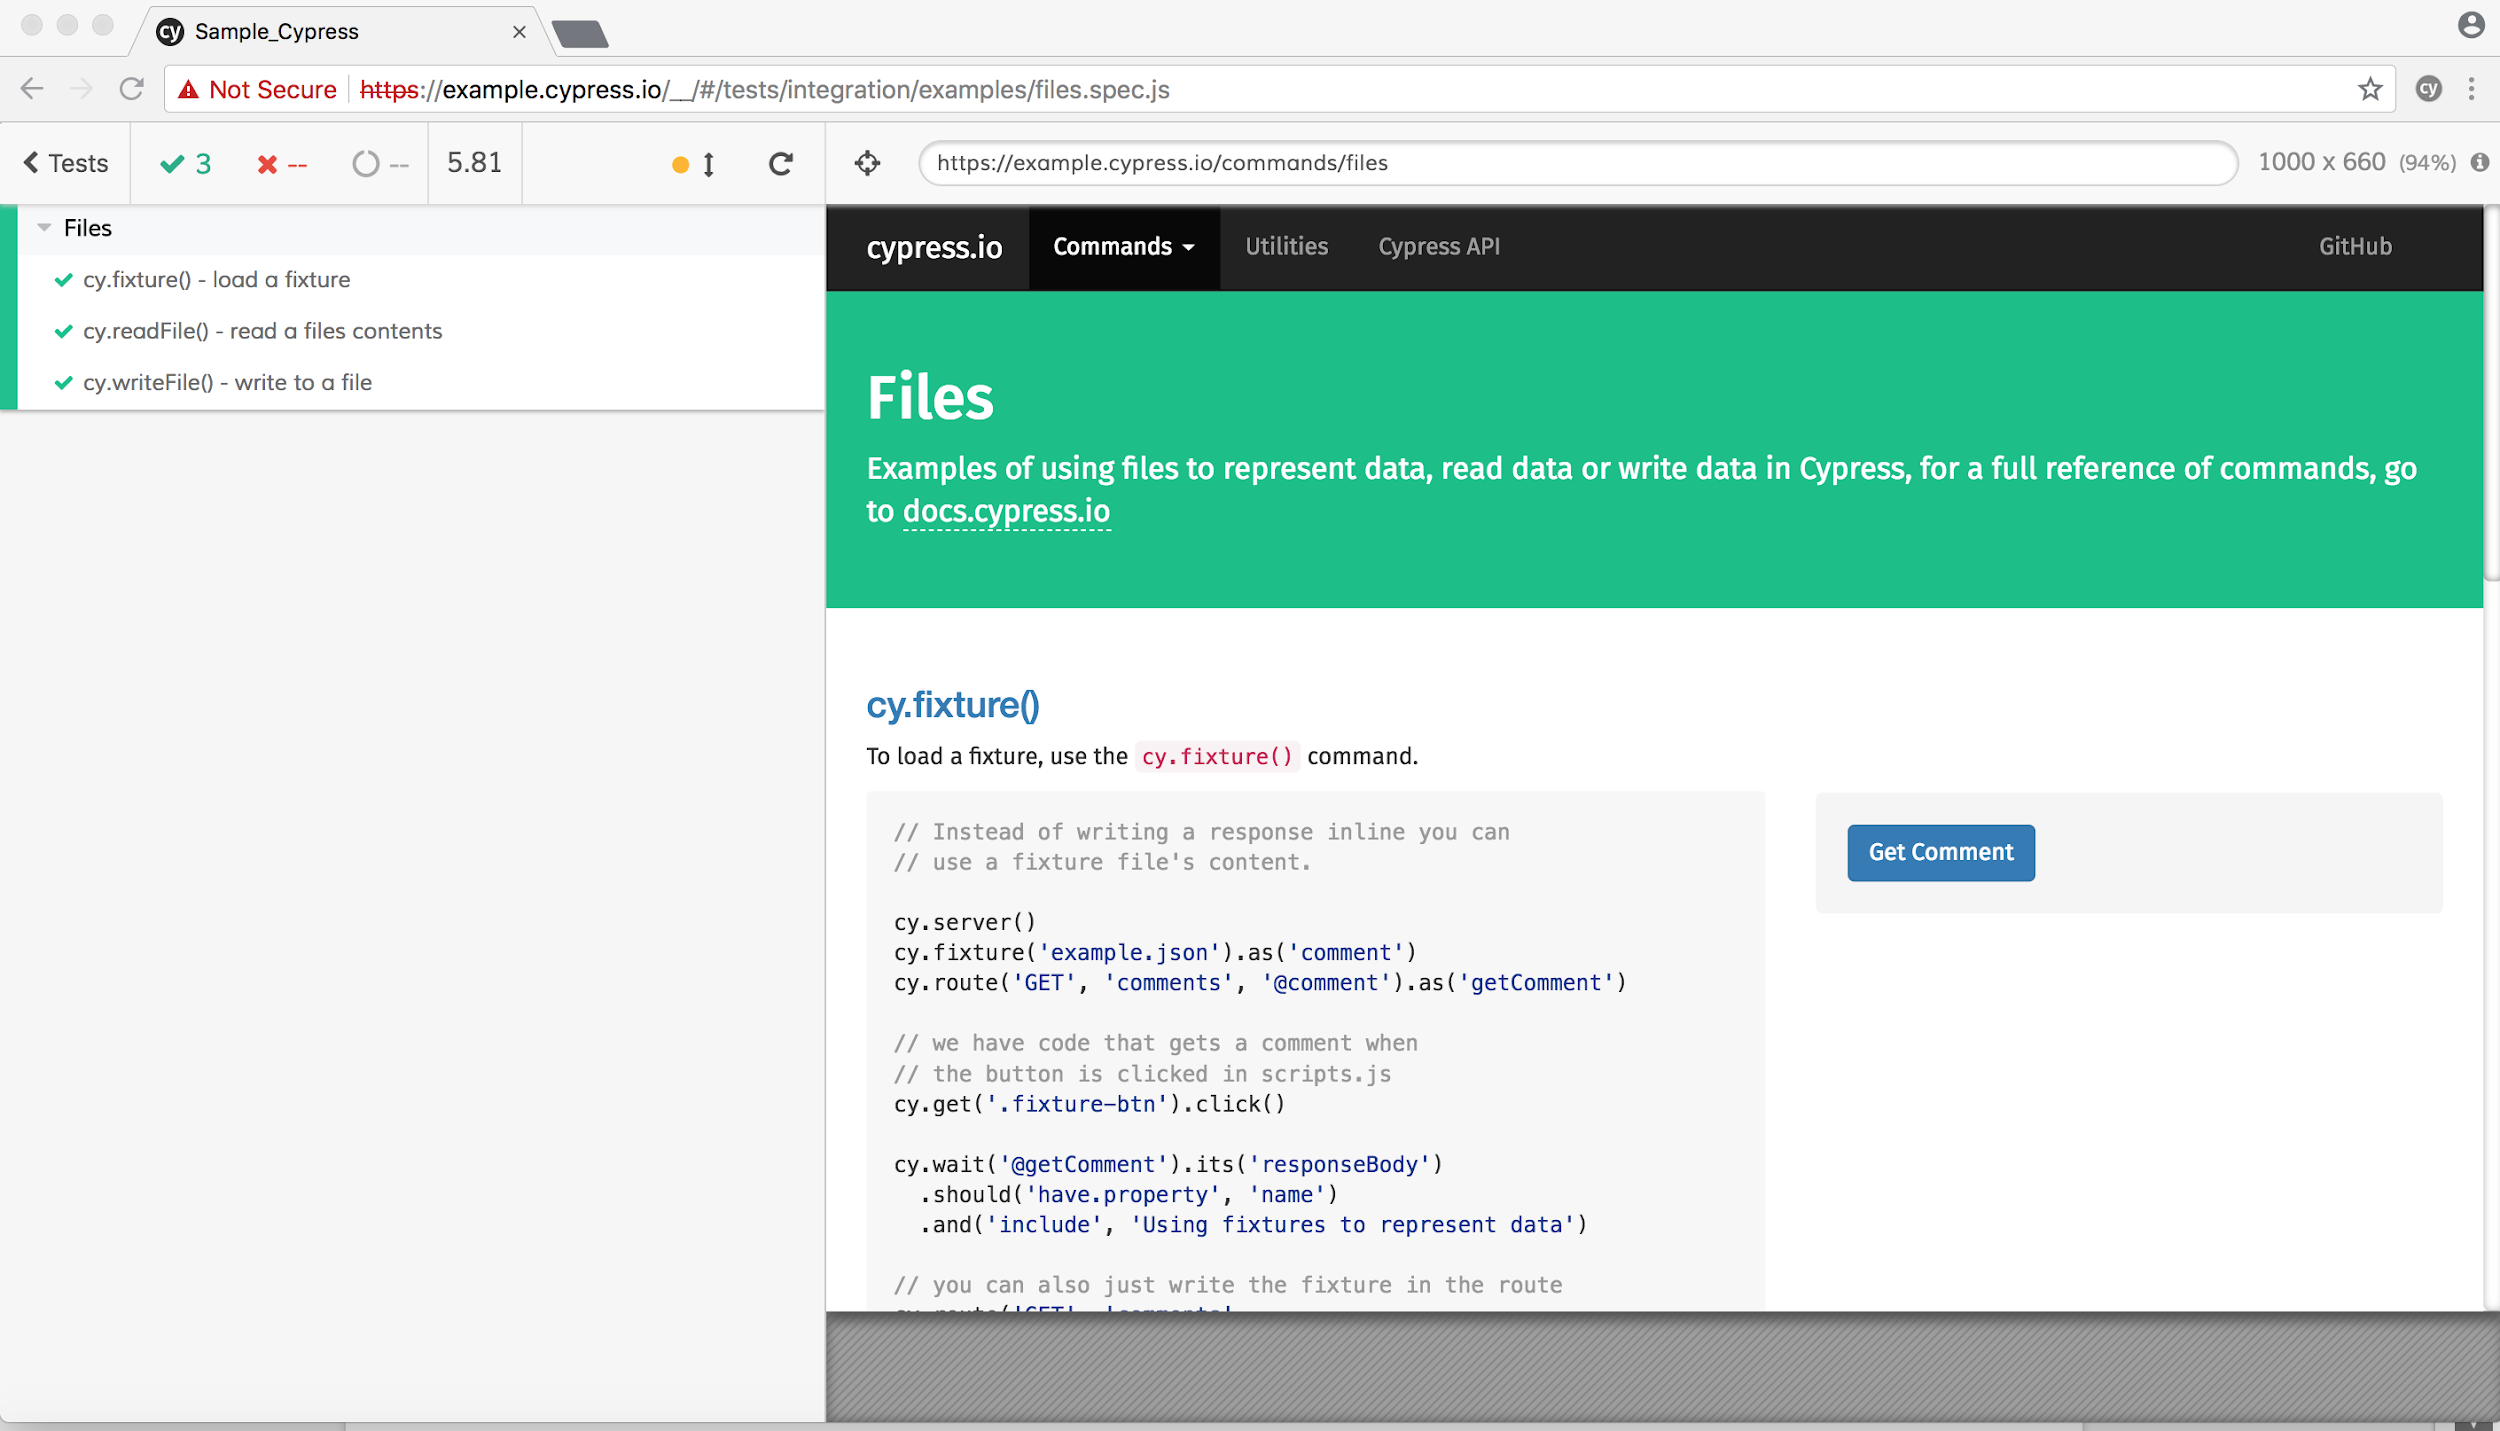
All executable files should be in the Integration folder, the spec.js files are available in the integration folder. If you need to automate an application, create a spec.js file in the integration folder and start developing the script.
Note: Cypress requires nodejs version greater than 4.0.0
Open your project or a new folder in the command prompt and initialize the npm to create a package.json file, use the below code to initialize it.
Now package.json file will be created in that folder. Run the below command to install the cypress tool,
npm install --save-dev cypress
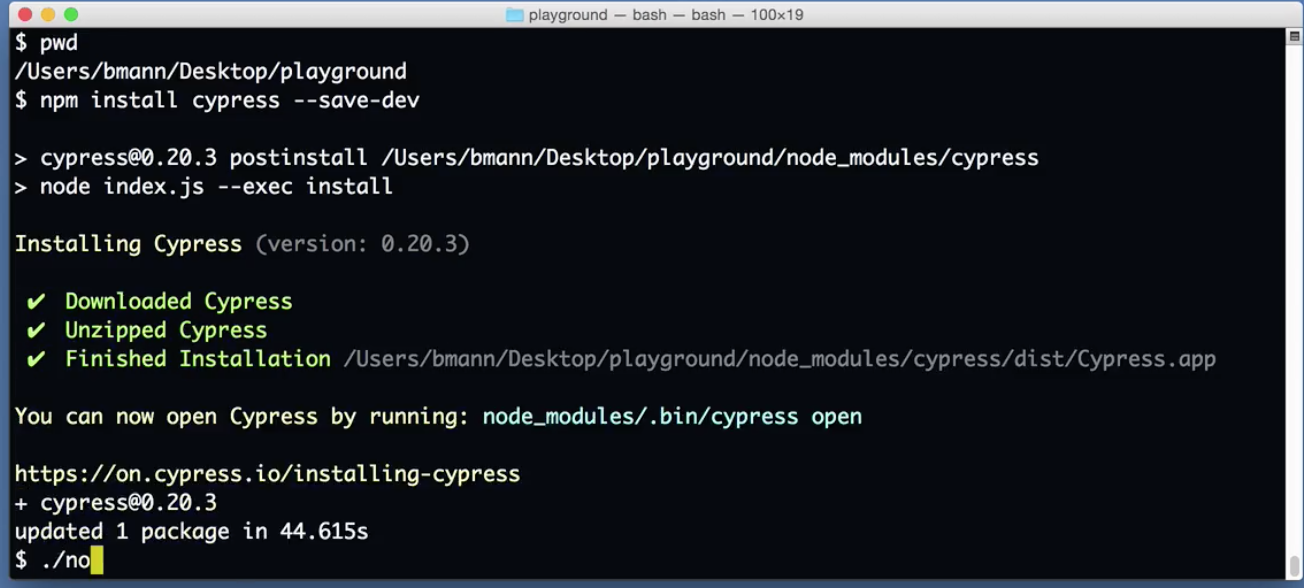
A folder node_modules will be created and lot of dependencies will be downloaded in that folder. Open the cypress tool by using the below commands,
The long way with the full path
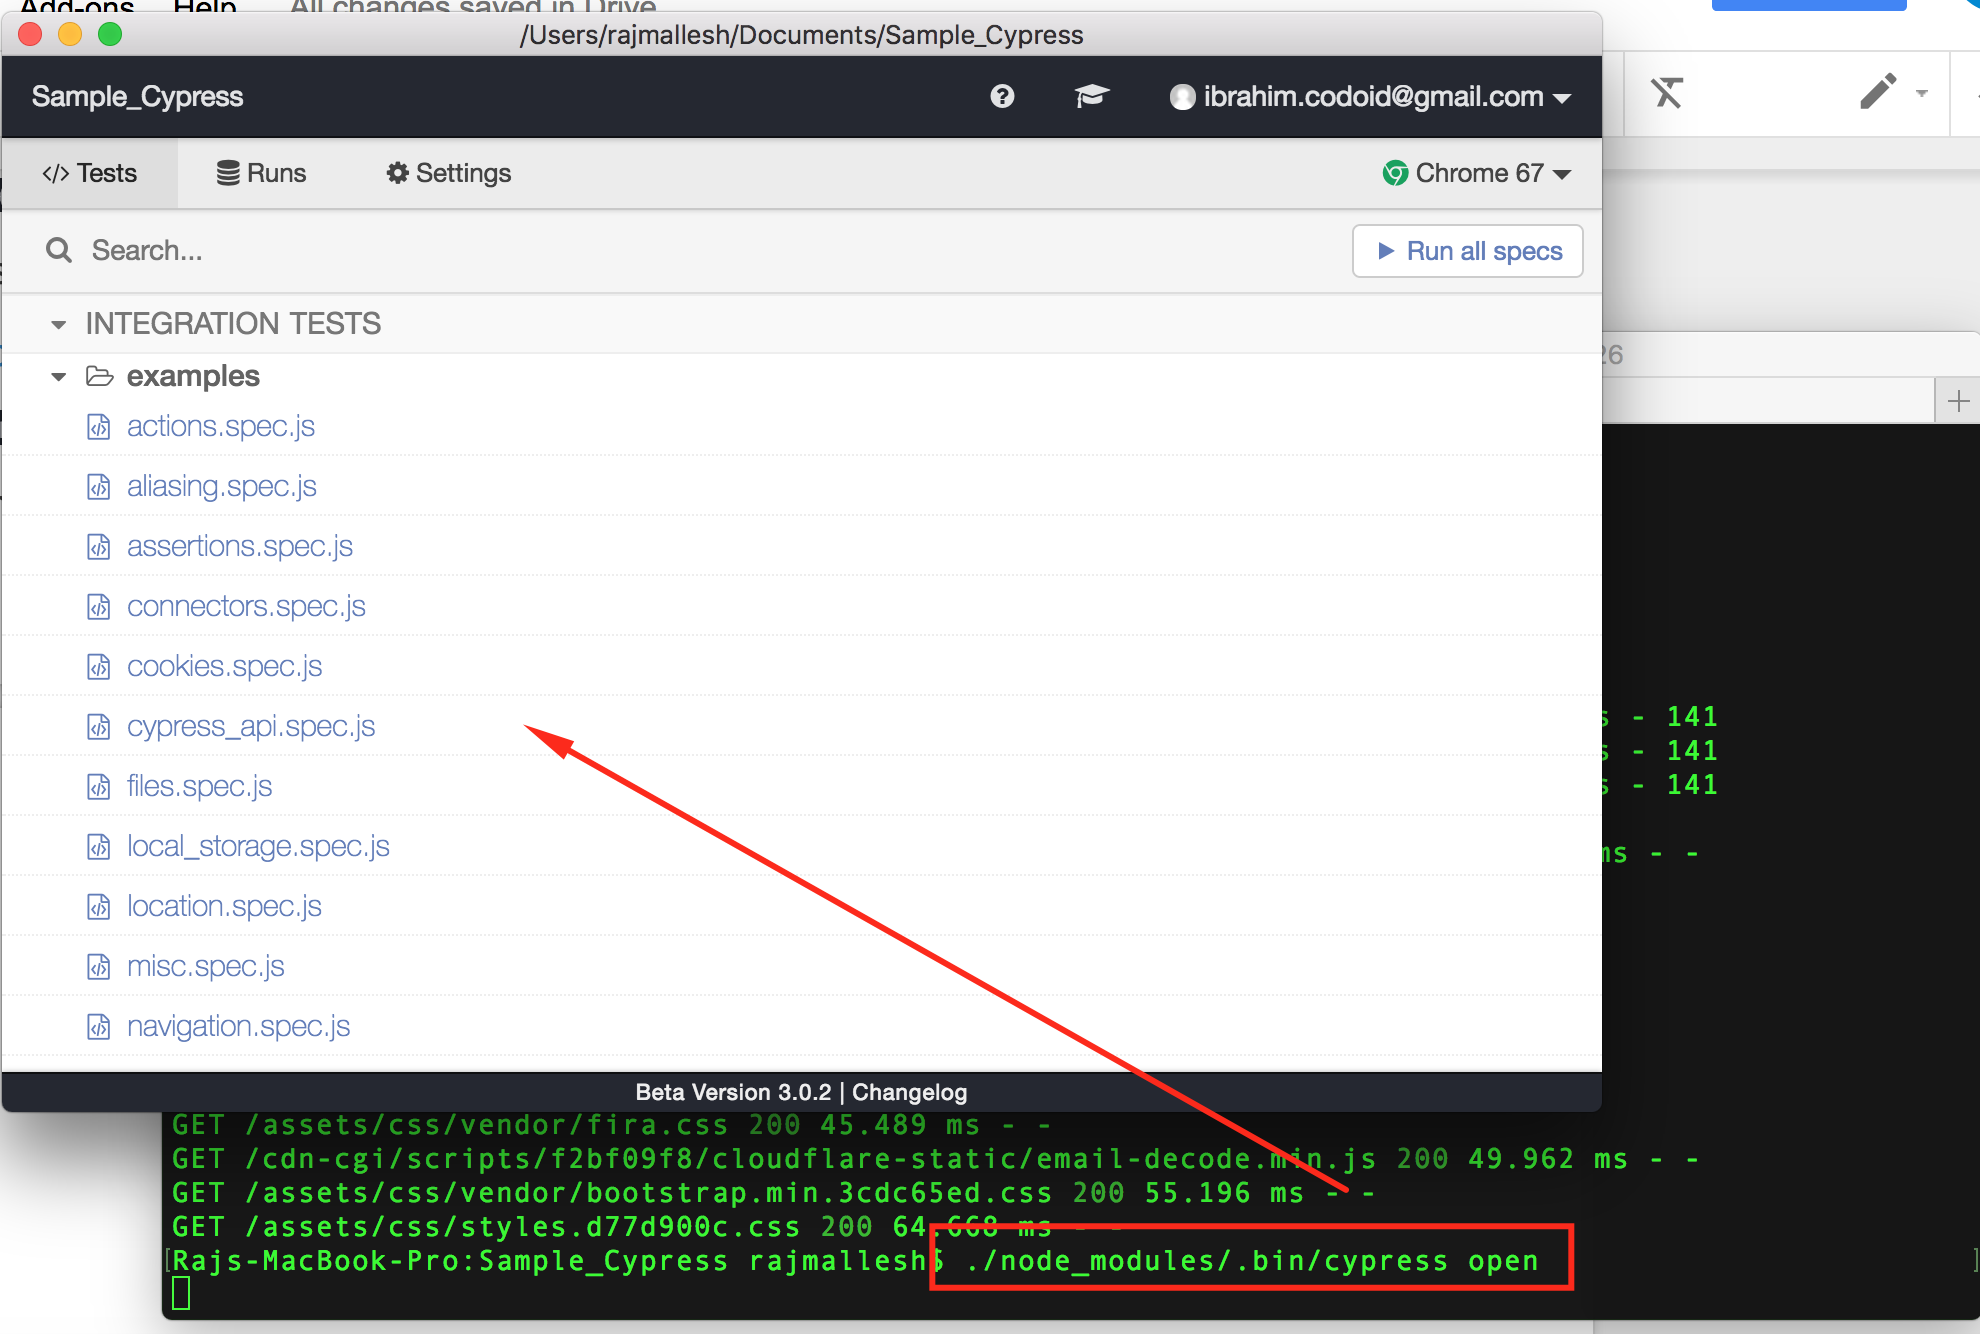
$./node_modules/.bin/cypress open
Or with the shortcut using npm bin
Or by using npx Note: npx is included with npm > v5.2 or can be installed separately.
After a moment, the Cypress Test Runner will launch.
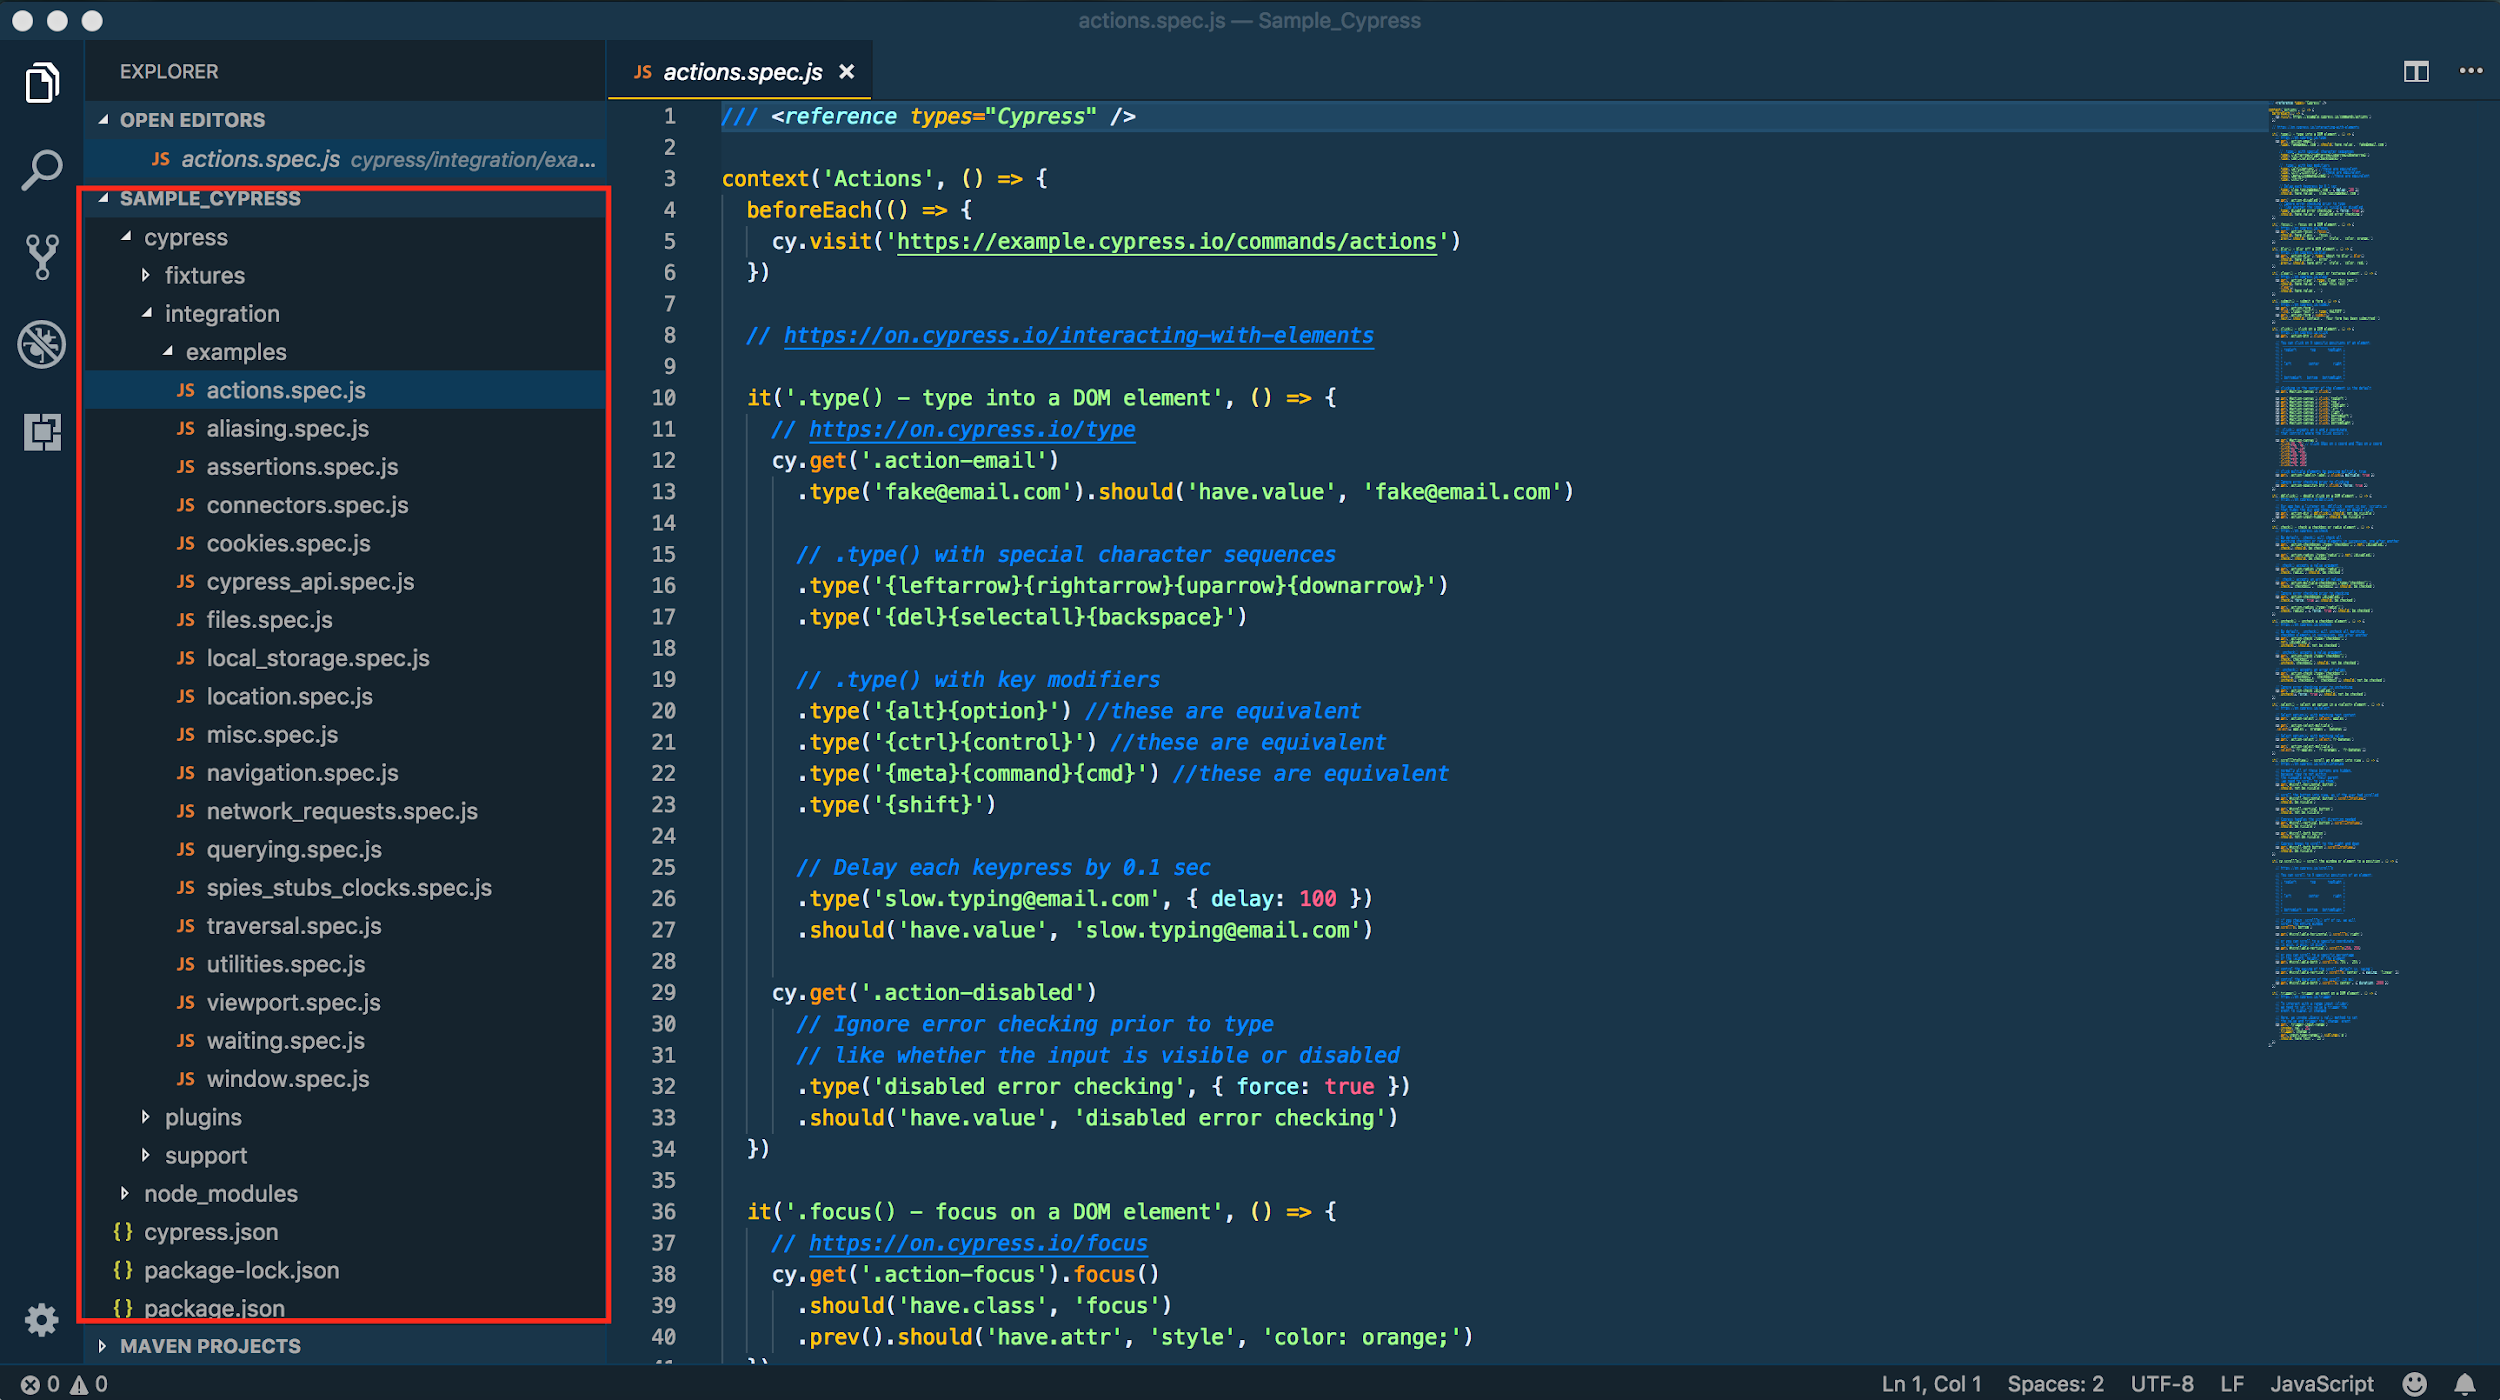
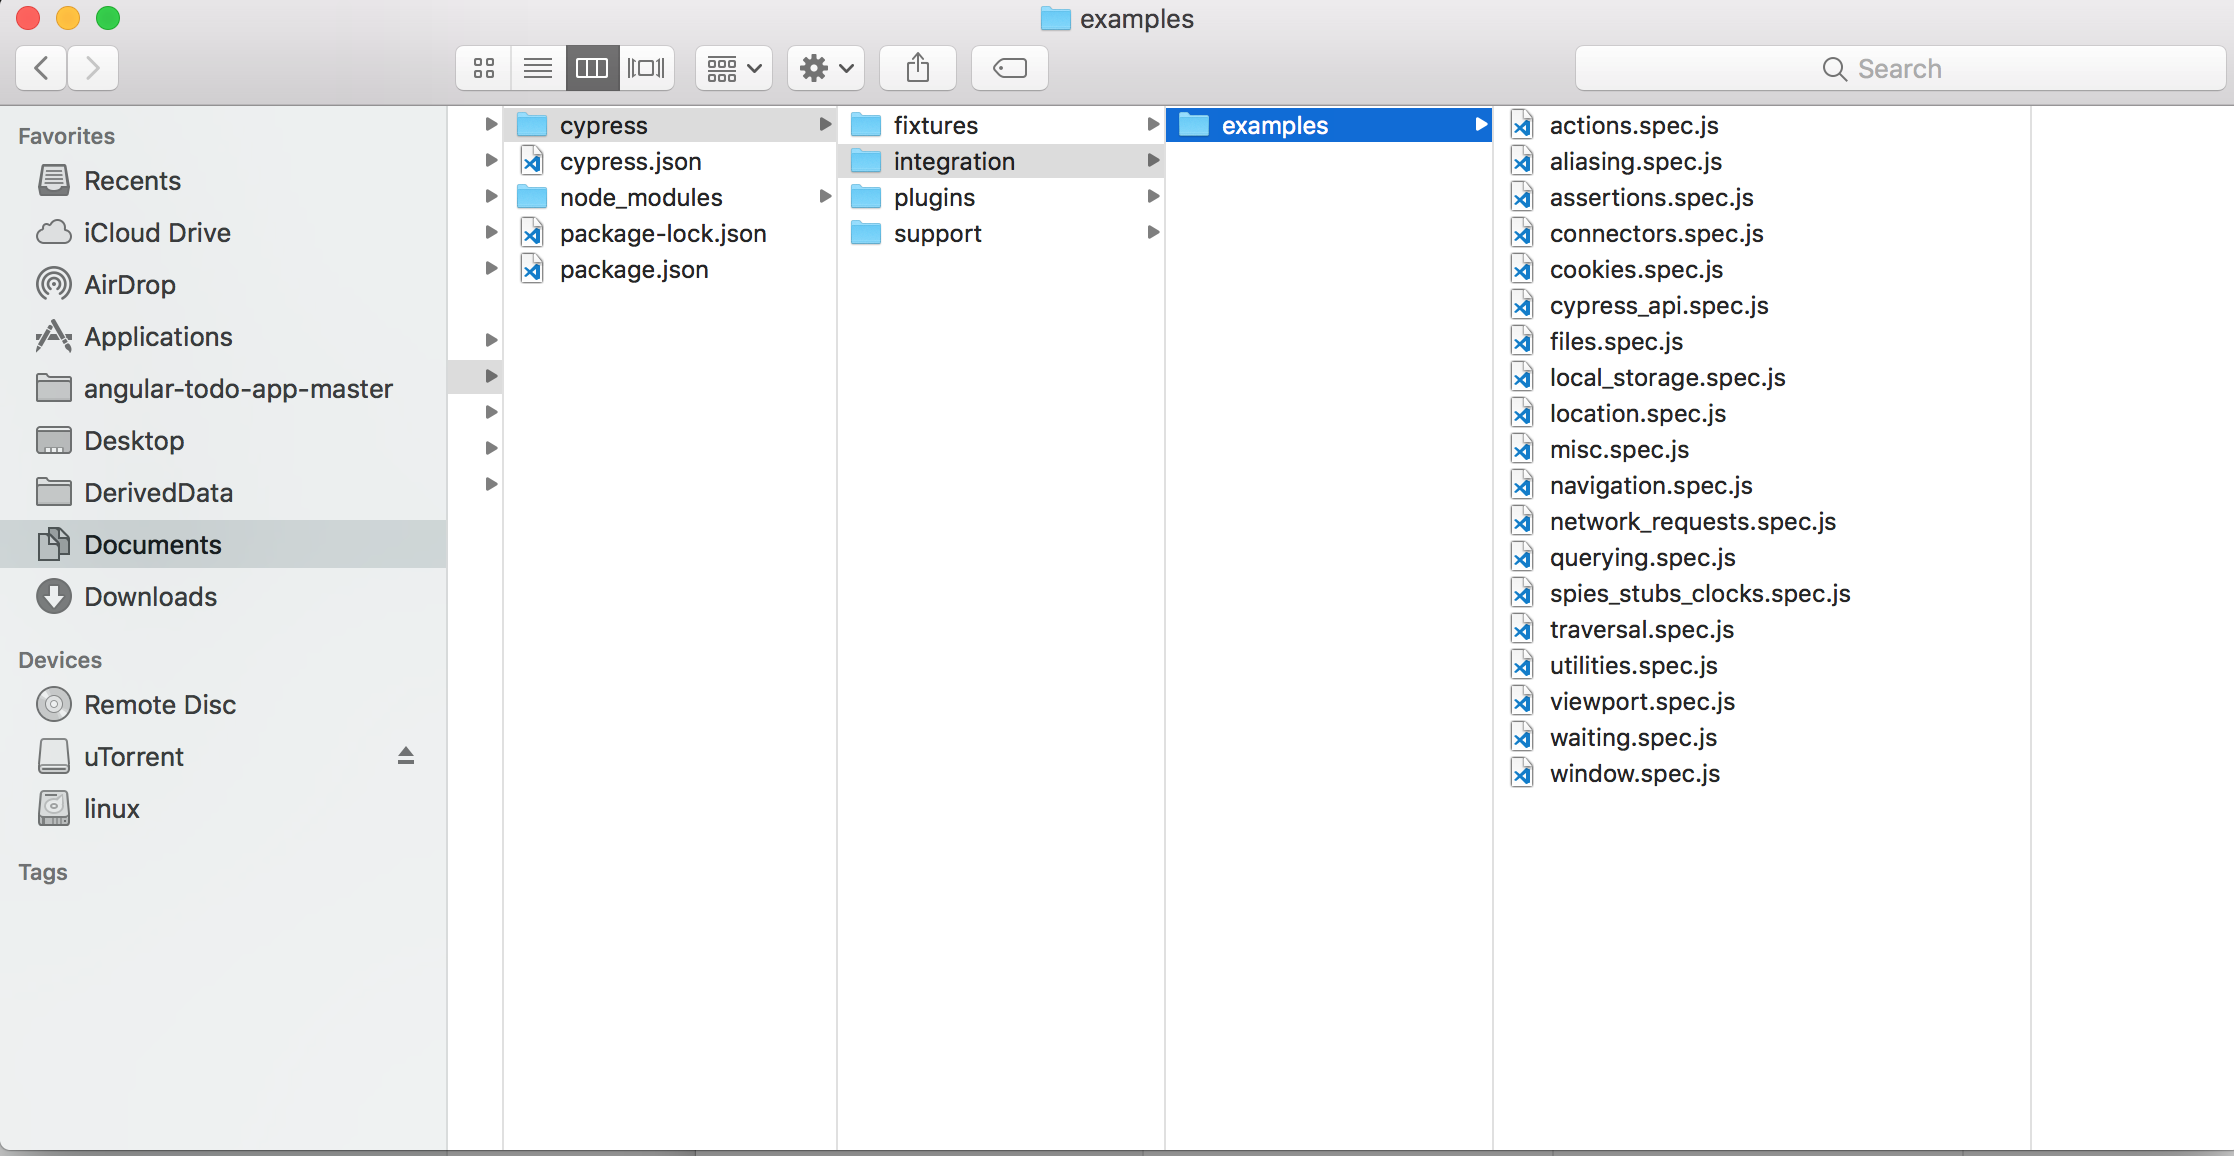
Examples: Open the project path in your editor(VS Code, Atom, etc), it should contains the ‘cypress’ folder and ‘cypress.json’ files. In the ‘cypress/integration’ folder it will have the example folder, that folder contains lot of examples ‘spec.js’ file.
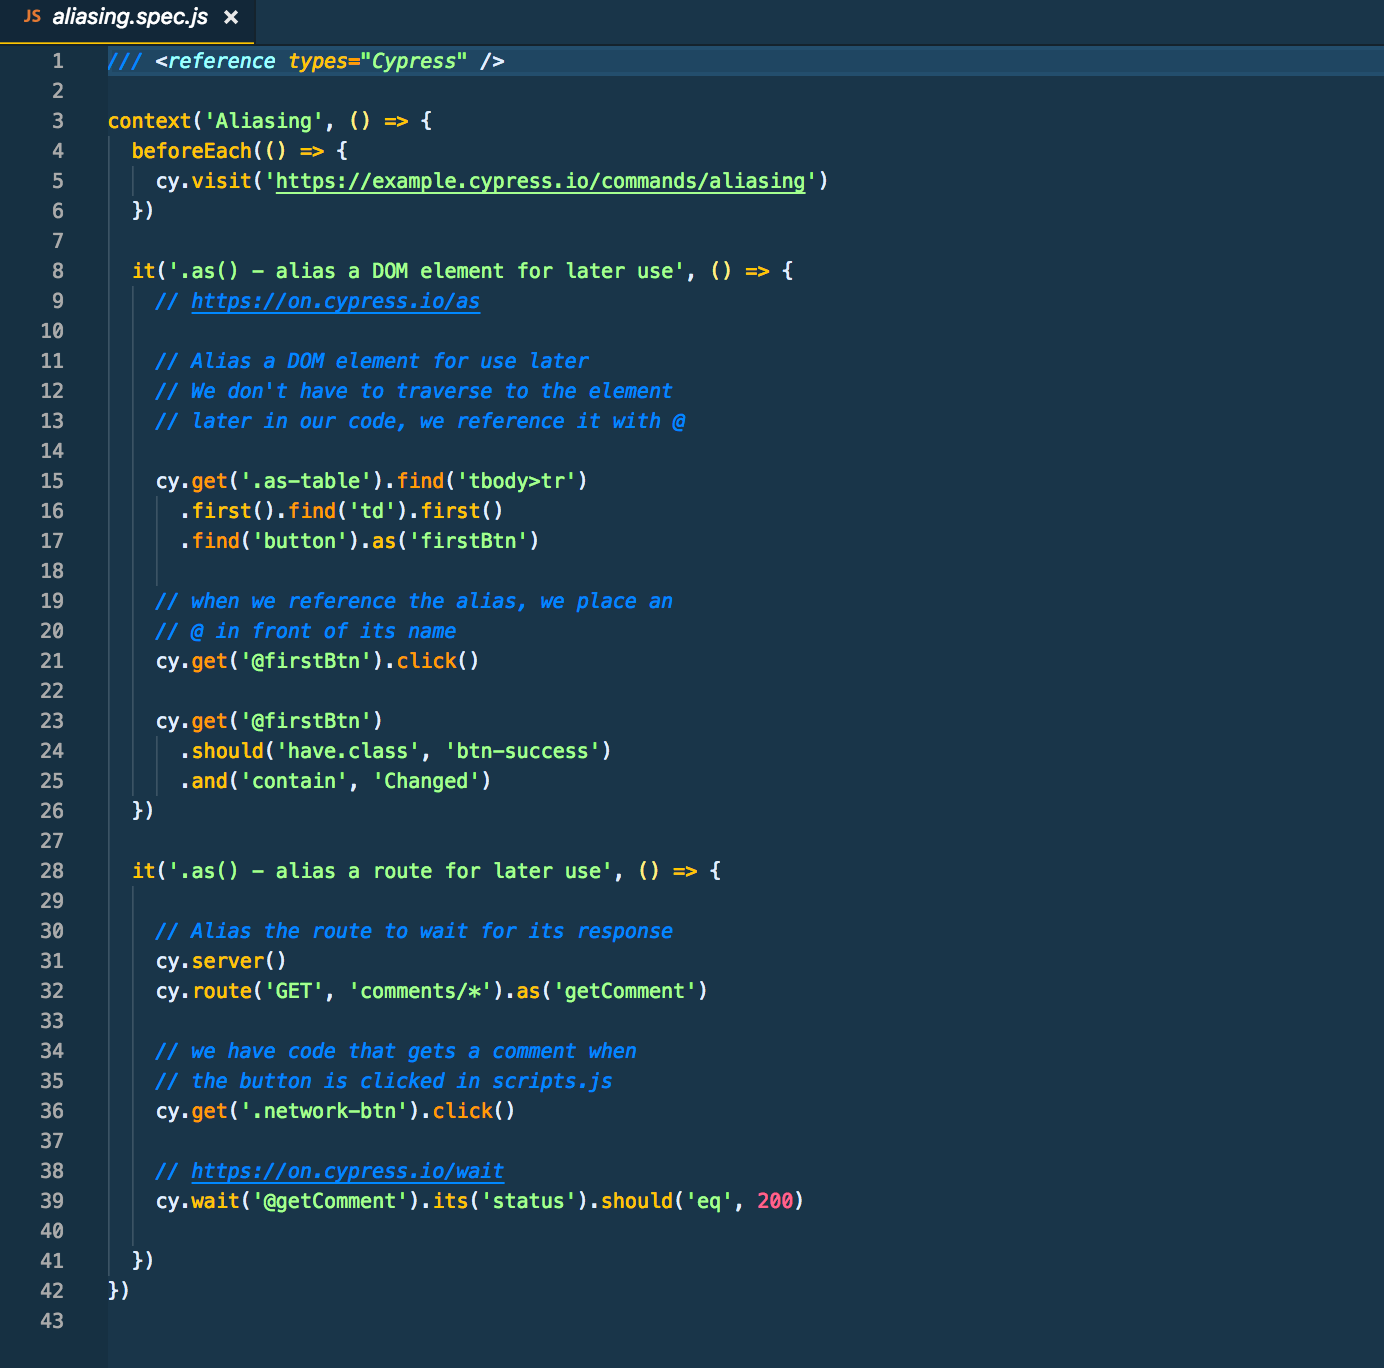
The ‘spec.js’ file will contain the examples of automation scripts.
Frequently Asked Questions
-
Is Cypress easier than Selenium?
Yes, Cypress is easier than Selenium as it's simple to learn and faster to use. Though Selenium supports multiple languages, its complexity makes it difficult for developers and testers to adapt quickly.
-
Can I use Cucumber with Cypress?
Yes, you can use Cucumber with Cypress. It integrates with Cucumber to allow you to write test scenarios in BDD format and also uses all the capabilities of Cucumber by using the Cucumber-preprocessor node module.
-
Does Cypress support Mobile Automation?
Cypress will never be able to run on a native mobile app, but we can test some mobile web browser functionality and mobile applications developed in a browser, such as with the Ionic framework. Currently, the cypress can be used to control the viewport.
-
How to install Cypress?
Cypress can be downloaded in two ways.
1. Direct Download
2. npm (Node Package Manager)
Steps for installation
1. npm-i init, this will create a package.json file
2. npm install cypress —save-dev will fetch the most recent version of cypress available for download.
3. node_modules/.bin/cypress open, we can run the cypress runner with this command.
-
What is Cypress Automation?
Cypress Automation is the process of using JavaScript to automate the web application testing process. It is designed to make testing web applications easier and faster by providing a clean and intuitive API, a robust set of assertions, and an easy-to-use debugging interface.

by admin | Oct 2, 2018 | Automation Testing, Fixed, Blog |
As a programmer or tester who work with python, we often need to get data from excel or we need to write data to excel in our code; there are many packages out there that help you with that exact task.
However, the one we would recommend is openpyxl because it is simple, effective and it works with excel formulas too. This blog post contains information that one needs to know to work with openpyxl.
As usual we need to install the package before we use it in our code and the simplest way to install openpyxl is to use pip as shown below.
A workbook is a openpyxl object that contains all the data in an excel file, you can create a new workbook from scratch (without any data) or you can create a workbook from an excel file that already exists.
from openpyxl import Workbook, load_workbook

#creating an empty workbook
new_workbook=Workbook()

#creating a workbook from file
wokbook_from_file=load_workbook(file_name)
#<file_name> is the path and the name of the excel file as a string
If you create a empty workbook it will have one sheet with sheet name “Sheet”, you can access this sheet with active attribute of the workbook.
default_sheet=new_workbook.active
To create a new sheet use the method create_sheet()
new_sheet=new_workbook.create_sheet(sheet_name)
#<sheet_name> is the name of the sheet to be given to the given sheet

'''creating a sheet with <sheet_name> as sheet name that is the same as another sheet that already exists will create a sheet with <sheet_name><unique_number> as sheet name, where the unique_number is sequentially generated number starting at 1'''
To copy the content of one sheet to a new sheet, ie to create a new sheet with content of an existing sheet use the copy_worksheet() method.
copy_sheet= new_workbook.copy_worksheet(new_sheet)

#to copy a sheet you must pass the source sheet object not just its name
The names of all the sheets in a workbook can be accessed with the attribute sheetnames
copy_sheet= new_workbook.copy_worksheet(new_sheet)

#to copy a sheet you must pass the source sheet object not just its name
The name of any give sheet can be accessed and changed using the title attribute of the sheet.
print(new_sheet.title)
new_sheet.title=new_title
If you have a workbook that contains a sheet to which you only know the name of, the sheet can be accessed just like you access the value in a dict to which the key is known.
sheet= new_workbook[sheet_name]
#<sheet_name> is the name of the sheet as a string.
# just like in a dict if a sheet with <sheet_name> as name is not present in the workbook a KeyError is #raised
If you wish to iterate through all the sheets in a workbook, you can do that by iterating the workbook as you would iterate a list.
for sheet in new_workbook:
	print(sheet.title)
Now onto the important part, To access a cell and to write data to cell, use the slice operator as you would in a dict.
#assign value to a single cell
sheet['A1']=10
#notice the key to a cell is a string, that is the same as the name of the cell as it would appear in excel.

#get value from a single cell
print(sheet['A1'].value)
#notice you need to get the value attribute of a cell to get the data stored in that cell.
You can access value in many cells by using any one of the following methods which suits your need.
cell_range=sheet['A1':'D4']
#this will return all the cells as a tuple of rows in a tuple, to access the data from the cell inside this use.

for row in sheet['A1':'D4']:
	for cell in row:
		print(cell.value)
#this will print all the value from A1 to D4 in the order A1,A2,...A4,B1,...B4,C1,...C4,D1,...D4
#to access an entire column
row_a=sheet['A']
for cell in row_a:
	print(cell.value)

#similarly you can access an entire row
row_1=sheet[1]
for cell in row_1:
	print(cell.value)

#to access multiple columns
for col in sheet['A':'B']:
	for cell in col:
		print(cell.value)

#to access multiple rows
for row in sheet[1:5]:
	for cell in row:
		print(cell.value)
To access and set value to a cell use the meths cell().
#access single cell
cell_a1=sheet.cell(row_index,col_index)
#where row_index is int that indicates the nth row in which the cell is located
# and <col_index> is int that indicates the column in which the cell is located, 1 for A , 2 for B, …
#so for A1 cell row_index =1 and col_index=1
print(cell_a1.value)

#to set value to a cell
sheet.cell(row_index,col_index,value)
#where row_index is int that indicates the nth row in which the cell is located,
# col_index is int that indicates the column in which the cell is located, 1 for A , 2 for B, …
#and value is the value to be assigned to the cell
To iterate through rows or columns, iter_rows() and iter_cols() can be used respectively.
#iterate rows
for row in sheet.iter_rows(min_row=1,max_row=10,min_col=1,max_col=10):
	for cell in row:
		print(cell.value)
# min_ro, max_row, min_col and max_col are starting row, final row, starting column and final column #respectively; all the values are int and the parameters should be entered as keyword argument

#iterate columns
for col in sheet.iter_cols(min_row=1,max_row=10,min_col=1,max_col=10):
	for cell in col:
		print(cell.value)
# min_ro, max_row, min_col and max_col are starting row, final row, starting column and final column #respectively; all the values are int and the parameters should be entered as keyword argument
#the only difference between iter_rows() and iter_cols() is that iter_rows() returns a tuple of row tuple and iter_cols() returns a tuple of column tuple.
To add new row to a sheet use the append method.
sheet.append([‘col1’,’col2’])
sheet.append(1,2)
Not all the package allows for insertion and deletion but it is a time saving feature that you will not know the importance of until you use it. This package makes it easy to do just simple use insert_rows(), insert_cols(),delete_rows() and delete_cols().
sheet.insert_rows(index,number_of_rows)
#inserts number_of_rows rows in position index

sheet.delete_cols(index,number_of_cols)
#deletes number_of_cols from index position, ie deletes cols from index to #index+number_of_cols
All the action that were done to and with the data were done in memory to commit the same information to storage.(i.e) to write the data to a file, you must not forget to save it by using the save method of workbook.
new_workbook.save(file_name_and_extension)

#where the <file_name_and_extension> is the name and extension, example “test.xlsx”
# the extension must be xlsx if you want to open the file MS Excel.
For those who do not know, pandas is a python package provides a very useful data structure called data frame. This post will not go in to details about pandas but only provide information on how to opnenpyxl and pandas interact.
To create a workbook from dataframe, you need to import dataframe_to_row method.
from openpyxl.utils.dataframe import dataframe_to_row
new_workbook=Workbook()
defalut_sheet=new_workbook.active

for row in dataframe_to_row (<dataframe>,index=True,header=True):
	defalut_sheet.append(row)

	To convert a workbook to a dataframe, follow these steps.

import pandas as pd
data=[]
for row in sheet.values:
	data.append(row)
df=pd.DataFrame(data)
When you need to work with a large data sets read only and write only modes will be very useful.
Read only mode allows you to read a large file without moving the entire data contained within it to memory. To read a file in read only mode you need to make the read_only flag True while reading a file.
wokbook_from_large_file=load_workbook(file_name,read_only =True)

#in red only mode the formulas will not be evaluated but appear as row strings.
Similarly when you want to dump a lot of data to a file use write only mode. To create a write only workbook make the write_only flag True. Unlike normal workbook a write only workbook will not have a default sheet and all the sheets should be added; data cannot be read from a write only workbook and write only workbooks can only be saved only once.
new_workbook=Workbook(write_only =True)

#data can only be written to a write only workbook using append() method.

by admin | Mar 15, 2017 | Selenium Testing, Fixed, Blog |
In this blog post, we will show you how to setup JMeter WebDriver Sampler. Before that let’s understand why we need the WebDriver Sampler. Ensuring software product quality involves both functional and non-functional testing. For non-functional testing, our focus is more on load and performance testing. Gatling and JMeter are widely used open-source performance testing tools.
In JMeter, we have WebDriver Sampler. Why do we need Selenium webdriver in JMeter? Using JMeter HTTP sampler, you can measure server response time. However, Selenium webdriver sampler leverages to measure the end user load time.
Let’s see how to setup WebDriver Sampler in JMeter.
Download & Launch JMeter
Download JMeter Plugin Manager
Download plugins-manager.jar and put it into lib/ext directory, then restart JMeter.
JMeter WebDriver Sampler Installation
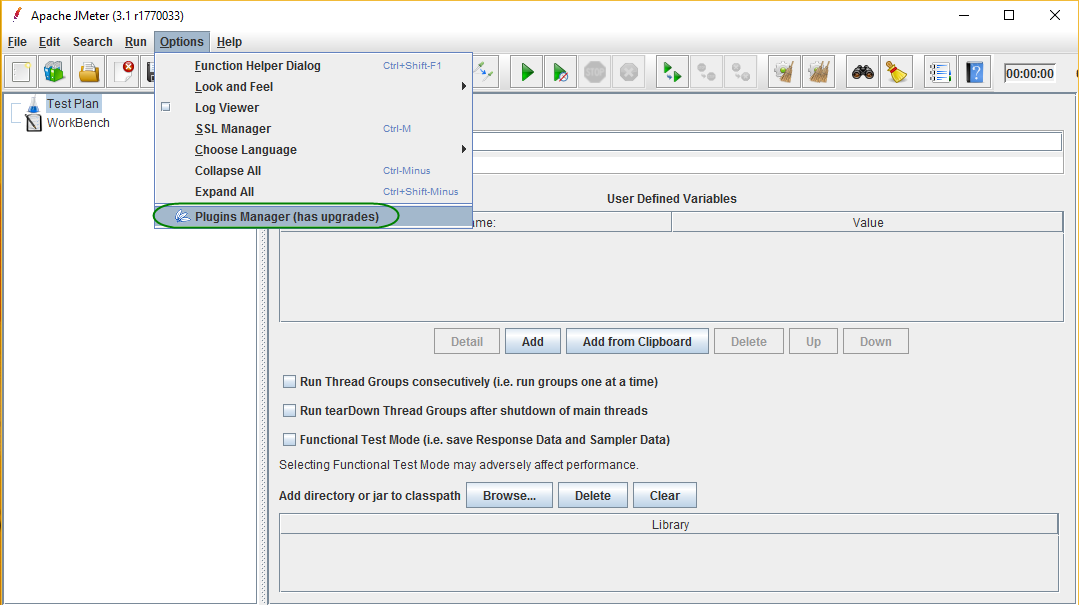
Open Plugin Manager
Select and Install the Sampler
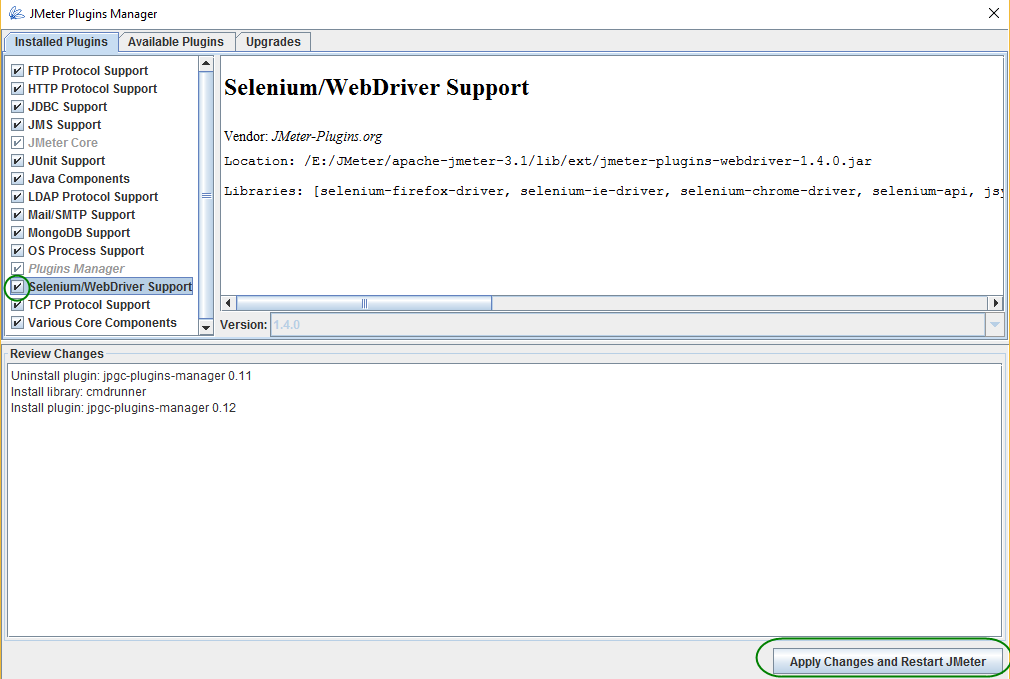
Click Available Plugins, select Selenium/WebDriver Support and click ‘Apply Changes and Restart JMeter’ button.
Create WebDriver Sampler
1) Right click on Test Plan and click Add->Threads(Users)->Thread Group
2) Right click on Thread Group and click Add->Sampler->Webdriver Sampler
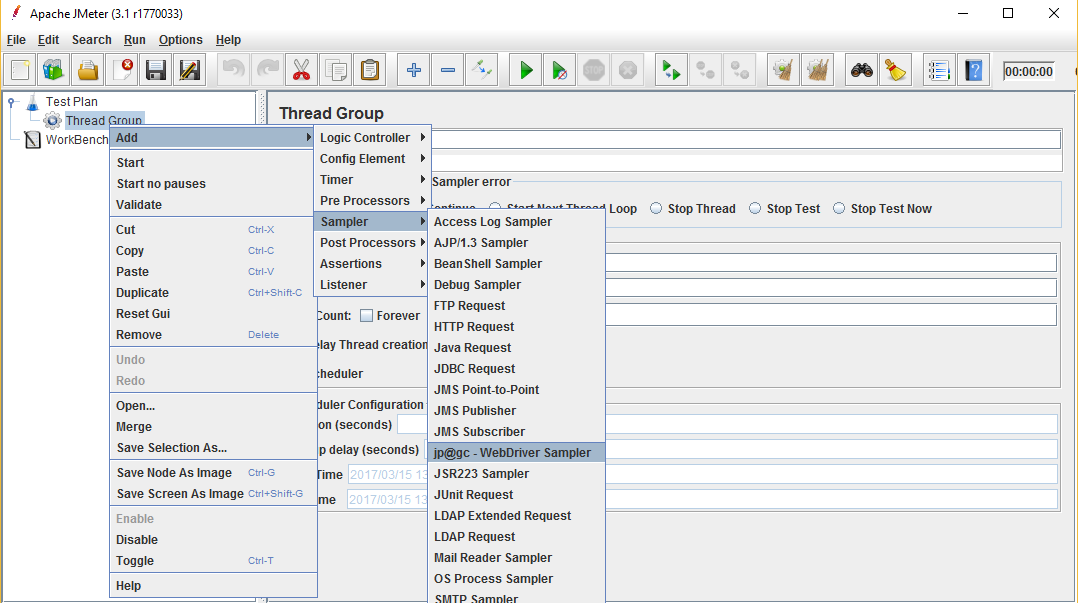
We hope this article is helpful. In the subsequent posts, we will show you how to write scripts in the sampler editor.

by admin | Mar 7, 2017 | Agile Testing, Fixed, Blog |
Writing testable user stories helps to conclude the development. Testable is one of the attributes for a User story. In agile software development, if a user story is too big (compound user story), we can split the story, create multiple shorter stories and put them in an epic. To conclude a story development, it must be tested successfully. So every user story should be testable.

Non-functional user stories are good examples for untestable. The following user story is not testable because it is not written from a testing point of view.
“As a user, I want a good user experience and usability on Homepage.”
You can rephrase the story as “Home page should comply with usability checklist” to make it testable. If a user story is testable, you can identify acceptance tests before the story is implemented.

by admin | Apr 22, 2017 | Automation Testing, Fixed, Blog |
In this blog post, you will learn how to read Excel file using JavaScript. exceljs – JavaScript Excel Library reads, manipulates and writes spreadsheet data and styles to XLSX and JSON.
We have used Apache POI, Fillo, JXL, and pyxll Excel Java & Python libraries for automation testing services. However, Reading and manipulating Excel file in JavaScript is very interesting.
Installation
You can install exceljs Excel Workbook Manager with the below npm install command.
`npm install exceljs`
Code
//Read a file
var workbook = new Excel.Workbook();
workbook.xlsx.readFile("data/Sample.xlsx").then(function () {

//Get sheet by Name
var worksheet=workbook.getWorksheet('Sheet1');

//Get Lastrow
var row = worksheet.lastRow

//Update a cell
row.getCell(1).value = 5;

row.commit();

//Save the workbook
return workbook.xlsx.writeFile("data/Sample.xlsx");

});
You can also read and write CSV file. Refer: Reading CSV and Writing CSV


