by admin | Jul 5, 2021 | Selenium Testing, Blog, Latest Post |
Jenkins has become the go-to solution for integrating Selenium with Maven as Jenkins enables quicker deployment and more efficient monitoring. The adoption of the CI/CD pipeline has become more prevalent in the software arena. In addition to being a resourceful DevOps tool, Jenkins is also very effective when it comes to building the CI/CD pipeline. As one of the best QA companies, we have used Jenkins as it helps to check the latest build that can be deployed to the production environment. It also makes the process of Selenium test automation much easier with the help of Maven. So in this Jenkins integration with Selenium guide, we will be going through the step-by-step process on how to do it. Before we proceed further, let’s take a look at a few basics.
An Introduction to Selenium and Jenkins:
Selenium is an open-source automation tool that is widely used for testing web applications across various browsers like Chrome, Mozilla, Firefox, & Safari. Selenium will be able to automate these browsers using Selenium WebDriver. Test scripts can be written in any programming language like Ruby, Java, NodeJS, PHP, Perl, Python, etc.
As stated earlier, we all know Jenkins is an open-source automation tool that allows continuous integration (CI) and continuous delivery (CD) and that it is a java based application. Jenkins is mainly used to build and test any software project, making it easy for developers to continuously work and integrate changes to the project.
Installation of Selenium and Jenkins
Before heading over to the Jenkins integration with Selenium, let’s take a look at how to install and set up both Jenkins and Selenium.
Steps to Download Jenkins
1. Download Jenkins from their official website.
2. Unzip the file and open the Jenkins exe file.
3. Click ‘Next’ to start the installation.
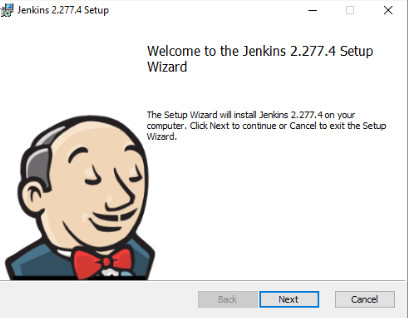
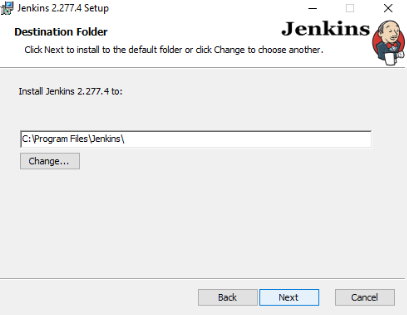
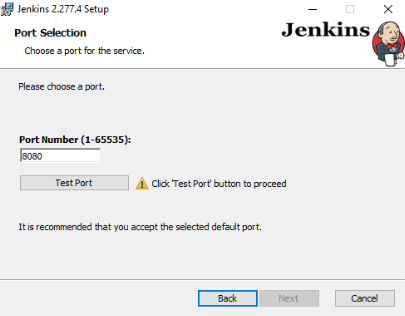
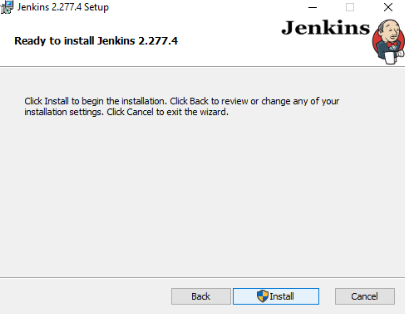
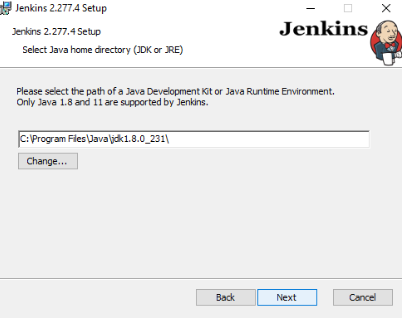
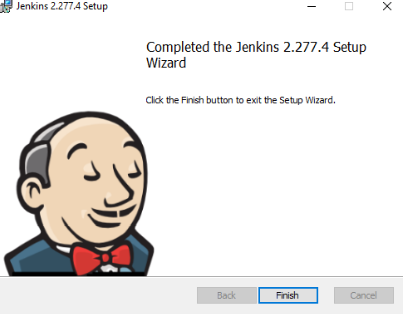
4. Click the Finish button to complete the installation process.
5. You will be redirected automatically to a local Jenkins page, and the port number would be 8080 by default. We can also launch a browser and navigate to the mentioned URL http://localhost:8080
Creating an admin account to access Jenkins
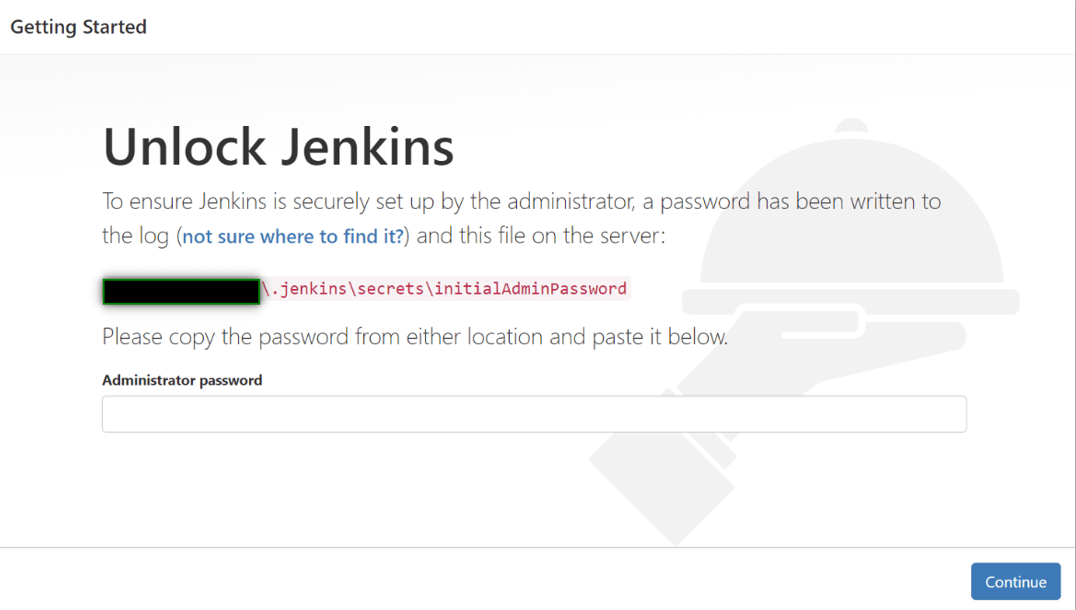
1. You can obtain and enter the secret password by navigating to the mentioned path as shown in the below image. Once you have entered the password, click on Continue.
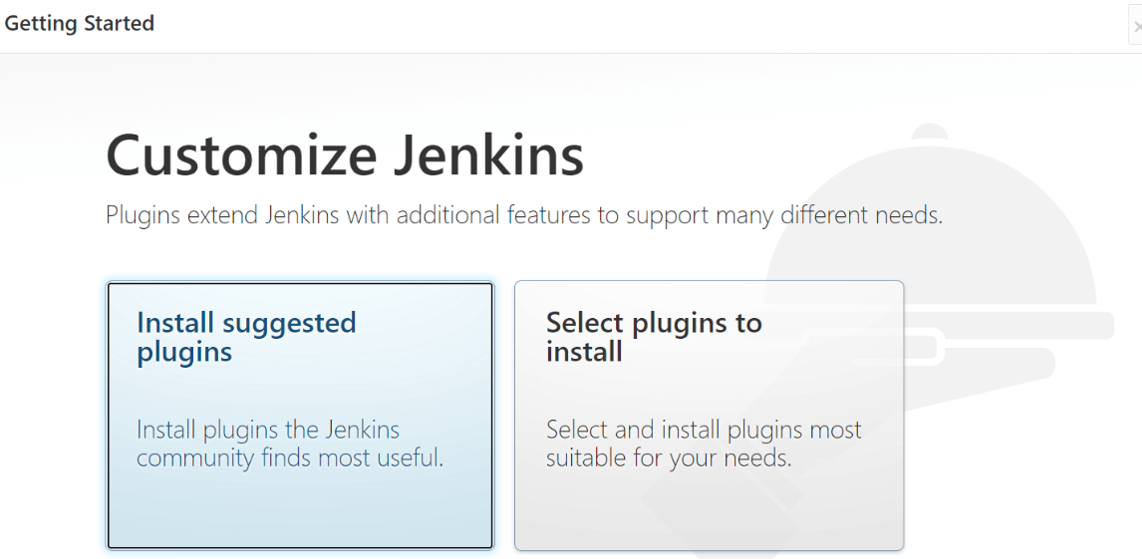
2. After entering the secret password, you will be asked to install plugins. Click on the required plugins option so that the recommended plugins could be downloaded and installed.
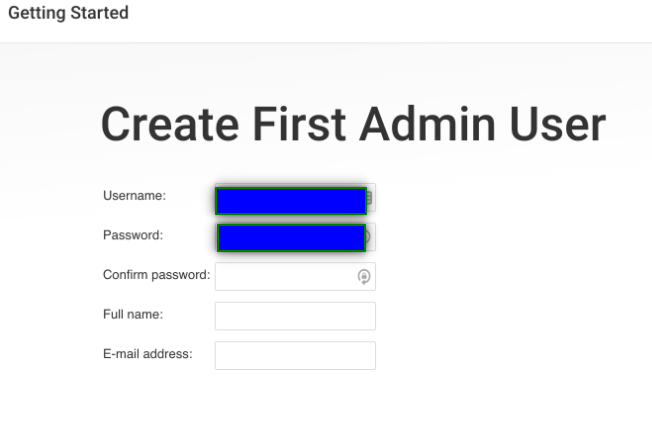
3. After the successful installation, you will be asked to create an administrator account with the following details that are mentioned in the screenshot.
4. Once you have successfully installed Jenkins, the default Jenkins dashboard can be seen as shown below.
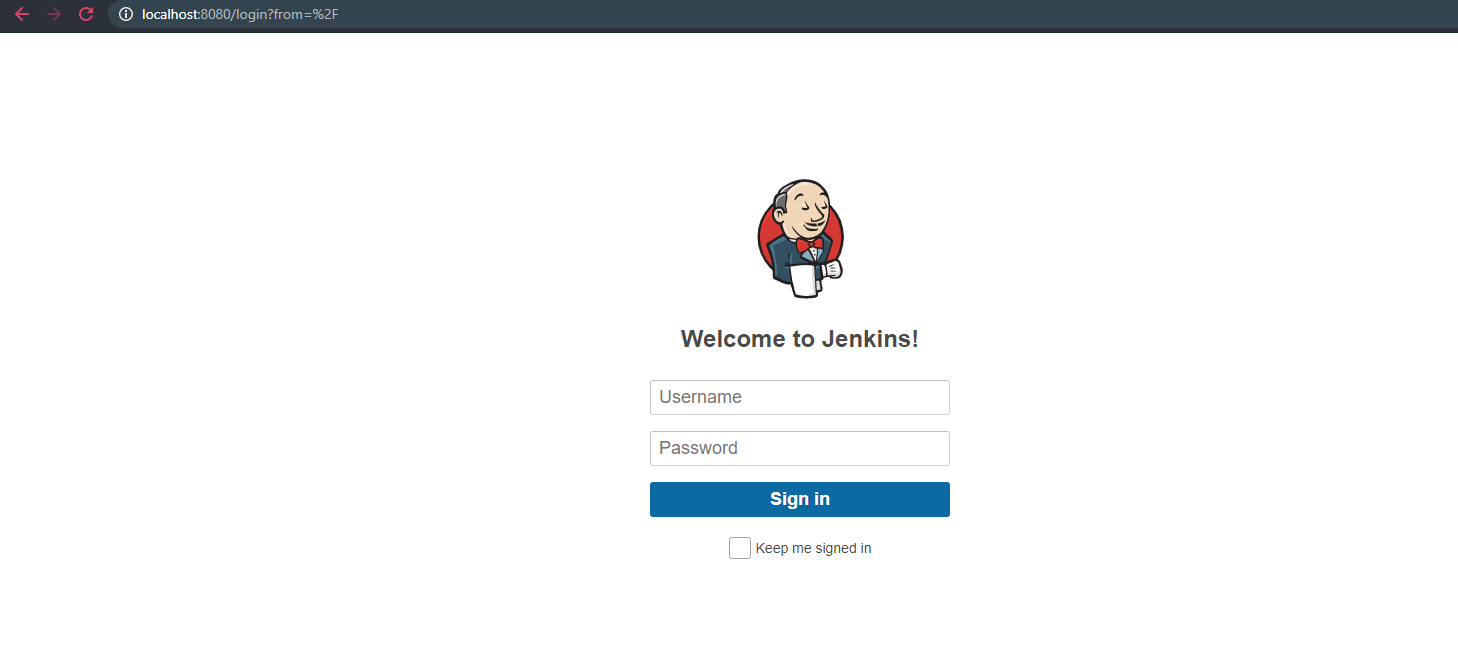
Jenkins integration with Selenium
The Jenkins integration with Selenium can be achieved in various ways and we will be focusing on how it can be established using Maven in this guide. Let us quickly introduce what is Maven, why we have chosen Maven, and go through the installation process as well.
What Is Maven?
Maven is a software project management & build management tool which allows us to add and manage all the dependencies in a single pom.xml file.
Why Maven for Jenkins integration with Selenium?
1. It can act as the central repository to get dependencies
2. Maven helps to maintain a common structure across the organization
3. It makes integration with CI tools easier.
How to Install Maven?
1. Download Maven from their official site.
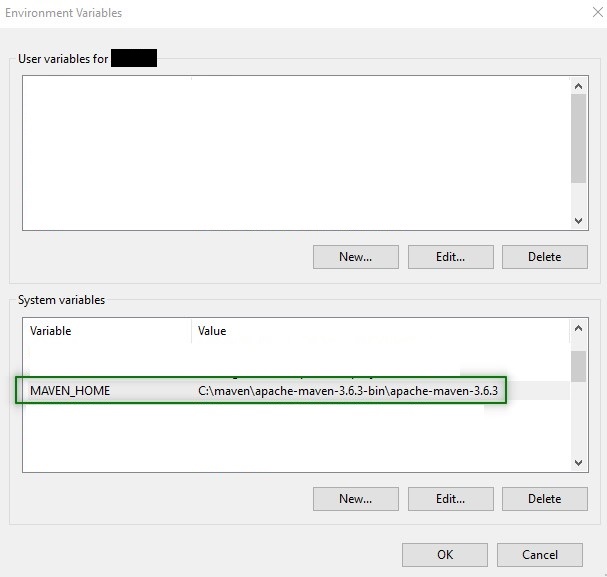
2. Then add MAVEN_HOME under system variables as shown below
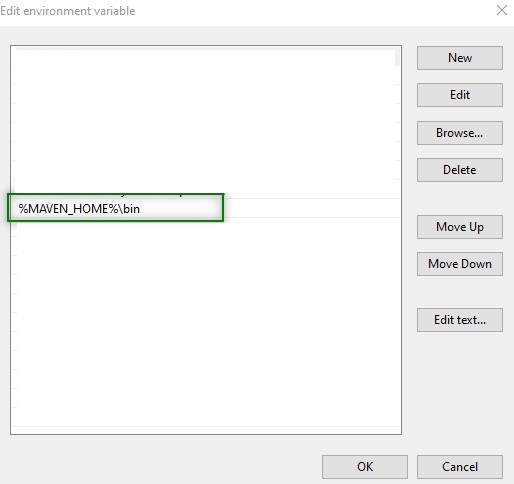
3. Now, set up the path for the bin directory of the maven directory.
4. To verify if maven has been installed successfully, type the following command in the command prompt.

5. Post the verification, you can go ahead and create a maven project and add the maven dependencies in the pom.xml file that will be used to achieve Jenkins Integration with Selenium.
POM.xml file
<?xml version="1.0" encoding="UTF-8"?>
<project xmlns="http://maven.apache.org/POM/4.0.0"
         xmlns:xsi="http://www.w3.org/2001/XMLSchema-instance"
         xsi:schemaLocation="http://maven.apache.org/POM/4.0.0 http://maven.apache.org/xsd/maven-4.0.0.xsd">
    <modelVersion>4.0.0</modelVersion>
    <groupId>org.example</groupId>
    <artifactId>MyfirstDemo</artifactId>
    <version>1.0-SNAPSHOT</version>
    <dependencies>
        <dependency>
            <groupId>org.testng</groupId>
            <artifactId>testng</artifactId>
            <version>7.4.0</version>
            <scope>test</scope>
        </dependency>
        <dependency>
            <groupId>org.seleniumhq.selenium</groupId>
            <artifactId>selenium-java</artifactId>
            <version>3.141.59</version>
        </dependency>
        <dependency>
            <groupId>junit</groupId>
            <artifactId>junit</artifactId>
            <version>4.13.2</version>
            <scope>test</scope>
        </dependency>
    </dependencies>
    <build>
        <plugins>
            <plugin>
                <artifactId>maven-compiler-plugin</artifactId>
                <version>3.8.0</version>
                <configuration>
                    <source>1.8</source>
                    <target>1.8</target>
                </configuration>
            </plugin>
            <plugin>
                <groupId>org.apache.maven.plugins</groupId>
                <artifactId>maven-surefire-plugin</artifactId>
                <version>2.22.1</version>
                <configuration>
                    <suiteXmlFiles>
                        <suiteXmlFile>E:\MyfirstDemo\testng.xml</suiteXmlFile>
                    </suiteXmlFiles>
                </configuration>
            </plugin>
        </plugins>
    </build>
</project>
Using the Java class ‘Sample.java’, we create a WebDriver script. Jenkins Integration with Selenium
package Demo;
import org.openqa.selenium.WebDriver;
import org.openqa.selenium.chrome.ChromeDriver;
import org.testng.annotations.Test;
public class Sample {
    @Test
  public void demo() {
    System.setProperty("webdriver.chrome.driver","src/Drivers/chromedriver.exe");
    WebDriver driver = new ChromeDriver();
    driver.get("https://www.cricbuzz.com/");
    String baseTitle = driver.getTitle();
    System.out.println("title =" + baseTitle);
    driver.manage().window().maximize();
    }
}
TestNG.xml file
<?xml version="1.0" encoding="UTF-8"?>
<!DOCTYPE suite SYSTEM "http://testng.org/testng-1.0.dtd">
<suite name="TestSuite">
<test name="demo">
    <classes>
        <class name="Demo.Sample">
        </class>
    </classes>
</test>
</suite>
How To Integrate Selenium Tests In Maven With Jenkins?
So the next aspect that we are going to cover in this Jenkins Integration with Selenium guide is to see how to integrate Jenkins with Selenium WebDriver and how Maven is instrumental in the integration of Jenkins with Selenium test scripts. For a crystal clear understanding, we have also added screenshots of all the important steps.
Start the Jenkins server and launch the browser and navigate to the localhost using the mentioned URL http://localhost:8080.
Steps:
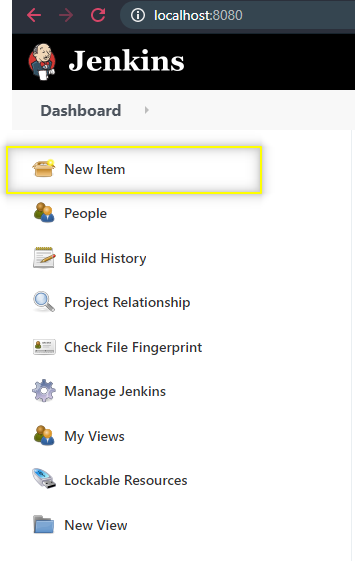
1. The first and foremost step would be to create a new project by choosing the ‘New Item’ option from the Jenkins dashboard.
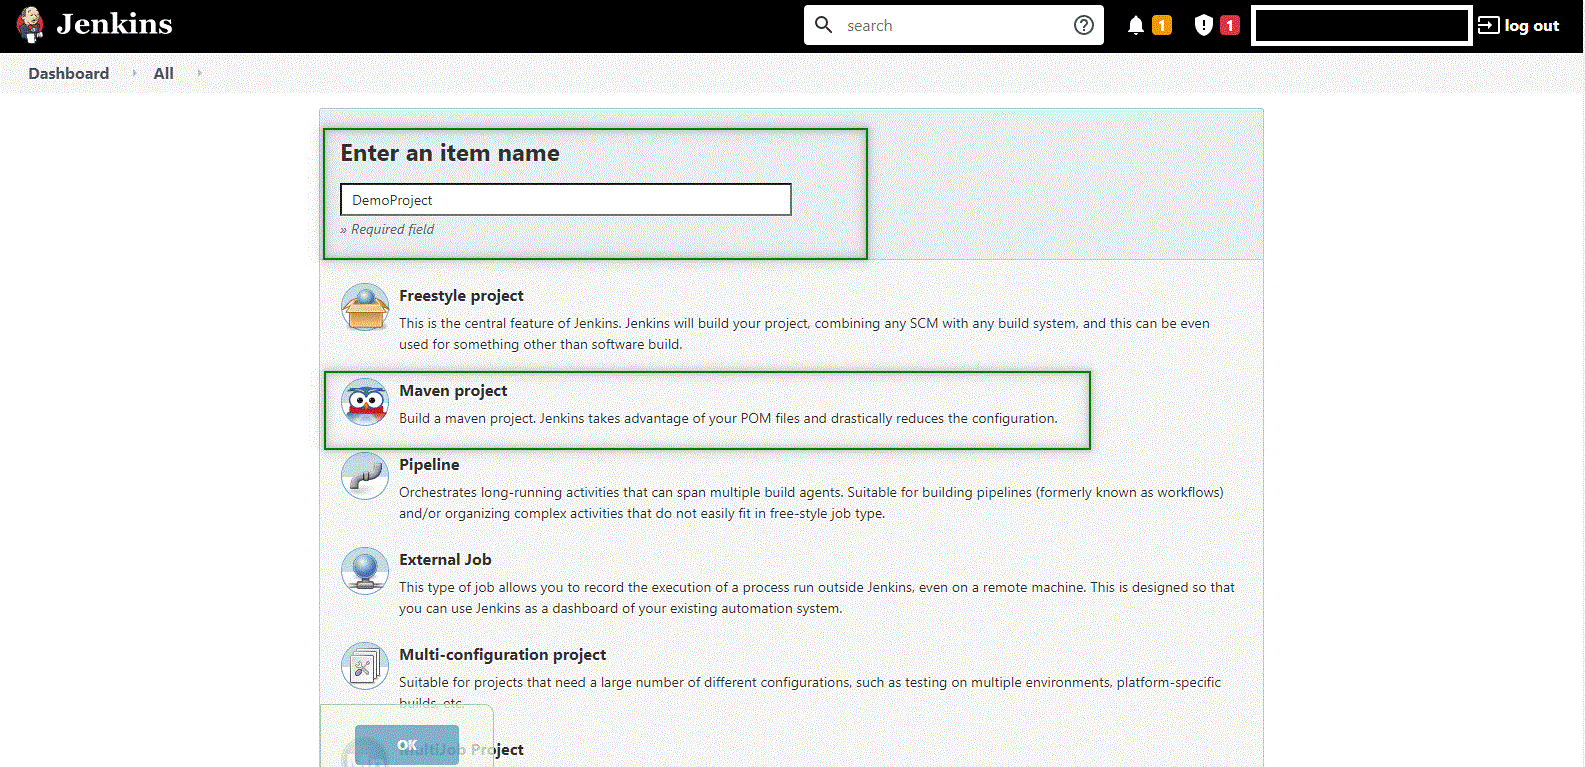
2. Obviously, the next step would be to give the new project that we have created a name. In this case, we have used “DemoProject” as the name of the project for explanation purposes. It goes without saying that you can name the project as per your wish. Once the name has been entered, we have to select ‘Maven project’ as the option from the given list and then click on OK.
3. The created project file can be seen in the Jenkins dashboard, and so we would have to select the project from the list to proceed further.

4. From the many options that appear on the left, click on ‘Configure’.

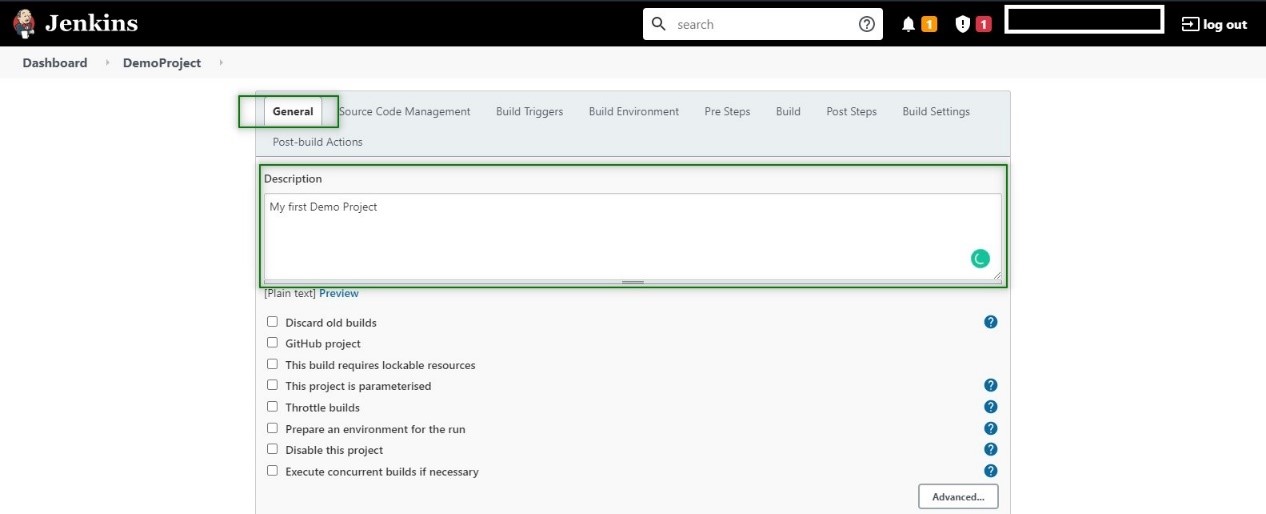
5. Automatically Jenkins takes us to the project configuration view where we can configure the project-related details under the General tab. As shown in the image, this section includes the name and description of the project.
6. The next section is the Source Code Management, under which we have to select the ‘None’ option.
The Git Option:
Here, we select ‘None’ in the Source Code Management section as we just need a build.
If you select Git, you would need to commit to the repository and enter the credentials by clicking on ‘Add’. In this Jenkins Integration with Selenium guide, we will be only focusing on the aspects and features needed to make the integration possible.

7. So we can head straight to the Build section next, and it would require two important steps to load the POM.xml file. Under the Root POM, you have to enter the complete path of the pom.xml that you have created. Under the Goals and options, you would have to enter the following command

8. Once these crucial pieces of information have been filled in, we can scroll down and click on ‘Apply’ and then finally ‘Save’.
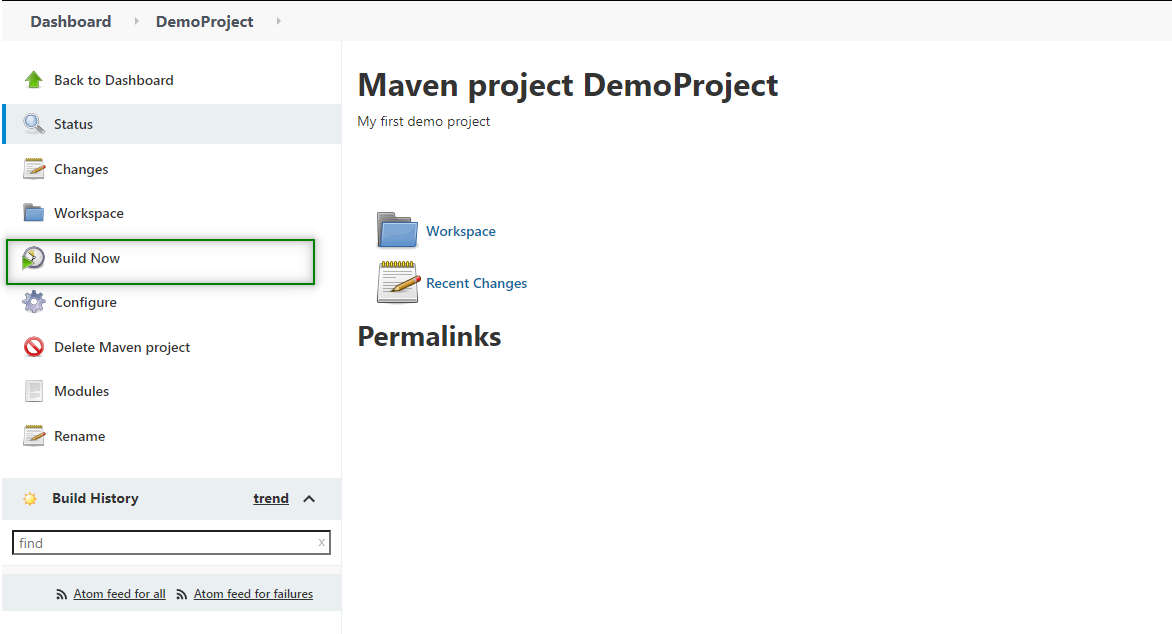
9. Once the above step is completed, we head back to the project where we have to click the ‘Build Now’ option.
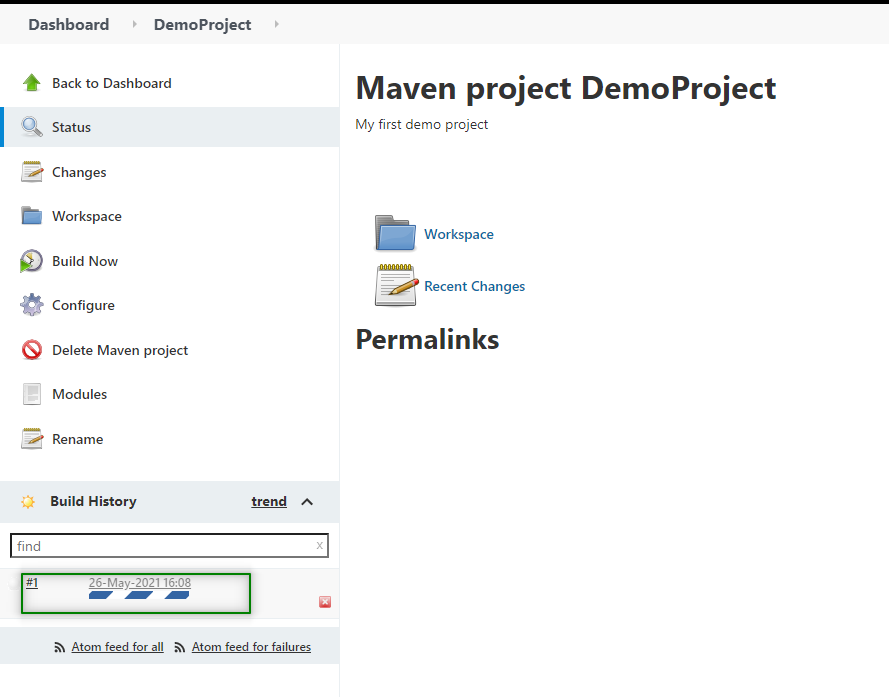
10. Now that we have manually triggered the build in Jenkins, the job will run after the completion of the build.
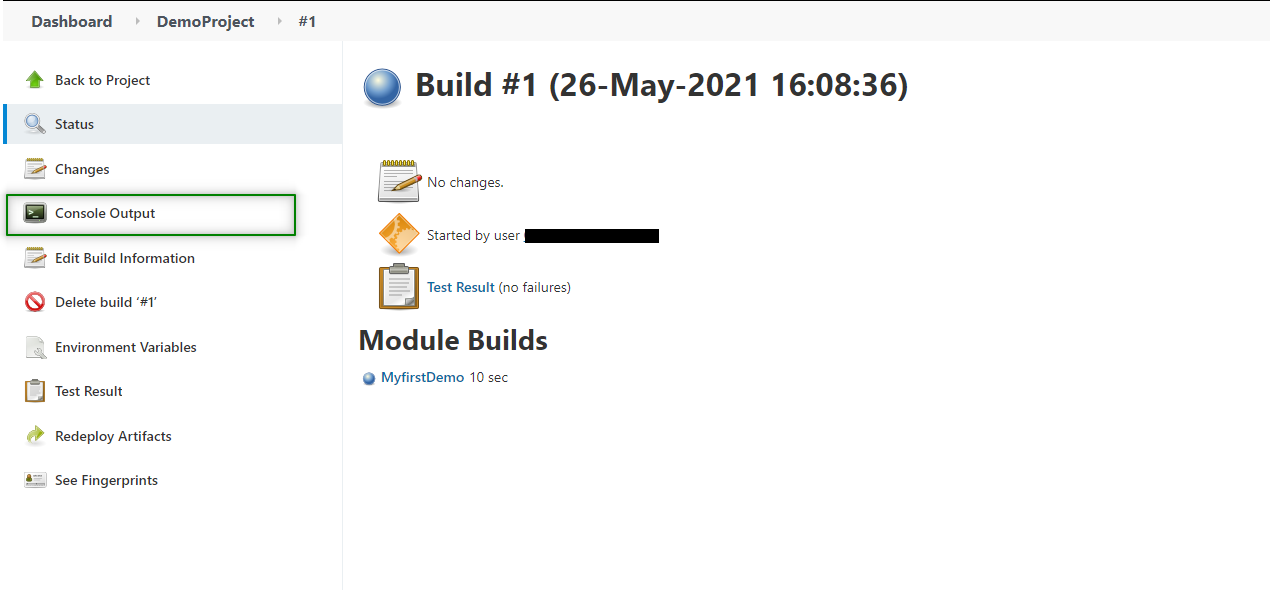
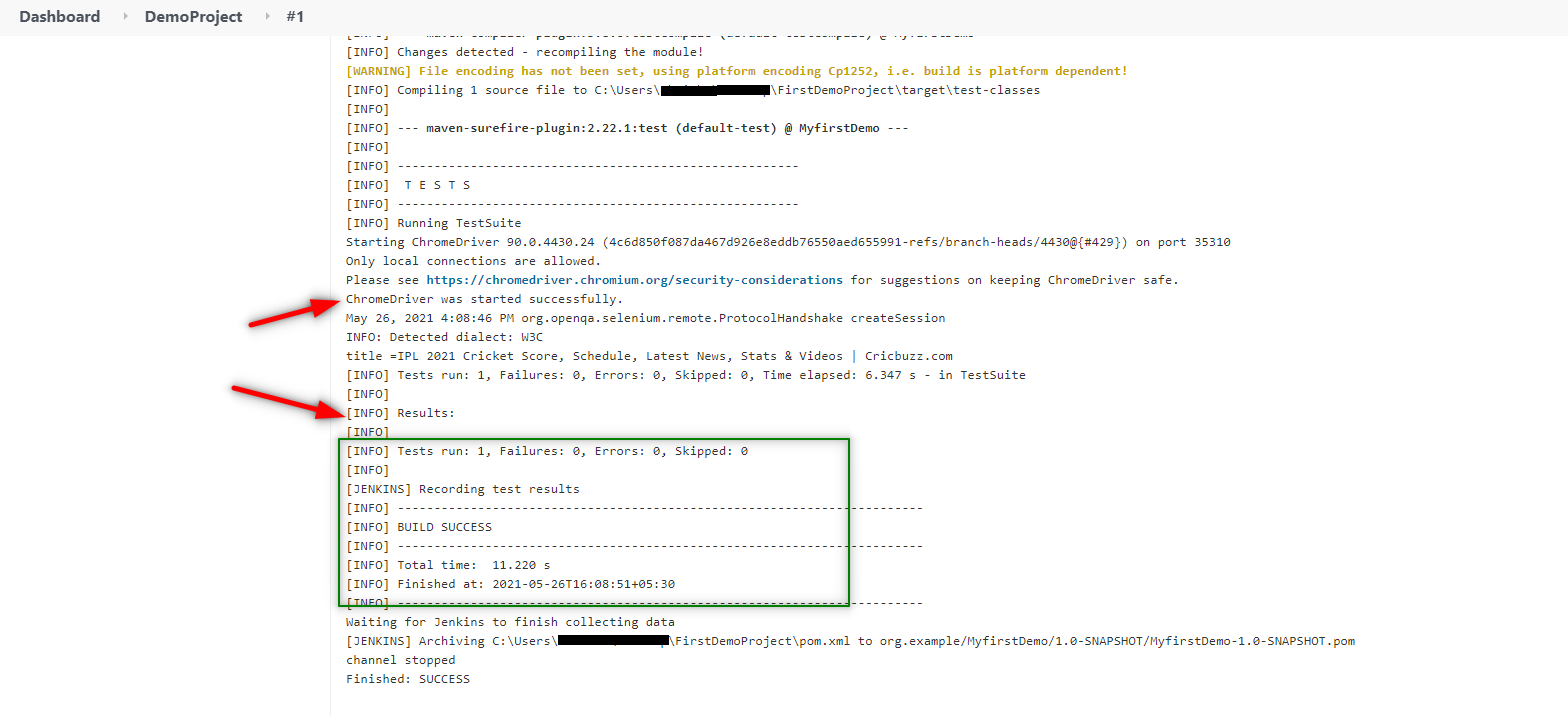
11. The results can be viewed in the console output as shown below.
Conclusion:
We hope this step-by-step Jenkins integration with Selenium has been helpful to you. Using this integration, we have been able to build and test our software projects efficiently and achieve the goal of continuous integration. Using Jenkins, we have been able to provide the best Selenium testing services to our clients. Beyond the benefits that we have already seen, Jenkins allows us to schedule jobs to run at any time, and it also supports a wide range of selenium plugins that will come in handy to achieve a variety of project needs.

by admin | Jun 14, 2021 | Selenium Testing, Blog |
Most of the Automation testing projects that people are working on presently are based on Selenium WebDriver coupled with Java. But as one of the leading QA Companies, we have found that combining Selenium WebDriver with Python has benefits of its own. So in this Selenium with Python Tutorial for Beginners, we will be looking at how we can automate testing using Selenium WebDriver with Python. Before we see how to mix Selenium WebDriver with Python in automation testing, let’s understand why we use Selenium WebDriver and Python rather than any other programming language which is prevalent for automation testing.
Why Selenium WebDriver?
Selenium is an open-source UI automation testing tool. It is very rich in features and allows the users to automate user interaction just as if they were interacting with the web page manually. It has great community support, and it is one of the most widely used automation testing tools for testing web pages. Most importantly, it provides great support to work along with most of the testing frameworks out there.
The setup process is a cakewalk, and you will definitely agree with us once you have gone through the blog.
Why Python?
Python has recently become the most popular programming language due to its great support towards the Data Science and Machine Learning communities. Python has become the beginner’s programming language, all thanks to its simple syntax. Most importantly, it has a wide array of libraries that supports almost any field in the world. In addition to that, Python developer’s community is very active and keeps improving the language with far more frequent updates in comparison to any other programming language in the developing community. So it enables Python to work well with different automation frameworks and tools, making it a stable choice in the testing community as well. Now that we have seen why Python is a really good option, let’s find out how you can install Python on your device and get things started.
Installing Python
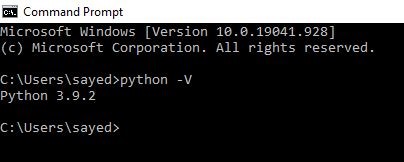
We have used a Windows system for this Selenium with Python Tutorial, and if you are also using a Windows system, then you can download the latest version of Python from the official site. But if you are using a Mac, you may find that Python has already been installed. So you can check whether your Mac has Python installed in it by opening your command prompt or terminal and typing “python -V”. If installed, you would see something like this:
Installing Virtual Environment
The best practice for any Python project would be to create a virtual environment and then install all necessary packages within the virtual environment so that the installed packages for one project don’t affect the other. When Python is installed, its standard package manager “pip” also gets installed along with it. So any required packages or libraries can be installed using the below command
pip install <package_name>
We would also be required to install the virtualenv package using the below command,
Visual Studio Code Editor:
In this Selenium with Python Tutorial, we would be using the Visual Studio Code Editor for the sake of easy project management. So you can open the VS code terminal and follow the instructions step by step as shown below:
1. First, change the directory to your desired location
2. Create a project directory
E:\>mkdir Python_Selenium
3. Then, change the directory to the created project directory
4. Create a virtual environment
E:\Python_Selenium>python -m venv py_sel
5. Change the directory to the Scripts folder of the virtual environment
E:\Python_Selenium>cd py_sel/Scripts
6. Activate the created virtual environment
E:\Python_Selenium\py_sel\Scripts>activate
7.Check whether the virtual environment is activated
(py_sel) E:\Python_Selenium\py_sel\Scripts>
Installing Selenium
Now that we have installed the virtual environment, we can go ahead and install Selenium using the pip install selenium command within the created venv. But before that, we have to change the directory to the project directory,
(py_sel) E:\Python_Selenium\py_sel\Scripts>cd..\..\
(py_sel) E:\Python_Selenium>
Now install Selenium,
(py_sel) E:\Python_Selenium>pip install selenium
Collecting selenium
  Using cached selenium-3.141.0-py2.py3-none-any.whl (904 kB)
Collecting urllib3
  Using cached urllib3-1.26.4-py2.py3-none-any.whl (153 kB)
Installing collected packages: urllib3, selenium
Successfully installed selenium-3.141.0 urllib3-1.26.4
To check the installed packages, we can use the pip list command.
(py_sel) E:\Python_Selenium>pip list
Package    Version
---------- -------
pip        21.1.1
selenium   3.141.0
setuptools 49.2.1
urllib3    1.26.4
It’s just that simple, and now Selenium is installed and ready to use. One last step that is left out before we start creating Selenium Python tests is that we need to set up our browser driver.
Driver Setup
Drivers are required to allow Selenium WebDrivers to interact and perform actions with a browser instance. So each browser has its own driver just like how Chrome has ChromeDriver, and Firefox has GeckoDriver. We will be using Google Chrome in this Selenium with Python Tutorial, so let’s go download the Chrome Driver.
Make sure you check your browser version and download the appropriate driver version.
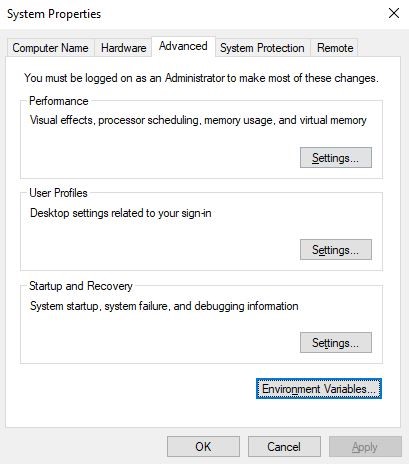
Once downloaded, unzip the file and copy the driver to a folder in your system and mention the location in User Variables of the Environment Variables under the Path variable as shown below
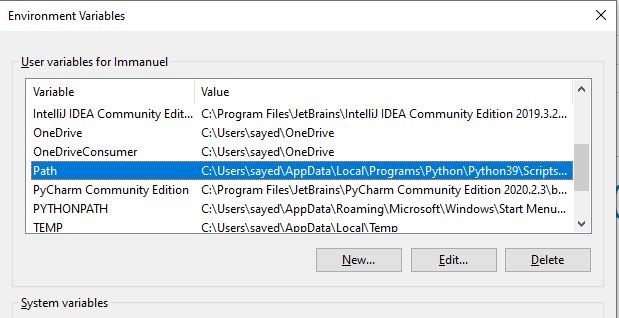
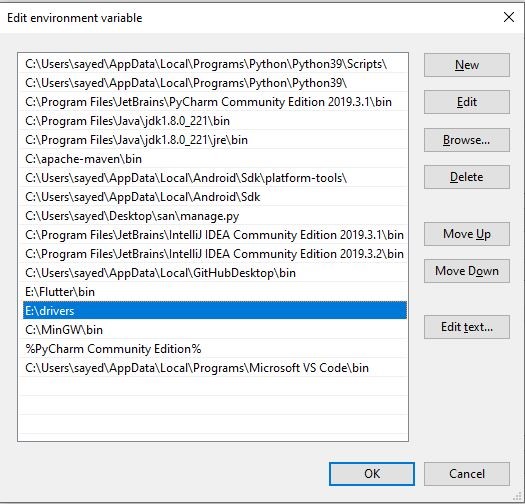
We have completed the driver setup and now we can go ahead and write our first automation test.
Selenium with Python Tutorial for writing tests
As we mentioned earlier, for the sake of easy project management we will be using Visual Studio Code Editor for writing automation scripts
We need to open the project directory that we’ve created already for this Selenium with Python Tutorial in VS Code and create a python file within it as we will be writing our automation test script here
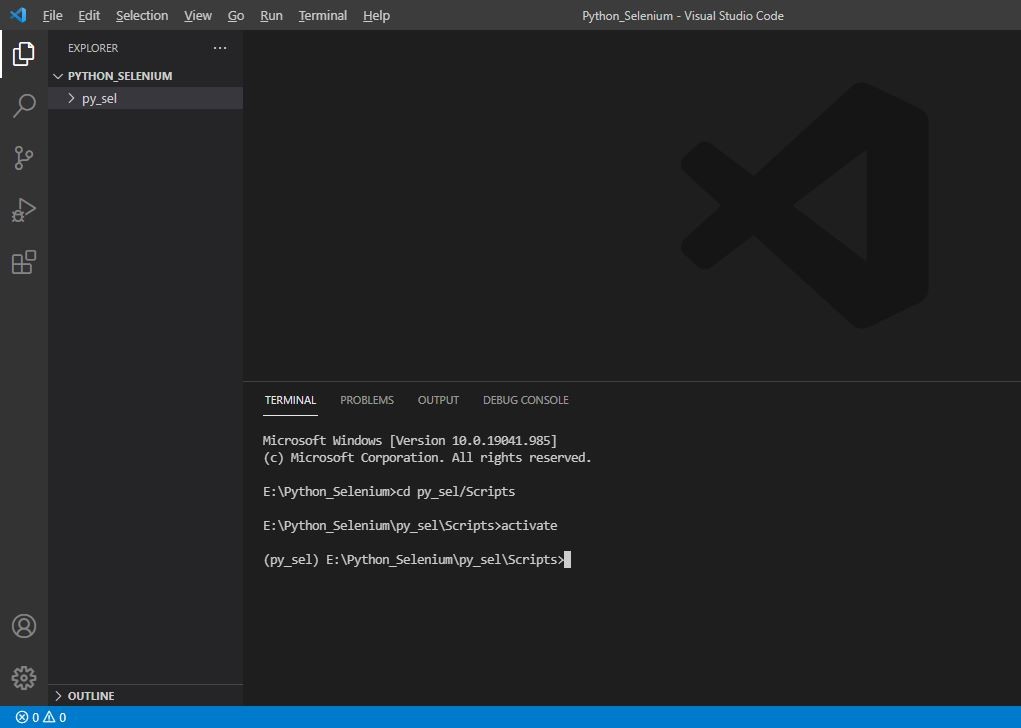
In the above image, you can see that the project directory has been opened, and the virtual environment(py_sel) in the terminal is also activated. So it is clear that all the packages that we installed within the venv can now be accessed using the test scripts that we are going to write.
Now we can go ahead and create a python file within the project directory as test.py and write the basic scripts to launch the browser instance and browse to a web page using its URL.
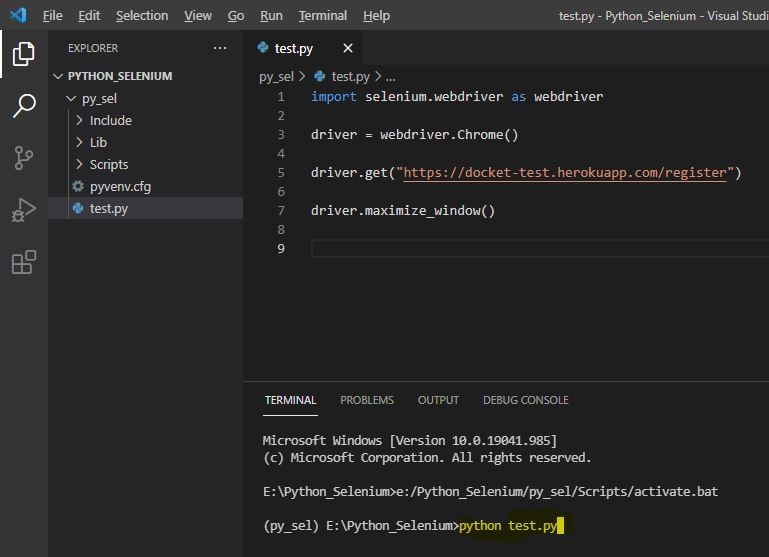
# Importing Selenium web driver in order to use all its functions
import selenium.webdriver as webdriver

# Set the driver instance
drvier = webdriver.Chrome()

# Browse to the endpoint
driver.get("https://docket-test.herokuapp.com/register")

# Maximize the window
driver.maximize_window()
So we are now ready to test the functioning of the basic script that is used for launching the browser instance, browsing to the mentioned URL, and maximizing the window.
Execution:
To run a python file all we need to do is to run the following command
So, it will be python test.py in our case
We can see the browser instance launching, browsing to the mentioned URL, and maximizing the window as we already expected. So let’s go ahead and perform some more actions using some of the rich functions of the Selenium tool.
In this part of the Selenium with Python tutorial, we are going to explore how is it possible to automate a registration and login process that requires data like Username, Email ID, and Password to be provided on the website that we launch. So we will be able to carry this action out by learning to locate web elements like text boxes, buttons, titles, etc., on a webpage.
Locating web elements of a web page is a crucial skill when it comes to automation testing. It is used to automate the actions we would manually perform using a keyboard and mouse while looking at a monitor or display. So the Selenium tool should be informed of the web elements that we need to perform actions on, and we are required to mention each web element uniquely so that it is identified using different locators of the Selenium tool.
Selenium with Python Tutorial for Locating Web Elements
The locators are like an address that uniquely identifies a web element within the web page. Since all the web pages have numerous types of web elements like placeholders, text boxes, radio buttons, etc., identifying these elements requires an accurate and effective approach. As we mentioned earlier, the more effective the locator is, the more stable will the automation script be. We have different types of locators to accurately and precisely locate a web element,
1. ID
2. Name
3. Link Text
4. CSS Selector
5. Xpath
6. Tag Name
7.Class Name
So, now let’s locate the different web elements in the demo web page that we’ve taken, starting with the “Username” placeholder
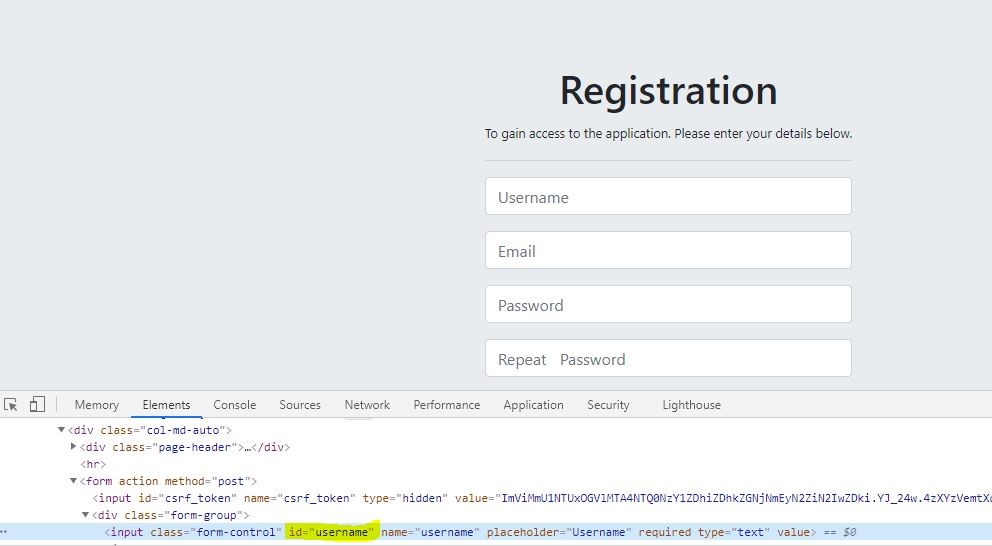
Username:
As we can see, the username placeholder in the DOM (Document Object Model) structure has an ID representing the web element. Since the ID uniquely identifies the “username” web element, we can use it in the Selenium command to locate it and perform actions in it. So in this case, we will be entering a username.
# Enter username in the appropriate placeholder
driver.find_element_by_id('username').send_keys('JaneDoe')
Email:
Then the next web element is an Email placeholder, we will use a different locator like a name locator to locate the Email placeholder.
# Enter email in the appropriate placeholder
driver.find_element_by_name('email').send_keys('[email protected]')
Password:
The next web element is the password placeholder which we will identify using the Xpath locator
# Enter password in the appropriate placeholder
driver.find_element_by_xpath("//input[@id='password']").send_keys('Selenium@123')
The last placeholder is the repeat password placeholder, for which we will identify using the CSS Selector.
# Enter repeat password in the appropriate placeholder
driver.find_element_by_css_selector('input#password2').send_keys('Selenium@123')
Register Button:
Now that we have located and entered all the required data, the register button is the next web element that has to be located, and it can be done using the ID locator.
But unlike all the earlier four web elements where we needed to perform the action of entering text using the send_keys() function, here we need to perform a click action as it is a radio button. There is no need to worry as Selenium has a unique click() function that we can use to perform the click action as shown below.
# Click register button
driver.find_element_by_id('submit').click()
Assertion:
When you are automating any process, it is vital to make sure that there are no mistakes in any of the stages, and this can be achieved by making use of assertions. So what an assertion does is that, it verifies if the result we have obtained is same as the expected result. In this case, we can add an assertion for the confirmation message that is displayed after the successful registration.
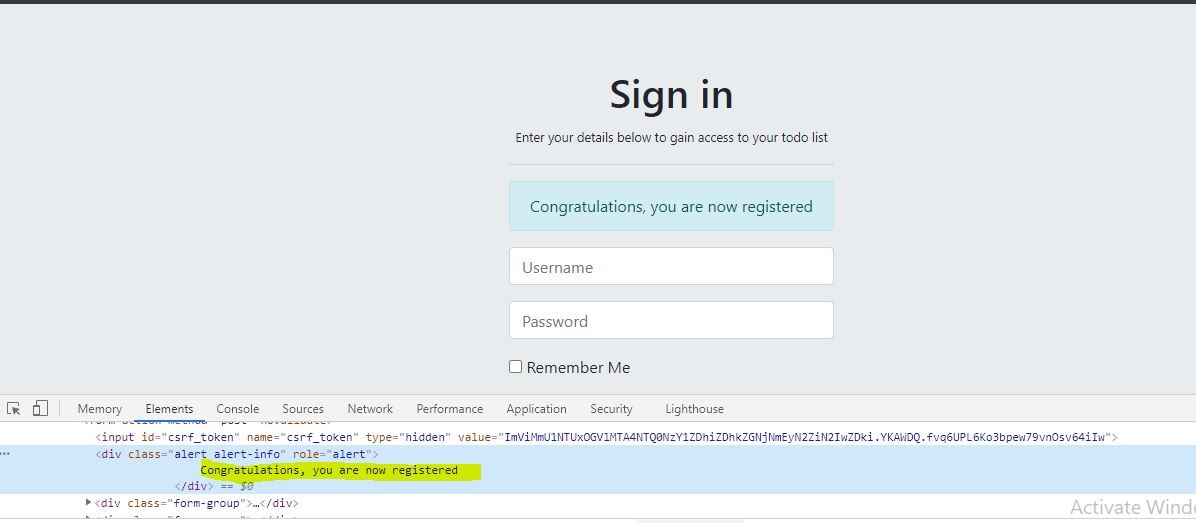
# Save the registration success message to a varible for assertion
message = driver.find_element_by_xpath("//div[@class='alertalert-info']").text

# performing assertion to find the success message is displayed as it should be
assert message == 'Congratulations, you are now registered'
What we are doing in the above step is that we are fetching the text of the confirmation message using the XPath locator and the text() function and then storing it in a variable message. After which the inbuilt Python assertion library is used to match and check whether the displayed message is the same as the expected message or not. Since assertion returns a Boolean value (either true or false), the test will pass only if both the actual and expected values match and return as true.
Login:
Then the final actions are to be performed in the login form using the created credentials. First, we need to enter “username”, following which the “password” is entered, and finally, we can click on the “Sign In” button
# Enter username in the login page
driver.find_element_by_id('username').send_keys('JaneDoe')

# Enter password in the login page
driver.find_element_by_id('password').send_keys('Selenium@123')

# Click Sign in button in login page
driver.find_element_by_id('submit').click()
Assertion:
Once the “Sign In” button is clicked, we can see that we have logged in successfully by automating the whole process. As our final assertion, we can even check whether we are on the home page or not by using the appropriate URL.
# Get url of the current page
current_url =  driver.current_url

# Perform assertion of the current URL with the expected URL
assert current_url == "https://docket-test.herokuapp.com/todo"
The current_url function of the Selenium WebDriver returns the URL of the page which is currently displayed in the browser. We are then asserting that with the expected URL which we know already.
One last line to add in the script for any project is to close the browser, and that process can be automated by an inbuilt function of Selenium WebDriver which is quit()
On the whole, we have written a whole basic automation script in which we have used different types of locators to uniquely identify a web element, which is one of the most important skills in automation. In addition to that, we also included assertions to check whether the actual and expected results were the same. So to sum it all up, these are the basic functionalities required to begin with automation.
Conclusion
We hope you have enjoyed reading this blog, and as the blog title suggests, this is a Selenium with Python Tutorial for beginners. That is why we have covered all the foundations that are needed to start working in automation. Starting from knowing why we use Selenium WebDriver, and especially Python language though there are other prevalent programming languages out there. As a leading QA company providing the best Selenium Testing services, we believe this strong foundation will come in handy for all beginners starting out their journey in automation testing.

by admin | Apr 13, 2021 | Selenium Testing, Fixed, Blog, Latest Post |
In every interview, there is that one common question that an automation tester would face, and that question is, ‘What is the use of Selenium WebDriver Event Listener?’. So in this blog article, we are going to precisely answer that question for you. In addition to that, once you have read this article, you will be in a position to use Selenium WebDriver Event Listener effectively to its full potential.
Selenium WebDriver is a Web Browser automation framework, and everyone is aware of that. Let’s say you want to capture a screenshot after a test case execution, you can write Selenium’s screen capturing snippet inside the testing framework’s ‘afterEach’ hook method. For example, if you want to capture a screenshot before/after every element click. You would have to write a screen capture snippet right after every click action which is not only a cumbersome task to do, but it is also a waste of valuable time. But you can make this process so much easier than this by making use of Selenium Event Listener. By using Selenium Event Listener, you can write the screenshot snippet inside the ‘beforeClickOn’ or ‘afterClickOn’ method.
Selenium has an interface called the ‘WebDriverEventListener’, which has 27 methods. All these methods are event listeners for Selenium WebDriver’s important actions. Let’s not leave any stone unturned and explore them one by one.
Implement WebDriver Event Listener Methods
First and foremost, you would have to create a class that implements the listener methods. Once that is done, you can create a concrete class for the WebDriverEventListener interface as shown below.
import org.openqa.selenium.support.events.WebDriverEventListener;

public class MyListener implements WebDriverEventListener {

}
As soon as you have created the class, your IDE will ask you to implement the listener methods. Once you accept the implementation, your class will have all the 27 methods.
import org.openqa.selenium.By;
import org.openqa.selenium.OutputType;
import org.openqa.selenium.WebDriver;
import org.openqa.selenium.WebElement;
import org.openqa.selenium.support.events.WebDriverEventListener;

public class MyListener implements WebDriverEventListener {

    @Override
    public void beforeAlertAccept(WebDriver driver) {

    }

    @Override
    public void afterAlertAccept(WebDriver driver) {

    }

    @Override
    public void afterAlertDismiss(WebDriver driver) {

    }

    @Override
    public void beforeAlertDismiss(WebDriver driver) {

    }

    @Override
    public void beforeNavigateTo(String url, WebDriver driver) {

    }

    @Override
    public void afterNavigateTo(String url, WebDriver driver) {

    }

    @Override
    public void beforeNavigateBack(WebDriver driver) {

    }

    @Override
    public void afterNavigateBack(WebDriver driver) {

    }

    @Override
    public void beforeNavigateForward(WebDriver driver) {

    }

    @Override
    public void afterNavigateForward(WebDriver driver) {

    }

    @Override
    public void beforeNavigateRefresh(WebDriver driver) {

    }

    @Override
    public void afterNavigateRefresh(WebDriver driver) {

    }

    @Override
    public void beforeFindBy(By by, WebElement element, WebDriver driver) {

    }

    @Override
    public void afterFindBy(By by, WebElement element, WebDriver driver) {

    }

    @Override
    public void beforeClickOn(WebElement element, WebDriver driver) {

    }

    @Override
    public void afterClickOn(WebElement element, WebDriver driver) {

    }

    @Override
    public void beforeChangeValueOf(WebElement element, WebDriver driver, CharSequence[] keysToSend) {

    }

    @Override
    public void afterChangeValueOf(WebElement element, WebDriver driver, CharSequence[] keysToSend) {

    }

    @Override
    public void beforeScript(String script, WebDriver driver) {

    }

    @Override
    public void afterScript(String script, WebDriver driver) {

    }

    @Override
    public void beforeSwitchToWindow(String windowName, WebDriver driver) {

    }

    @Override
    public void afterSwitchToWindow(String windowName, WebDriver driver) {

    }

    @Override
    public void onException(Throwable throwable, WebDriver driver) {

    }

    @Override
    public <X> void beforeGetScreenshotAs(OutputType<X> target) {

    }

    @Override
    public <X> void afterGetScreenshotAs(OutputType<X> target, X screenshot) {

    }

    @Override
    public void beforeGetText(WebElement element, WebDriver driver) {

    }

    @Override
    public void afterGetText(WebElement element, WebDriver driver, String text) {

    }
}
Attaching EventListener with WebDriver
Now that the event listener class has been created, your next task would be to attach the web driver instance with the event listener, and that can be easily done by following the method shown below.
WebDriver driver = new ChromeDriver();

driver.get(“http”://codoid.com);

EventFiringWebDriver eventHandler = new EventFiringWebDriver(driver);

MyListener listener = new MyListener();

eventHandler.register(listener);
The real value of the WebDriver Event Listener comes from your idea and purpose. If you don’t have a purpose to use it, then implementing Event Listener is simply a waste of time. So, make sure to put in some time and thought before you go straight ahead and start things up. In the upcoming sections, as a test automation company, we have shared how we have effectively used Selenium WebDriver Event Listener for our automation testing projects. Let’s take a look at it beginning from ‘onException’.
onException
When you are in a situation that requires you to run a test suite multiple times, there are chances of getting some failures because of the script or application issues. Selenium has 33 common exceptions. If you manage to capture all these exceptions which are thrown during automated test suite execution, it will be extremely useful for auditing purpose. Let’s say you want to know which Selenium exception was triggered the most often in the past three weeks. When you have the exception history & metrics in hand, you can understand whether the automated test suite is stable enough or if it needs any minor tweaks.
Capturing Selenium Exceptions in the ‘onException’ method is pretty easy. But the question here is, ‘How can you store the exceptions for future reference?’. Well, the solution is easy too, as you can use Sentry to store the exceptions. If you are fairly new to Sentry or unaware of how to configure it in your framework, don’t be worried, we’ve got you covered. All you have to do is follow the steps that are listed below to easily configure Sentry in your test automation framework.
Step 1
Add the Sentry maven dependency in POM.xml
<dependency>
            <groupId>io.sentry</groupId>
            <artifactId>sentry</artifactId>
            <version>4.3.0</version>
</dependency>
Step 2
Sign-up in Sentry and create a project.
Step 3
Once the Sentry project is created, you will get the below code which needs to be integrated with your test suite.
Sentry.init(options -> {
            options.setDsn("https://2323.ingest.sentry.io/2323);
});
Note: Each project has its own DSN. So make sure to copy the above snippet from your project and not from here.
Step 4
Create a constructer in the Listener class and add Sentry config inside the constructer.
public class MyListener implements WebDriverEventListener {

    public MyListener(){
        Sentry.init(options -> {
            options.setDsn("https://2323.ingest.sentry.io/2323);
	});
    }
}
Step 5
Now ingest the exceptions in the Sentry from the ‘onException’ method.
@Override
    public void onException(Throwable throwable, WebDriver driver) {
        Sentry.captureException(throwable);
}
afterFindBy
Nowadays, setting up a test automation framework is fairly simple. If you are using JVM-Cucumber & Selenium WebDriver, then the framework setup is pretty much straightforward in all aspects. You need to write Scenarios in the Gherkin format, implement a step definition for each Gherkin step using Page Object, and finally integrate the other required components.
In order to produce a robust test automation suite, you would need the following:
- A simple and concrete framework
- A Stable Environment
- A Skilled Team
- A team that follows good Object Locating Techniques
The first three requirements are default elements that every test automation suite must-have. When you have a truly skilled Automation Testing Team, then it is pretty much a given fact that they will follow good object locating techniques. However, you just can’t have the same team members for a longer period. So it is vital to ensure the scripting standards and object locating strategies even with the new team members to maintain the robustness of your test automation suite.
As a QA company, we use peer review and pair scripting sessions to ensure the test automation’s scripting quality and its robustness. However, it is a tedious task to review locators for each object. What we do in the afterFindBy method is, use regular expression and search sub-string logics to verify if the XPaths & CSS Selectors have met the standards that have been set.
beforeClickOn
The ‘beforeClickOn’ method comes in handy when you need to take screenshots of every click action for a workflow. Let’s say someone from your team wants to know what and all buttons/links/objects were clicked in an E2E test. Inside the ‘beforeClickOn’ method, you can access the driver instance and save the screenshot in a PDF file.
When you implement the ‘beforeClickOn’ method, make sure to create a config variable to decide whether you would need a screenshot before every click action or not. Another useful aspect is that, instead of saving the page screenshots before clicking, you can store WebElement screenshots and compare them with the excepted images. When you perform visual testing, you can catch if the CSS Styles are not applied for the Web Elements which is also a major advantage.
Conclusion
We hope you have enjoyed reading this blog article and that it will positively impact your efficiency. Now it is time for you to try and implement Selenium WebDriver Event Listener for any of these ideas in your project and see the results for yourself. If you would like to recommend any other ideas that will help improve the existing methods, please feel free to head over to the comments section share your valuable thoughts. Test Automation Services is one of the core services of Codoid. Our team is always ready to explore new implementations using Selenium & Appium. Subscribe to our blog so that you never miss out on our highly useful automation testing blog articles that will help you be at the top of your game.

by admin | Jan 28, 2021 | Selenium Testing, Blog |
Page Object Model is a design pattern for automation testing. It is easy to define what the Page Object Model pattern is. However, many automation testers use the Page Object model without knowing its value. In this blog article, we will learn what ‘Page Object Model’ is and how to use it effectively.
Let’s say your team is writing automation test scripts without Page Object Pattern. In that case, there are high chances of developing duplicate test steps. In the modern era, manual testing on multiple browsers and devices is a nightmare for a team. So your team needs to create automation scripts quickly and add the new features’ test scripts in the automated regression suite.
Without the Page Object Model, your team would need to have a lot of discussions and reviewing steps to avoid duplicate test scripts. If you are on the Home page and want to write a test automation script for a functionality using Page Object Model (POM), then all you need to do is create an object for the HomePage class & call the methods.
If the page does not have the method you are looking for, then create the method in the Home page class. So that, the other team members may reuse it for future script development.
In simple terms, you can use the Page Object Pattern to represent a GUI page into a class to improve readability and maintainability.
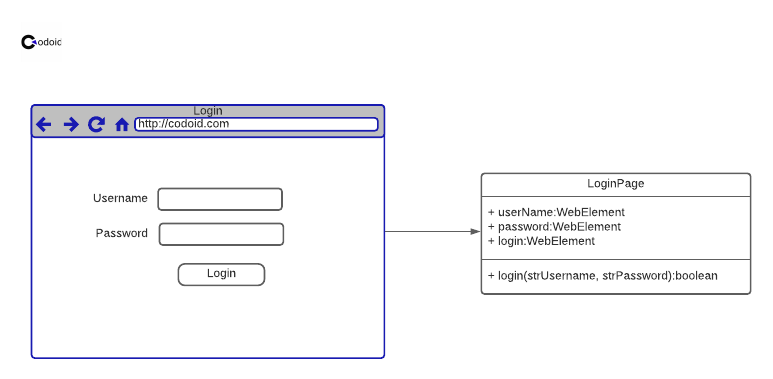
In the above diagram, Username, Password, and Login buttons are UI elements. The three elements are defined in the LoginPage class as WebElement and the required functional method (login) is also captured.
Benefits
Script Maintenance Page Object Model eases script maintenance. Let’s say you are automating test scripts using Java and JVM-Cucumber. All the assertions happen in Step Definitions files. If the username and password locators are changed, then you need to update the Login page class and not the step definition files.
Readability If the scripts are readable, then anyone in the team can reuse them. In the below screenshot, the script navigates to the eGift card page on Amazon.com. Only the Gherkin and the method name in the step definition gives some hint about the snippet.

If the steps are published in POM you will get a readable script. Refer to the below snippet. The step definition calls a method from the HomePage object. Now, the script is more readable and maintainable.

Decreases effort to create new tests Once the automation testing codebase is large and mature enough, you can reuse it for new script development. Adding automation test scripts quickly in the regression test suite will add more value to the project and product. Let’s say you have all the required pages and methods for your automation script development, then you need to call the methods to complete the scripting. As a test automation company, we store the Web App POM in pages package/folder and the Mobile App POM in Screens package/folder.
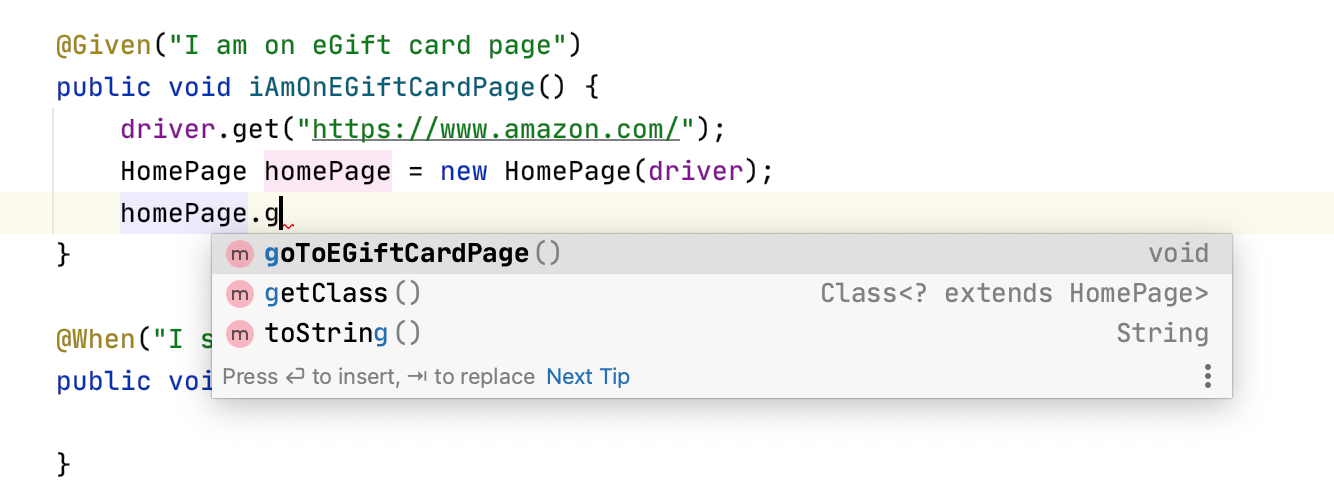
Abstraction Layer Page Object Model enables an abstraction layer between a step definition and page. When an automation tester creates a script, he/she will use the IDE’s IntelliSense to view the methods which are associated with an object before selecting a method.
Common Mistakes while implementing Page Object Model
Duplications Most modern Websites/Web Applications contain some common UI elements which are displayed on all the pages. Bread Crumb, Navigation menus, Footer Links, and Search area are all examples. If the common UI elements and validations are not captured on the common page, then your team will create duplicate codes for common objects on multiple pages.
To avoid duplication, create a page and use it for publishing common elements and validations. After that, inherit the common/base page in all other pages.
Adding Too Much If the UI page has multiple sections or components, then don’t capture all the UI elements and validations in one page. In simple terms, if the page object has more code, it will increase the maintenance.
Create classes for different components instead of writing everything in a single class.
Multi-Level Inheritance Don’t use multi-level inheritance as it will lead to confusion. It is always vital to remember that overdoing anything will never add value. An automation tester should be able to understand the code hierarchy quickly. So that, the automated test scripts can be updated/fixed easily. As a leading test automation service provider, we try to keep the framework simple enough for all the test automation projects.
Adding Assertion in Pages Don’t add assertions in pages. The reason is that pages are not meant for tests. A page method needs to perform actions on UI and return the result. Write assertions steps in step definitions/tests and not in pages.
Let’s say Tester 1 adds an assertion in a page method. Tester 2 may need the method only for performing actions and not for assertions because the assertion is unnecessary for Tester 2. Adding assertions in the POM decreases the chances of reusability.
Naming Convention Method name should reveal the purpose of the method. If a tester understands the purpose only after going through the method’s comment, then it is clear that the method doesn’t have a proper name.
Script Review
To create a robust test automation suite, you need highly skilled resources and the team needs to follow the best practices. Ensuring whether the team is following the automation best practices or not is the catch here.
Make sure not to add any page in the test suite without reviewing. Script reviewing sessions will ensure the standards and best practices.
Dependency Injection
In JVM-Cucumber, you can inject Constructor level Page objects. Before taking a deeper dive, let’s see what ‘Dependency Injection’ is. Dependency Injection is a service. Once an object is created, Dependency Injection will serve the object wherever you need it.
Let’s say you have two ‘step definition’ files and a Gherkin scenario shares the ‘steps implementation’ in those two files, then you need shared page objects. For example, you can’t have two different objects for the HomePage class, because you need to share the state of the object between steps.
If you use Picocontainer in JVM-Cucumber, it will inject the dependencies in a step definition’s constructor and the injected object state is shared wherever it is used. Please note – Object State sharing is only for steps and not for scenarios. If a scenario’s execution is complete, then the new instances of the step definitions will be created for the next scenario.
If you don’t use Dependency Injection, you will create static variables to manage object states. However, it will lead to unnecessary confusion and trouble-shooting failures will become a cumbersome task.
Dependency Injection using Picocontainer
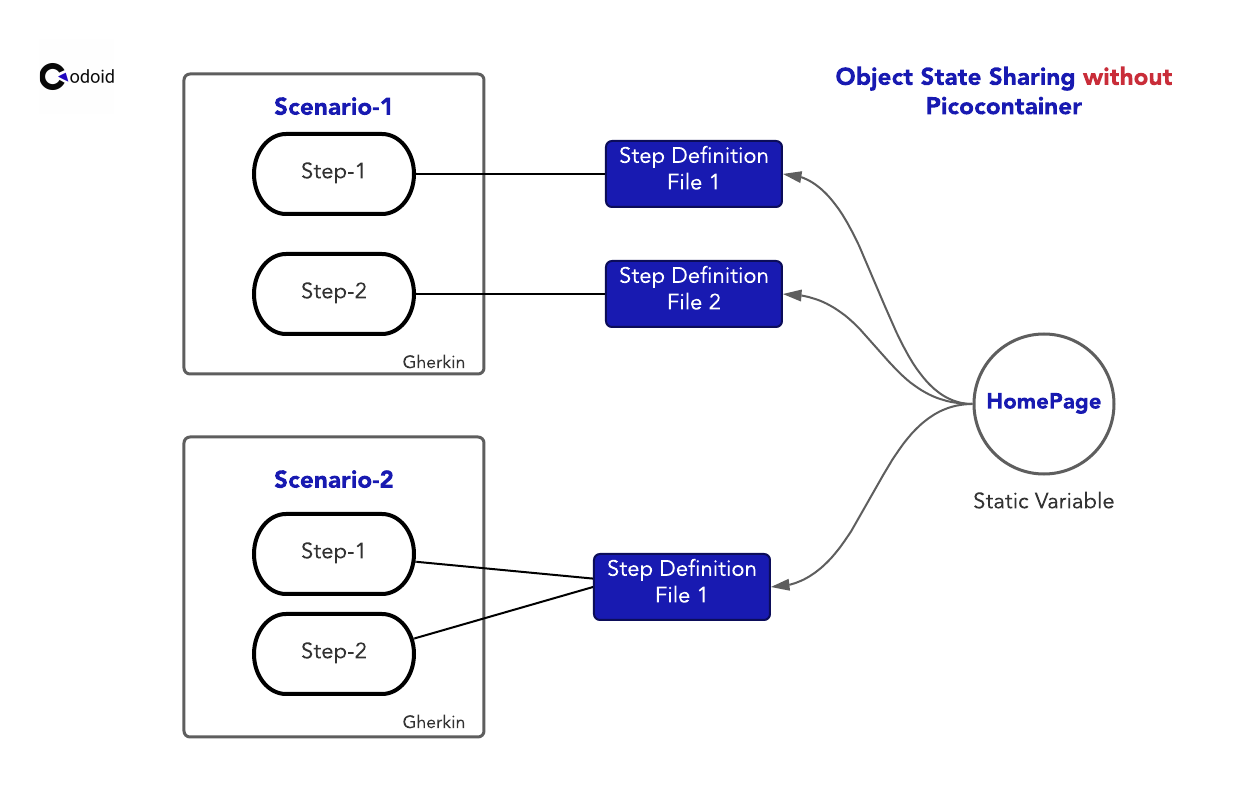
Refer to the above diagram. There are two ‘step definition’ files which are referring a static page object. However, the object state is continuing for Scenario 2 execution as well. This needs to be avoided. If the state is shared within a scenario, we can avoid data leaks.
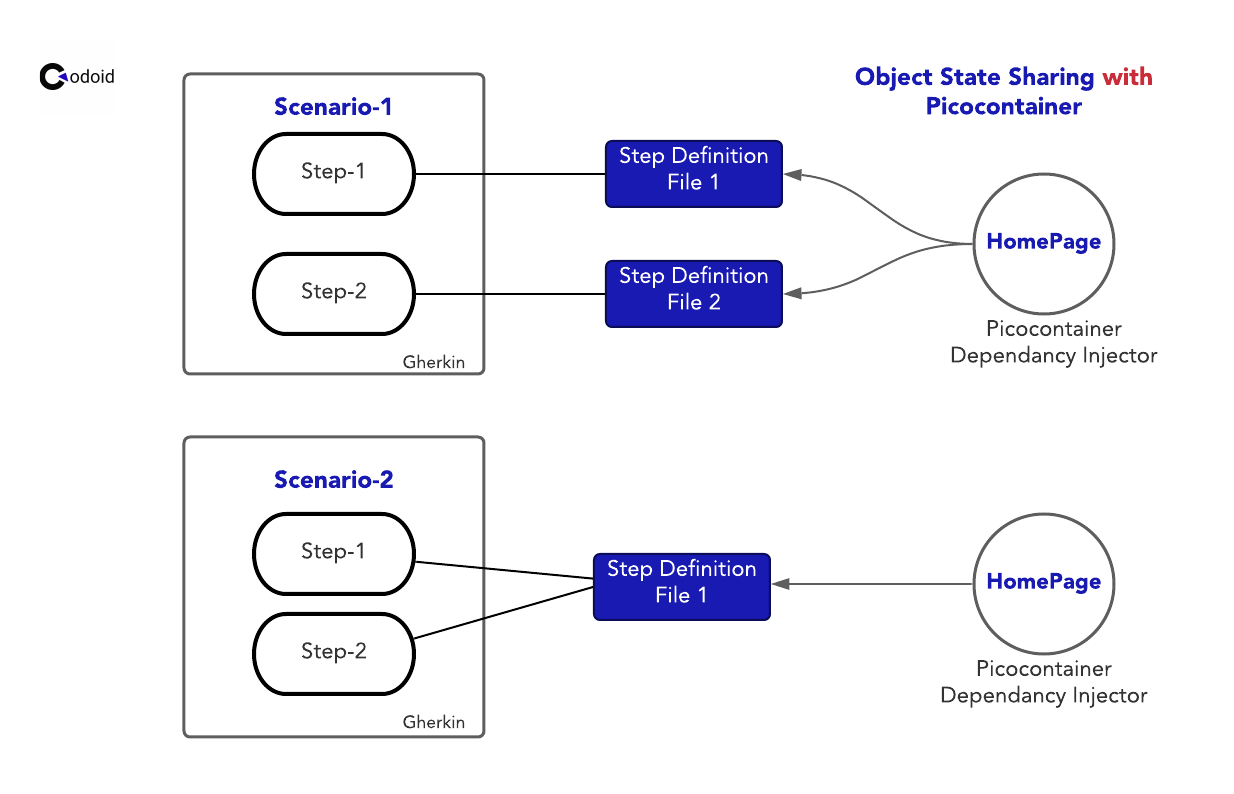
Picocontainer serves the objects which are required for a step definition file. In the above diagram, the state is scoped at the scenario level. For each scenario execution, new objects will be created by the Picocontainer Dependency injector and the state will be shared within the steps.
You might have used Picocontainer Constructor Dependency Injection. In the following section, you will learn how to implement Annotated Field Injection.
Step-1 Create a maven project
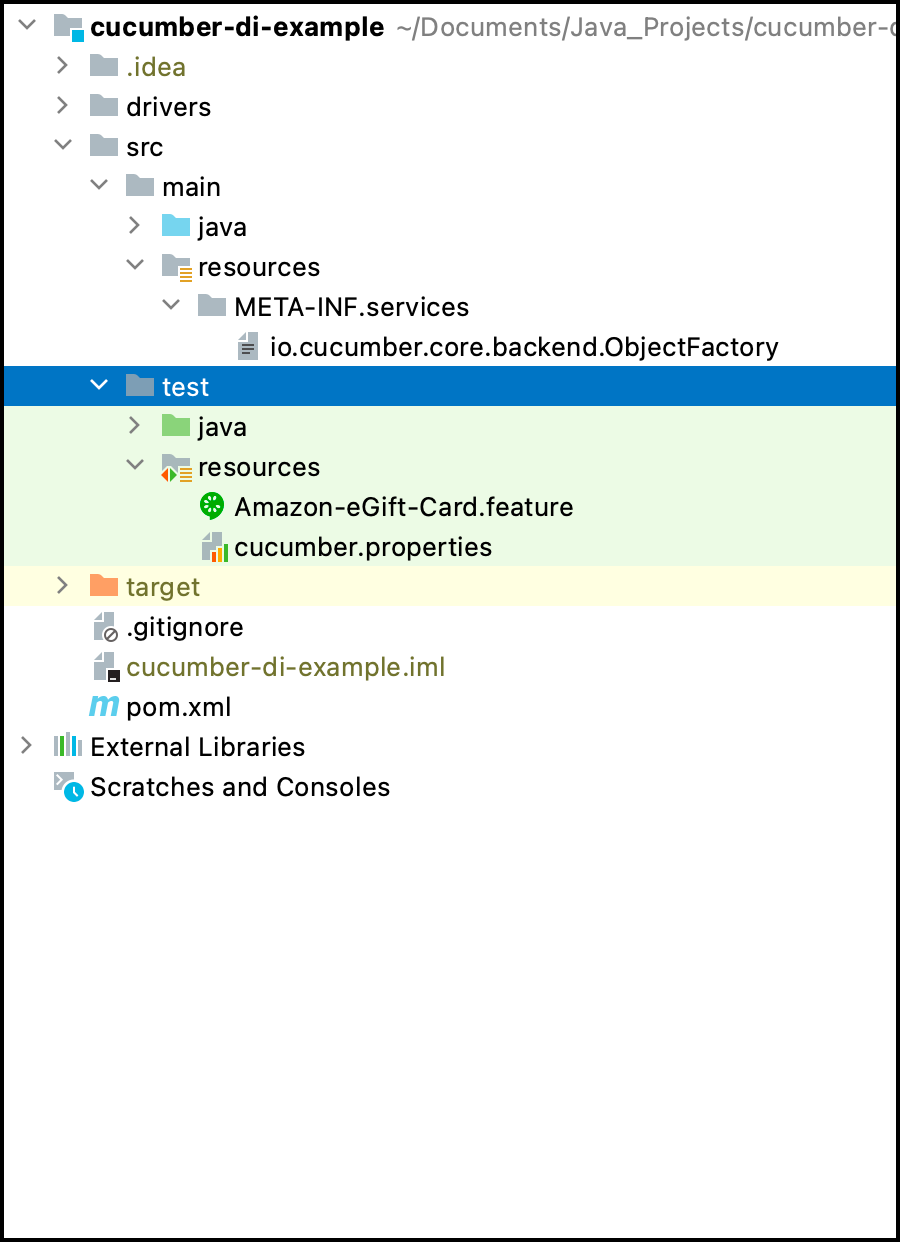
Step-2 Create a feature file under test->resources. File name – ‘Amazon-eGift-Card.feature’
Feature: Amazon eGift Card Feature

  Scenario: As a customer, I see Newest eGift cards
    Given I am on eGift card page
    When I select Newest Arrivals sorting option
    Then I should able to see the Newest eGift card arrivals
Step-3 Create a Step Definition file under test->java. File Name – MyStepdefs
import io.cucumber.java.en.Given;
import io.cucumber.java.en.Then;
import io.cucumber.java.en.When;
import org.picocontainer.annotations.Inject;
import pages.HomePage;
import pages.EGiftCardPage;
import pages.ProductPage;
import utils.SharedDriver;

import java.util.HashMap;

import static org.junit.Assert.assertEquals;

public class MyStepdefs {

    @Inject private SharedDriver driver;
    @Inject HomePage homePage;
    @Inject ProductPage productPage;
    @Inject EGiftCardPage eGiftCardPage;

    @Given("^I am on eGift card page$")
    public void iAmOnEGiftCardPage() {
        homePage.goToEGiftCardPage();
    }

    @When("I select Newest Arrivals sorting option")
    public void iSelectNewestArrivalsSortingOption() {
        eGiftCardPage.selectNewestArrivals();
    }

    @Then("I should able to see the Newest eGift card arrivals")
    public void iShouldAbleToSeeTheNewestEGiftCardArrivals() {
        eGiftCardPage.selectFirstProduct();
        HashMap<String,String> productDetails =  productPage.getProductDetails();

        assertEquals(productDetails.get("MODEL_NUMBER"), "307_US_Email");

    }

}
Step-4 Create three pages under src->main->java->pages.
package pages;

import org.openqa.selenium.By;
import org.openqa.selenium.WebDriver;
import org.openqa.selenium.support.PageFactory;

public class HomePage {
    private final WebDriver driver;

    public HomePage(WebDriver driver){
        this.driver = driver;
        PageFactory.initElements(driver, this);
    }

    public void goToEGiftCardPage(){
        driver.get("https://www.amazon.com/");
        driver.findElement(By.id("nav-hamburger-menu")).click();
        driver.findElement(By.xpath("//div/parent::a[.='Gift Cards']")).click();
        driver.findElement(By.linkText("eGift cards")).click();
    }

}
package pages;

import org.openqa.selenium.By;
import org.openqa.selenium.WebDriver;
import org.openqa.selenium.support.PageFactory;

public class EGiftCardPage {
    private final WebDriver driver;

    public EGiftCardPage(WebDriver driver){
        this.driver = driver;
        PageFactory.initElements(driver, this);
    }

    public void selectNewestArrivals(){
        driver.findElement(By.id("a-autoid-0-announce")).click();
        driver.findElement(By.xpath("//a[.='Newest Arrivals']")).click();
    }

    public void selectFirstProduct(){
        driver.findElement(By.xpath("//span[@data-component-type='s-product-image']/a")).click();
    }
}
package pages;

import org.openqa.selenium.WebDriver;
import org.openqa.selenium.WebElement;
import org.openqa.selenium.support.FindBy;
import org.openqa.selenium.support.PageFactory;

import java.util.HashMap;

public class ProductPage {
    private final WebDriver driver;

    @FindBy(xpath = "//div[@id='detailBullets_feature_div']//span[contains(.,'Item model number')]/following-sibling::span")
    private WebElement itemModelNumber;

    @FindBy(xpath = "//div[@id='detailBullets_feature_div']//span[contains(.,'ASIN')]/following-sibling::span")
    private WebElement ASIN;

    public ProductPage(WebDriver driver){
        this.driver = driver;
        PageFactory.initElements(driver, this);
    }

    public HashMap<String,String> getProductDetails(){
        HashMap<String, String> productDetails = new HashMap<String, String>();

        productDetails.put("MODEL_NUMBER", itemModelNumber.getText());
        productDetails.put("ASIN", ASIN.getText());

        return productDetails;
    }
}
Step-5 Create SharedDriver.java under src->main->java->utils
package utils;

import org.openqa.selenium.WebDriver;
import org.openqa.selenium.chrome.ChromeDriver;
import org.openqa.selenium.support.events.EventFiringWebDriver;

import java.util.concurrent.TimeUnit;

public class SharedDriver extends EventFiringWebDriver {
    private static final WebDriver driver;

    private static final Thread CLOSE_THREAD = new Thread() {
        @Override
        public void run() {
            driver.quit();
        }
    };

    static{
        System.setProperty("webdriver.chrome.driver", "drivers/chromedriver");
        driver = new ChromeDriver();
        driver.manage().timeouts().implicitlyWait(5, TimeUnit.SECONDS);
        Runtime.getRuntime().addShutdownHook(CLOSE_THREAD);
    }


    public SharedDriver() {
        super(driver);
    }
}
Step-6 Create PicoDependencyInjector.java under src->main->java->utils. If you see the PicoDependencyInjector file, the required pages are added in the injector.
package utils;


import io.cucumber.core.backend.ObjectFactory;
import io.cucumber.picocontainer.PicoFactory;
import pages.EGiftCardPage;
import pages.HomePage;
import pages.ProductPage;

public class PicoDependencyInjector implements ObjectFactory {

    private PicoFactory delegate = new PicoFactory();

    public PicoDependencyInjector() {
        addClass(SharedDriver.class);
        addClass(HomePage.class);
        addClass(EGiftCardPage.class);
        addClass(ProductPage.class);
    }

    @Override
    public void start() {
        delegate.start();
    }

    @Override
    public void stop() {
        delegate.stop();
    }

    @Override
    public boolean addClass(Class<?> aClass) {
        return delegate.addClass(aClass);
    }

    @Override
    public <T> T getInstance(Class<T> aClass) {
        return delegate.getInstance(aClass);
    }
}
Step-7 Now, you need to notify Cucumber that you are using custom injector. All you need to do is create a ‘io.cucumber.core.backend.ObjectFactory’ file in src->main->java->resources->META-INF->services and mention the ‘utils.PicoDependencyInjector’ class.
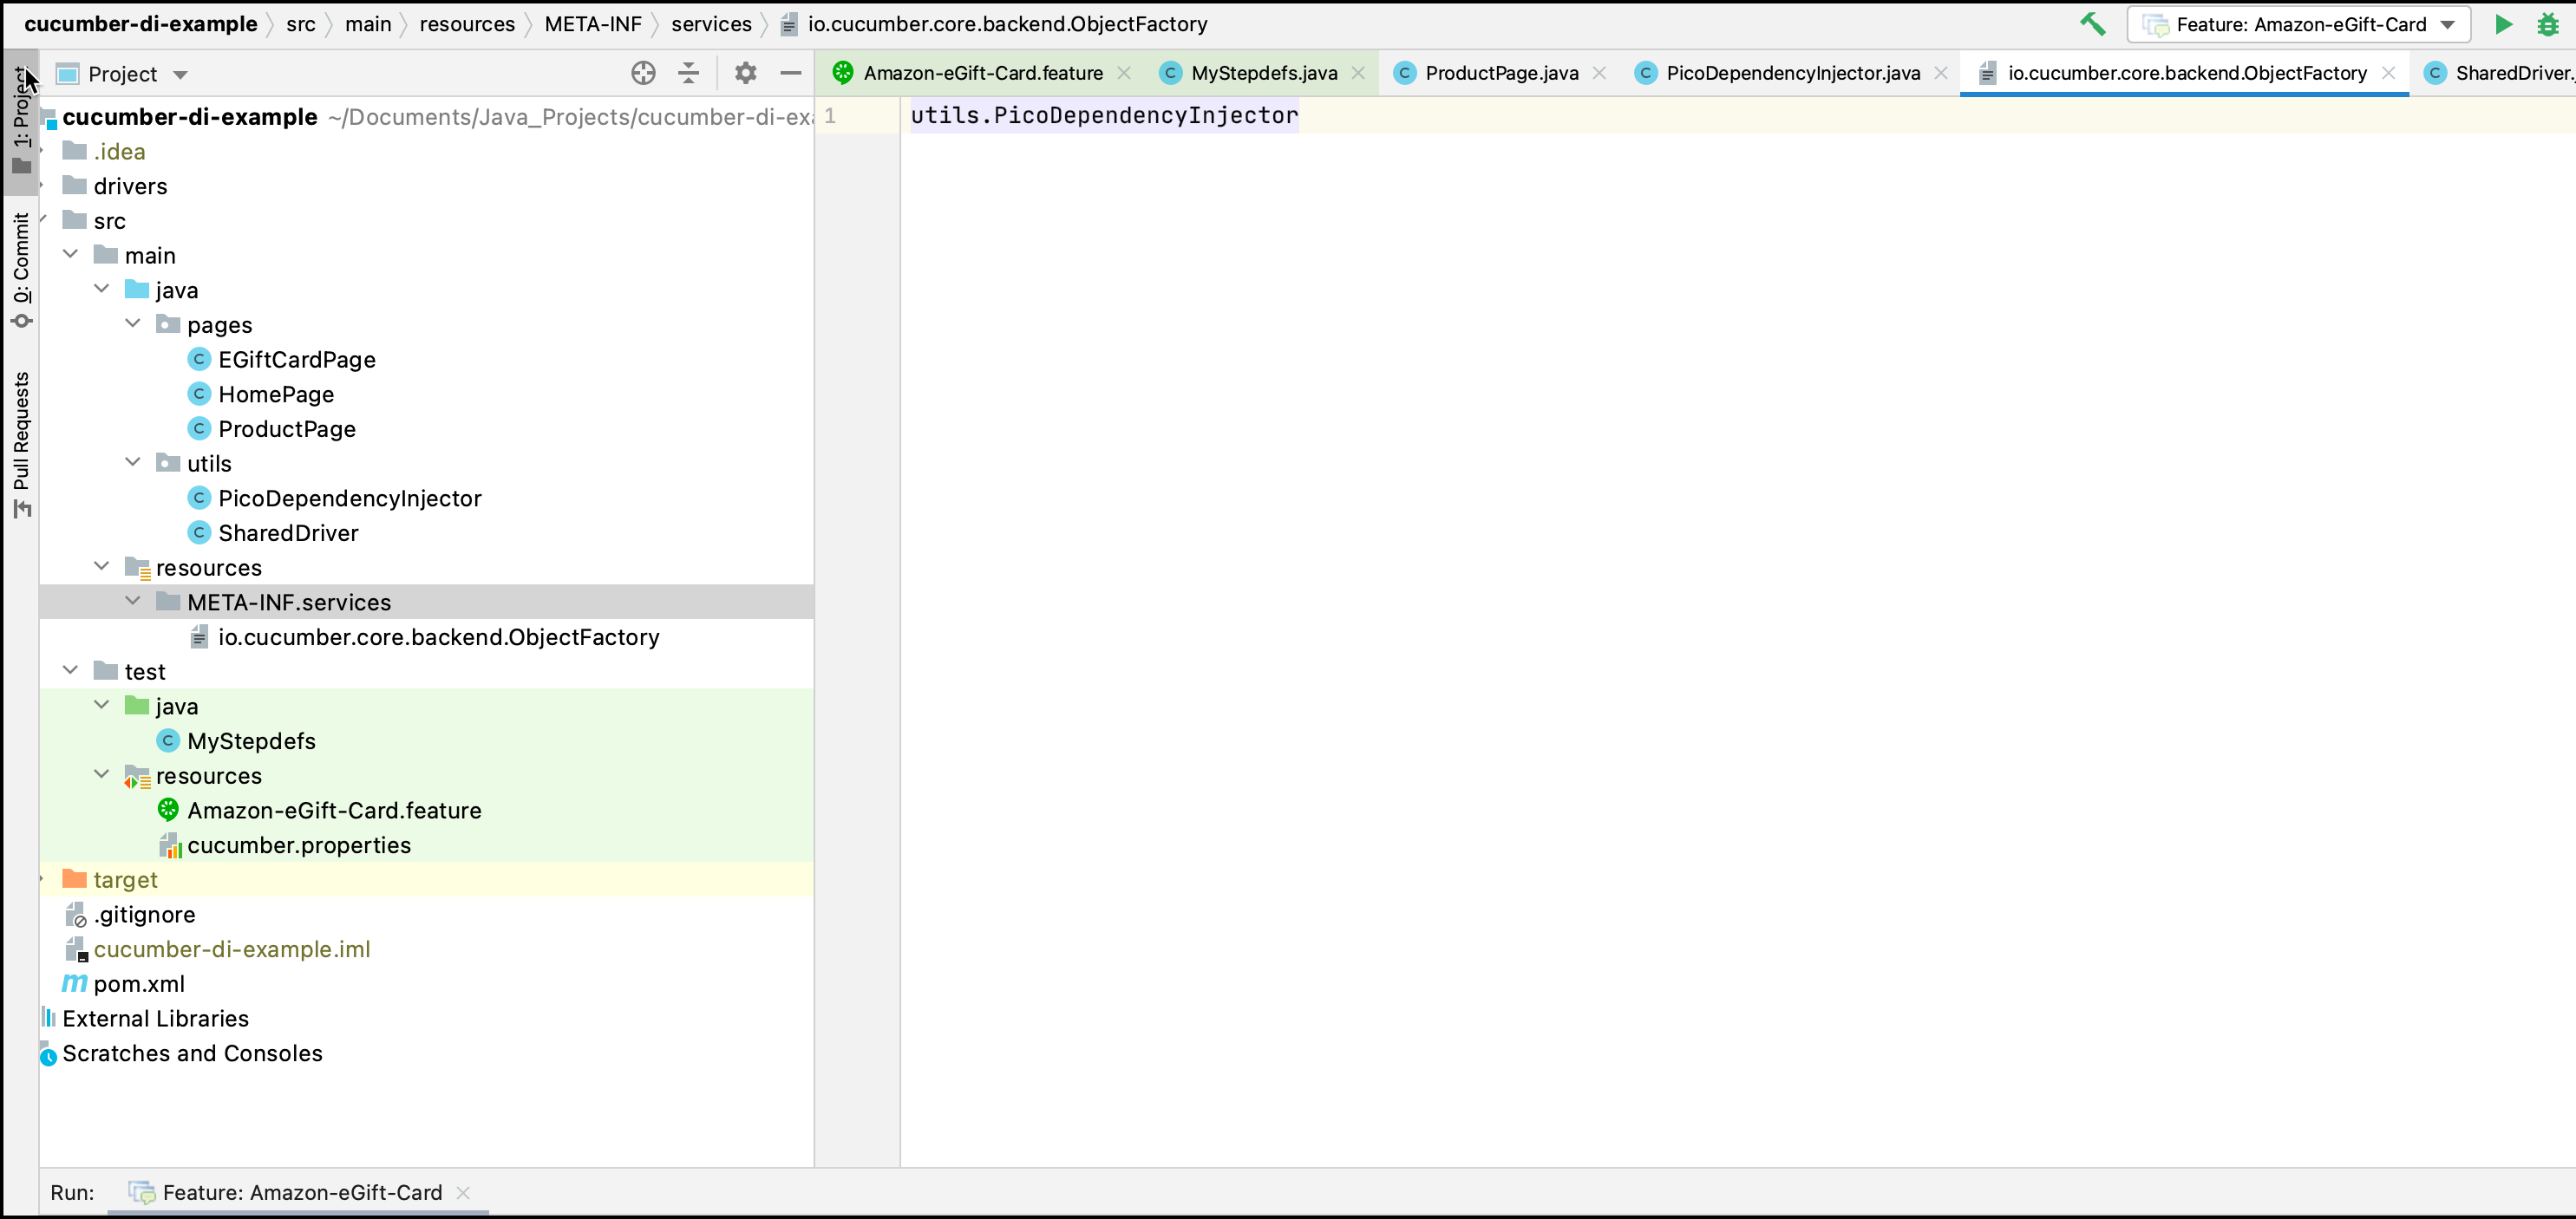
Step-8 Create cucumber.properties in test->resources and add the below content.
cucumber.object-factory=utils.PicoDependencyInjector
Step-9 Add the below listed maven dependencies in POM.xml
<dependencies>
        <dependency>
            <groupId>io.cucumber</groupId>
            <artifactId>cucumber-picocontainer</artifactId>
            <version>6.9.1</version>
        </dependency>

        <dependency>
            <groupId>io.cucumber</groupId>
            <artifactId>cucumber-java</artifactId>
            <version>6.9.1</version>
        </dependency>

        <dependency>
            <groupId>org.seleniumhq.selenium</groupId>
            <artifactId>selenium-java</artifactId>
            <version>4.0.0-alpha-5</version>
        </dependency>

        <dependency>
            <groupId>io.cucumber</groupId>
            <artifactId>cucumber-junit</artifactId>
            <version>6.9.1</version>
            <scope>test</scope>
        </dependency>
    </dependencies>
Viola, you’re done! If you refer to the step definition file, the objects are created using @Inject annotation at the field level. You can view the full code in the following repository – cucumber-di-example
Conclusion
As a QA company, we rely on automation testing to provide testing feedback quickly to our clients’ teams. Following best practices and design patterns improve readability and maintainability. If adding new scripts is taking time, then you don’t have reusable scripts or you have just started implementing automation testing for your project. We hope this article has bought to light the full potential of using the Page Object Model by explaining how you can use it effectively.

by admin | Jan 4, 2021 | Selenium Testing, Blog |
Selenium Grid helps you to leverage parallel execution and cross-platform testing at the same time. You would most definitely know how much valuable time this can save. If you are running a race against time on a project with a quick deadline then this right here can be a lifesaver. So let’s get to know more about Selenium Grid and how to make this wonder possible.
If you have multiple testbeds (i.e, Virtual Machines or Desktop PCs which are allocated for automated script execution), then you can use Selenium Grid to send Selenium Commands and Session creation request to a centralized server (i.e., Hub) which receives the client requests and assign it to the applicable nodes.
In this blog article, you will learn what is Selenium Grid, how to use it, and all the prominent Selenium Grid 4 features.
Remote WebDriver (Selenium Standalone)
Before learning Selenium Grid, you should be familiar with ‘Selenium Remote WebDriver’.
Let’s say you have Selenium Scripts on a Windows machine and want to run the scripts on a Safari browser on a Mac machine. The older approach needed you to move the scripts from the Windows machine to the Mac machine and then only execute them on a Safari browser.
But now, if you know how to use Selenium Remote WebDriver, you can execute the scripts from Windows itself by pointing to the Mac machine Selenium Server URL. This technique makes the otherwise tedious process very simple. Let’s dive deeper into it, shall we?
Download Selenium Server
Download the Selenium Server Jar file from Selenium.dev website.
Start Selenium Server
Use the below command to start the Selenium server.
java -jar selenium-server-standalone-3.141.59.jar
By default, Selenium Standalone Server runs on port 4444. You can use the below snippet to launch the browser.
DesiredCapabilities capability = new DesiredCapabilities();
capability.setBrowserName("chrome");

RemoteWebDriver driver = new RemoteWebDriver(new URL("http://localhost:4444/wd/hub"),capability);
Selenium Standalone Server Configuration
- BrowserTimeout – You can use this option to make the WebDriver Browser Session wait while a WebDriver command is being executed. Let’s say driver.get(url) is being executed with BrowserTimeout=60 secs. The WebDriver Session will wait for 60 secs and quit the session if the command is not complete within the given timeframe. Note: If the BrowserTimeout is not specified when starting the server, then the session will wait indefinitely if a command request does not get a response.
- Config – If you have the Standalone Server configurations in a Json file, you can use the config option to mention the json file path. If the config option is not used, it will take the default values.
- Port – As we mentioned earlier, Selenium Server’s default port is 4444. If you would like to override, you can do it using the Port option.
- Role – Selenium WebDriver has three roles for the server. (Standalone, Hub, and Node)
- Timeout/SessionTimeout – The Selenium Standalone server has multiple session slots. Each slot should be released for other test executions. Let’s say a session is idle for 240 seconds (i.e., The Remote WebDriver session is not receiving any commands from the client for 240 seconds). In this case, the standalone server will release the session slot for other tests. 240 seconds is not a default value. You can mention any value based on your requirement.
Why Selenium Grid?
Selenium Standalone server is not sufficient for distributed execution. If you have 5 testbeds for automated test script execution, then you have to manage 5 Selenium Servers. Moreover, each server has its own URL. So you need to update the test suites with 5 server URLs as well. All of this can be easily simplified when using the Selenium Grid.
Selenium Grid has only two components, one is Hub and another one is Node. All your tests point Hub. The Hub acts as a centralized server that is responsible for assigning a Node for WebDriver session initialization and command execution requests.
Let’s assume you have three Windows machines and one Mac machine. One of the Windows machines is used for Hub & its nodes. The other three machines (2 Windows & 1 Mac) are used for the other Node setup.
Refer to the below diagram.
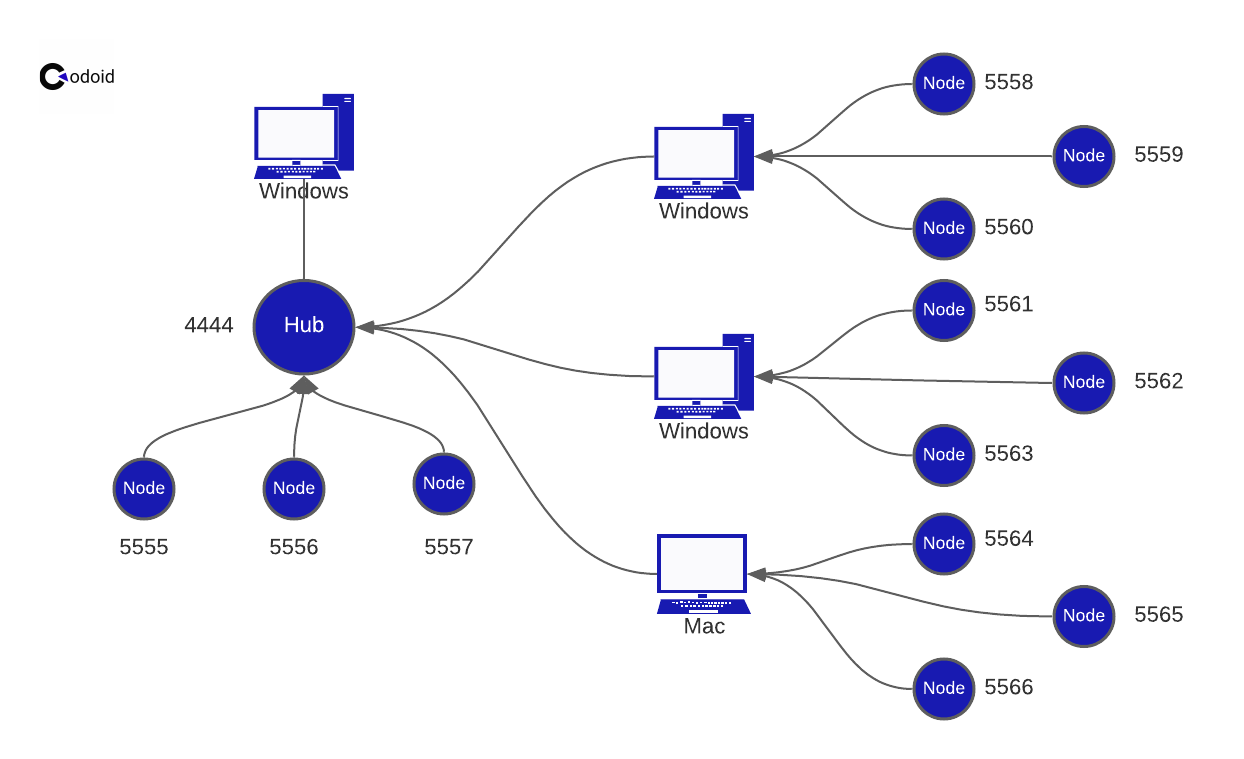
To run your Selenium test scripts on Safari using a Mac machine, you can use any of the following port numbers 5564, 5565, and 5566 as per the diagram. Since this is a Selenium Grid Architecture, you can use the Hub URL instead of Node’s URL.
When you use the Hub URL, all the session creations and command requests will go to the Hub. The Hub will decide which node is suitable for the client request. Desired Capabilities plays a crucial role in node allocation.
If you are planning to add or remove any node, you need not change the Remote URL in your test suite, because all your scripts are using Hub URL not Node URL.
Selenium Grid helps you in setting up a cross-browser testing infrastructure and it eases the Selenium Server management using Hub and Node roles. When you have a simple execution architecture, you can go with the Selenium Standalone server. If you are planning for parallel execution, cross-browser testing execution, and performance test script execution on local browsers, then the Selenium Grid setup is a must.
As an automation testing company, we use Selenium Grid for multiple automation testing projects to enable parallel execution.
Starting Hub
Starting a Selenium Grid Hub is easy. Just run the below command in Terminal/Command Prompt and it will start Hub on port 4444.
java -jar selenium-server-standalone-3.141.59.jar -role hub
Hub Configuration
- Matcher/CapabilityMatcher – Hub has its own logic to select a node to start a WebDriver session. However, you can override this logic using the Matcher option. All you need to do is create a class and write the logic. Refer DefaultCapablityMatcher Java class to write a custom matcher.
- CleanUpCycle – Hub needs to check & kill the idle sessions at frequent intervals. How often the cleanup needs to be carried out is determined using the CleanUpCycle option. The default value is 5000 milliseconds.
- Log – If you want all the Hub logs in a file instead of STDOUT, then pass the filename in the log option.
- MaxSession – MaxSession is used at the Hub level to mention how many WebDriver sessions are allowed in parallel on a node. The default max session at Node level is 5. If Hub has Max Session configuration, then it will override the Node’s Max Session.
- NewSessionWaitTimeout – Sometimes Nodes may not be available for a new session request. You can use the NewSessionWaitTimeout option to make your test wait for the specified milliseconds instead of waiting for a Node indefinitely.
- ThrowOnCapabilityNotPresent – If ThrowOnCapabilityNotPresent=true and no node is available for the specified desired capabilities, then your test will throw an error else the test will wait until the supporting node is registered under the hub.
- Registry – Hub’s Kernel logic is written in DefaultGridRegistry.java which is responsible to check free & used nodes and assign nodes to the incoming client requests. If you would like to override this logic, use the Registry option.
- JettyThreads – The default value is 200. Let’s say you are going to attach 50 nodes under a Hub. Then JettyThreads=200 is not sufficient. You need to increase the JettyThreads. 50 nodes mean each node supports 5 max sessions by default. So 50 X 30 = 250 threads are required. Use JettyThreads/JettyMaxThreads to increase the thread pool.
Attaching Nodes
Once the Hub is started, you can start and attach a node from any machine. All you need is the Hub’s URL.
Use the below command to register a node.
java -jar selenium-server-standalone-3.141.59.jar -role node -hub http://ip-address:4444/grid/register/
Node Configuration
- Capabilities – This is an optional parameter. By default, you will get 5 Chrome, 5 Firefox, 1 Internet Explorer instance. If you want all the 11 instances as Chrome browser, then use the capabilities parameter while creating a node. Example:
java -jar selenium-server-standalone-3.141.59.jar -role node -hub http://ip-address:4444/grid/register/ -capabilities browserName=Chrome, maxInstances=11
- NodePolling – Hub needs to check whether the registered nodes are alive in a frequent interval. By default, Hub will check the nodes’ availability every 5 seconds.
- DownPollingLimit – Let’s say DownPollingLimit=3. If the node is not responding in three-node polling, then the node will be marked as Down in Hub. The default value for DownPollingLimit is 2 attempts.
- Register – This is a boolean parameter. If the Hub is unavailable, then the nodes will try to re-register with Hub. If register=false, the nodes will never try to re-register.
- RegisterCycle – How often the nodes can try to re-register with Hub is determined using the RegisterCycle parameter. The default value is 5000 milliseconds. Every 5 seconds the nodes will try to re-register if the Hub is unavailable.
- UnregisterIfStillDownAfter – If a node is down for more than 60 seconds, then the node will stop attempting to re-register with Hub. If you would like to increase/decrease the default 60 seconds, then use the UnregisterIfStillDownAfter parameter.
Grid Console
Hub and nodes creation initiated on Command Prompts/Terminal Windows. Checking the status of Hub and Nodes in the Terminal Window is a cumbersome task. Selenium Grid has a Web GUI to view the registered nodes and Hub configuration. Once the hub has started, you can view the Hub configuration in the following Grid Console URL http://localhost:4444/grid/console.
VisGrid
If you use VisGrid Selenium Grid UI, you don’t need to start Hub & Nodes in Command Prompt. Stopping/Managing Hub & Nodes is easy with VisGrid. As a leading Selenium Testing Services provider, we at Codoid created this UI to ease the Selenium Grid setup. However, after using VisGrid internally for a month, we released it as freeware. Now, VisGrid is widely used by the test automation community.
You can manage multiple nodes in a single window. Moreover, Selenium Browser Drivers come with the VisGrid package.
Selenium Grid 4
As we mentioned before, by using Selenium Server Jar you can setup Standalone Server and Selenium Grid Hub & Node. Hub takes care of the below-mentioned tasks.
- Identify a suitable node to create a WebDriver Session.
- Find a node with a session ID to assign a WebDriver command execution request from the client.
- Check whether the registered nodes are alive using NodePolling.
Hub plays a crucial role in the Selenium Grid set up. If a machine is dedicated for Hub and you are registering local nodes, then the memory consumption to operate Hub and execute Selenium commands on the same machine will be high.
When you are planning for a complex Selenium Grid execution architecture, you need to go for Selenium Grid 4’s Distributed execution setup. What is new in Selenium Grid 4 you might wonder. The Hub’s processes are separated in Selenium Grid 4. So instead of overloading the Hub, you can setup each task of Hub in different machines.
Selenium Grid 4 is not released yet. But there is no need to worry as you can try it in the Selenium Alpha version.
Sessions – In Selenium Grid 4, first you need to start sessions.
java -jar selenium-server-4.0.0-alpha-5.jar sessions
Sessions are used to store Node URI and Session ID.
Distributor – Distributor is responsible to start a new WebDriver session on a suitable node and update the Session ID in Sessions Map against the node URI.
java -jar selenium-server-4.0.0-alpha-5.jar distributor --sessions http://localhost:5556
Router – Router receives WebDriver command requests and a new session request from the client. If the request is for a new session, then it will be redirected to the Distributor. If the request is for command execution, then Router will query the node URI using a Session ID in Sessions.
Once the node URI is received from Sessions, the Router will redirect the command execution to the node.
java -jar selenium-server-4.0.0-alpha-5.jar router --sessions http://localhost:5556 --distributor http://localhost:5553
Node – In Selenium Grid 4 distributed execution set up, Node will be registered under Router. If you have setup the router in a separate machine, you can mention the host parameter to point the router while starting the node.
java -jar selenium-server-4.0.0-alpha-5.jar node --detect-drivers
In Selenium Grid 4, you will get a new GUI to view nodes. However, it is not released in the Alpha version yet.
Conclusion
So the biggest takeaways from this Selenium Grid Tutorial are learning about Selenium Grid 3 & 4 and all the important configurations. If you are trying to achieve parallel execution in test automation, creating independent automated tests and elegant Selenium Grid setups are a must.
If the Selenium Standalone server is sufficient for you, then the Selenium Grid is not necessary at this point. However, knowledge of the Selenium grid will help you to setup distributed execution when you want to scale up the automated test execution.
Frequently Asked Questions
-
What is selenium grid used for?
Selenium Grid is used to perform Cross Browser Testing at a scale, by running a test on different browser-device combinations simultaneously.
-
What is the difference between selenium and selenium grid?
Selenium is a suite of tools for automating web browsers, while Selenium Grid is a tool within the suite that enables parallel testing. Selenium Grid specializes in running multiple tests across different browsers, operating systems, and machines.
-
How many nodes does a selenium grid have?
A Grid can contain multiple Nodes. Each Node manages the slots for the available browsers of the machine where it is running.
-
Can we use a selenium grid for performance testing?
Yes, Selenium grid can be used for performance testing, and it provides the advantage of easily and quickly incorporating performance tests into the continuous testing environment. It is critical to use the proper tools like JMeter or k6.
-
What are the major components of the Selenium grid?
The major components of the Selenium Grid are Router, Distributor, Session Map, Session Queue, Node, and Event Bus.
-
Is Selenium Grid free?
Yes, Selenium Grid is a free and open-source testing tool that allows users to test web applications across different browsers and platforms.

by admin | Dec 8, 2020 | Selenium Testing, Fixed, Blog |
Using the CSS selector, you cannot traverse to the parent node/grandparent nodes on the DOM tree. The advantage with the XPath locator is you can traverse between child & descendant and parent & ancestors. To use XPath effectively in Selenium WebDriver, you should be familiar with XPath Axes and HTML. In this blog article, you will learn how to use XPath Axes in Selenium WebDriver.
What are XPath Axes?
There are thirteen axes available for XPath. As per the definition in Mozilla Web Docs – “An axis represents a relationship to the context node, and is used to locate nodes relative to that node on the tree.”
Let’s say you want to select a parent node using its child node. You first write XPath to pick the child node and the parent node using XPath parent axis.
As an automation tester, if you are familiar with XPath Axes, you can write robust locators for dynamic WebElements. At Codoid, we train our novice test automation engineers on Selenium Basics and Object Locating Strategies before they are inducted for automation testing services. In the training phase, XPath Axes is one of the core topics.
Let’s look into all the XPath Axes which are useful for test automation scripting.
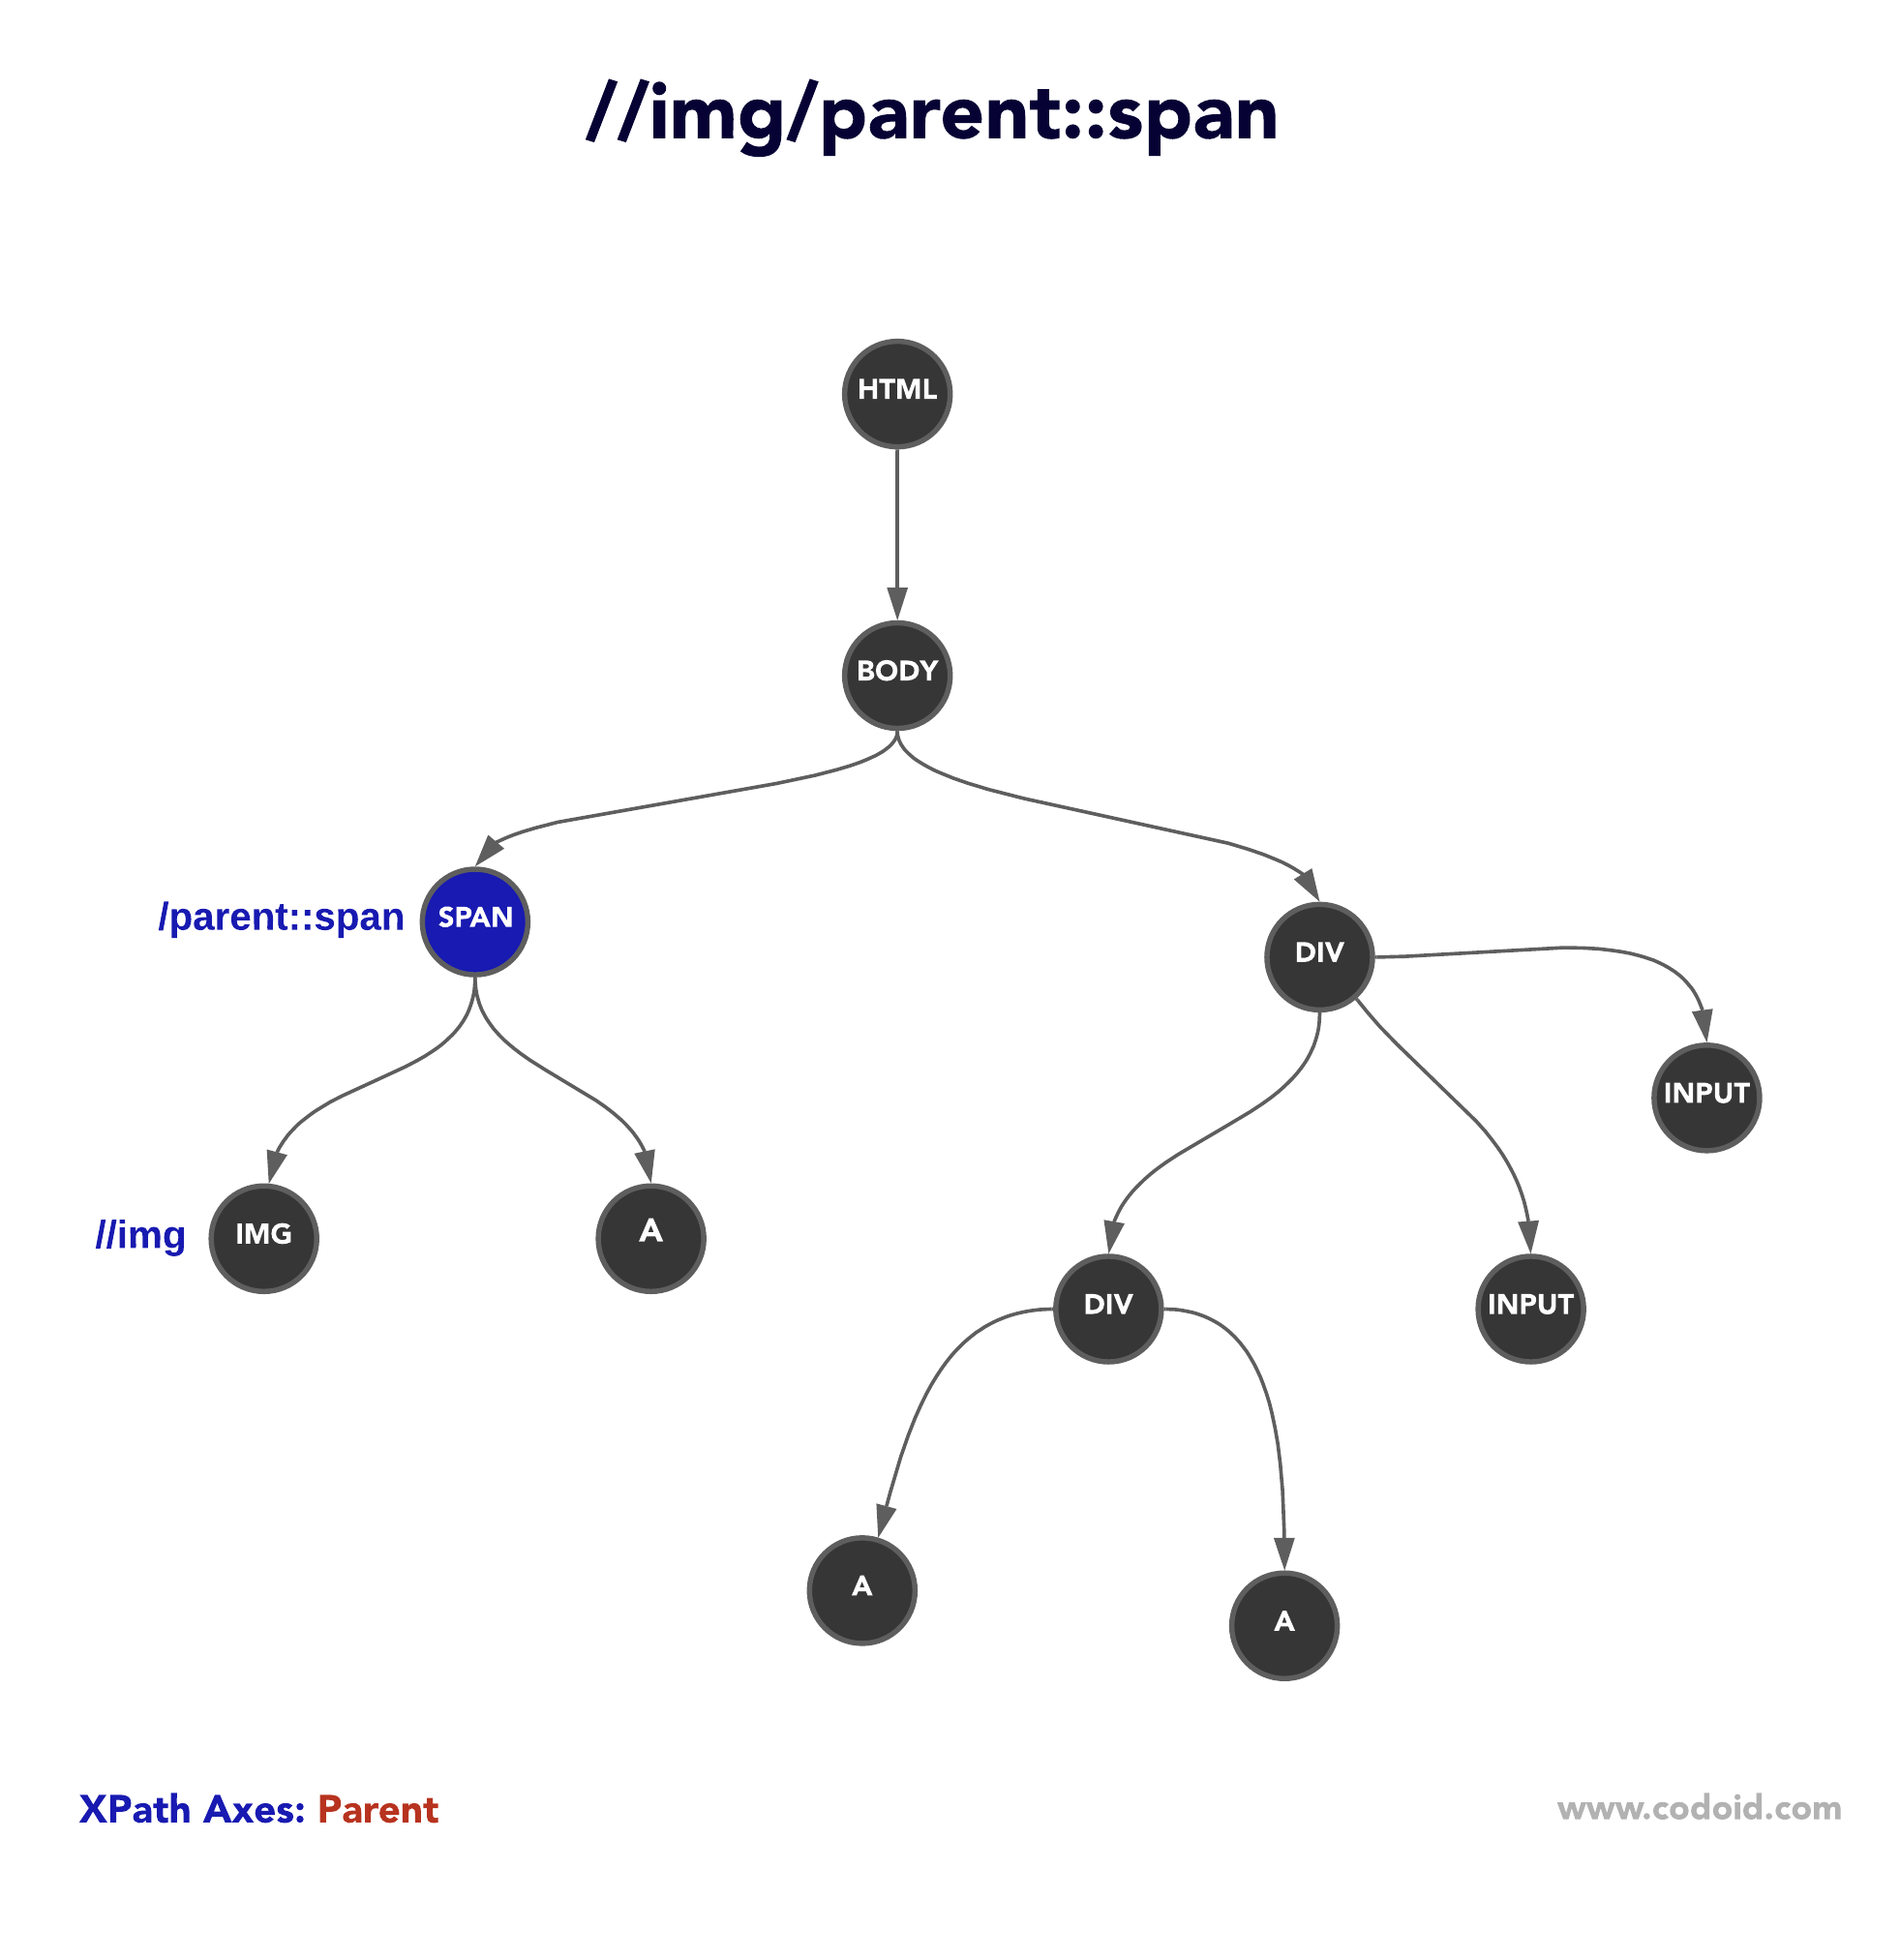
parent
If you want to select the parent node from the child, use the parent axis.
As the below diagram, first, it locates the IMG tag and then selects the parent node (i.e., SPAN tag)
ancestor-or-self
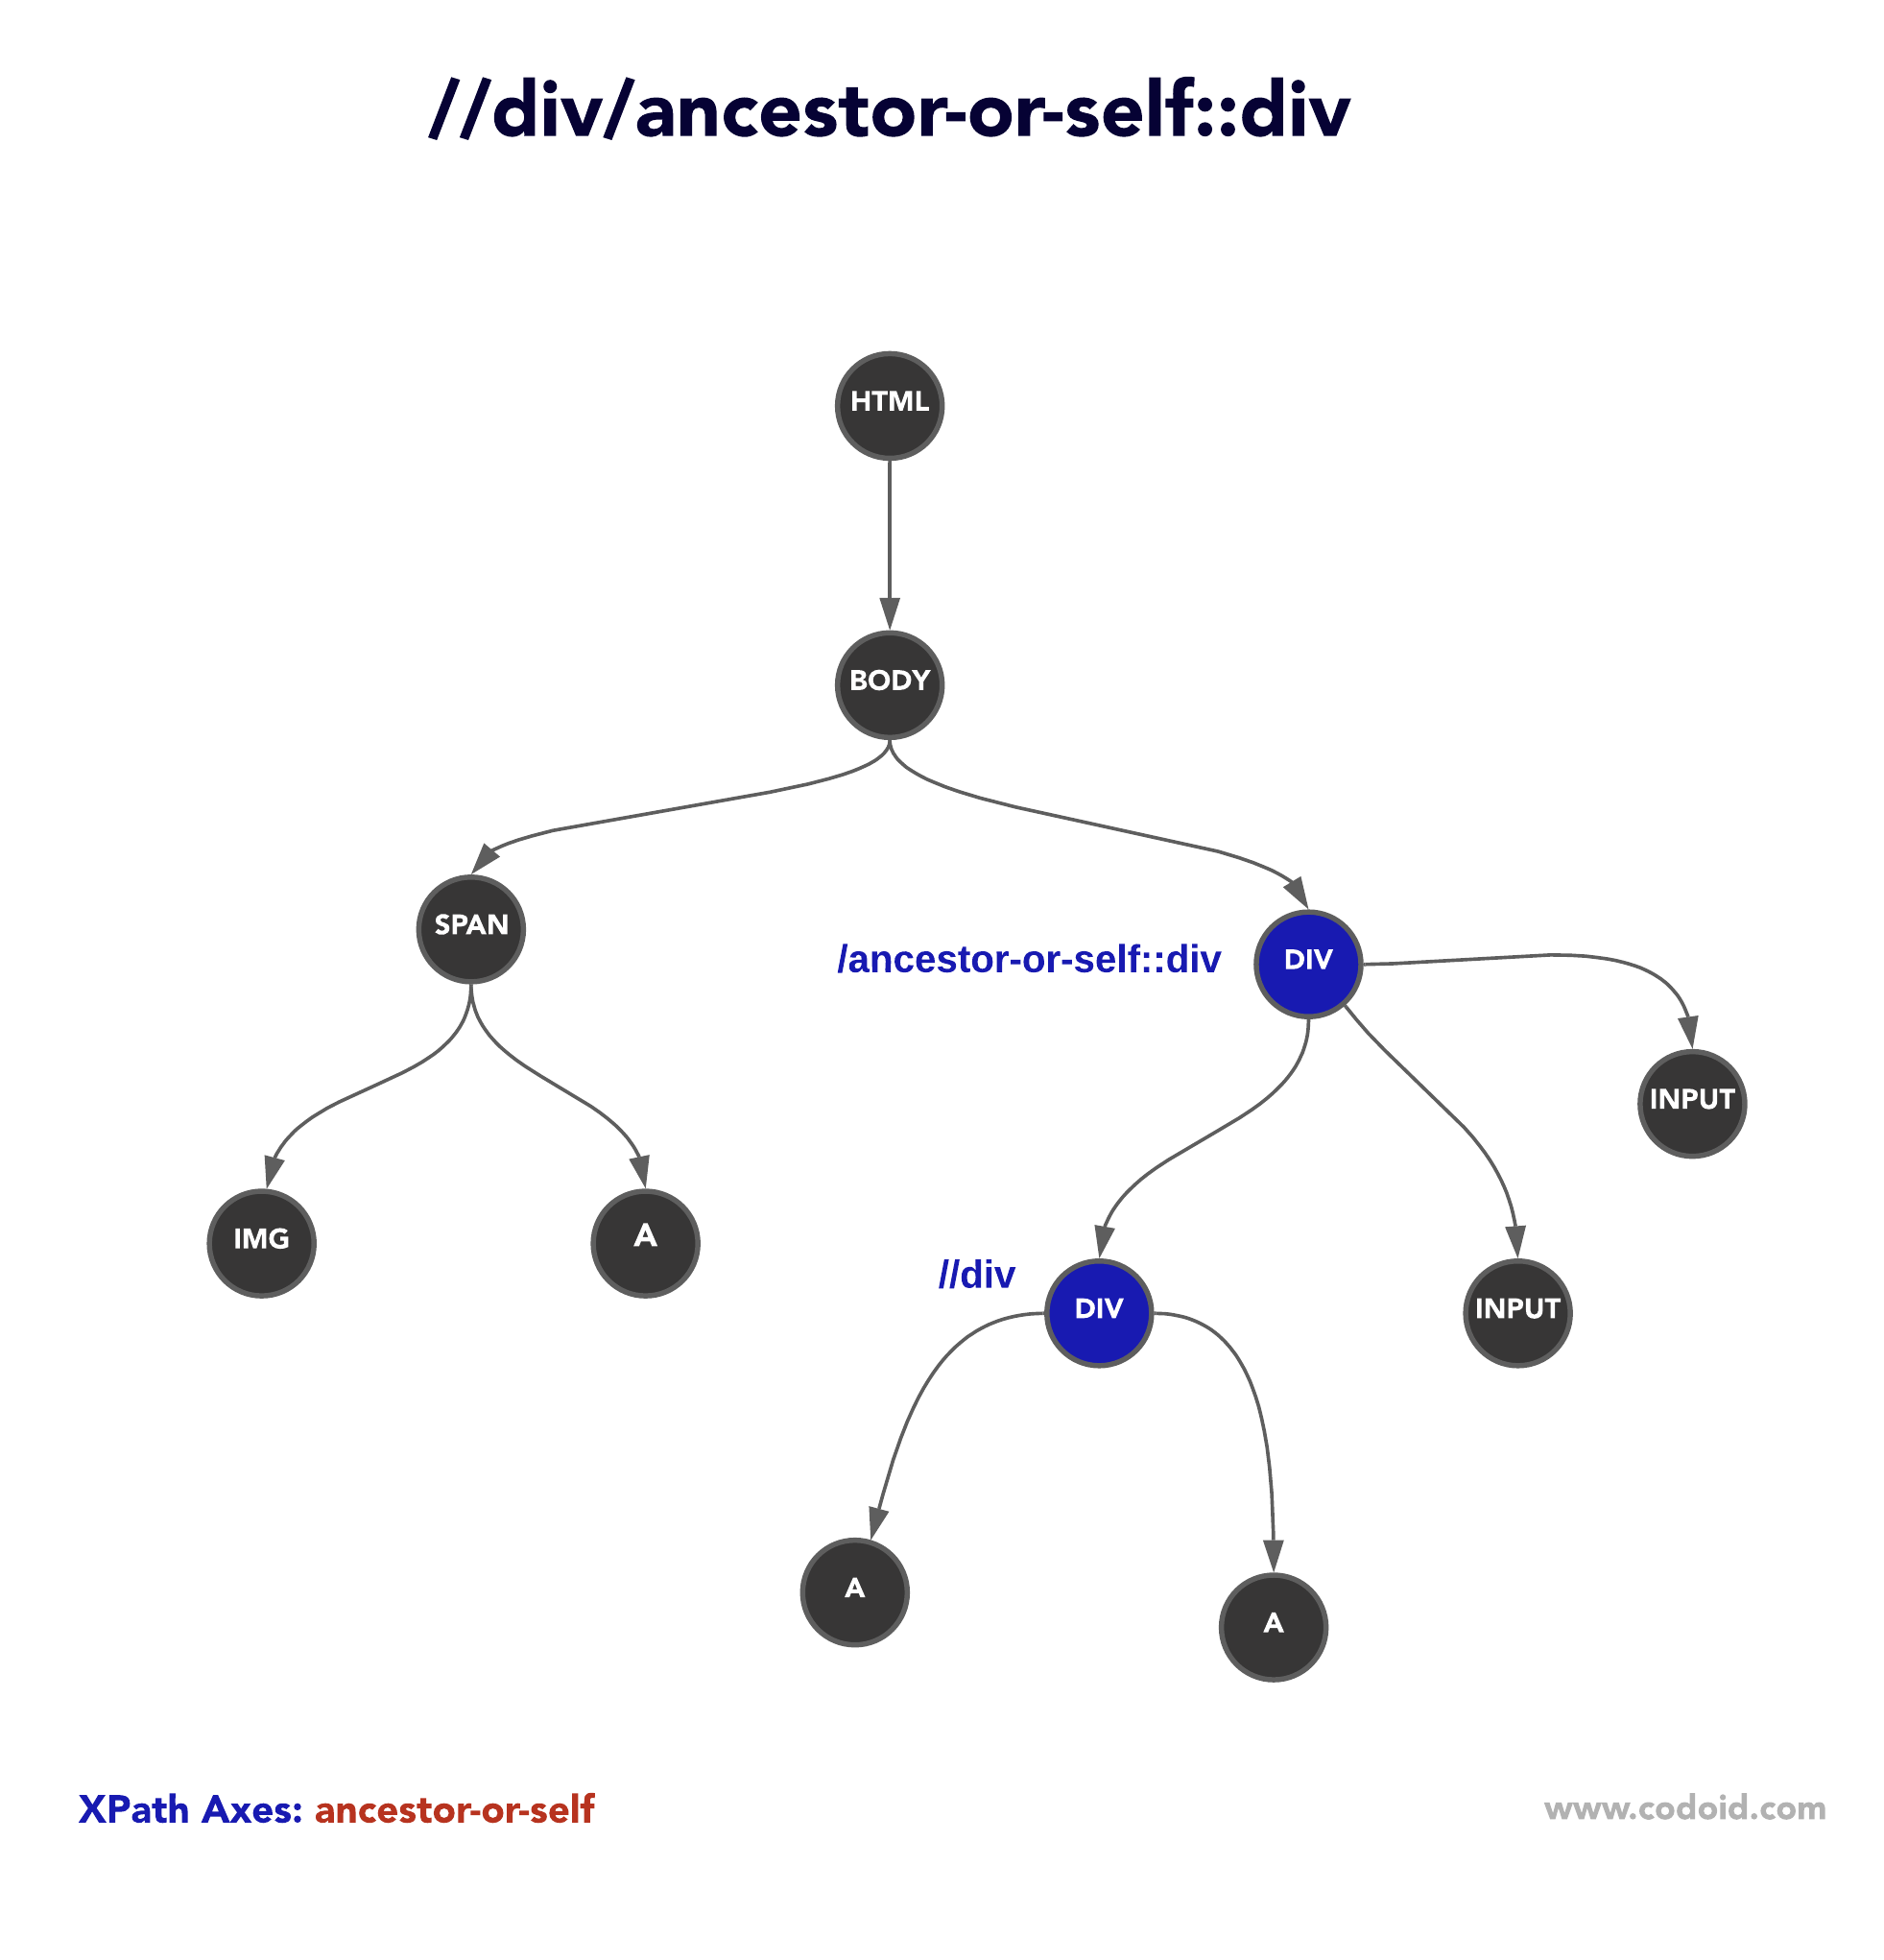
ancestor-or-self axis selects the parent, ancestors, and the context node as well.
Let’s say there is a DIV tag; you want to identify its parent & ancestors DIVs, and additionally the context node if that is also a DIV tag. If this is the situation you face during Selenium Automation Testing, you can use ancestor-or-self axis.
child
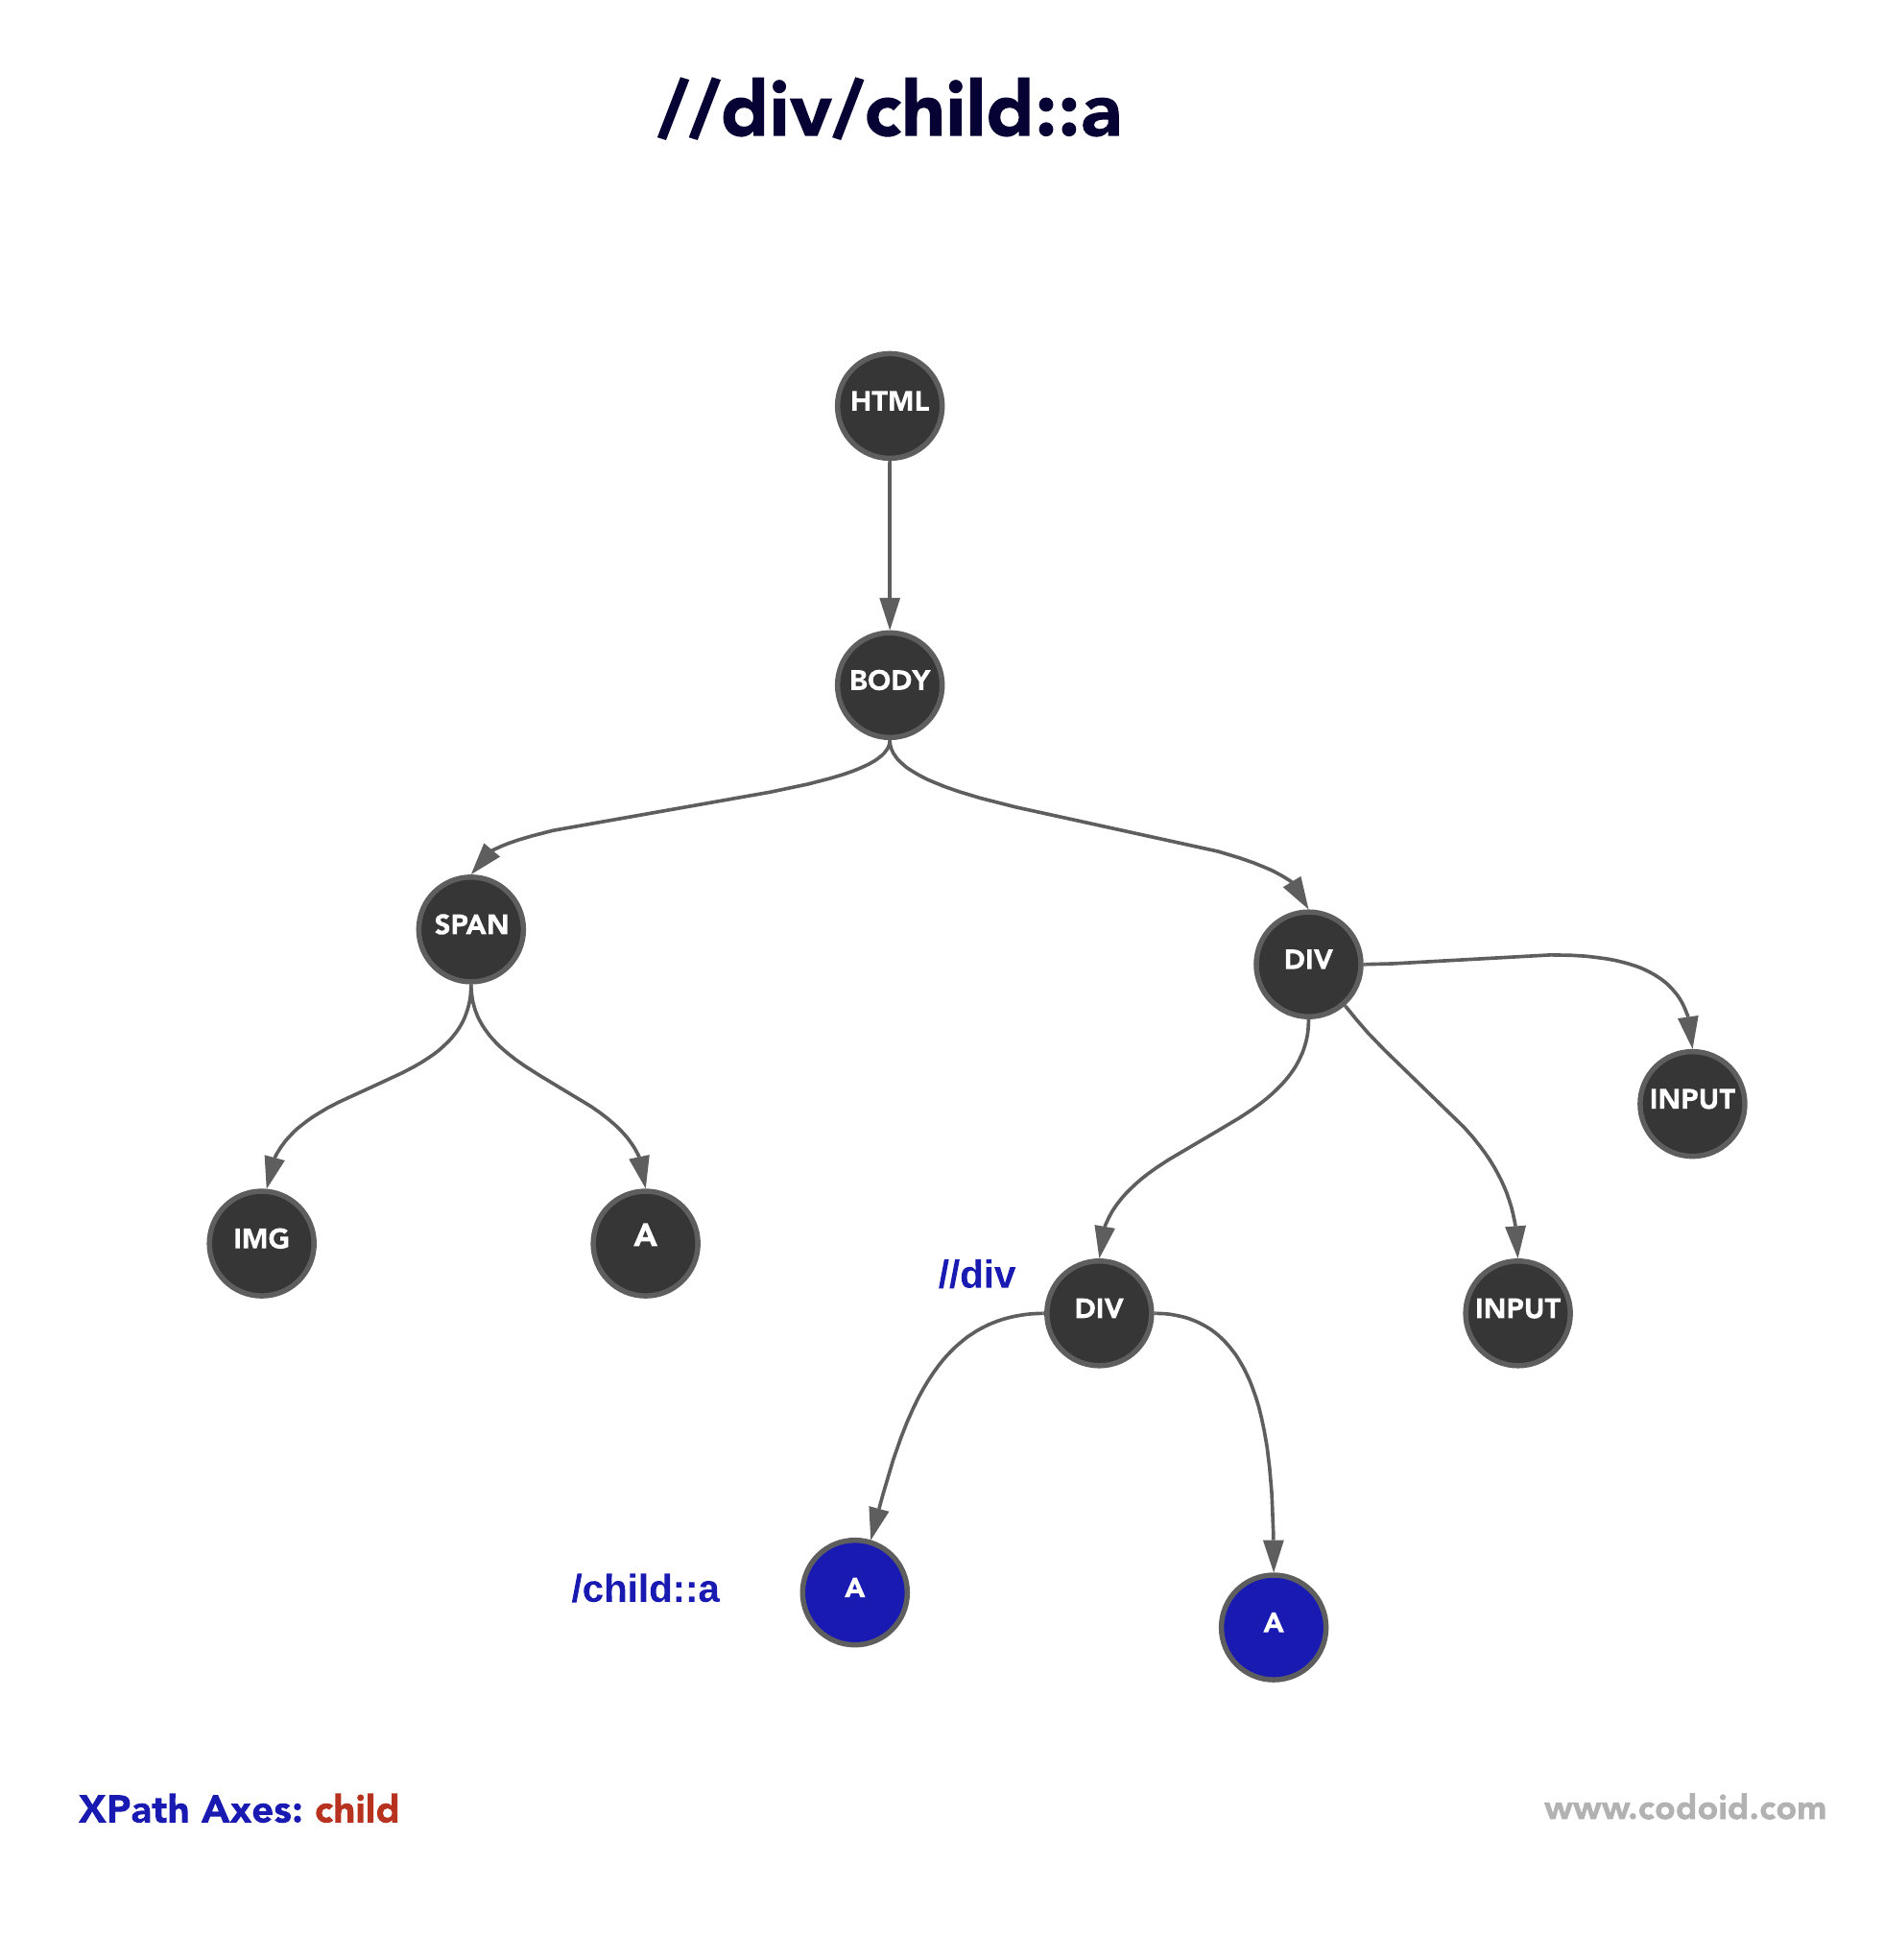
To select all the children nodes of the context node, you can use the child axis.
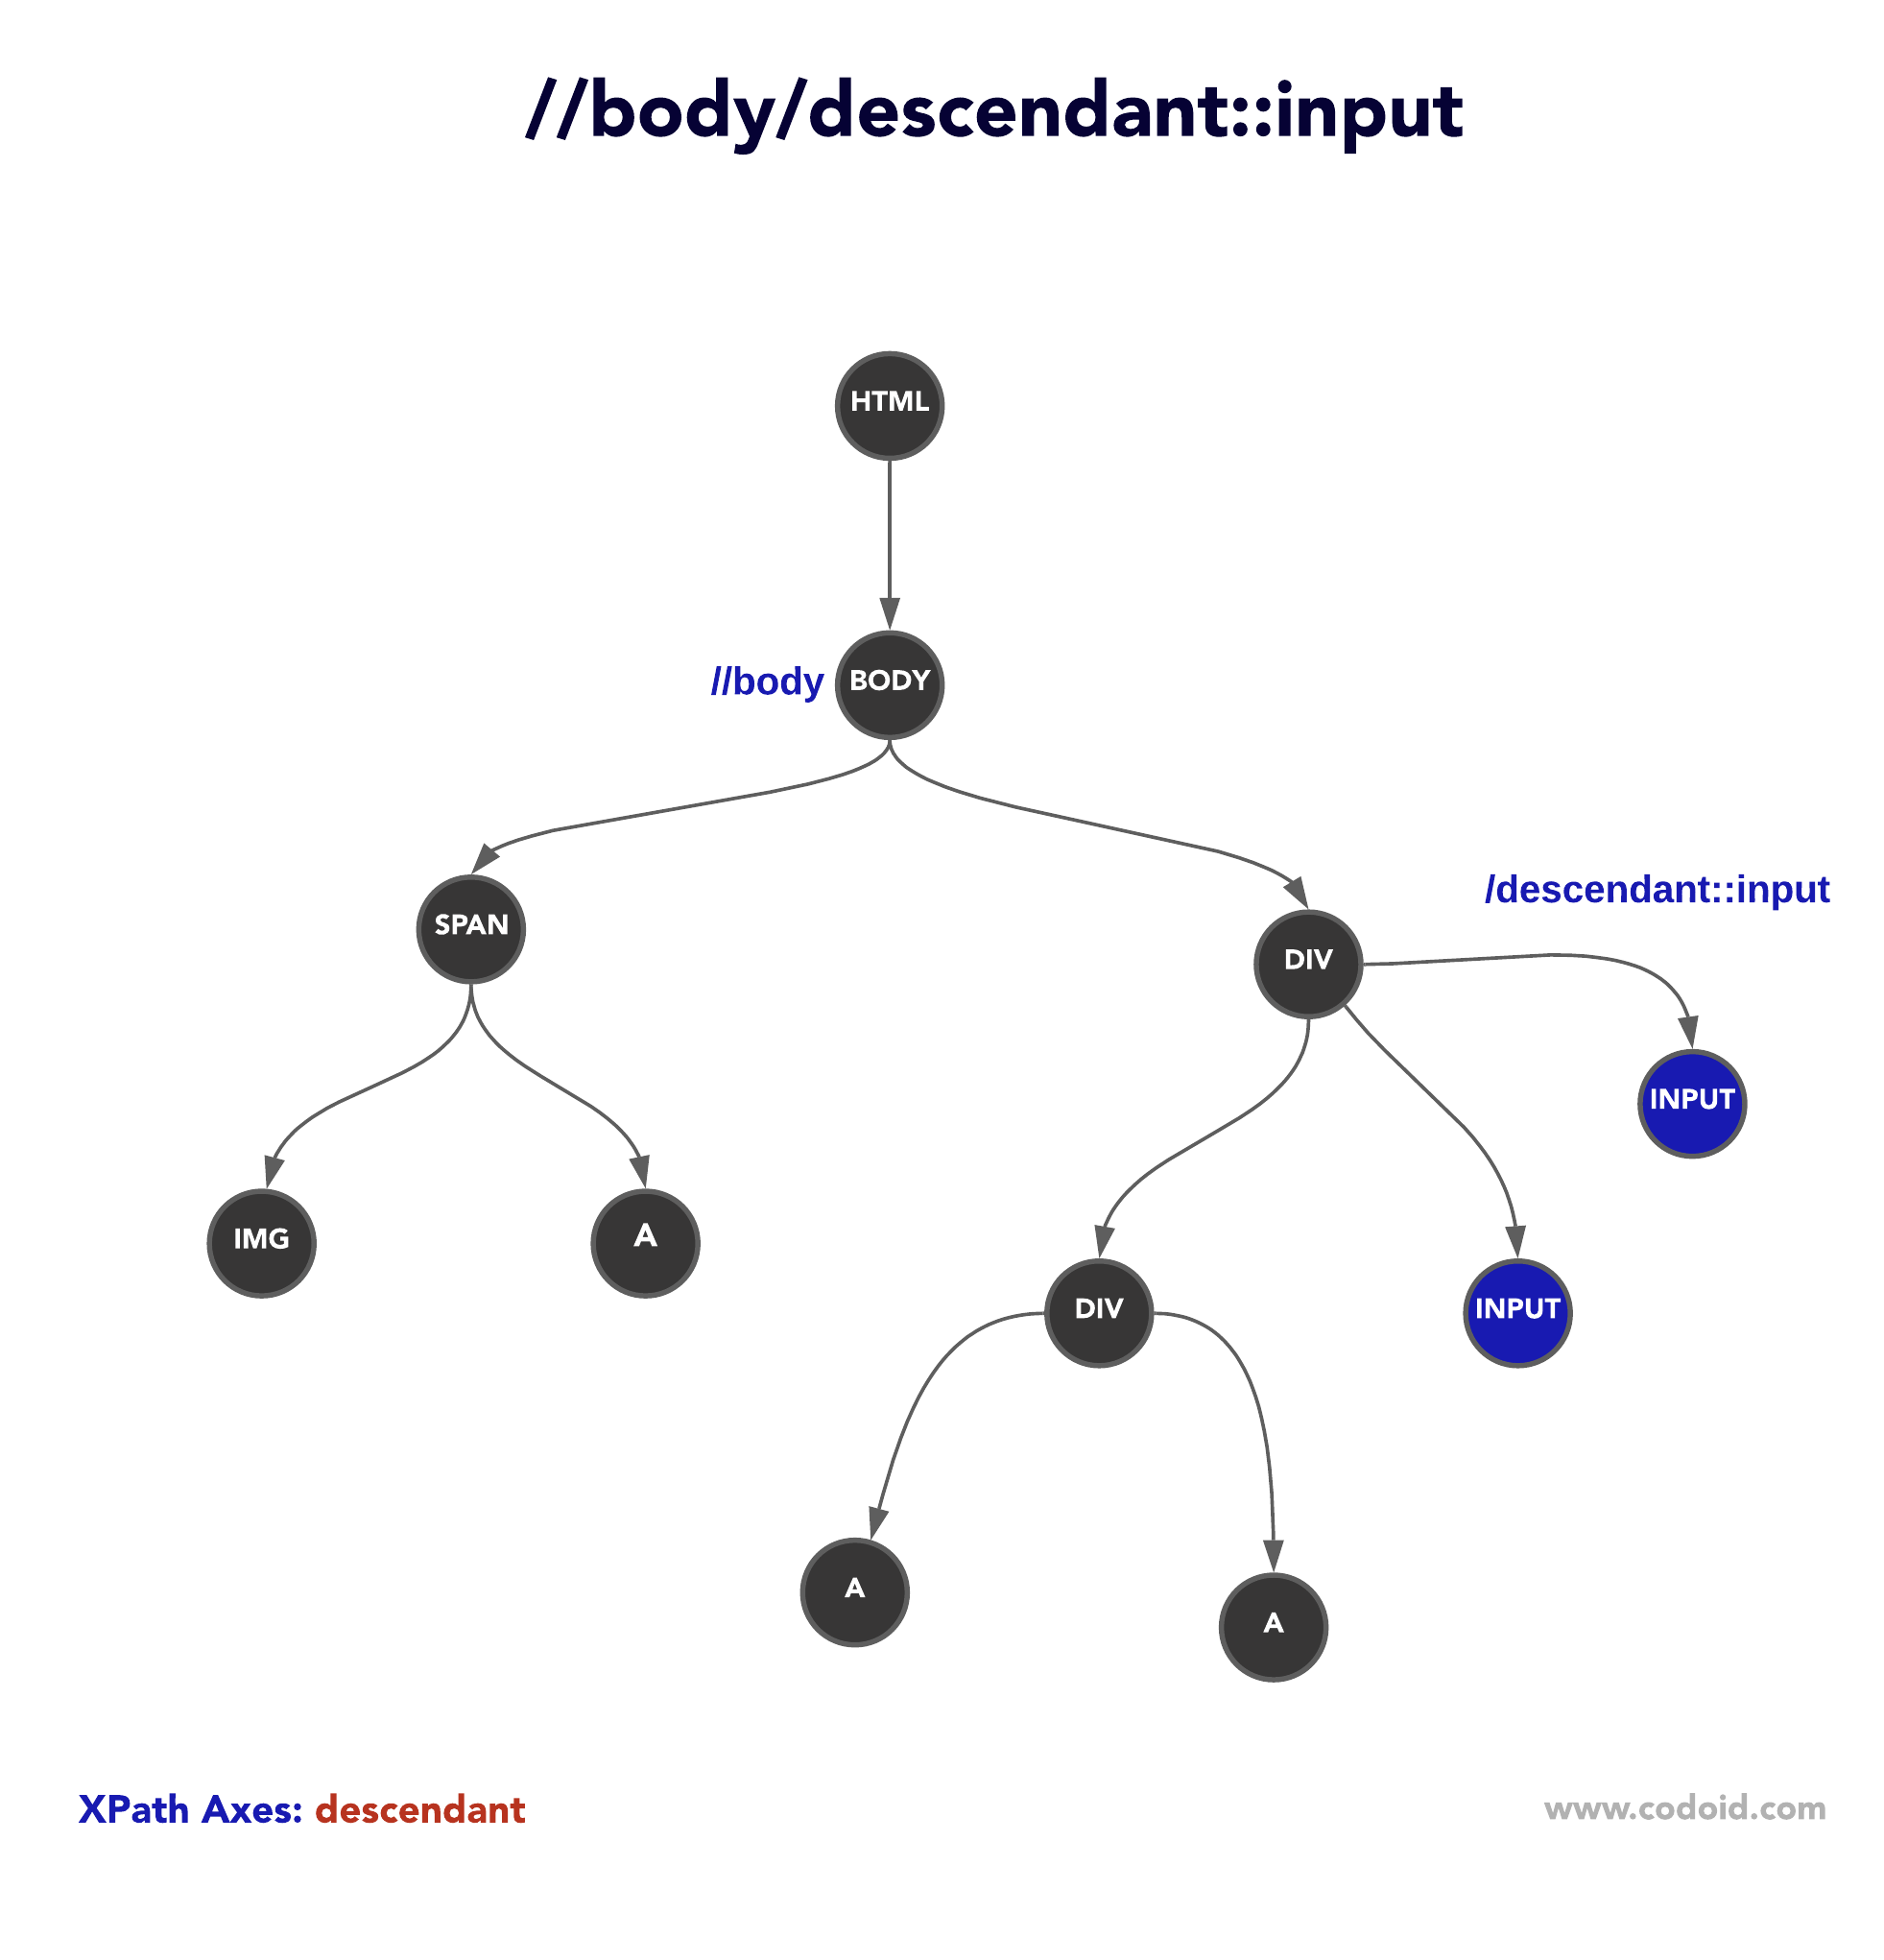
descendant
To select children and the descents nodes, use the descendant axis. The descendant axis is a widely used axis by automation testers. However, the below diagram will be a good learning material for novice testers who are learning Selenium.
following-sibling
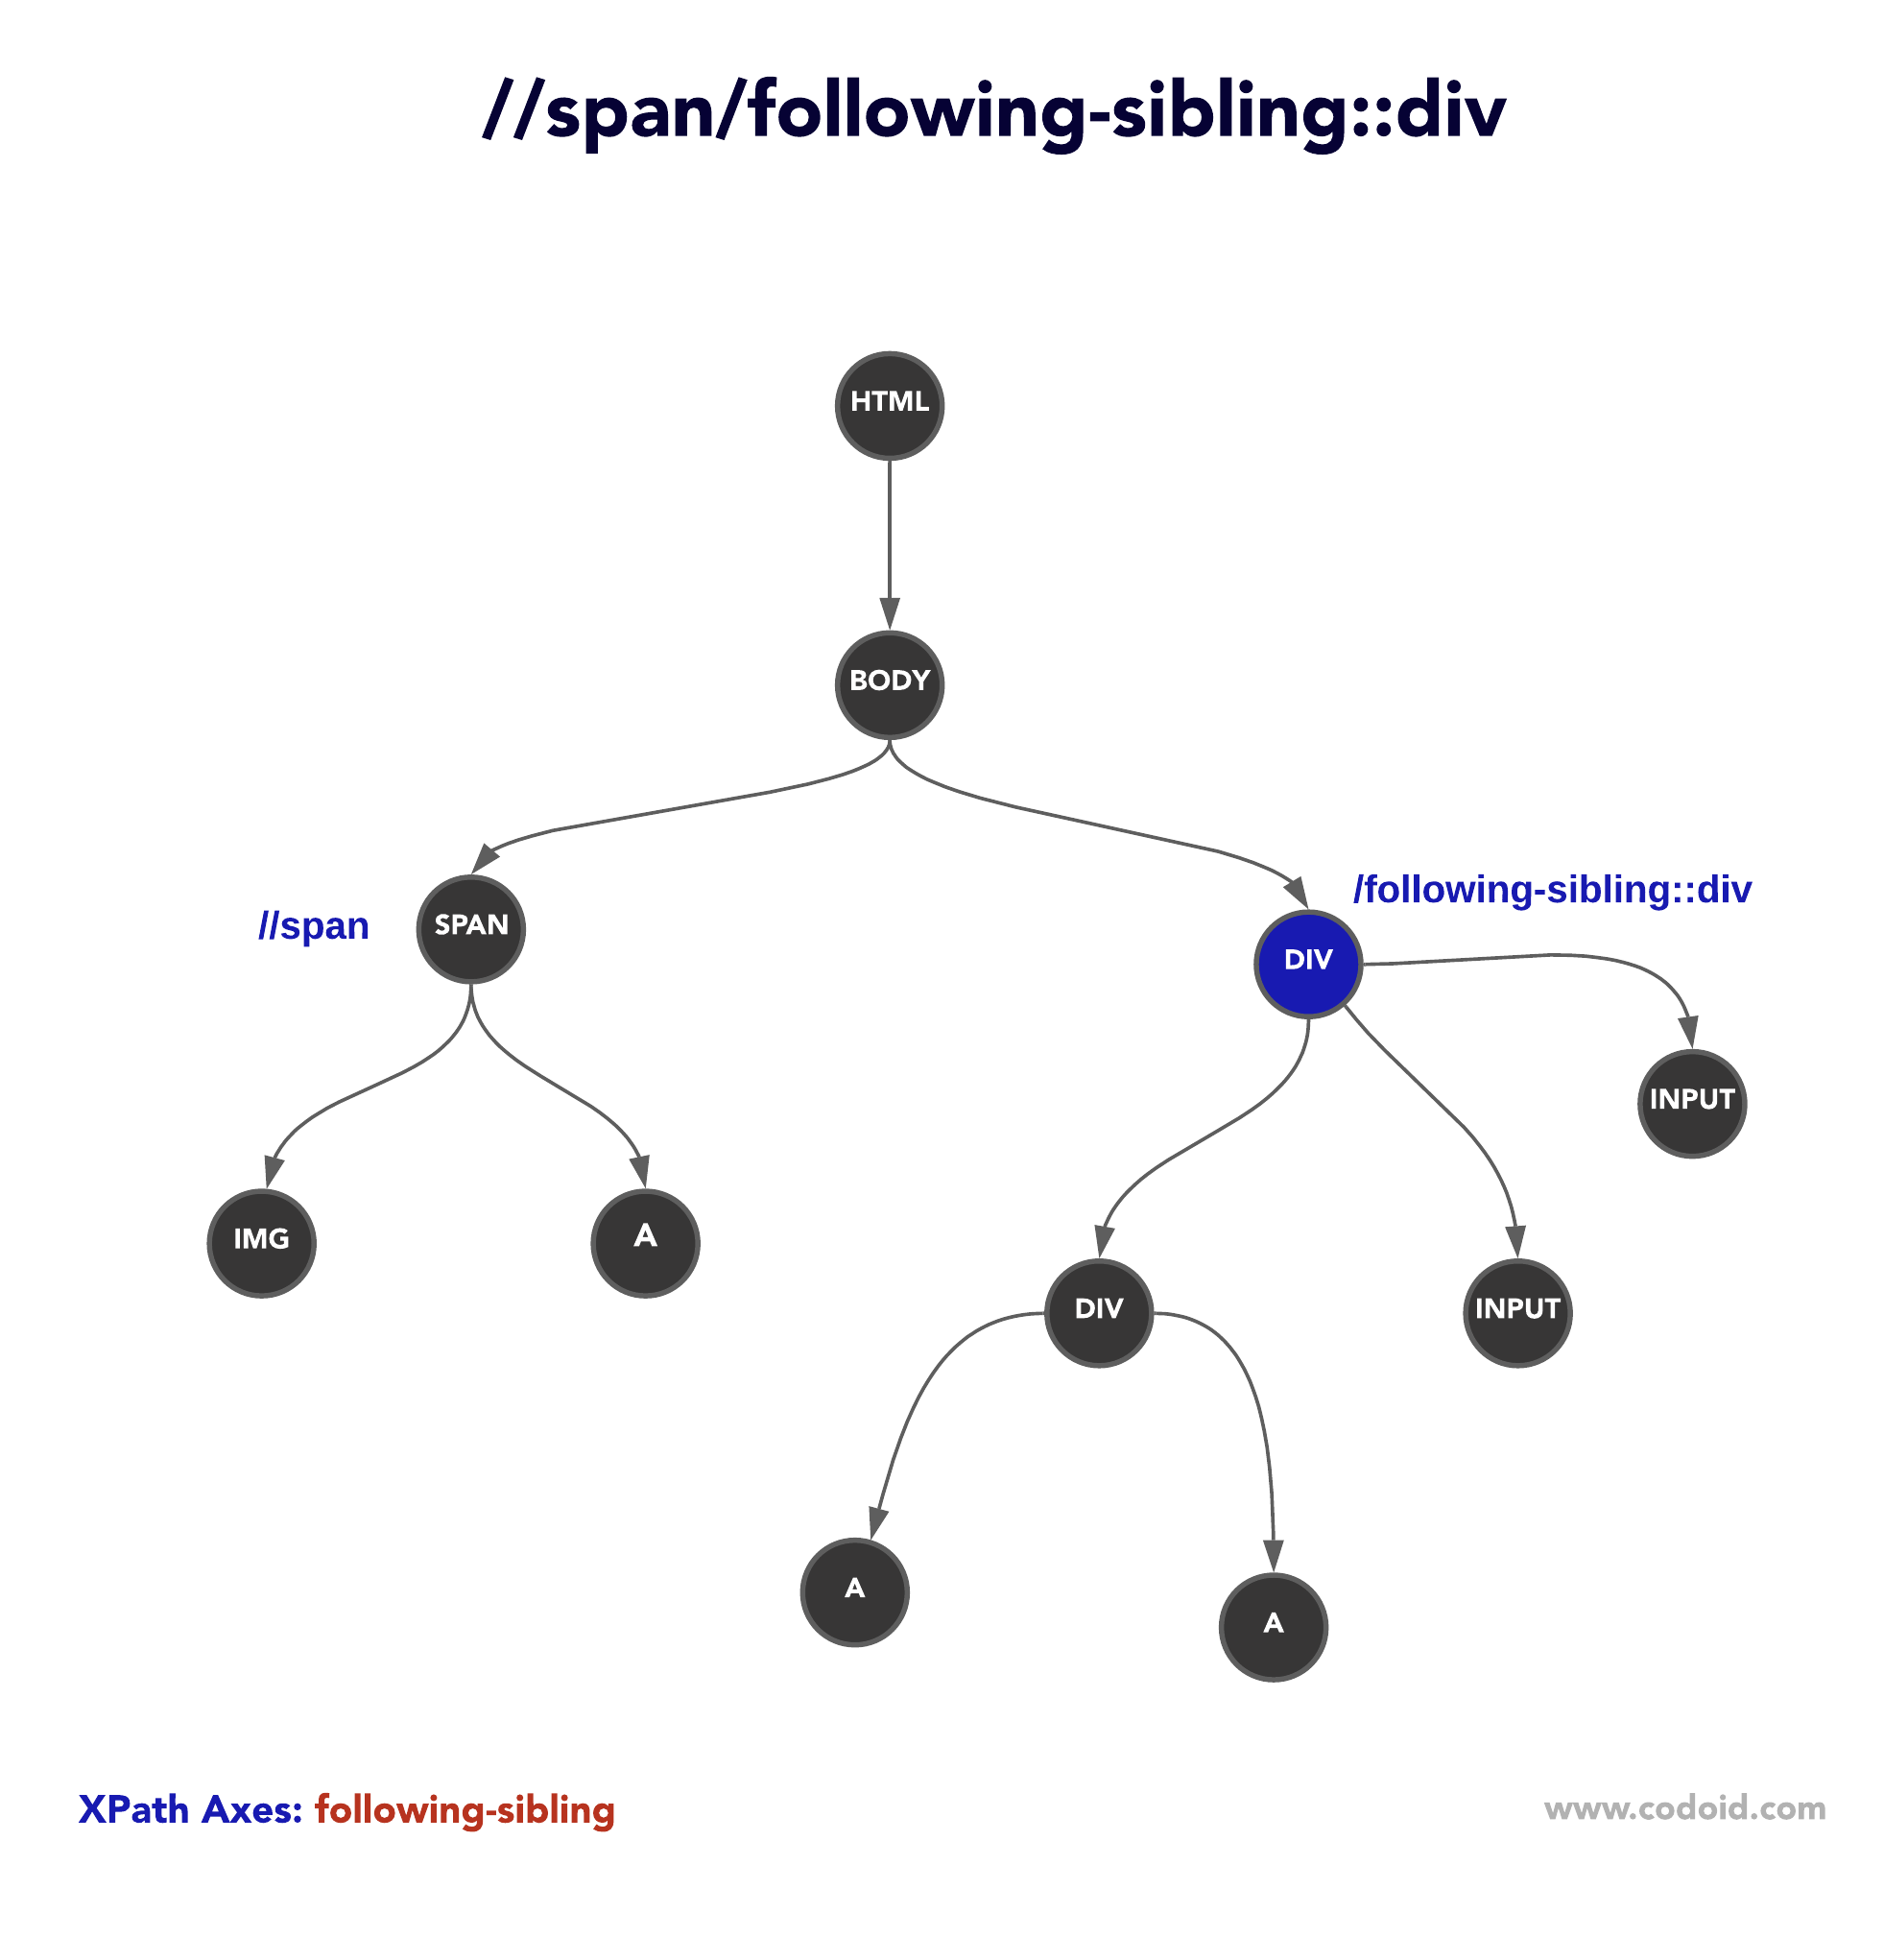
If you would like to select siblings that are after the current node, try the following-sibling axis.
preceding-sibling
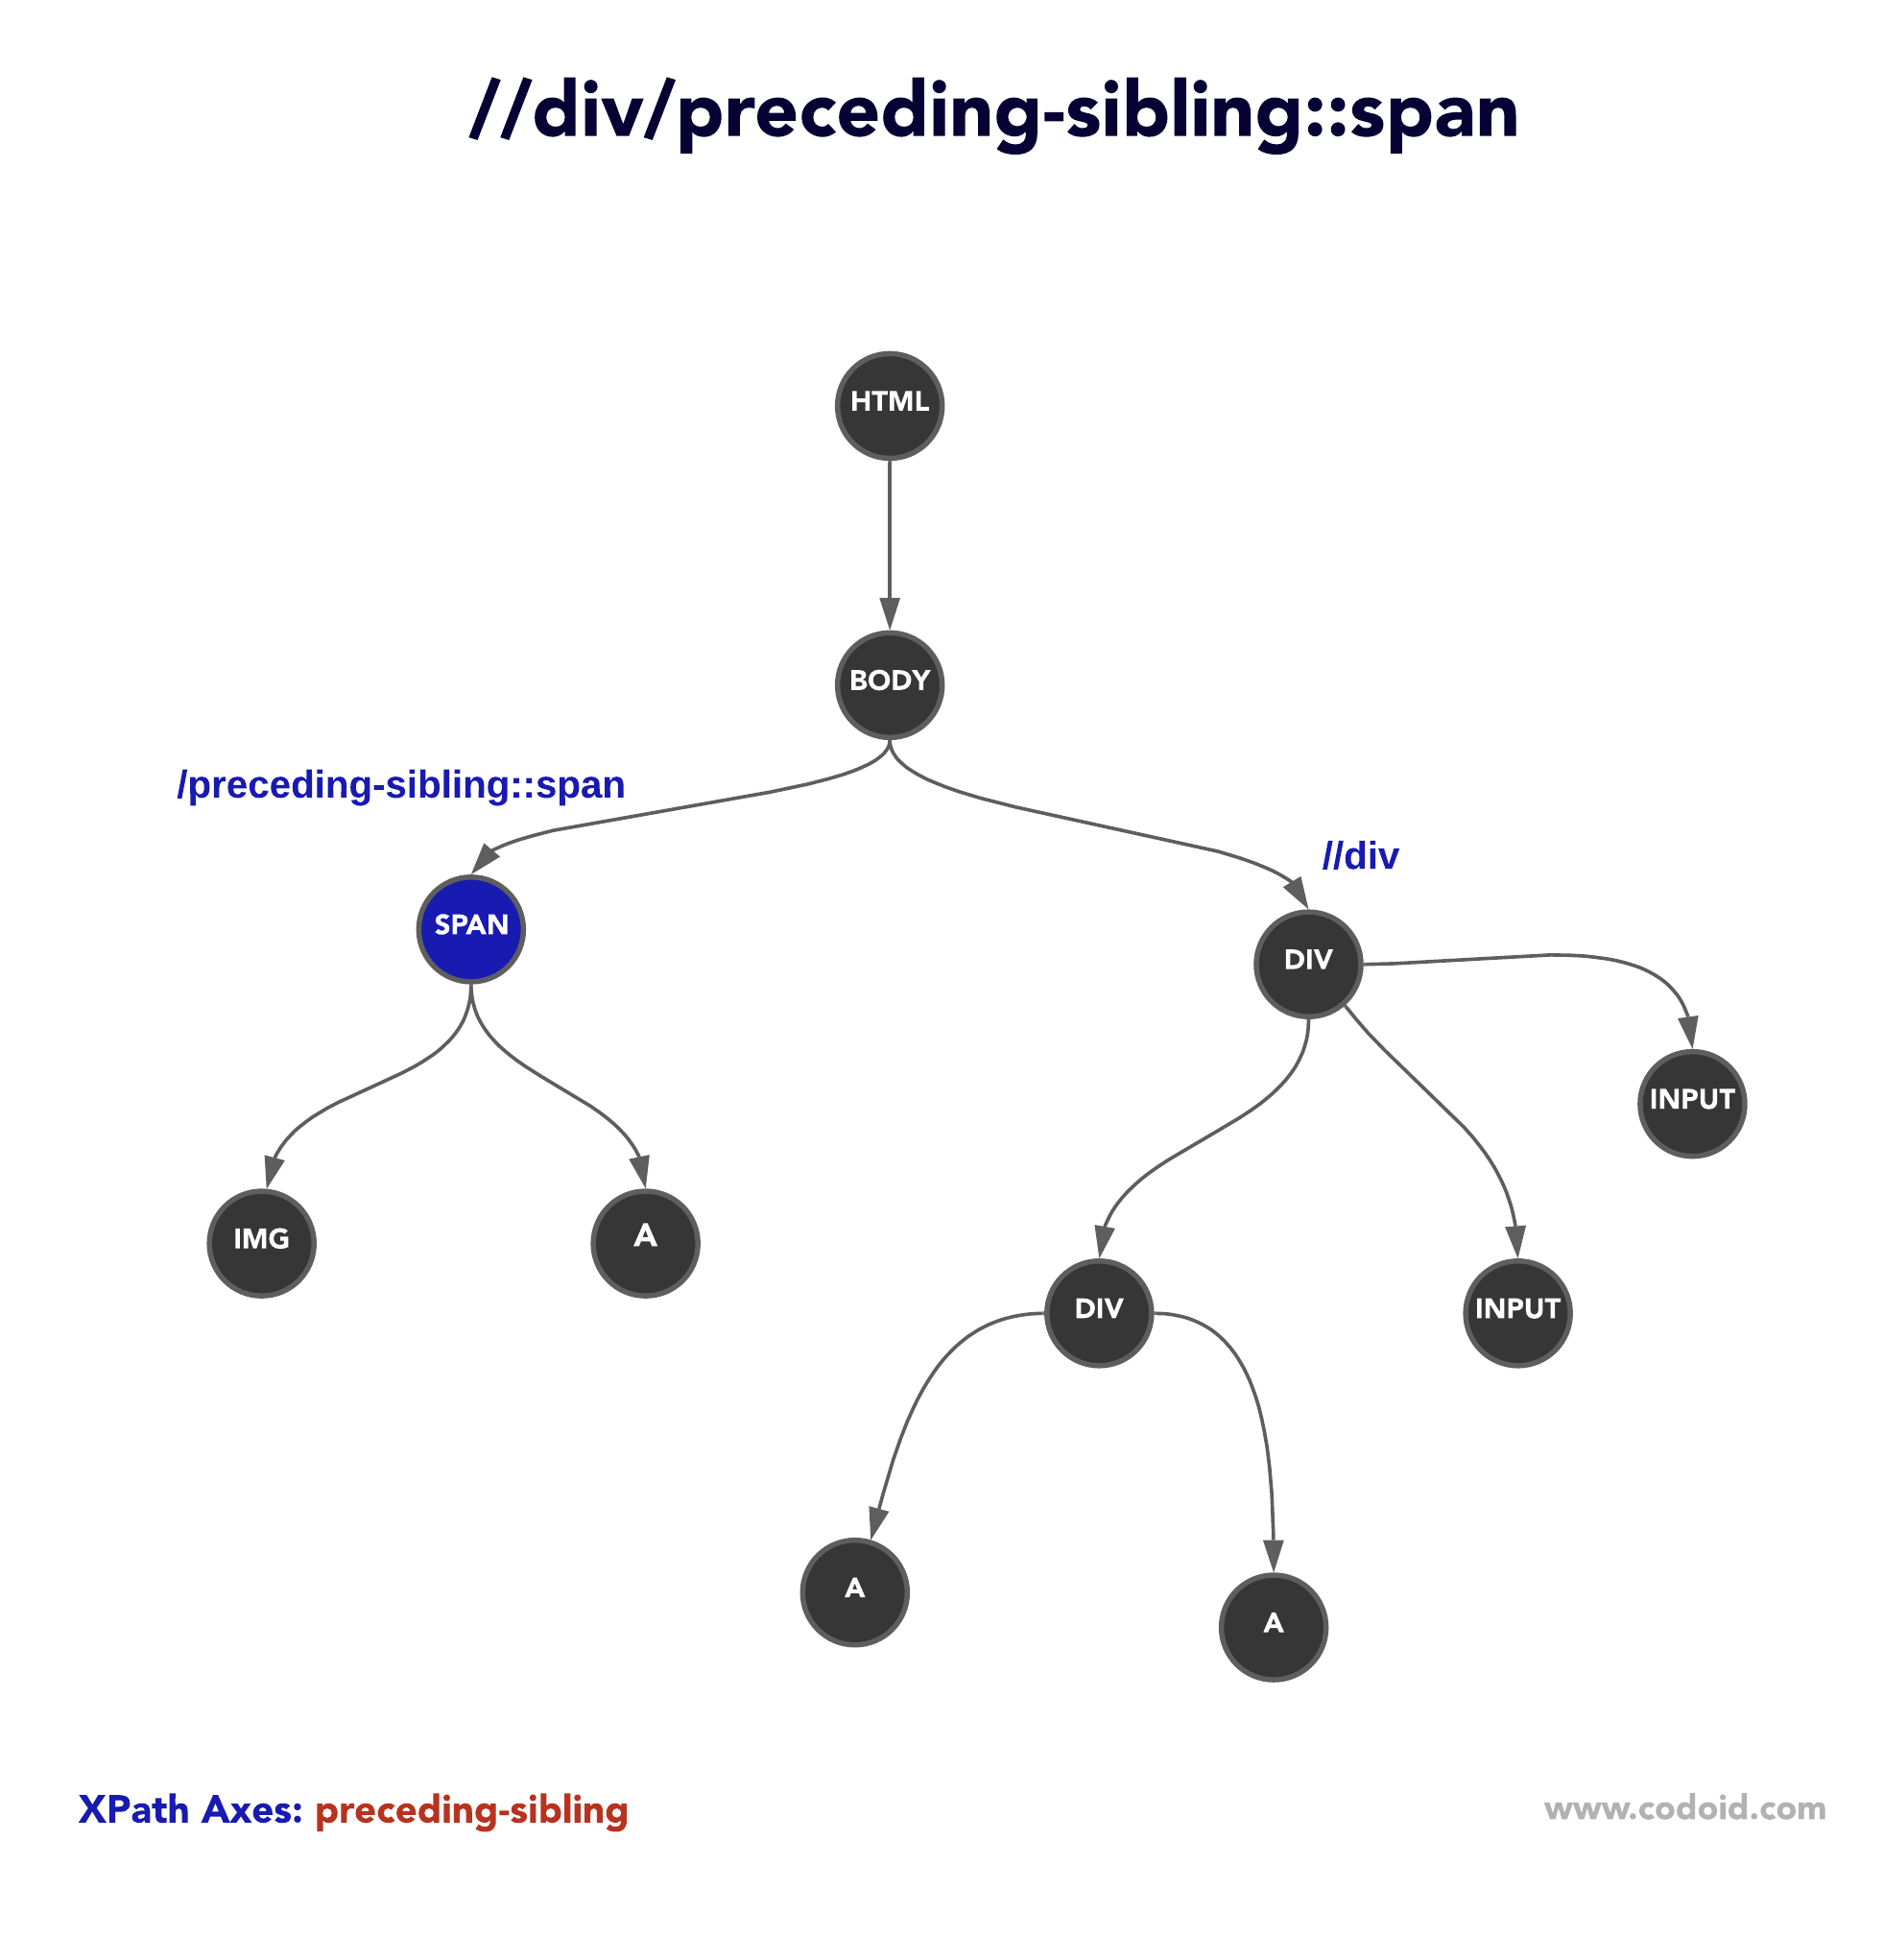
If you would like to select siblings that are before the current node, try the preceding-sibling axis.
Conclusion
XPath Axes are helpful to traverse the DOM tree to locate dynamic web objects. Selenium Tester should know each XPath axis and its use to create robust automation test scripts.
For mobile apps automation testing, locating techniques are different. In the subsequent blog articles, we will be publishing more on mobile app test automation using Appium. As a leading automation testing company, we have started our Singapore operations and planned to schedule automation testing training sessions for professionals in the Singapore region.
If you are in Singapore and want to learn Object Locating Concepts, Advanced Selenium, & Appium, please contact us.


