by admin | Jul 4, 2020 | Selenium Testing, Fixed, Blog |
A major proportion of automation testers are familiar with Selenium Keys feature. You can use Selenium Keys and SendKeys in WebElement class, Action Class, and Keyboard class. In this blog article, you will learn the nuances between these methods.
Everyone is well aware of the fact that SendKeys method is mostly used to enter value in a textbox or file path in File inputbox. Take for instance if you wish to paste the value which is available in clipboard using CTRL + V in a textbox.
txtBox = driver.find_element_by_id("txt1")

#Pastes the clipboard value in the textbox
txtBox.send_keys(Keys.LEFT_CONTROL, 'v')
The above snippet pastes the value in the textbox. Now, you want to enter a string after pasting the clipboard.
txtBox.send_keys(Keys.LEFT_CONTROL, 'v', 'Codoid')
When you execute the above code, it won’t accept the string (i.e. Codoid). Because the modifiers keys (i.e. CTRL/ALT/SHIFT/etc) will not be released until SendKeys call is complete.
To understand the above precisely, pass the third argument text as ‘value’ and rerun the snippet.
txtBox.send_keys(Keys.LEFT_CONTROL, 'v', 'value')
If you notice the execution, the snippet has pasted the clipboard text twice. The reason is CTRL key is released only after the SendKeys method call.
CTRL key is not released yet and the third argument (‘value’) string’s starting letter is ‘v’. So again CTRL + V is pressed. That’s why the clipboard text is pasted twice in the textbox.
Then how to enter the argument text in the textbox? Just use KEYS.NULL after CTRL + V. Refer the below snippet.
txtBox.send_keys(Keys.LEFT_CONTROL, 'v', Keys.NULL, 'value')
As soon as Keys.NULL is used all the modifier keys will be released.
Using Action class’ SendKeys methods, you can’t press modifier keys. Try the below code, it won’t paste the clipboard content as we tried using WebElement’s Sendkeys method.
action = ActionChains(driver)

action.send_keys_to_element(txtBox, Keys.LEFT_CONTROL, "v").perform()
You need to use KeyDown to press modifiers keys. Try with the below code, it will paste the text in the textbox.
action.key_down(Keys.LEFT_CONTROL).send_keys_to_element(txtBox, "v").perform()
We as an automation testing company, have mitigated several unsuccessful automation testing projects. Gaining enduring technical know-how of selenium basics to advanced level is a key to test automation success.

by admin | Jun 19, 2020 | Selenium Testing, Fixed, Blog |
Writing Selenium CSS Selectors for object locating alone cannot improve script execution performance. Additionally you need to write performant CSS Selectors. Copying and pasting CSS Selectors that are suggested by any plugin or browser is not a right approach. You should be able to construct your own CSS Selectors or should possess strong knowledge of auto generated selectors.
In this blog article, you will learn the basics of Selenium CSS Selectors. If you are familiar with XPath and CSS Selector construction on your own, then creating robust automated test suite will be a cake walk.
By ID
If you have ID for an element on which you are going to perform action, then you can go with ID selector instead of CSS Selector. However, if you want to identify parent node in the CSS Selector, then you should be familiar with selecting an element using ID.
HTML
<input type=”text” id=”txt1″/>
Selector
#txt1
Direct Child
You can use the below CSS Selector to select a direct child under a parent node.
HTML
<div>
<input type=”text” />
</div>
Selector
div>input
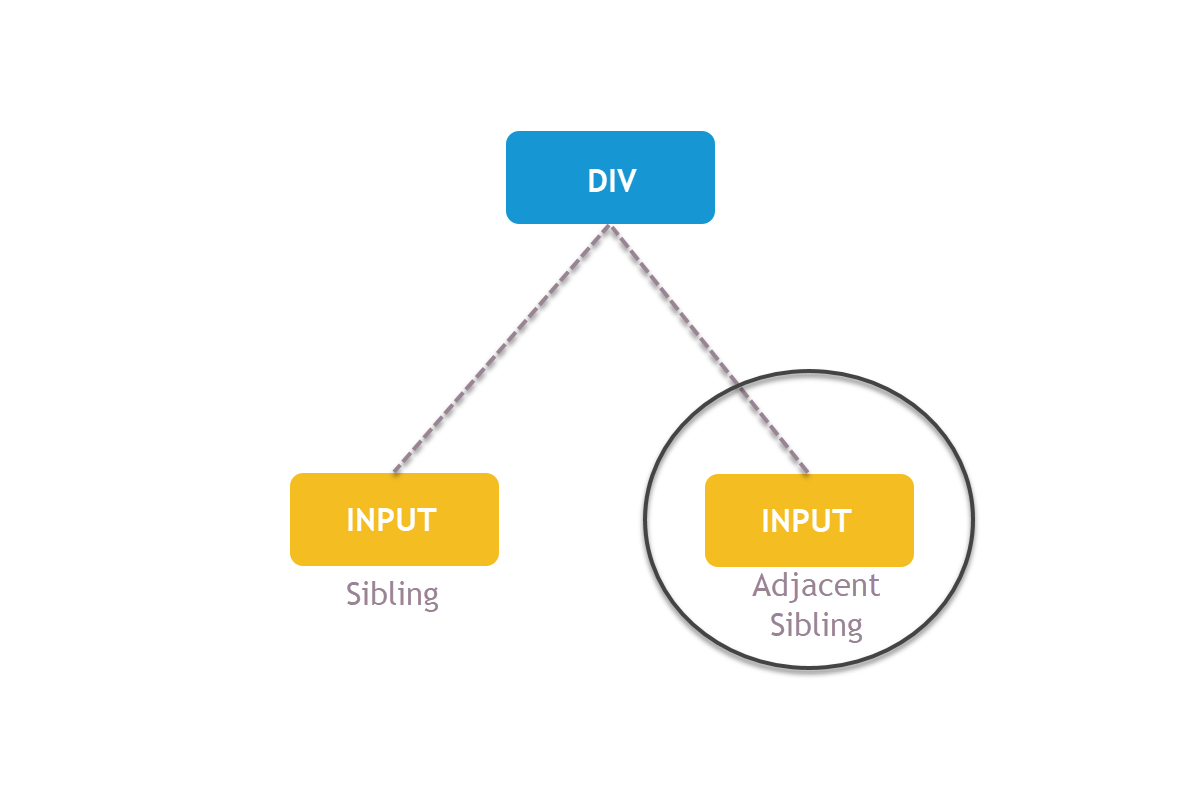
Adjacent Sibling
Once you select a node, you can also jump to an adjacent sibling using the below selector.
Selector
div > input + input
Starts With
Using starts with to match attribute value.
HTML
<input type=”text” id=”txt4″ class=”textbox-st”/>
Selector
input[class^=’text’]
Sub String Match
Matching a sub string in an attribute value.
HTML
<input type=”text” id=”txt4″ class=”textbox-st”/>
Selector
input[class*=’box’]
Ends With
Using ends with to match attribute value.
HTML
<input type=”text” id=”txt4″ class=”textbox-st”/>
Selector
div>input[class$=’st’]
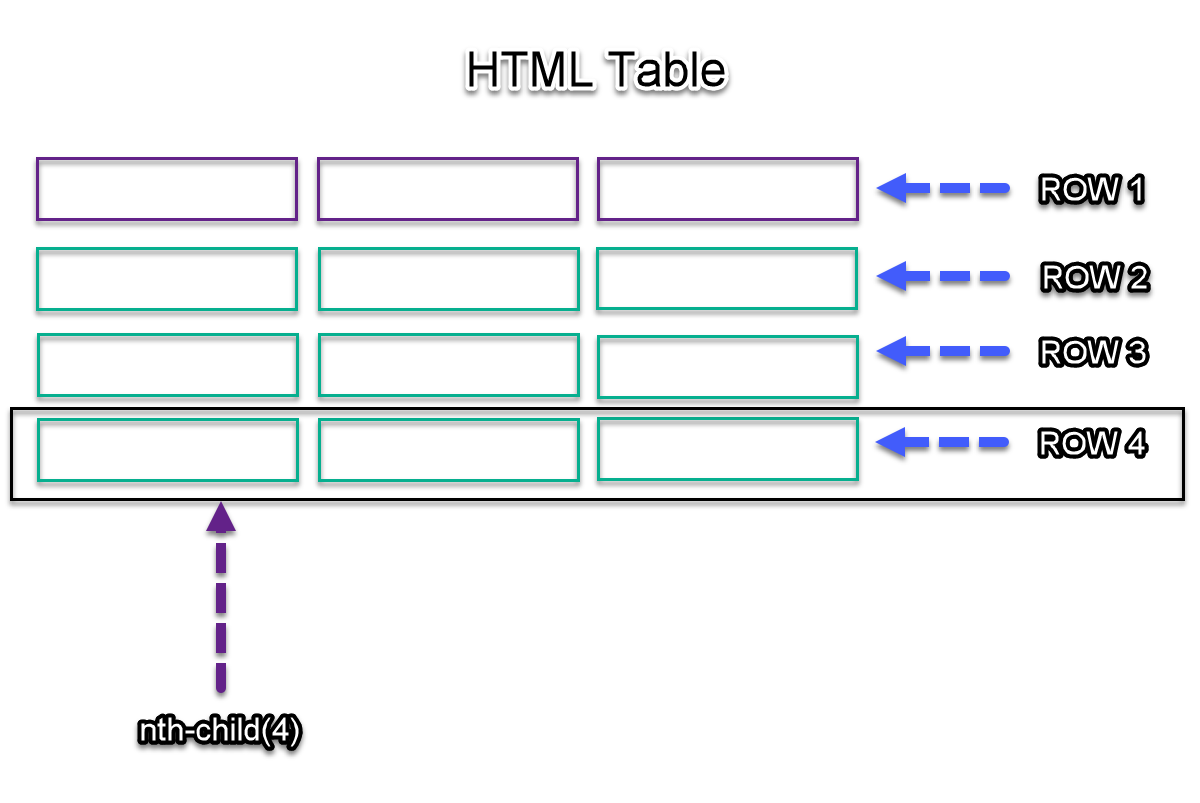
nth-child
Selecting an element using its index
Selector
tr:nth-child(4)
Basics of Selenium CSS Selector and XPath is a mandatory skill for a test automation engineer. As a software testing services provider, we train all our new recruits on object locating techniques. When your team is well versed in XPath & CSS Selector, they will be able to produce robust test automation suites.

by admin | Apr 13, 2020 | Selenium Testing, Fixed, Blog |
Buildbot is a continuous integration tool which is developed using Python. What is so unique about BuildBot CI when we already have Jenkins? In BuildBot, you can create and schedule tasks using Python code instead of setting up in UI. When you setup the tasks in code, you can extend and customize the CI features based on your project needs. As a leading QA company, we use a multitude of CI tools as per clients’ need. However, BuildBot CI has given us a whole new experience while exploring.
In this blog article, you will learn how to install BuildBot on Windows 10 and running Selenium Scripts successfully, Let’s start with installation.
Note: All the steps which are mentioned in this blog article are only applicable for Windows.
Create Virtual Environment
Open command prompt, go to any folder, and type the below command. Note: bbot is the virtual environment name. Once the environment is created, you can find ‘bbot’ folder.
Activate Virtual Environment
Step 1: Open command prompt and go to the virtual environment folder. Ignore this step, if you are already inside the virtual environment folder.
Step 2: Go to ‘scripts’ folder which is available in bbot folder.
Step 3: Run activate command.
Twisted Binary Installation
Step 1: Download Twisted?20.3.0?cp38?cp38?win_amd64.whl
Step 2: Install the binary
pip install Twisted?20.3.0?cp38?cp38?win_amd64.whl
Install BuildBot CI
pip install buildbot[bundle]
pip install buildbot-www
Create & Start Master
Step 1: Open command prompt and activate bbot environment which we created in step #1
Step 2: Create a folder where you want to setup master and its workers.
Step 3: Create master using the below command. You can find
buildbot create-master master
Step 4: Start master
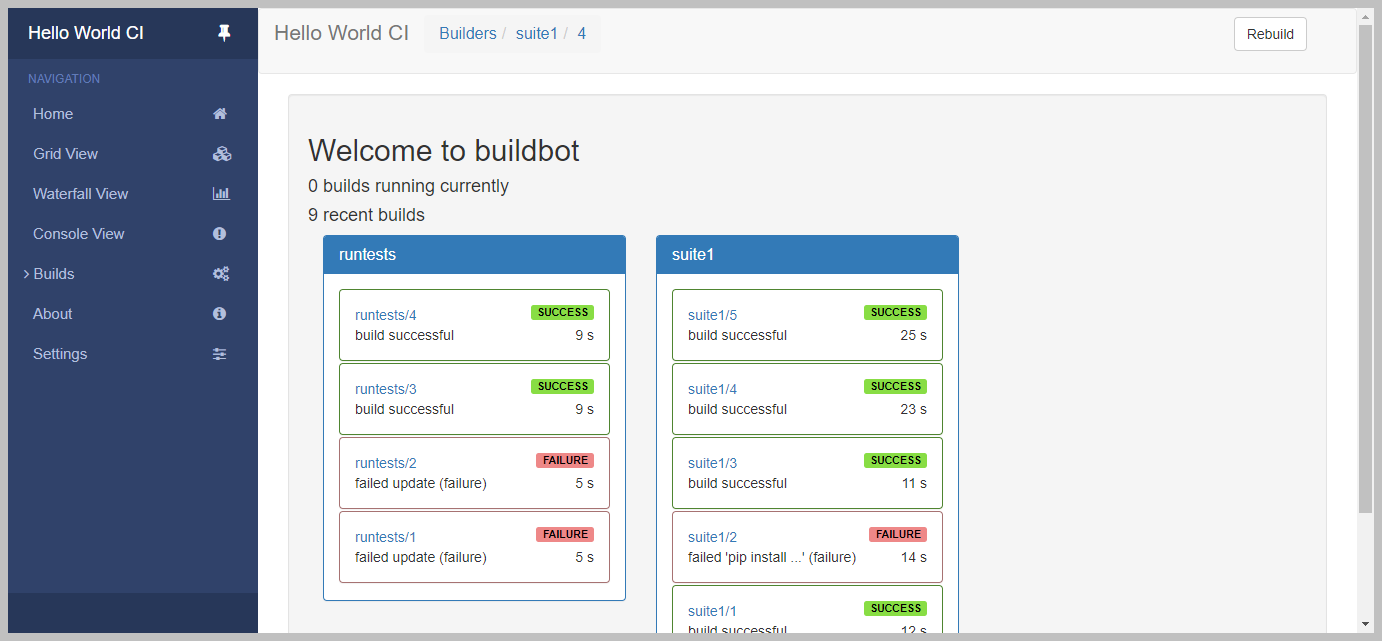
Step 5: Launch the following URL – http://localhost:8010/ and check if you can see the below page after starting the master.
Creating Master Configuration File
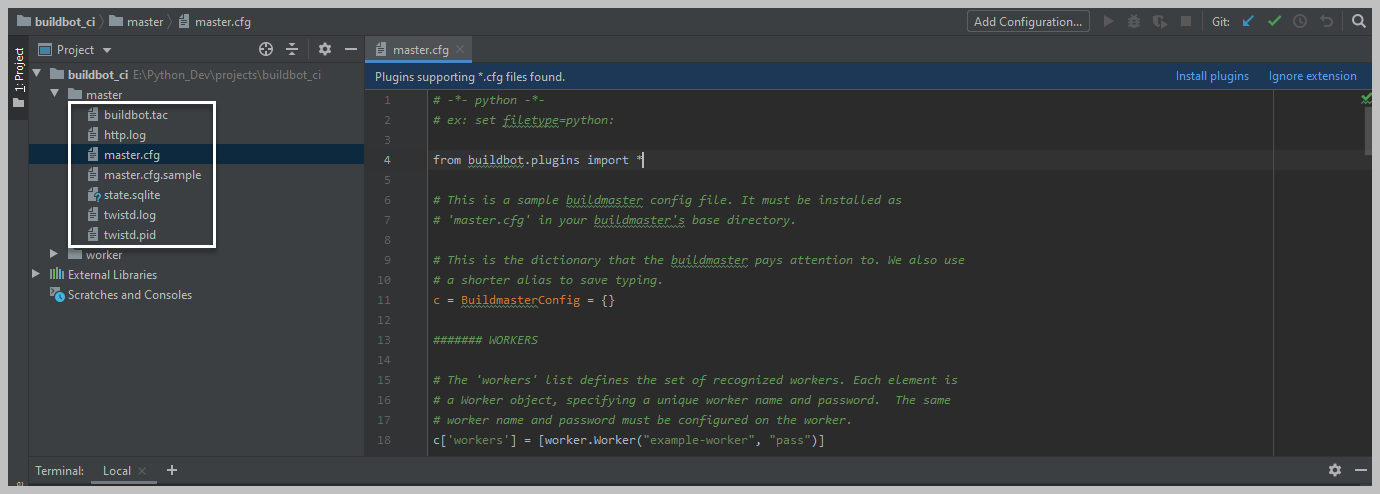
Open Python project in PyCharm IDE where the master is setup. Inside the master folder, you can find ‘master.cfg.sample’ file. Copy & paste the file in master folder. Rename the file as ‘master.cfg’.
Updating Configuration File
Now it is time to update build details in BuildBot Master configuration file. We have already created automated test scripts to configure in master.cfg. In the following sample Git repo, you can find a BDD feature and the required step definition. To run the feature file in the buildbot CI worker, you need to update the git repo URL in master.cfg. Please follow the below steps to update the Git URL and execution commands.
Step 1: Open the master.cfg
Step 2: Go to line number 34 and update the Git URL (git://github.com/codoid-repos/sample-selenium.git)
Step 3: Go to line number 61 and update the Git URL (git://github.com/codoid-repos/sample-selenium.git)
Step 4: Go to line number 63 & 64 and replace the below snippet.
factory.addStep(steps.ShellCommand(command=["pip","install","-r","requirements.txt"],
                                   env={"PYTHONPATH": "."}))

factory.addStep(steps.ShellCommand(command=["behave","features"],
                                   env={"PYTHONPATH": "."}))
Download Master.cfg
Step 5: Once the config file is updated, then master needs to be restarted. To restart master, you need to kill Python process in Task Manger and run ‘buildbot start master’ command again.
Start Worker
Run the below commands to install and start worker.
pip install buildbot-worker
buildbot-worker create-worker worker localhost example-worker pass
buildbot-worker start worker
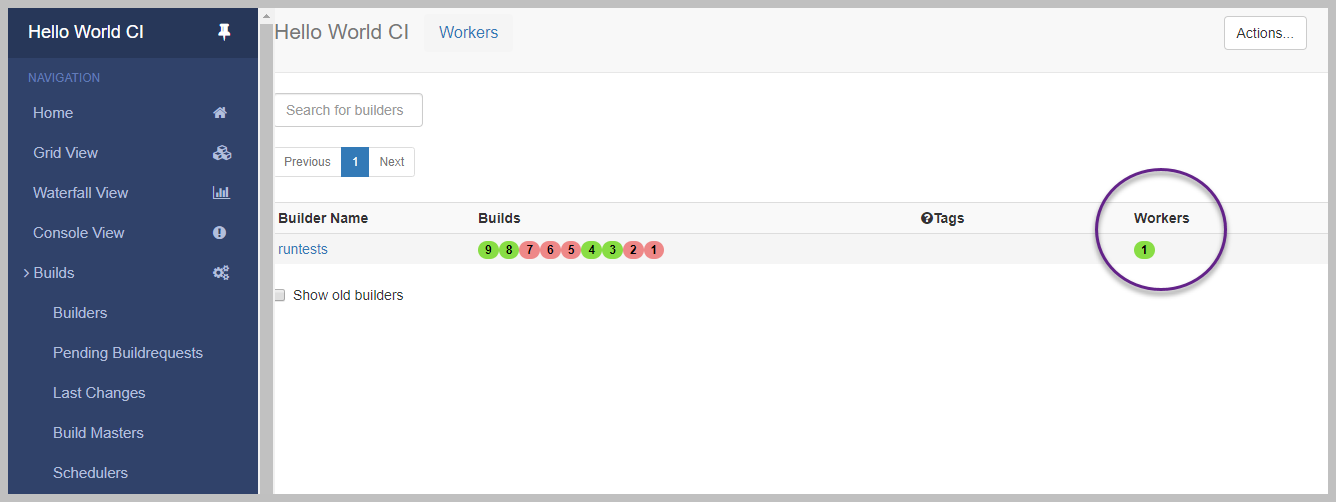
Once the worker is started, you can see the created worker in Workers column as shown below.
Start build
Step 1: Click Builders menu
Step 2: Click runstests build
Step 3: Click Start Build
Please ensure Git is set in Windows path variable.
That’s it.
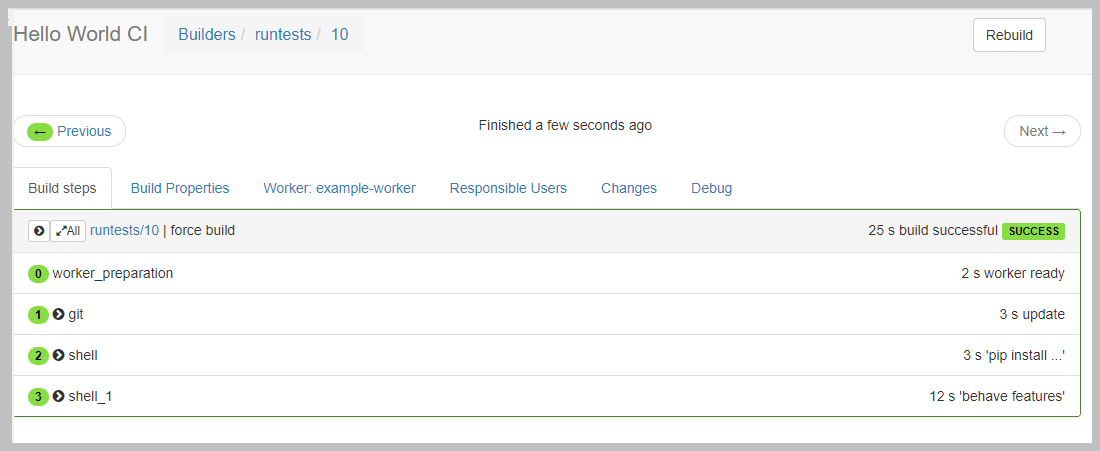
If the build is successful, you can see Green for all the tasks as shown below.
In Conclusion
We invariably use Jenkins and TeamCity in our test automation projects. However, exploring BuildBot CI gives us a different experience altogether. As a test automation company, we intend to publish more useful technical blog articles to share valuable insights to the software testing community. Even-though BuildBot CI setup is not straight forward. It provides some flexibility to manage & customize builds.

by admin | Apr 2, 2020 | Selenium Testing, Fixed, Blog |
Running prerequisite and cleanup snippets are necessary to make your BDD scenarios independent. In this blog, you will learn how to setup and tear down using Python Behave framework and ‘Before’ Scenario Example using Selenium.
We, as a test automation services company, use Python and behave for multiple automation testing projects.
Launching & Quitting Browser Before and After Scenario
Inside the environment.py file, create a fixture to launch a browser before scenario and quit it after the scenario.
Setup & Tear Down Code
@fixture
def launch_browser(context):
    #Launch Browser
    context.driver = webdriver.Chrome(executable_path='driverschromedriver.exe')
    yield context.driver

    #Clean Up Browser
    context.driver.quit()
    print("=============>Browser is quit")
If you notice the above code, you can find both Setup & Tear-down in the same method. It reduces your scripting efforts to a great extend and eases the script debugging & maintenance. The ‘yield’ statement provides the webdriver driver instance. After that the test run executes each steps in the scenario and resumes the remaining statements (i.e. the clean-up steps) which are after the yield statement.
Before Scenario Method Call
After defining the fixture, you need a method to call the fixture (i.e. before_scenario).
def before_scenario(context,scenario):
    the_fixture1 = use_fixture(launch_browser, context)
Full Code
from behave import fixture, use_fixture
from selenium import webdriver

@fixture
def launch_browser(context):
    #Launch Browser
    context.driver = webdriver.Chrome(executable_path='driverschromedriver.exe')
    yield context.driver

    #Clean Up Browser
    context.driver.quit()
    print("=============>Browser is quit")


def before_scenario(context,scenario):
    the_fixture1 = use_fixture(launch_browser, context)
How to get the scenario status?
Behave has four statuses for each Scenario namely: untested, skipped, passed, failed. To retrieve the status, use the below statement.
print(context.scenario.status)
Scenario Duration
In behave framework, you can get the scenario duration in the clean-up section as shown below.
@fixture
def launch_browser(context):
    #Launch Browser
    context.driver = webdriver.Chrome(executable_path='driverschromedriver.exe')
    print("=============>Browser is launched")
    yield context.driver

    #Clean Up Browser
    context.driver.quit()
    print(context.scenario.duration)
    print("=============>Browser is quit")
In Conclusion
We hope the snippets which are shared in this blog article are useful. In our upcoming blog articles, we will through light on some of the most useful Python automation testing snippets. Subscribe to our blogs to get latest updates.

by admin | Feb 18, 2020 | Selenium Testing, Fixed, Blog |
This blog is mainly about discussing Selenium Automation challenges that we come across at our Rota. When we say challenges, though it’s an impediment still it gives the opportunity to explore and that way we get introduced to many things
Basis the experience, we would like to half split this into two categories.
1) Anticipated challenges
2) Un-anticipated challenges
Anticipated Challenges
We always reckon that the things that we are discussing here are not really challenges or some impediment that blocks us from proceeding. These should be considered as tasks that have to be performed by adding some additional coding actions or by integrating an additional concept to the selenium scripts.
1. Improper waits
2. Weak locator selection
3. File uploads
4. Send keys operation in IE
5. Browser zoom settings in IE
6. Zone mismatches setting in IE
7. Windows authentication pop-up during URL launch
8. Seldom windows interactions
9. Sweet alert handles
10. Dynamic data expectation by application
11. Taking snap during alert presence
12. Launching Browser with options
Let’s see one after another to know, what each one is about
Improper waits
Basically when we are working with a web application through a browser we tend to see lot of synchronization problems, that mean there would be a significant problem in rendering the webpage that perhaps due to the poor and sluggish network provisions or at times the design of the webpage itself or sluggish server response i.e. not all the elements may not load at the same instance.
But by nature selenium’s swift is far high and try to interact with the element that it was instructed to do so and fails because the element isn’t loaded properly so far. How do you handle this risk?
The above one is potentially a technical problem, but we have better concepts to achieve that. Based on need and the suitability with proper understanding any of the below wait concept is used
Implicit wait – one mention at the start of the script would help the wait applicable for all the subsequent actions
Explicit wait– This is recommended only when we know that a particular element is expected to be delayed for presence. This wait is applicable to that one particular action, so that way we can ensure we are not waiting on other elements because of this
Fluent wait- This is an advanced explicit wait, it features the recurrence with which the wait has to be executed with the help of polling time.
Improper choice Locators
The only possible way to interact with web elements is by identifying the locators in DOM. If the selection of those is improper that leads to a great mess. A careful study of when to go for what locator is much needed. Here below are some examples of weak locators.
Improper Locators
Do not use Id attribute if at all it has a change of numbers/ if it’s generating dynamically.
Do not use the class name attribute if that has spaces in it.
While writing Xpath matches rather than going with start-with, end-with functions its always advisable to go with contains as its generic
File Uploads
On a few use cases, we might need to deal with uploading the file that’s available some other location also downloading the one from the browser page. Upon understood the task, the right choice of a decision whether or not a third party tool integration is needed to perform, or do we have any libraries that perform tasks for us. Talking to the right set of people or seeking suggestions from experienced peers would help us achieve the task, rather than just shouting out as a blocker.
Possible solutions:-
Observe the DOM attributes for the file path text box in the webpage if at all it is defined with a type parameter as “File”. We can directly send keys the file location (no need to click) that way we can upload file
On the other hand if the possibility one doesn’t work, we will have to integrate the AutoIT / VNC viewer script to upload the file
Using Robot class presented in java we can achieve the action as that helps to impersonate the mouse and keyboard actions
IE problems
Internet explorer being an inbuilt browser on a windows machine is certainly not as much friendly as the other native browsers such as Chrome, Firefox…Etc. the most commonly seen challenges and the way to fix are
Send keys operation: – This is a tedious task unless we knew that we have a workaround to use a 32-bit version of InternetExplorerDriver.exe file, otherwise it is relatively slow with IE.
Zoom Settings: – if at all zoom in is set to some higher value (perhaps 100). Element can’t be clicked as they are not inclined within the clickable window, just taking care of the setting would help us
Security Zones: – The IE browser might not get launched if at all the settings were not set to the same protected mode.
Windows Interaction
On a few occasions windows interaction is unavoidable, however, it’s a not very straight forwarded action still it’s mandatory to perform the action as it’s a business need. Considering them as challenge shout out is not desired, this again generates space for an individual to explore and integrate the other components. Following or some actions which are expected to be encountering.
Accessing the file that was downloaded
Impersonating the mouse and keyboard actions
Run a batch file that’s available in a specific path
Solution:- The possible solutions for any of the above solutions would be to use the Robot class present in java AWT package or to integrate the selenium code with any other external tools such as AutoIT/ VNC viewer or coded UI
Scrolling actions
At times the element that we are looking for may not be visible unless we scroll down to the webpage.
Solution
The possible solution would be through javascript executor which is an interface, help us getting the executeScript operation done through a driver.
The fact that the browser has a bit of implementation of javascript these actions were preferably done through javascript. We can pass the below arguments to the executeScript method to scroll in a browser window
Scroll by method- we can actually specify the location of the elements in terms of co-ordinates, then pass those parameters so that we will have window scrolled down until that place
ScrollTo- This is another offered method to scroll to a specific element, we locate the element to which we wanted to scroll to then pass that locator as a parameter
ScrollHeight- Despite the element location, if we want to scroll down to the bottom of the page, this method can be used
Windows Authentication pop-up
There are some applications that throw windows authentication popup after navigating to the URL, the pop up that comes is neither an alert nor belong the application to locate them in DOM.
Solutions
There are two possible solutions for this problem,
Pass the credentials in URL as http://username:[email protected]
On the other hand, using javascript executor would help, we can do a sendkeys operation within the executeScript method to achieve this
Sweet Alerts
Alert handling is one of the popular mechanism in selenium, I feel many out there wouldn’t even come across these kinds of alerts (Sweet). These would basically be displayed for a few seconds and disappear. The real challenge with these elements is about how to identify them in DOM.
Solution
In order to find the following procedure should be followed
Mouse hover on the sweet alert to make that pop out.
Freeze the DOM (shift+F8) when the element is present on UI, then the related attributes of the elements will be displayed to capture.
Dynamic data expectation by application
Web applications a day on day becoming more advanced, dynamic in order to enhance the user experience. The data that present on one row today may not present at the same place tomorrow also many fields do not accept the duplicate data. Given this advanced behavior, the static test data may not help. Generating the random numbers/ alphabets and appending to the actual value would help to avoid such problems.
Capturing snapshot during the alert present
Though we have take screenshots method also know of a procedure to capture the snap during each action, it is quite not possible with the case when we have an alert appeared on the window, in order to achieve this we should use the below coding snippet.
System.setProperty("webdriver.chrome.driver", "./drivers/chromedriver.exe");
		ChromeDriver driver = new ChromeDriver();
		driver.manage().window().maximize();
		driver.get("https://www.irctc.co.in/eticketing/forgotPassword.jsf");
		driver.manage().timeouts().implicitlyWait(30, TimeUnit.SECONDS);

		driver.findElementById("forgot_passwrd:checkDetails1").click();
		Thread.sleep(1000);

		// take snap
		BufferedImage image = new Robot().createScreenCapture
		(new Rectangle(Toolkit.getDefaultToolkit().getScreenSize()));

		ImageIO.write(image, "png", new File("./data/Alert.png"));

	}
Challenges during browser launch
When we launch a browser to navigate to application URL, we might see the below problems
Notification or info bars, that makes the script to fail
Cache memory not cleared due to which can’t navigate to application home screen
Browser is not opening in maximized mode by default
At times we will have a requirement to open the browser to incognito tab
Solution:- For the above potential problems we have a solution by adding chrome options. we can also set the desired capabilities for any browser such as Mozilla, IE< safri..etc
ChromeOptions op = new ChromeOptions();
//		op.setHeadless(true);
		op.addArguments("--disable-notifications");
		// To run in private  mode
		op.addArguments("--incognito");
		// To start browser in full screen
		op.addArguments("--start-fullscreen");
		// To disable the yellow info bar
		op.addArguments("--disable-infobars");
		ChromeDriver driver = new ChromeDriver(op);

		driver.get("https://www.google.co.in/");
		System.out.println(driver.getTitle());
Un-anticipated challenges
These are a kind of unchecked exceptions which are truly due to the poor implementation. These can’t be expected due to the fact that we may not realize what it can cause until we come across, ideally, these should have been avoided with due diligence and thorough review of the project, but there will be an instance where people miss doing that. Given below were some examples of this category.
- Improper coding standards
- Least concerned about following framework standards
- Improper reporting mechanism
- Improper feasibility analysis
- No proper exception handling
- Improper VCS system existence
Improper coding standards
If the coding standards are not maintained properly within the framework it can lead to great problems. Below are a few things that could eat our cat.
Not using the best suitable data structure to perform data operations
Hard coding the data in a script
Not writing generic methods
The above problems were some high-level ones, which can increase the maintenance effort to our framework as redundant code needs to add, also it could cause significant delay to the script execution.
Least concerned about following framework standards
The purpose of the framework is to build a structure for the project as were to write what? and how? With a proper template structure built, all team members have a common understanding.
A couple of problems seen are,
Not defining the folder structure
Writing the common methods w/o following the interface document given
Adding the dependencies to the build path directly rather than fetching from the POM.xml/ build.gradle file
Improper reporting mechanism
Reports are an essential component to any test automation framework, based on reports the test case is mainly judged whether or not it’s a failed or passed one. It is mandatory to include the report test steps right after every validation to ensure we are capturing the action result to show it to the business stakeholders. Some common problems we may see in terms of report generation on a few frameworks are
No mention of the reported step after validation, ideally these steps are more advised to add it to the common functionalities written
Not mentioning the understandable description in the report, the problem with it is non-technical people may not decipher the results
Not calling the report generation method under right testing annotation rather than writing them at the end of whole test execution as that results in the generation of multiple reports
No meaning full name to the report, that gets generated.
Improper feasibility analysis
It is a fact that 100% automation testing is impossible, below should be taken into consideration whilst taking a decision
A careful study of the use case with the given scope is required to decide whether or not I can be automated.
Understanding the value that it adds by automating the test case is a must. Ideally, we should be able to identify which way can it be validated quickly
No proper exception handling
Exception handling is one important mechanism to understand the cause for the failure. If we fail to catch every exception that may be thrown by the test case during execution that leads to a problem of flakiness, the test will execute till that step and hard stops then when we verify the report we will have all steps passed, but unfortunately not the whole test case is being run. This is one big problem at a business level, so documenting every exception with the help of try with multiple catch blocks is needed. It is equally important to add an understandable description in the report fail step for easy triaging.
No VCS exists in the project
When we work as a team, having a VCS system (GIT, Bit bucket, SVN)in place is a must. Lack of this facilitation will cause problems as it can’t properly merge the changes done by the different team members. It’s not ideal to just copy the changes from one system to another system when we have a system that does this for us very accurately. This will also help us to keep everybody in the team with the latest code base details.
No Documentation
Seldom times we come across certain issues, the workaround would have found after a thorough follow up with different teams. We must realize that the articulating those learning would help the team to a great extent. Continuous retrospection and noting the workaround will service back the team and no need to spend efforts again when they re-occur. This also acts as a pure knowledge base for the team.
Eg: any certificate installation to the java keystores /trust store to hit the application, verifying the hostname, any inputs from the infra team during automation set up installation.


