by admin | Apr 13, 2020 | Selenium Testing, Fixed, Blog |
Buildbot is a continuous integration tool which is developed using Python. What is so unique about BuildBot CI when we already have Jenkins? In BuildBot, you can create and schedule tasks using Python code instead of setting up in UI. When you setup the tasks in code, you can extend and customize the CI features based on your project needs. As a leading QA company, we use a multitude of CI tools as per clients’ need. However, BuildBot CI has given us a whole new experience while exploring.
In this blog article, you will learn how to install BuildBot on Windows 10 and running Selenium Scripts successfully, Let’s start with installation.
Note: All the steps which are mentioned in this blog article are only applicable for Windows.
Create Virtual Environment
Open command prompt, go to any folder, and type the below command. Note: bbot is the virtual environment name. Once the environment is created, you can find ‘bbot’ folder.
Activate Virtual Environment
Step 1: Open command prompt and go to the virtual environment folder. Ignore this step, if you are already inside the virtual environment folder.
Step 2: Go to ‘scripts’ folder which is available in bbot folder.
Step 3: Run activate command.
Twisted Binary Installation
Step 1: Download Twisted?20.3.0?cp38?cp38?win_amd64.whl
Step 2: Install the binary
pip install Twisted?20.3.0?cp38?cp38?win_amd64.whl
Install BuildBot CI
pip install buildbot[bundle]
pip install buildbot-www
Create & Start Master
Step 1: Open command prompt and activate bbot environment which we created in step #1
Step 2: Create a folder where you want to setup master and its workers.
Step 3: Create master using the below command. You can find
buildbot create-master master
Step 4: Start master
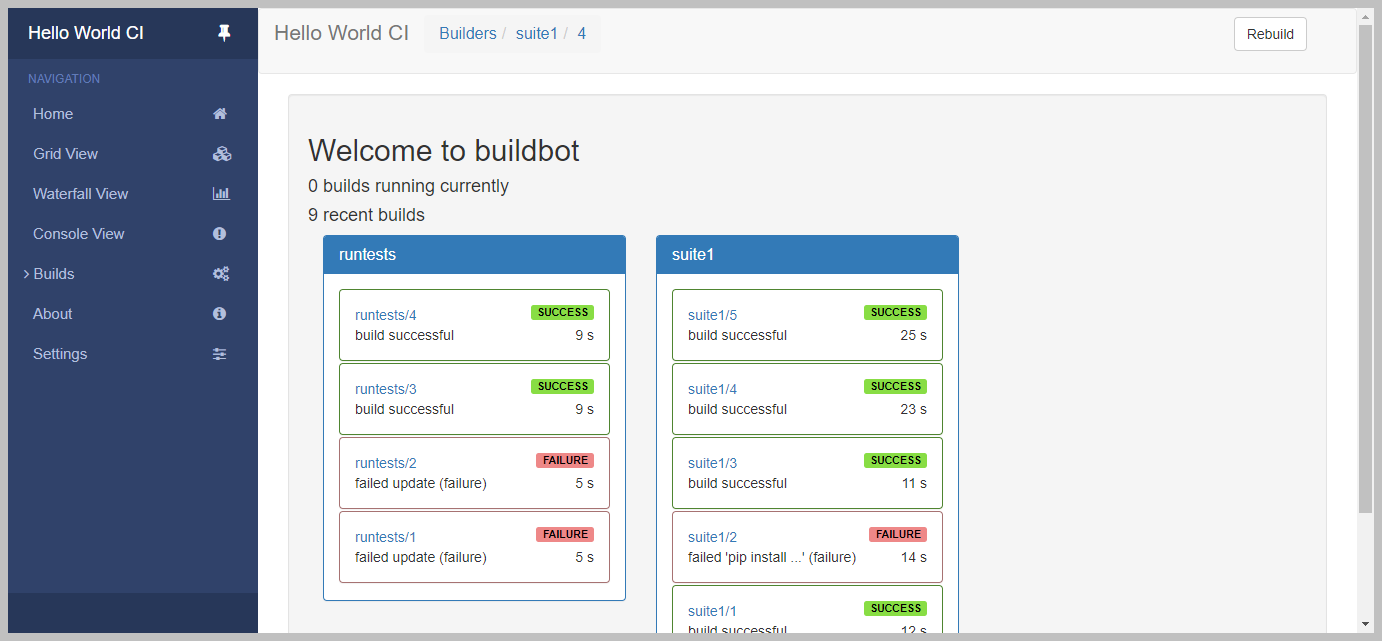
Step 5: Launch the following URL – http://localhost:8010/ and check if you can see the below page after starting the master.
Creating Master Configuration File
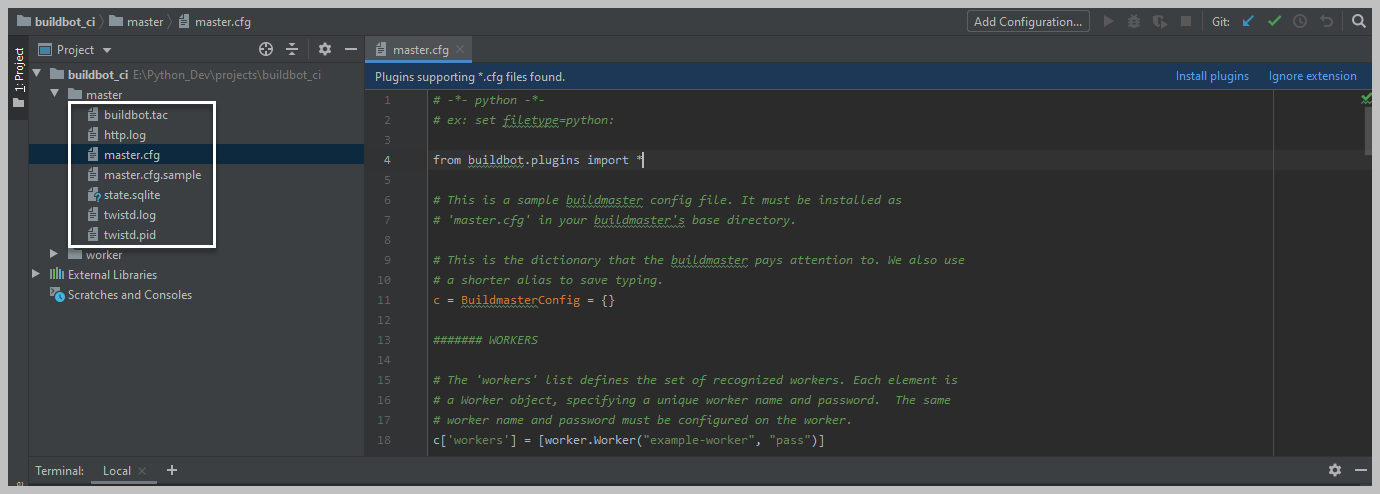
Open Python project in PyCharm IDE where the master is setup. Inside the master folder, you can find ‘master.cfg.sample’ file. Copy & paste the file in master folder. Rename the file as ‘master.cfg’.
Updating Configuration File
Now it is time to update build details in BuildBot Master configuration file. We have already created automated test scripts to configure in master.cfg. In the following sample Git repo, you can find a BDD feature and the required step definition. To run the feature file in the buildbot CI worker, you need to update the git repo URL in master.cfg. Please follow the below steps to update the Git URL and execution commands.
Step 1: Open the master.cfg
Step 2: Go to line number 34 and update the Git URL (git://github.com/codoid-repos/sample-selenium.git)
Step 3: Go to line number 61 and update the Git URL (git://github.com/codoid-repos/sample-selenium.git)
Step 4: Go to line number 63 & 64 and replace the below snippet.
factory.addStep(steps.ShellCommand(command=["pip","install","-r","requirements.txt"],
                                   env={"PYTHONPATH": "."}))

factory.addStep(steps.ShellCommand(command=["behave","features"],
                                   env={"PYTHONPATH": "."}))
Download Master.cfg
Step 5: Once the config file is updated, then master needs to be restarted. To restart master, you need to kill Python process in Task Manger and run ‘buildbot start master’ command again.
Start Worker
Run the below commands to install and start worker.
pip install buildbot-worker
buildbot-worker create-worker worker localhost example-worker pass
buildbot-worker start worker
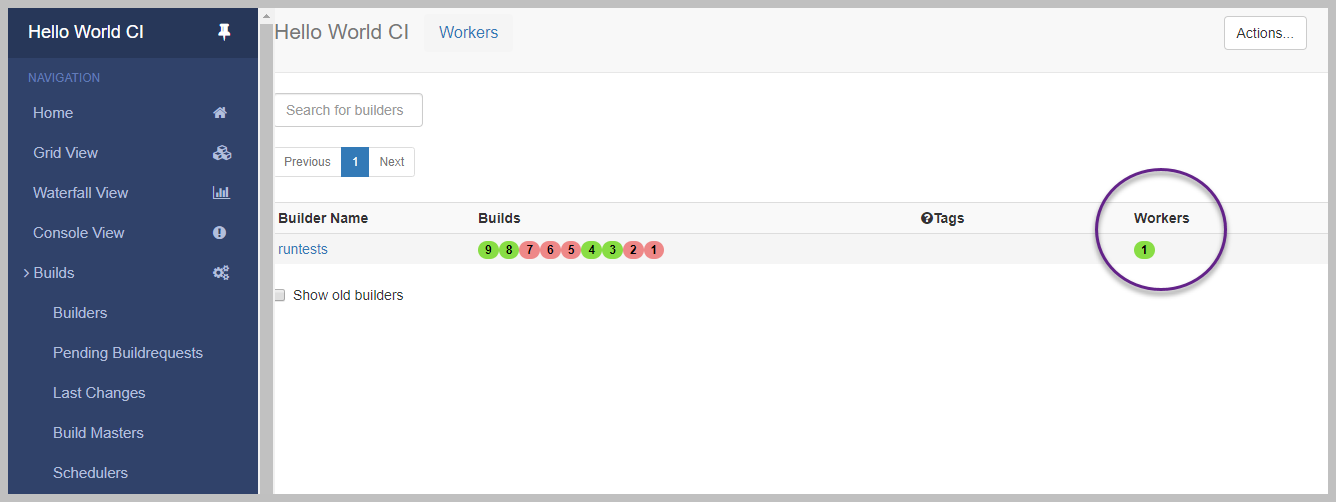
Once the worker is started, you can see the created worker in Workers column as shown below.
Start build
Step 1: Click Builders menu
Step 2: Click runstests build
Step 3: Click Start Build
Please ensure Git is set in Windows path variable.
That’s it.
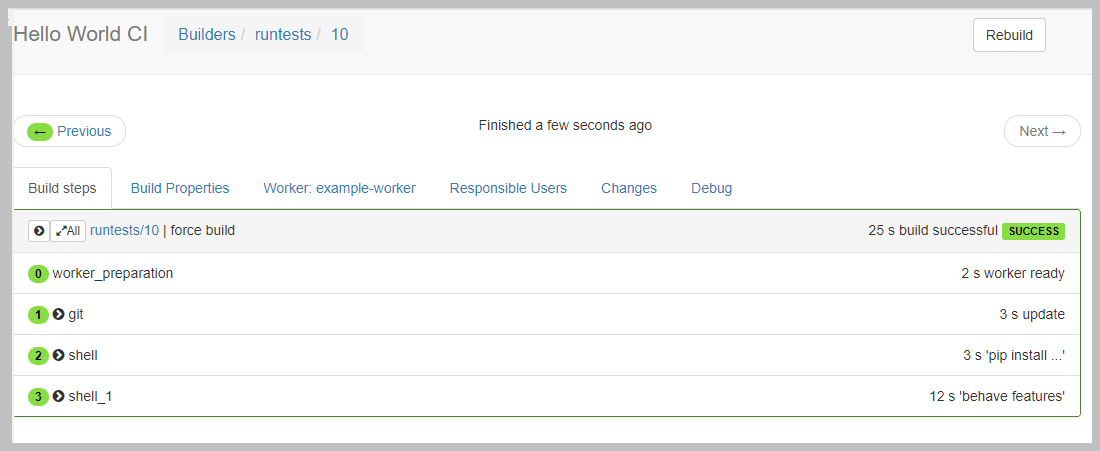
If the build is successful, you can see Green for all the tasks as shown below.
In Conclusion
We invariably use Jenkins and TeamCity in our test automation projects. However, exploring BuildBot CI gives us a different experience altogether. As a test automation company, we intend to publish more useful technical blog articles to share valuable insights to the software testing community. Even-though BuildBot CI setup is not straight forward. It provides some flexibility to manage & customize builds.

by admin | Apr 10, 2020 | Software Testing, Fixed, Blog |
Functional Testing is a type of software testing which is performed to validate the basic functionality of the Software Application against functional requirements. Software is developed based on business requirement and Functional Testing helps and assures that Software developed is as per the business requirements.
Functional testing comes under black-box testing as functional tester does not bother about how the code is written or conducts code review to validate the code, instead, he executes the software and provide inputs based on business and functional requirement and validates against his expected result to certify the Application.
Functional Testing can be carried out for any software irrespective of Web Application, desktop application, web service or a stored procedure. Be it any type of Technology, the objective is to validate the functionality of the system under test is as per the business / functional requirement.
Why Functional Testing:
Why Functional Testing leads to a question of why testing?
Testing is done to ensure that the application works as expected. When an application is delivered without testing, then there is no assurance/guarantee that the application will function as expected. More than 60% of testing efforts go to Functional Testing effort. Remaining efforts would be a part of Non-Functional Testing like Performance, usability, security, etc.
Without Functional Testing we cannot conclude software does the operation as expected and hence Functional Testing is as important as software being developed by the development team.
Aspects of Functional Testing
Below are the key aspects of Functional Testing:
1. Testing based on Functional Requirement
2. Testing based on Business Process
Testing based on Functional Requirement
This Testing is based on the nature of the application functionality. Whenever a build is provided based on User stories / Functional Specification / Business Requirement document, we carry out various types of testing to prove it function as expected.
Before delivering the Application to Functional Testing team, developers do testing and it is called Unit Testing. Once developers complete the Unit Testing Application build is delivered to the testing team for Functional Testing.
Before we conduct a thorough Functional Testing we perform Smoke and Sanity Testing to ensure that build is stable and can be carried out for further testing. When a build is failed in smoke and sanity, that means the build has a serious flaw and developer has to further work on it.
Once Smoke and Sanity Testing is passed, Integration, System Testing and System Integration Testing is performed to certify the Application under test.
Testing based on the Business process:
When we say Business process from Functional Testing point of view, it is the End to End flow of business-critical functionality. Example) if an Application deals with Payment processing, then the business process would be testing the Payment setup until payment initiation until successful / exception criteria.
We could define a critical end to end business process considering positive and negative flow and testing these critical business areas. From this aspect, we could also perform risk-based testing based on the testing timeline and the number of business process areas.
Entry and Exit criteria of Functional Testing
Below are the key Entry criteria for Functional Testing:
Requirements must be fully frozen with clearly defined expected outcome (Requirements could come in the form of Business Requirement / Functional Specification document or User Stories)
Development should be completed
Build must be unit tested and completely signed off by the development team
Test Strategy and Test plan should be completed and should be signed off by stakeholders
Test data should be available for execution
Below are the key Exit criteria for Functional Testing:
Test cases should be prepared with complete coverage on requirements
Test cases should be reviewed and signed off by the Business team
Test cases must be executed and Severeity1 and 2 defects should be closed by Testing team
Functional Testing Strategies:
Before performing functional testing, below pointers/strategy would help to manage the test effectively:
Validate if the requirements are clear
1. To test effectively requirements should be clear with the clearly defined input and output criteria’s
2. If the requirements are not clear, enter into series of discussion with Business team, development team and project stakeholders beforehand and take steps to crystallize the requirement.
3. Even after series of discussion, if requirements are not clear come up with the In-scope and out of scope and keep requirements whichever are not clear in out of scope.
4. Raise a project-level risk and get into agreement with project stakeholders.
Assess and come up with proper Functional Plan
1. Based on the requirement clarity and project scope come up with Functional Test plan covering the scope of testing, type of testing to be conducted, Test schedule, resource requirement, risk management procedure, etc
2. Once the Functional Test plan is prepared, get it signed off from project stakeholders
Identify the Test Schedule and Execution Timeline
1. Based on the project plan, identify time allotted for Testing phase
2. Calculate the execution timeline
3. Come up with Risk-based Testing approach for better functional coverage
4. If the timeline is less, execute P1, P2 Test cases and get into agreement with Stakeholders
Resource fulfillment and Automation assessment
1. Based on the project schedule and Test schedule, assess and do feasibility of Automation and validate the benefits expected out of automation
2. Identify the right resource requirement if automation can be implemented
Proper Defect Management
1. Assign proper defect Manager / Coordinator for conducting defect triage calls
2. Escalate for Sev1 and Sev2 priority fixing with development counterparts
3. Extend timelines or come up with alternate plans based on Environment/delay in defect fixes
4. Assign to testers based on defect fix by the development team
5. Review of defect retesting and closure
Proper Test Completion Report
1. When Functional Testing is completed, Test Completion report has to be prepared
2. While preparing Completion report, ensure in-scope and out of scope is declared properly
3. Update inference from Functional Testing and any defects are open/deferred update it properly in the closure report
4. Update what went well, what not went well with a reason along with improvement areas as well to be updated
Key Metrics that we report on Functional Testing
Functional Testing metrics can be classified based on the Test Phases:
Test Design Metrics:
Total Test Coverage
Automation Coverage
Test Design productivity (Manual and Automation)
Test Execution Metrics:
Test Execution productivity (Manual and Automation)
Test Execution Coverage
Error Discovery Rate
Test cases Passed / Failed / Blocked / Deferred
Defect Metrics:
Defect Leakage
Defect Removal Efficiency
Defect Density
Defect Fix Rate
Key Business Outcome
Present the Functional Testing Outcome post every release during retrospection/release closure discussion.
Invite key stakeholders and provide an update to key parties on overall Functional Testing outcome and benefits through Functional Testing activity. Since the QA team is much closer to the Business team in-terms of business requirements understanding, present how much of defects have been raised with criticality and how many defects converted to release / functional enhancement will be the key thing to be discussed. This will be an interesting story to Business team.

by admin | Apr 7, 2020 | Automation Testing, Fixed, Blog |
While building any test automation framework and designing scripts at times we might end up having flakiness in scripts if the proper standards and the test data generation are bad. Given the fact that in test automation framework results are vital as they state whether the test passed or failed and ultimately that concludes the stability of the application under test. Holistically result from reports are the ones which help the business stakeholders to understand where we are with respect to the software product launch.
In this blog we are going to talk about the importance of the results and how should we ensure we don’t fake them. False results are capable of creating a big mess in the system and they are quite costly to fix and learn.
Having said about the fake results, let’s understand what we are meaning to say by the word fake.
It can be of something that has a bug in the software system but the test shows it’s passed. By the term of medical science, this can be addressed as false positive, because we have seen a pass result that is not actually true.
On the other hand, there can be a scenario where the functionality in the system could have been in working state, however, the test shows it failed. This behavior being inline with the medical science term called a false negative.
Relation between automation testing and false positive/negative
Glad that we understood a couple of new terms, but it is still a question as to what’s the relationship between them and the automation testing? why only applicable to automation testing?
If we just recall the purpose of automation, it is essential to script the test case and execute it in the future so that the manual effort spent in reduced. So when we are scripting it for future use a high degree of care should be taken and get the things right. The reason for insisting on the promptness and care is we are not going to be visiting the script thoroughly every now and then. If at all due to oversight something wrongly implemented it obviously serves the wrong results and ultimately leads to flakiness it could be either false positive or false negative.
And to answer the question why it doesn’t applicable to functional manual testing, their user applies his sense than some automated process, any wrong input gets corrected during the execution itself hence there is no room for this concept in manual testing.
Importance to look after false positive/negative
As briefed above at a very high level that these false positive and false negative results can cause a great loss in the business as we are purely mistaking the results. It could impact in the following ways.
A false positive can lead to bug leak in the market as it was pursued to be working good at our site, this can greatly impact the reputation and business loss for the company.
A false negative can lead to spending extraneous effort by various people because of the reported problem when it’s not true. The bug has to be initially understood then learn to repeat then spend efforts to triage the same to conclude it. These efforts ultimately affect the deadline of a release.
Reasons for flakiness in scripts and possible solutions
Let’s understand the prime reasons for occurring false positive/ negative
Incorrect test data
Test data is mandatory to input for any test case to execute. We should always generate the test data as per the guidelines set for the fields in the application. Violation of the rules will lead to abrupt script failure this causes the test case to be failing.
The above failure of the false under the category of a false negative, the reason being we were not supposed to see a failure had there been in data issue.
Duplicate test data
In the recent era applications have gained a lot of maturity in order to serve the user better. Certain important fields will not accept the duplicate data, so if we fail to generate the unique data we again hit a false failure this again comes under the category of false negative.
In order to overcome that we should always generate unique data. One possible solution would be to generate random values and append to the actual test data that is being read from the external excel file.
Improper coding standards
While designing the scripts proper coding standards must be followed failing which will lead to the failure of the scripts in the form of a false positive or false negative. Let’s discuss a few key points in coding standards as what we really mean by and what its contribution in leading to failure is.
Wait handling events
When we are especially automating the GUI we expect some delay for a page to load and the elements to generate and attach to DOM. We also have a parameter of the network, considering all these things we should lay out a plan to handle the weight properly. We should also keep in mind that due to the inclusion of waits the order of n of a script should not go too high. We should be very careful enough to select the appropriate wait, to see below there are 3 waits that we can use as per need
Implicit wait
Explicit wait
Fluent wait
Java wait- thread.sleep(1000)
Initiating and closing browser connections
As we know that the test runs in browser hence invoking and quitting the browser is the most common action that we interact with. The opening and closing actions should be managed correctly by the testNG annotation so that we have a new instance created after each test after each execution as desired. The recommendation would be to launch a new instance after every test so that the impact of one test will not be there on the subsequent test.
Also we should ensure that if at all any browser is running in the port even after completion of test we must close those connections before we re-launch the new browser instance for a subsequent test. It is recommended to use driver.quit() to help withclosing all connections as driver.close() only closes the current browser. This way we can avoid any flakiness that browser can contribute.
Not handling the exceptions
Exception handling brings a lot of sense to the code, it helps application from not to terminate abruptly on failure cases. This is being achieved by surrounding the code snippet with try and catch blocks with necessary exceptions hierarchy.
What basically happens is that, if at all we don’t have a mechanism of catching the anticipated exceptions in the corresponding code block when we face that exception, unfortunately, test case interrupts abruptly and no report would capture that failure as we don’t have that execution caught also any finally block to execute certain mandatory information. In this case, we will get a report with the actual result status of the previous test steps (be it pass/ fail) and report generation stops and it flushes. Ultimately the report doesn’t have the proper results printed in it, its creating false positive or negative in this case.
The prominent solution would be to use the try-catch blocks properly with necessary test step information printed so that everyone can understand that the test actually failed.
Not printing the test step description and status in the report
Report is one of the best evidence to check whether a particular test failed or passed. As it’s a bible it’s essential to capture the right information. We should be very diligent while writing the report and capturing the test step information. A small wording mistake can change the meaning of the result and it creates ambiguity.
Conclusion
Since automated tests are executed by a system and given the fact that it has no intelligence thus far rather than performing the assigned task, it’s our responsibility to get the things right on the very first time, so that the verification and analysis would not take much longer to understand while publishing the results. A small mistake can even be costlier based on the priority so nothing can be misjudged or misunderstood.
Hope the information gave some insights on the topic, thanks for reading through.
Happy learning!!!

by admin | Apr 5, 2020 | Software Testing, Fixed, Blog |
Welcome to Codoid blogs once again, in this blog we are going to see about software testing metrics. Below are the topics we will cover in this blog.
What is a Metric
Why Metric is required
Types of Metrics in Testing
Testing Metrics in Detail
What is a Metric
As per standard definition, A Metric is a quantifiable measure to track the progress of certain areas which we want to constantly monitor and report.
Metric is used to predict something which we wanted to measure and we can set a benchmark for it so that we can compare it with a certain interval of time. Example) Speed which we travel can be a metric and we can keep a benchmark as 48 kmph. We can constantly measure every day or every week and we can compare against our benchmark.
Why Metric is required:
1. Metric will help us to give us a prediction on how are we performing.
2. It gives us direction on how we perform release after release to ensure we are constantly improving. If there is a decline in performance, we can take corrective steps to improve that particular factor
3. It helps us to uncover potential risks in our project.
(Example, We are targeting to go live on a date assuming 10 days of Test Execution with 20 TC / Day productivity, Let’s assume for consecutive 5 days productivity is only 10 TC / Day, this could eventually delay our execution by 5 more days and will delay the release. It is a potential risk to the project. On tracking this execution productivity on a day to day basis during execution timeline, will tap the project in our control, we could take action on 2nd day itself and keep the project on track.)
4. Improves the Test Coverage and Automation coverage.
5. It helps in continuous process improvement, once we become mature in a way of tracking, we could add a few more metrics and helps in coming up with continuous improvement in our project delivery.
6. It helps to plan for release in a better way. As with each and every release, if we track metrics, we could use predictions and with the lessons learned from previous releases, we can come up with better planning.
7. It overall improves the Cost, Quality and Time in delivering the project.
Types of Metrics in Testing
Based on the STLC phases, we can define metrics for each phase of Testing. Let us see them in detail in this section.
STLC Phases are:
Requirement Analysis
Test Planning
Test Design
Test Execution
Test Closure
And for each of these phases we have multiple metrics to track.
Testing Metrics in Detail
Requirement Analysis
Requirement Quality:
Requirement Quality defines the correctness/accuracy of the requirement.

IRQ – is the quality of Individual requirements which signifies whether the requirement is valid (value 1) or invalid (value 0). It can be measured in percentage as well.
Correctness of Requirement:
This metrics helps us to determine if the requirement is correct/valid/is not a duplicate.

IRC will be 1, if it is a valid requirement, else it will be 0
Requirement Creep:
This metric helps to understand how much percentage of requirements added post requirement gathering phase.

Test Planning
Metrics in Test Planning is used to arrive at how effective testing is carried out. We track and tap the control of the project by taking various measurements during Test Design and Test Execution activities. Below are the few measurement criteria that help in the effective Test Planning
Resource Requirement Vs Fulfilment
Effort burnt VS Progress
Cost Spent Vs Work Done
Cost Spent Vs Requirement Coverage
Overhead Cost
Team productivity
Test Design
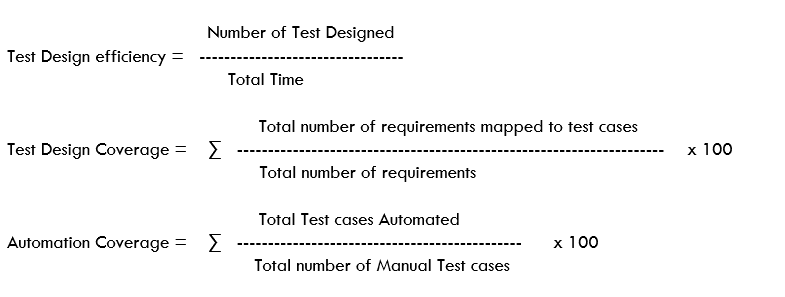
Test design is the most important phase in Software Testing. There are a lot of metrics that can be generated in Test Design phase and will be useful to management for tracking purpose.
Some of the Metrics with formula are given below:
Test Execution
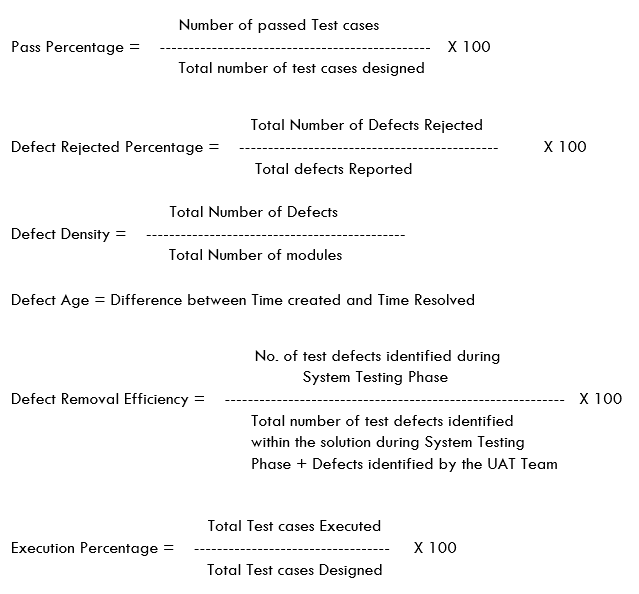
Below are few standard metrics used in Test Execution phase:
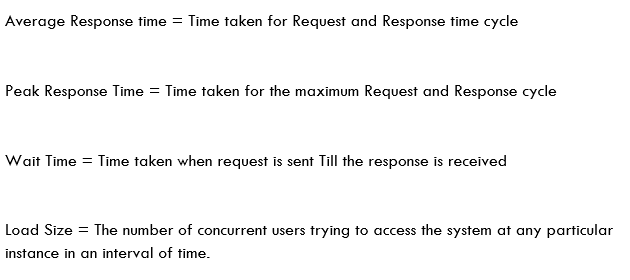
Test Closure:
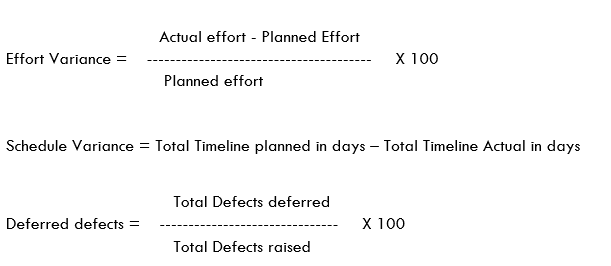
Defects by priority and severity will be tracked as a part of Test closure report
Conclusion:
Testing Metrics are helping us to track our progress and improve our delivery quality in a better way. There are so many metrics available to track the progress and Test Management tools nowadays are better equipped with various features to track these metrics and it also has various customization mechanism to track custom metrics rather than following standard metrics, we should first finalize KPI and Metrics for our measuring the performance and utilize these tools features to satisfy our requirement.

by admin | Apr 2, 2020 | Selenium Testing, Fixed, Blog |
Running prerequisite and cleanup snippets are necessary to make your BDD scenarios independent. In this blog, you will learn how to setup and tear down using Python Behave framework and ‘Before’ Scenario Example using Selenium.
We, as a test automation services company, use Python and behave for multiple automation testing projects.
Launching & Quitting Browser Before and After Scenario
Inside the environment.py file, create a fixture to launch a browser before scenario and quit it after the scenario.
Setup & Tear Down Code
@fixture
def launch_browser(context):
    #Launch Browser
    context.driver = webdriver.Chrome(executable_path='driverschromedriver.exe')
    yield context.driver

    #Clean Up Browser
    context.driver.quit()
    print("=============>Browser is quit")
If you notice the above code, you can find both Setup & Tear-down in the same method. It reduces your scripting efforts to a great extend and eases the script debugging & maintenance. The ‘yield’ statement provides the webdriver driver instance. After that the test run executes each steps in the scenario and resumes the remaining statements (i.e. the clean-up steps) which are after the yield statement.
Before Scenario Method Call
After defining the fixture, you need a method to call the fixture (i.e. before_scenario).
def before_scenario(context,scenario):
    the_fixture1 = use_fixture(launch_browser, context)
Full Code
from behave import fixture, use_fixture
from selenium import webdriver

@fixture
def launch_browser(context):
    #Launch Browser
    context.driver = webdriver.Chrome(executable_path='driverschromedriver.exe')
    yield context.driver

    #Clean Up Browser
    context.driver.quit()
    print("=============>Browser is quit")


def before_scenario(context,scenario):
    the_fixture1 = use_fixture(launch_browser, context)
How to get the scenario status?
Behave has four statuses for each Scenario namely: untested, skipped, passed, failed. To retrieve the status, use the below statement.
print(context.scenario.status)
Scenario Duration
In behave framework, you can get the scenario duration in the clean-up section as shown below.
@fixture
def launch_browser(context):
    #Launch Browser
    context.driver = webdriver.Chrome(executable_path='driverschromedriver.exe')
    print("=============>Browser is launched")
    yield context.driver

    #Clean Up Browser
    context.driver.quit()
    print(context.scenario.duration)
    print("=============>Browser is quit")
In Conclusion
We hope the snippets which are shared in this blog article are useful. In our upcoming blog articles, we will through light on some of the most useful Python automation testing snippets. Subscribe to our blogs to get latest updates.

by admin | Apr 1, 2020 | Automation Testing, Fixed, Blog |
Test automation framework to be explained in laymen terms as the set of guidelines such as coding standards, data handling, report presentation and bringing the repository system into place. With the following of the guidelines, we can make the suite more re-usable with as less maintenance as possible.
What is Test Automation Framework?
Framework is all about defining set protocols, rules and regulations to make the task more standardized.
The framework standard makes us be more procedural oriented. This standard practice will help everyone to understand the way to achieve a specific task and we have great control of tracking things and ultimately we end up have hassle-free maintenance. In the software development life cycle we rely on two we follow two major approaches in order to build a successful software product let’s see what are they and role of the framework.
Let’s quickly discuss the two common framework approaches that are followed most commonly in development and testing streams. These are rule-based approaches for the successful implementation of the task.
Test driven development approach (TDD)
This is one of the best agile development methodologies, in this approach we write tests first then the goal is to make sure the tests go through. This way we can get rid of redundant work and build a very accurate system.
Developers will establish a framework that all unit tests are automated. The code is then added to make sure the tests are passed and then the next implementation takes place. this is the repeated process that takes place until the product is completely built.
Behavior driven development approach
This is also a test-first approach but these acceptance tests were written by either business analysts or testers. Unlike the TDD, this driven approach will try to certify the implemented functionality. BDD Automation Testing approach is built in a fashion that it validates the full functionalities then produces a meaningful report to understand the results.
Role of a framework in test automation
1. Easy to maintain the test suite
2. Easy to transfer knowledge to any new joiner to the team
3. Code re-usability
Components in test automation framework
Thus far we have discussed the framework in a more general way, let’s take a moment to correlate that to the test automation. What are those rules and components that are collectively called as a framework in a test suite?
Dependency management
Whilst creating a project it’s essential to rely on dependency management and build tools to ensure all in the team uses the same version of a particular library. We should never consider loading the libraries from the build path. The omission of this rule can lead to great confusion and we might observe things that are working in one machine, may fairly get failed on other’s end. Also if there are version mismatches due to hardcoding the libraries by every individual we can’t root cause the problems.
Maven & Gradle can help us in resolving the dependencies also to build the code
Reporting results
Results are mandatory to be shared after test execution, so integrating a decent reporting API will help us publishing a report that can be deciphered by all the stakeholders. Report creation must be taken utmost care as it shows how many tests are passed and failed. The failed ones can later be analyzed to see if they are true defects are any script or environment issues.
Best reports that are used are extent reports, allure reports and testing Html reports
Test Runner
In a sophisticated test suite, we will have hundreds to thousand numbers of test cases. Without having a proper test runner tool we can manage the test execution. These tools will help us running the tests with different set options, some are a below
Prioritize the tests
Making one test dependent on other
Execution the same test for the number of times we want
Running the failed test cases
Grouping the test cases and run them in parallel of sequential fashion
Best examples of test runner tools are J-unit, N-unit, testNG, jasmine..etc
Version controlling system
Integration of VCS is essential as we as a team commit a lot of changes to the code base on a daily basis. It’s highly difficult to integrate the changes. Proper education on pulling he code as a first activity before we start our day then pushing at the end of the day after a review will help us maintain the code base up to the date.
Best examples of VCS systems are GIT, BitBucket, SVN..etc
Logging mechanism
Logs are anywhere in the world are treated to be important as that helps greatly in triaging and root cause a problem that’s occurred. We need to write log files to a file for each step we perform during test execution. This log acts as evidence to the malfunction we observe.
Log4j is one of the best log tools to be integrated
Third party tool integration
At times in order to perform specific tasks we might not be able to achieve with the existing framework then we should consider adding any third party tool that can help us doing that, this is how we are making our framework more sophisticated and precise
Example for the third party tools is VNC viewer, AutoIT, winnium…etc. we will need these tools while there is a need to perform some windows actions in selenium framework.
Screenshots capturing
We should have a disciplined screenshot capturing mechanism and storing them in a repository to help with understand the issue that occurred during failures. We can take a call as to whether to capture only on failure cases or on any test step depending upon the memory we have.
Types of test automation frameworks
Given the design implementation and other properties we have various types of test automation frameworks and they are as below
Linear framework
Linear framework is implemented in such a way that the test is directly written in a file as a straight forward test. This test can also be designed by using any record and playback tools. This kind of approach, however, is simpler to design it leaves us doing a lot of maintenance.
Advantages:
1. Easy to develop scripts
2. Not much coding experience is required, only tool experience would do the trick
Disadvantages:
Since the test is written directly, it’s very difficult to maintain the script when there are changes to the applications.
Modular framework
Modular framework is designed in such a way that, tests of common modules were first identified and then design those as reusable or generic methods. Since the common methods were designed as wrapper methods we can very well re-use them in any other test cases.
This kind of approach is followed when the application development is being done as individual microservices. Tests are developed for a specific service and only those can be invoked on demand.
Advantages:
1. Since the common flows have been documented as reusable methods, re-usability increases
2. Less maintenance required
Disadvantages:
Still the data is hardcoded in tests
Data driven framework
Data driven framework has been identified as one of the powerful frameworks across all. In this type, we can service the test data that’s needed via excel, JDBC sources, CSV files. The tests become more generic as the data has been separated from the test code. With the help of various data, script flow can be altered and that way we can achieve more test coverage.
In this we have classified the data as two types as
Parameterization
Any data that looks to be static and we don’t see dynamic changes can be considered as a parameter. The best examples for this kind of data are URLs, JDBC URLs, endpoint details and environment details. We tend to read this data from the properties file or from XML file
Dataprovider
This is the real test data needed for the test case. We basically read this data from the external sources such as Excel workbooks, CSV files, JDBC sources. This data has the ability to alter the flow of the test case. This facilitates us to provide more coverage with minimum code base.
Advantages:
1. Since the data is separated from the tests, tests become more versatile
2. Data can easily be created as per the requirement
3. Easy to maintain the scripts
Key driven framework
In keyword driven framework, the codebase/test case is driven by the action-based keyword. In this framework, we have all the actions identified and list as keywords then map to the application functionality. The keywords again are consumed from an external excel workbook or from a separate java class. This framework can be even developed without application by assuming the functional flow but it needs high expertise and it can lead to a re-work too if things don’t go right.
Advantages:
Since the code base is developed as per actions, methods developed for a particular action can be re-used.
Hybrid framework
Hybrid framework is a customized one, all the best things from the different frameworks are pursued in this. When we say customization, there is no standard practice as such, it’s all about the requirement within a particular project. We might see a mix of data-driven, keyword and modular practices to make the framework more versatile and flexible to maintain.
Behavior-driven development framework
Behavior driven development approach is also known as ATDD (acceptance test-driven development). In this model, the tests are driven by a test step written by either BA or tester in plain English that is understood by everybody. A spec file or feature file is created for a specific test case in gherkin language then the code base is developed accordingly.
How is this model helping?
Ever since the agile model of development has emerged, we started giving more priority to parallel testing and early testing alongside development. There were some challenges in understanding the test case developed in the above discussed other frameworks. Tests appear to be more technical so that it’s getting difficult for non-technical stakeholders to understand. In this approach as the test case written in a specific language which is gherkin (more or less English). Given the design, it’s easy for everyone to say what’s happening with the test also report makes more sense too.
Examples of this kind of frameworks are- cucumber, gauge..etc
Conclusion
There is no wrong in being a process nerd because unless we have protocols defined even in our lives we can’t be sure of the progress and get the things right on the very first opportunity. In the same fashion with the help of above-defined rules we can achieve the tasks hence thanks to the framework and its defined best practices. We should still be under an impression that the best yet to come, given that sense we expect lot more enhancements to make our lives far easier at work. Change is inevitable be ready to adopt.
Thanks for walking through this long, I reckon you would have had some learning.


