by admin | Jan 31, 2019 | Selenium Testing, Blog |

by admin | Sep 5, 2018 | Selenium Testing, Blog |

by admin | Mar 15, 2017 | Selenium Testing, Fixed, Blog |
In this blog post, we will show you how to setup JMeter WebDriver Sampler. Before that let’s understand why we need the WebDriver Sampler. Ensuring software product quality involves both functional and non-functional testing. For non-functional testing, our focus is more on load and performance testing. Gatling and JMeter are widely used open-source performance testing tools.
In JMeter, we have WebDriver Sampler. Why do we need Selenium webdriver in JMeter? Using JMeter HTTP sampler, you can measure server response time. However, Selenium webdriver sampler leverages to measure the end user load time.
Let’s see how to setup WebDriver Sampler in JMeter.
Download & Launch JMeter
Download JMeter Plugin Manager
Download plugins-manager.jar and put it into lib/ext directory, then restart JMeter.
JMeter WebDriver Sampler Installation
Open Plugin Manager
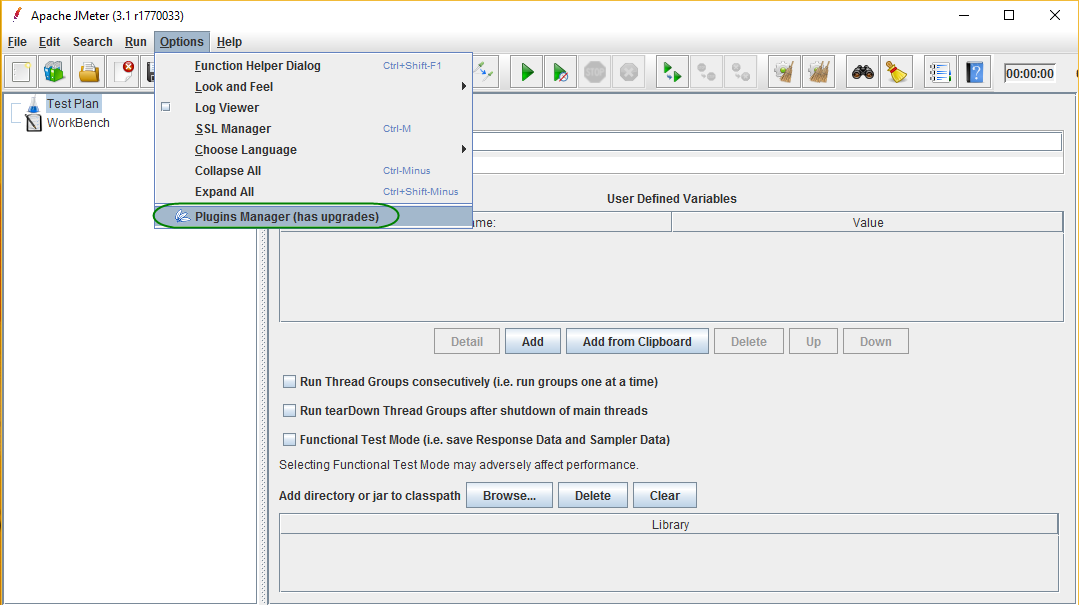
Select and Install the Sampler
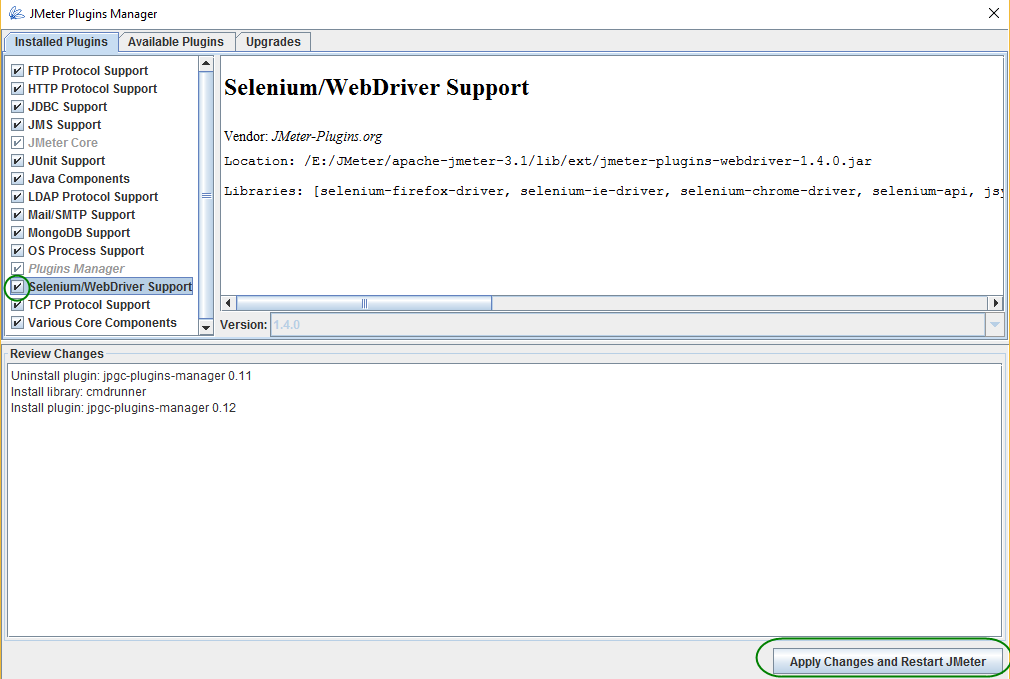
Click Available Plugins, select Selenium/WebDriver Support and click ‘Apply Changes and Restart JMeter’ button.
Create WebDriver Sampler
1) Right click on Test Plan and click Add->Threads(Users)->Thread Group
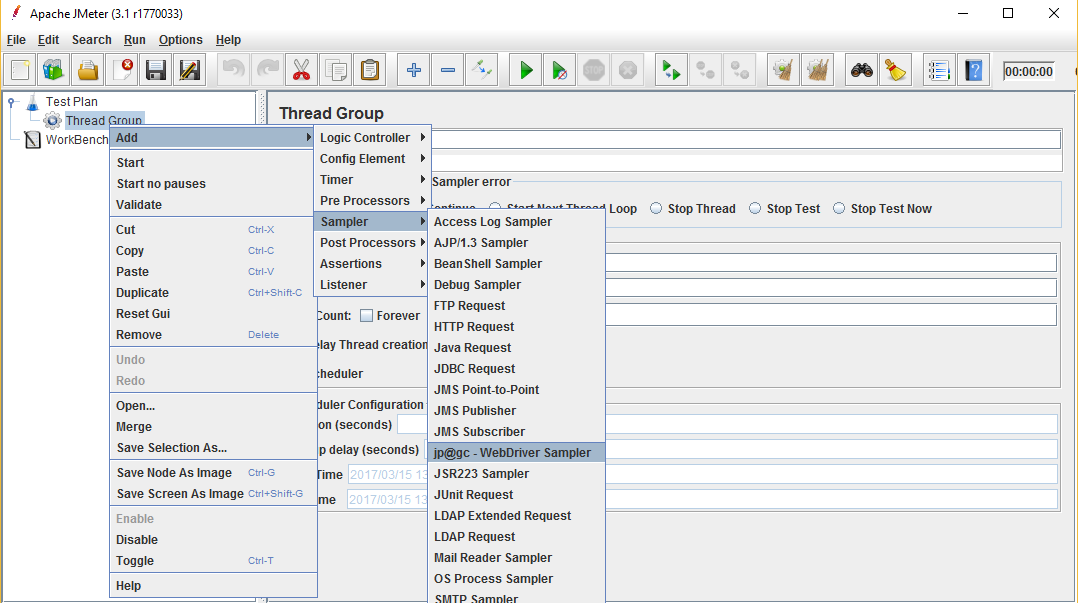
2) Right click on Thread Group and click Add->Sampler->Webdriver Sampler
We hope this article is helpful. In the subsequent posts, we will show you how to write scripts in the sampler editor.

by admin | Apr 4, 2017 | Selenium Testing, Blog |
Writing automated acceptance tests using Jasmine, Protractor & Gulp is very popular. In this blog post, you will learn how to launch Selenium Webdriver Server automatically using Gulp Protractor without using seleniumServerJar and seleniumAddress in Protractor configuration file.
Protractor Configuration File
In Protractor configuration file, don’t add seleniumAddress and seleniumAddress
exports.config = {
    // Capabilities to be passed to the webdriver instance.
    capabilities: {
        'browserName': 'chrome'
    },

    // Framework to use. Jasmine is recommended.
    framework: 'jasmine',

    specs: ['todo-spec.js'],

    jasmineNodeOpts: {
        defaultTimeoutInterval: 30000
    }
};
Gulpfile.js
var gulp = require('gulp');
var protractor = require("gulp-protractor").protractor;

gulp.task("execute",function () {
        return gulp.src([])
            .pipe(protractor({
                configFile: "conf.js"
            }))
            .on('error', function(e) { throw e })
    }
);
Now you can run your Gulp task without starting or configuring in conf.js.
by admin | Dec 22, 2017 | Selenium Testing, Fixed, Blog |
This blog article lists Python Selenium WebDriver commands which are helpful to automate Web Application Testing.
Selenium WebDriver Installation
WebDriver Initialization
from selenium import webdriver

firefox = webdriver.Firefox(executable_path='driversgeckodriver.exe')
chrome = webdriver.Chrome(executable_path='driverschromedriver.exe')
edge = webdriver.Edge(executable_path='driversMicrosoftWebDriver.exe')
ie = webdriver.Ie(executable_path='driversIEDriverServer.exe')
Browser Details
#Get Browser Name
print(browser.name)

#Get Title
print(browser.title)

#Get Current URL
print(browser.current_url)

#Get Current Window Handle
print(browser.current_window_handle)

#Get All Window Handles
handles_list=browser.window_handles

#Get Page Source
print(browser.page_source)
Maximize and Minimize
browser.maximize_window()
browser.minimize_window()
Switch to Frame & Window
browser.switch_to.active_element

browser.switch_to.alert

browser.switch_to.default_content()

# You can pass Window Name or Handle to switch between windows
browser.switch_to.window("window_name")

#You can switch to frame using Name, ID, Index & WebElement
browser.switch_to.frame(1)

browser.switch_to.parent_frame()
Back, Forward & Refresh
browser.back()
browser.forward()
browser.refresh()
Cookies
#Get all cookies in a list
cookies_list = browser.get_cookies

#Get a Cookie value
cookie_value = browser.get_cookie("my_cookie")

#Delete a Cookie
browser.delete_cookie("my_cookie")

#Delete all Cookies
browser.delete_all_cookies()

#Add Cookie
browser.add_cookie({"name:value"})
Finding Elements
#Find Element(s) By ID
element = browser.find_element_by_id("txt_1")
elements = browser.find_elements_by_id("txt_1")

#Find Element By XPATH
browser.find_element_by_xpath("//input")

#Find Element By Link Text
browser.find_element_by_link_text("Products")

#Find Element By Link Text
browser.find_element_by_link_text("Products")

#Find Element By Partial Link Text
browser.find_element_by_partial_link_text('Sign')

#Find Element By Name
browser.find_elements_by_name('foo')

#Find Element By Tag Name
browser.find_elements_by_tag_name('Input')

#Find Element By Class Name
browser.find_elements_by_class_name('breadcrumb')

#Find Element By CSS Selector
browser.find_elements_by_css_selector('input[name="txt"]')

by admin | Apr 23, 2017 | Selenium Testing, Fixed, Blog |
Collecting Network Events using Selenium WebDriver is simple, you just need to enable performance logging in Chrome Desired capabilities.
Once you enable Performance Log, Timeline, Network,
and Page events can be collected.
Enabling Logging in Desired Capabilities
DesiredCapabilities caps = DesiredCapabilities.chrome();
LoggingPreferences logPrefs = new LoggingPreferences();
logPrefs.enable(LogType.PERFORMANCE, Level.INFO);
caps.setCapability(CapabilityType.LOGGING_PREFS, logPrefs);
Collecting Network Events
WebDriver driver=new RemoteWebDriver(new URL("http://localhost:4444/wd/hub"), caps);

driver.get("https://codoid.com/about-codoid/");

List<LogEntry> entries = driver.manage().logs().get(LogType.PERFORMANCE).getAll();
System.out.println(entries.size() + " " + LogType.PERFORMANCE + " log entries found");
for (LogEntry entry : entries) {
          System.out.println(new Date(entry.getTimestamp()) + " " + entry.getLevel() + " " + entry.getMessage());
}
Note
If tracing is enabled, `ChromeDriver` will start a browser-wide trace when Chrome is launched, and will continue tracing until Chrome closes.
Reference
Performance Log
Demo code for the GTAC 2013 talk “Web Performance Testing with WebDriver” by Michael Klepikov


