by admin | Aug 3, 2020 | Software Testing, Fixed, Blog |
Any web-app or app intent to provide a truly universal experience, must be seamlessly functional on whatever device/ OS/ browser combinations their customer prefers. Having access to the latest hardware, operating systems, and platforms allows the testing process to be more streamlined, less expensive, and more innovative. In order to meet this objective, device availability becomes imperative and organisations spend several hundreds to thousands of dollars in procuring and maintaining these physical devices which are used for testing. This necessitates the need for a cloud-based device testing environment such as AWS Device Farm.
There are many cloud based solutions such as SauceLabs, BrowserStack, Perfecto mobile etc. AWS is another cloud testing platform which allows testing of apps over real android and iOS devices. AWS Device farm is a cloud-based application testing environment that enables remote testing of websites and mobile apps on a significant number of real mobile devices and an extensive range of desktop browsers, without the hassles of managing of building any testing infrastructure. It offers access to both modern and legacy versions of devices from multiple manufacturers.
AWS device farm has three pricing options for mobile app testing.
Pay as you go There won’t be any charge for the first 1000 minutes and you will be charged $0.17per device per minute.
Unlimited test & access This is a slot based plan. You can buy a slot for $250/per month. Let’s say you buy an Android slot. Now, you can access any real Android device using the slot for unlimited hours. If you want to run in parallel, you need to buy more slots. I.e. one slot, you can access one device at a time.
Private devices In this option, you can choose devices of specific hardware and software configurations that you wish to run your tests, those devices will be reserved for you till you unsubscribe from the plan. This plan starts from $200 per month.
An interesting feature is the possibility to connect remotely to a specific device model via a remote screen and install our app. As of today, AWS device farm has 162 device combinations. You can access devices which are eligible for remote access. If you want a real device for manual testing, then open Device Farm Page and start a session. You can hold a session for a maximum of 150 minutes.
You may ask a question: Why should I go for private devices as I already have a slot for manual testing. What difference does it make? Private devices are dedicated to you. In other options, the devices which you access on remote sessions are actually used by someone a while ago. However, the private devices will be allocated dedicatedly for your account. No other users can access it.
Appium is a widely used tool for automating your mobile application, you can run Appium scripts using TestNG, Junit, Node.JS, Python and Ruby. Many cloud device services allow you to upload test scripts, however in AWS device farm, you have to upload a test package to execute on multiple devices simultaneously. Uploading the script has upside and downside. Upside – we don’t need a highly configured machine to run the test scripts. Downside – sometimes it is hard to figure out scripting issues.
Usually, on some cloud testing provider such as SauceLabs, the test code will run on your computer while instructing cloud devices to do something, but in Device Farm you need to package all your tests to be run on the cloud. When executing tests, ADF uses an approach which we call as server-side execution. This means that the test code runs entirely on their infrastructure. The alternative to this is what providers like Browserstack or Saucelabs use where the test code runs on the user’s machine, called client-side execution, and interacts with the cloud service via a web service.
In general, client-side execution is easier to implement; if you already know how to execute tests locally, the configuration changes you need to make are minimal. Amazon Device Farm approach is a bit trickier as it requires a few extra steps, namely packaging and uploading everything necessary to run your tests to their servers.
Automated tests can be scheduled in Jenkins to perform continuous testing using the Amazon Device Farm for each new build of the application. There is an Amazon Device farm plugin available for Jenkins. Here are the steps on how to configure your AWS account with Jenkins.
Steps to use this plugin:
1. Log into your Jenkins web UI.
2. Click on the job you wish to edit.
3. On the left-hand side of the screen, click “Configure”.
4. Scroll down to the “Post-build Actions” header.
5. Click “Add post-build action” and select “Run Tests on AWS Device Farm”.
6. Select the project you would like to use.
7. Select the device pool you would like to use.
8. Select if you’d like to have the test artifacts (such as the logs and screenshots) archived locally.
9. In “Application”, fill in the path to your compiled application for testing native or hybrid app. Check “It is a web application.” for testing web app.
10. Choose the test framework, provide the path to your test package location and other relevant details.
11. Configure device state parameters like radio details, extra data and device locations.
12. Configure the maximum execution timeout. The default execution timeout is 60 minutes.
13. Set the execution configuration parameters: video recording and app performance monitoring.
14. Click “Save”.
If you don’t want to use Jenkins UI and are looking for a code based plugin, then you can try aws-device-farm-gradle-plugin. Using this plugin, you can configure your application file and test files in the Gradle build system.
AWS allows third-party security auditors to assess the security and compliance of AWS Device Farm. AWS device farm has data retention policies. The data entered or saved in the device will be wiped out once the session is closed. However, Uploaded applications & test packages, logs, and video recordings will be retained certain days.
Almost most of the devices are public and shared ones, you cannot hold the devices for more than 150 minutes per session for both manual and automation testing. There is no information about the access limit for private devices.
If you have robust automated test scripts and you have performed multiple dry runs locally, then AWS device farm is a suitable platform for your cloud devices testing. However, don’t forget to use the 1000 minutes free trial before you go for any plans. We, as a software testing company, use different cloud testing platforms to test mobile applications on real devices. We would recommend choosing the platforms based on your testing needs. Before choosing a cloud testing tool, check how quickly the new devices are added and whether the remote access provides the selected device without any delay.
One of the best advantages of AWS device farm is uploading the test package once and getting the result for multiple devices. Whereas in other cloud testing platforms, you need to execute the same test package using your machine. With device farm we get detailed logs, performance graphs and screenshots are generated during each run to provide general and device-specific feedback. The service offers a lot of flexibility by allowing the state and configuration of each device to be altered in order to reproduce very specific test scenarios. Ensure the test cases selection for automation test execution is done via build file arguments. So that you can use a single build file with the same test package.
We hope you have enjoyed reading this blog article and found it insightful.

by admin | May 25, 2020 | Mobile App Testing, Fixed, Blog |
Mobile device usage has grown beyond everyone’s expectations, the degree of users using mobile devices instead of laptop/ desktop has increased phenomenally in recent years due to a multitude of factors like mobility, compatibility, internet usage etc.
Hence mobile phones have evolved from being a single-purpose communication device to more dynamic tools that support their users in a wide variety of tasks, e.g. playing games, listening to music, podcasts, watching movies/ video and navigating etc. There is certainly no sign that the move toward mobile is going to slow down anytime soon, hence many industries like real estate, retail, travel and financial bodies, even start ups started investing in developing mobile apps or a mobile friendly website and can see promising results. Mobile application development life cycle is generally much shorter than other application development but its success is purely dependent on its reliability and usability.
Hence, every application has to be thoroughly tested for its functionality, usability, compatibility, and security before it hits the market. Most of the appreneurs (mobile app entrepreneurs) are very serious in releasing their application with top notch quality because mobile users are notoriously impatient. They consider their devices even more personal than so-called personal computers and they will see how well the product actually works to achieve their given objective with greater usability. A frustrated user is least bothered nevertheless you have tested the app on 99 different types of devices if it doesn’t work on their device.
Businesses continue to integrate and deliver mobile applications with innovative and smart functionality to engage millions of their customers. Ensuring quality of their mobile applications with respect to its efficiency, performance and robustness will leave customers with an exemplary user experience. Testing a mobile application differs from traditional desktop or web applications, testers test the functionality of the application, run on different browsers and need to be tested on different OS versions.
Mobile application testing involves a number of check ins to make sure that the app meets the expectations of customers. One should run their tests on different devices, screen size, resolutions, OS and browser combinations. Also we need to check integrating with other services like location/GPS, Wi-Fi, and social media etc. It is not uncommon that these questions will arise if we want to cover the above aspects of testing the application.
• Should we procure as many numbers of devices as available to test the app?
• Do we have sufficient resources to test and cover so many devices?
• Should we test on available devices and assume that it will work on other devices too?
• Do we have any alternatives i.e. kind of simulation tools to test them all simultaneously keeping cost at minimum?
Above all, we should complete testing within a stipulated time frame, so the test team has to frame a mix of test plans that would help us in taking the right testing decision. Testers have to formulate testing strategies to overcome the below list of challenges immaculately.
Quick RolloutsMobile applications are expected to respond within a quick turnaround time to fix a bug or to release a new feature. It is necessary to test bugs/ features on devices within a short span of time.
Connection ModesOne should test how the app is performing on different network conditions like 3G/ 4G/ WiFi/ No Data, while Roaming etc. Especially gaming and live streaming videos need to be tested on such modes and the performance has to be evaluated.
End to End TestingMobile apps integrate seamlessly with other applications, middlewares etc. A thorough end to end testing is required to make sure that the data flow between applications, DB are produced without any problems.
Use of toolsThe most important factor is the availability and usage of tools to test the application’s feature, performance, compatibility etc. A right selection of tools will help the team to do better testing and to give better performance and ROI.
The above trends and practice aid mobile application testing to happen faster than ever before, which needs a greater need for speed and efficiency of QA teams. To keep on track, it’s critical to maintain a strategic mobile application testing process. The following model of mobile app testing plans can be considered for better execution.
Choosing the right set of devices as per your target audience’s behavior matters instead of testing in all devices. We can arrive at that using the approaches below.
1. Devices based on the market research:Select and prioritize your testing based on the market analysis. Determine the set of devices with your target operating System that will have the highest occurrence of accessing your application by using app purchase data and analytics.
2. Choose device based on key aspects:Select devices based on certain mobile aspects which can be considered in formulating the testing strategy. It focuses on the Infrastructure components like hardware, software, and network to ensure that the applications are managed in a controlled way.
3. Testing on cloud devices:Mobile cloud testing can overcome the cost challenges like purchasing and maintaining mobile devices. It has many benefits of choosing the right type of device, network and OS combinations. You can test your complete test suite on multiple devices in parallel and can pay for the duration you use that device.
4. Emulators:Emulator is another option to test mobile apps. These are free, open source and can be easily connected with the IDE for testing. As Emulators are available on the local machine so they run faster and with less latency than Real devices connected to a local network or devices available on the cloud. Gestures like Pinching, Swipe or drag, long press and network operations can’t be tested in emulators. However we can ensure that the basic functionalities are tested.
Many teams struggle to arrive at a consensus on when to choose automation testing and why. It’s very simple that it depends on your release cycle, development process, and the financial aspect, you may decide to start using automation for testing your app. Test automation is the best way of reaching an optimal level of test effectiveness, efficiency, and coverage. Test automation’s ultimate value comes from avoiding manually conducting repeatable test runs and freeing up time for new features and for faster releases. Mobile automation testing will increase your test efficiency as you will run more tests within a certain timeframe and shorten your time to market.
Mobile application testing is different from testing desktop or web apps. Before starting, you should determine the type of mobile app (mobile-web, native or hybrid) which helps you to choose a strategy. Also, you should choose the devices type (real devices, emulators or simulators, as well as cloud testing services). Each of the types mentioned has its own set of advantages and disadvantages as well, however a competent specialist will always help you in choosing the right one. Which makes you gain a better understanding and make informed decision of when to choose manual and when to use automated testing.

by admin | Jun 10, 2020 | Automation Testing, Fixed, Blog |
Software testing ensures your product meets all customer requirements and addresses each product risk with a proper test plan. Testing can uncover failures of many kinds, and in today’s agile world, automation testing is a part of the work to be done for the story and the benefit of test automation is quite obvious. A properly planned testing process is a must for ensuring the required level of software quality without exceeding a project’s time and budget.
Testing is no longer a one-time task but a continuous process. An estimate is a prediction, it could be an approximation of what it would cost, or a rough idea of how long a task would take to complete. Better testing estimates allow for more accurate scheduling, realize results more confidently, and form the foundation of good management credibility.
Estimating testing in the contemporary world of agile and DevOps demands some new rules. Stories with dozens of tasks that lack the value definition for intended users is not helpful. One need to consider the effort required for test design, test implementation, test execution, and the effort to automate while estimating the story. Especially when you are conducting an automation testing to reduce the cost and time, you should consider the below estimation techniques.
Scope usually means finding the right test cases for automation. The deciding factor for any test to be automated is linked with how many times that particular test can be repeated. When new functionalities get added or if there exist any modification in existing functionality then the automation scripts need to be added/ modified, reviewed and maintained for each release cycle.
• Split the application into separate modules and analyse each module to determine possible testing options
• Prioritize the list of modules and assess the history of each and every test case (as many of the test cases may not have been run often enough to get into the right priority)
• Analyse and classify the Test cases into various categories like API, Web, DB etc and choose the ideal candidate for automation
• Identify the complexity of the test case like Number of verification point or check points for each of the test cases
• Calculate the ROI for the identified test cases
Selecting an automated testing tool is essential for test automation. There are plenty of automated testing tools available in the market, it is important to choose the automated testing tool that best suits your overall requirement. Consider the below factors when selecting the automation tools
• Understand your project requirements and identify the scenarios you want to automate.
• Finalize the budget for automation and search the tool that suits your requirement.
• Compare and choose the tools that fall well within your budget and easy utilisation.
• Check for Logging and Reporting mechanism
• Underlying language which is used to build automation script and check for the feasibility of integrating with the build tools
Below is the combination of tools selection for framework development:
1. Eclipse / RAD – as IDE
2. Ant / Maven – As build tool
3. jUnit / TestNG – as unit test framework
4. Log4j – as Logger
5. ReportiNG – as reporting tool
6. Text files – for tracking the environments/credentials
7. Excel files – for tracking the test data
8. Perl / Python – for setting up an environment and triggering the test scripts.
Framework implementation means designing input files like Excel / JSON / XML etc, designing folder structure, implementation of logger, utilizing build tools and environment related data and credentials.
Framework means a real or conceptual structure created to provide support or guidance to an entity that could expand in future. In simple terms, a test automation framework can be defined as a set of processes, standards and interactions between the components in which scripts are designed and executed. While implementing a framework one should consider handling scripts and data separately, reuse of code, high extensibility, library creation and maintainability.
Test Case ComplexityWe classify the Test case based on the complexity of the Test case and the complexity of the test case is based on four elements including checkpoint, precondition, test data, and types of test case, which effectively assumes that the complexity is centred at these four elements. Below is the complexity assignment of the test case.
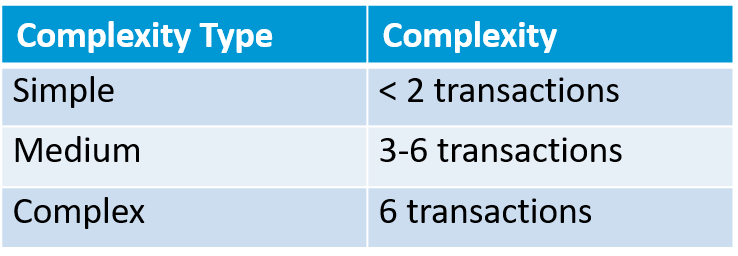
Transactions are measured while hitting /submitting a page / screen. In an ideal scenario a simple Test case should have less than 2 submits or it covers less than 2 navigations from a page. When we read the Test case, we focus on these navigations to calculate the Test case complexity.
Interface complexity
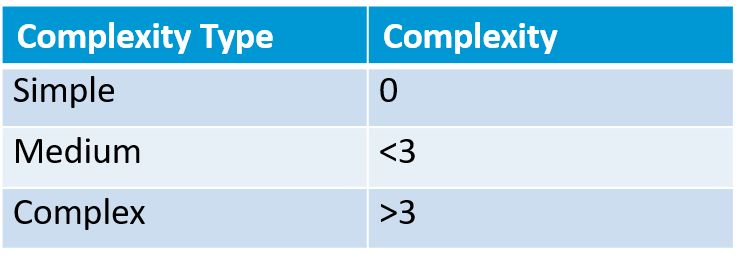
Estimators view and review the user interfaces, API, DB and network to measure the accuracy of the interfaces in providing the service. This complexity describes the external integration/interfaces that are associated with the proposed software. These integrations could be hardware, software, network and communication based on the deployment of the proposed software.
Verification Points
Verification Points are used to verify whether the value of an Application Under Test matches with the expected value. This output value can be considered as input data for other verification points. The complexity is measured using the Test Conditions, Test Data identification, Test Script preparation and Test Execution.
Listed below are the other variables which we need to consider while estimating
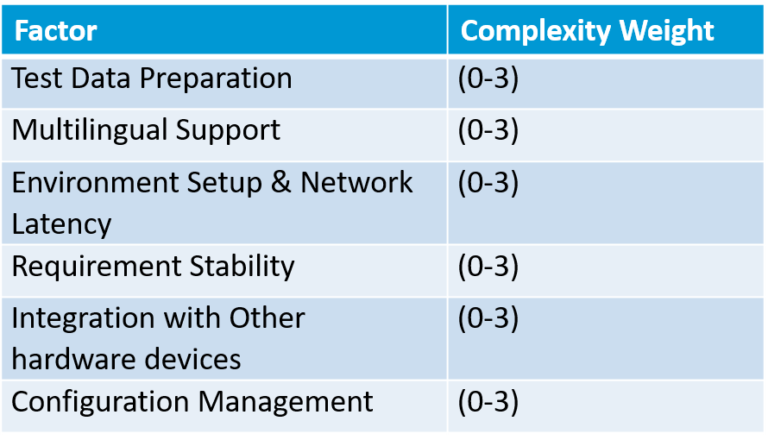
While it is quite obvious that the strategic goal of automation testing is to ensure business value, it is just as essential to articulate it periodically to stakeholders on where we stand in the journey towards it. This can be projected in two broad areas – savings in terms of time and cost. Our estimation approach must be dynamic and responsive to changing requirements with the various variables and components described above and the effort is calculated based on test design, test implementation, test execution, and the effort to automate. I hope this will give a head start to those who are seriously considering to calculate the automation testing effort estimation.


